Print Setting with mendel electronic gen6 and white PLA 3mm
Posted by sbancardo
|
Print Setting with mendel electronic gen6 and white PLA 3mm July 05, 2011 05:58PM |
Registered: 12 years ago Posts: 5 |
Hello evrybody,
I'm a beginner and i just completed my first mendel with parts coming from a commercial machine (SLS nylon) and the gen 6 electronics by camil purchased from mendel-parts,
I've done some test prints with Rep snapper and after with skeinforge ( following the tutorial in http://www.mendel-parts.com/new_forum/phpBB3/viewtopic.php?uid=1228&f=37&t=256&start=0 )
and I immediately noticed an improvement on the quality of the prints (see attached pictures) but i still have some problems of overshot - bubles (I don't know how to call them) basically there is exciting extruded material at the start of the paths of each layer... my first question is related to this issue, how do I solve the problem?
I have modified the firmware in order that if I set 10 mm on repsnapper exactly 10 mm of wire (3mm PLA purchased from Ultimachine) are sucked by the extruder; I have set the temperature in repsnapper at 190 degree.
A second question is related to the picture number 3 as you can see the top surface show a grid instead of a unique flat surface, does anyone know what i need to week on skeinforge to solve this ?
Any feedback is appreciated !
first picture : comparision between first print (gcode from repsnapper) on the right and improved second print (gcode from skeinforge)
if you wondering what is the print subject , the answer is gangsta chess [www.thingiverse.com]
Second picture : second print (gcode skeinforge) detail of the line of bubles-overshot (how should i call them?) on the side of the part
the new version for the x axis motor for Mendel ( by rhis-jones [www.thingiverse.com] ) first print (g code from skeinforge), the picture show the how there are some buble/overshot on the side and how the top of the surface is not close/uniform!
Thanks
Riccardo
I'm a beginner and i just completed my first mendel with parts coming from a commercial machine (SLS nylon) and the gen 6 electronics by camil purchased from mendel-parts,
I've done some test prints with Rep snapper and after with skeinforge ( following the tutorial in http://www.mendel-parts.com/new_forum/phpBB3/viewtopic.php?uid=1228&f=37&t=256&start=0 )
and I immediately noticed an improvement on the quality of the prints (see attached pictures) but i still have some problems of overshot - bubles (I don't know how to call them) basically there is exciting extruded material at the start of the paths of each layer...
my first question is related to this issue, how do I solve the problem?I have modified the firmware in order that if I set 10 mm on repsnapper exactly 10 mm of wire (3mm PLA purchased from Ultimachine) are sucked by the extruder; I have set the temperature in repsnapper at 190 degree.
A second question is related to the picture number 3 as you can see the top surface show a grid instead of a unique flat surface, does anyone know what i need to week on skeinforge to solve this ?
Any feedback is appreciated !

first picture : comparision between first print (gcode from repsnapper) on the right and improved second print (gcode from skeinforge)
if you wondering what is the print subject , the answer is gangsta chess [www.thingiverse.com]

Second picture : second print (gcode skeinforge) detail of the line of bubles-overshot (how should i call them?) on the side of the part
the new version for the x axis motor for Mendel ( by rhis-jones [www.thingiverse.com] ) first print (g code from skeinforge), the picture show the how there are some buble/overshot on the side and how the top of the surface is not close/uniform!
Thanks
Riccardo
|
Re: Print Setting with mendel electronic gen6 and white PLA 3mm July 05, 2011 09:42PM |
Registered: 13 years ago Posts: 862 |
Here are my current settings for Skeinforge41
Skeinforge 41 settings
Here are the settings I am now using with a little help from various people on the Reprap forums and via IRC chat.
Profile type – Extrusion
Profile selection – 225% (I have several I just kept cloning them so I could keep track of changes and name each one accordingly)
Search
Version – 11.04.26
Craft
Bottom
Activate Bottom –– Yes
Additional height over layer thickness (ratio) 0.5
Altitude (mm) 0.0
SVG viewer webbrowser
Carve
Add layer template to SVG – Yes
Extra decimal places (float) 2.0
Import coarseness (ratio) 1.0
Infill in direction of bridge – Yes
Layer thickness (mm) 0.4
-Layers-
Layers from (index) 0
Layers to (index) 912345678
Mesh type correct mesh – Yes
Perimeter width over thickness (ratio) 1.8
SVG viewer webbrowser
Chamber
Activate chamber – No
Clip
Activate clip – Yes
Clip over perimeter width (ratio) 0.5
Maximum connection distance over perimeter width (ratio) 10.0
Comb, Cool
Activate – No
Dimension
Activate dimension – Yes
Absolute extrusion distance – Yes
Extruder retraction speed (mm/s) 75.0
-Filament-
Filament diameter (mm) 2.8 (measured with digital callipers)
Filament packing density (ratio) 1.0
Retraction distance (mm) 3.0
Restart extra distance (mm) 0
Export
Activate export – Yes
Add export suffix – Yes
Gcode small – Yes
Fill
Activate fill – Yes
-Diaphragm-
Diaphragm period (layers) 100
Diaphragm thickness (layers) 0
-Extra shells-
Extra shells on alternating solid layer (layers) 2
Extra shells on base (layers) 1
Extra shells on sparse layer (layers) 1
-Grid-
Grid circle separation over perimeter width (ratio) 0.2
Grid extra overlap (ratio) 0.1
Grid junction separation band height (layers) 10
Grid junction separation over octagon radios at end (ratio) 0.0
Grid junction separation over octagon radios at middle (ratio) 0.0
-Infill-
Infill begin rotation (degrees) 45.0
Infill begin rotation repeat (layers) 1
Infill odd layer extra rotation (degrees) 90.0
Line – Yes
Infill perimeter overlap (ratio) 0.2
Infill solidity 0.25 (good for PLA) Nopheads preferred setting (this gives 25% fill ratio in the middle layers. I also use 50% and 80% depending on what I’m printing)
Infill width over thickness (ratio) 1.8
Solid surface thickness (layers) 3
Fillet, Home, Hop, Inset, Jitter, Lash
Activate – No
Limit
Activate limit – Yes
Maximum initial feed rate (mm/s) 50.0
Maximum Z feed rate (mm/s) 3.0
Multiply
Activate multiply – Yes
-Centre-
Centre X (mm) 100
Centre Y (mm) 100
-Number of cells-
Number of columns (integer) 1
Number of rows (integer) 1
Separation over perimeter width (ratio) 15.0
Oozebane
Activate oozebane – No
Preface (can’t be turned off)
-Name of alteration files-
Name of end file – end code.gcode
Name of start file – start code.gcode
Set positioning to absolute – Yes
Set units to millimetres – Yes
Your start and end codes are kept in the Skeinforge alterations folder
Raft
Activate raft – Yes
Add raft, elevate nozzle, orbit – Yes
-Base-
Base feed rate multiplier (ratio) 1.0
Base flow rate multiplier (ratio) 1.0
Base infill density (ratio) 0.5
Base layer thickness over layer thickness 2.0
Base layers (integer) 0
Base nozzle lift over base layer thickness (ratio) 0.4
-Interface-
Interface feed rate multiplier (ratio) 1.0
Interface flow rate multiplier (ratio) 1.0
Interface infill density (ratio) 0.5
Interface layer thickness over layer thickness 1.0
Interface layers (integer) 0
Interface nozzle lift over interface layer thickness (ratio) 0.45
-Object first layer-
Object first layer feed rate infill multiplier (ratio) 0.4
Object first layer feed rate perimeter multiplier (ratio) 0.4
Object first layer flow rate infill multiplier (ratio) 0.4
Object first layer flow rate perimeter multiplier (ratio) 0.4
Operating nozzle lift over layer thickness (ratio) 0.5
-Raft size-
Raft additional margin over length (%) 1.0
Raft margin (mm) 3.0
-Support-
Activate support cross hatch – No
Scale
Activate scale – No
Skirt
Activate skirt – Yes
Convex – Yes
Gap over perimeter width (ratio) 5.0 (prints a perimeter makes sure plastic is extruding)
Layers to (index) 1
(Initially I wasn’t getting a decent extrusion on the first layer of my prints so I added a skirt 5mm out from the print to solve this issue)
Speed
Activate speed – Yes
Add flow rate – Yes
-Bridge-
Bridge feed rate multiplier (ratio) 1.0
Bridge flow rate multiplier (ratio) 1.0
-Duty cycle-
Duty cycle at beginning (portion) 1.0
Duty cycle at ending (portion) 0.0
Feed rate (mm/s) 30.0
Flow rate setting (float) 30.0
Orbital feed rate over operating feed rate (ratio) 0.5
-Perimeter-
Perimeter feed rate over operating feed rate (ratio) 0.4
Perimeter flow rate over operating flow rate (ratio) 0.39
Travel feed rate (mm/s) 50.0
Splodge
Activate splodge – No
Stretch
Activate stretch – Yes
Cross limit distance over perimeter width (ratio) 5.0
Loop stretch over perimeter width (ratio) 0.11
Path stretch over perimeter width (ratio) 0.0
-Perimeter-
Perimeter inside stretch over perimeter width (ratio) 0.32
Perimeter outside stretch over perimeter width (ratio) 0.1
Stretch from distance over perimeter width (ratio) 2.0
Temperature
Activate temperature – Yes
-Rate-
Cooling rate (C/s) 3.0
Heating rate (C/s) 10.0
-Temperature- (I have been playing around with these)
Base temperature (C) 200.0
Interface temperature (C) 200.0
Object first layer infill temperature (C) 175
Object first layer perimeter temperature (C) 175
Object next layers temperature (C) 175
Support layers temperature (C) 175
Supported layers temperature (C) 175
Tower, Unpause, Widen, Wipe
Activate – No
I have some extra settings in the Export tab that I picked up from the forum, all they do is add the profile name to the exported gcode file extension and couple of other things to do with that so have not included them here
My start code is
G21; metric is good
G90; absolute positioning
G92 X0 Y0 Z0 E0; zero the extruded length axes
My end code is
G91
G1 F70
G1 E-10 F30000; sucks filament back quickly to stop ooze
G1 Z7 F70; lifts nozzle 7mm from finished print surface
G1 F2300
G1 X-10 Y100 F2300; moves print bed out for easy job removal
G90
M104 S0; turns off extruder
and this is how I worked out my setting for Perimeter flow rate set in the Speed tab as my fills were a bit full.
Basic formula: to get it right:
Extruding too much or too few for your nozzle diameter not taken into account:
Set your layerheight (LH) and Perimeter width over thickness ratio (PWR).
Multiply LH and PWR. That gives you your extrusion width in mm. (LH x PWR =EW)
Now calculate LH x EW = FCS (Fill x-section). that gives you the crosssection for the infill. This is the amount that SF calculates for volumetric dimension... It is the right amount for the infill... BUT: The primeter gets way too much extrudate this way. The volume for the perimeter would be:
LH/2 x EW/2 x 3.14 = PCS (Perimeter X-section).
Now get the ratio of PCS to FCS. (PCS / FCS = VRR (Volumetric reduction ratio..)
Set in SF- Speed: both extrusion and fill rate to same value. (50-50 maybe)
Set in Speed perimeter feedrate over operating feedrate ( to maybe 0.5 (so your perimeter is extruded slower and you get a better finish))
Now for the perimeter flowrate over operating flowrate multiply the PFROOFR with the VRR.. (Here 0.5 x VRR,)
Set it there...
You should be done...
You get good results if your nozzle x section ( (nozzle diameter/2)^2 x 3.14) is slightly or the same as your PCS..
LH0.4*PWR1.8= 7.2
LH0.4*EW7.2= 2.88
LH/2*EW/2*3.14
0.4/2*7.2/2*3.14= 2.2608
PCS/FCS
2.2608/2.88=0.784
so going with a perimeter feedrate of 0.5 I get
0.5*VRR
0.5*0.784= 0.392
I have a 0.5 nozzle
I have set the perimeter flow rate to 0.39
I hope this all makes sense to you. These settings are for my own Mendel with n Adrian's extruder which is what you have I am guessing and I run Gen6 on windows with Skeinforge and Repsnapper
__________________________________________________________________________
Experimenting in 3D in New Zealand
|
Re: Print Setting with mendel electronic gen6 and white PLA 3mm July 06, 2011 03:55AM |
Registered: 12 years ago Posts: 5 |
|
Re: Print Setting with mendel electronic gen6 and white PLA 3mm July 08, 2011 06:22AM |
Registered: 12 years ago Posts: 5 |
Hello Everybody,
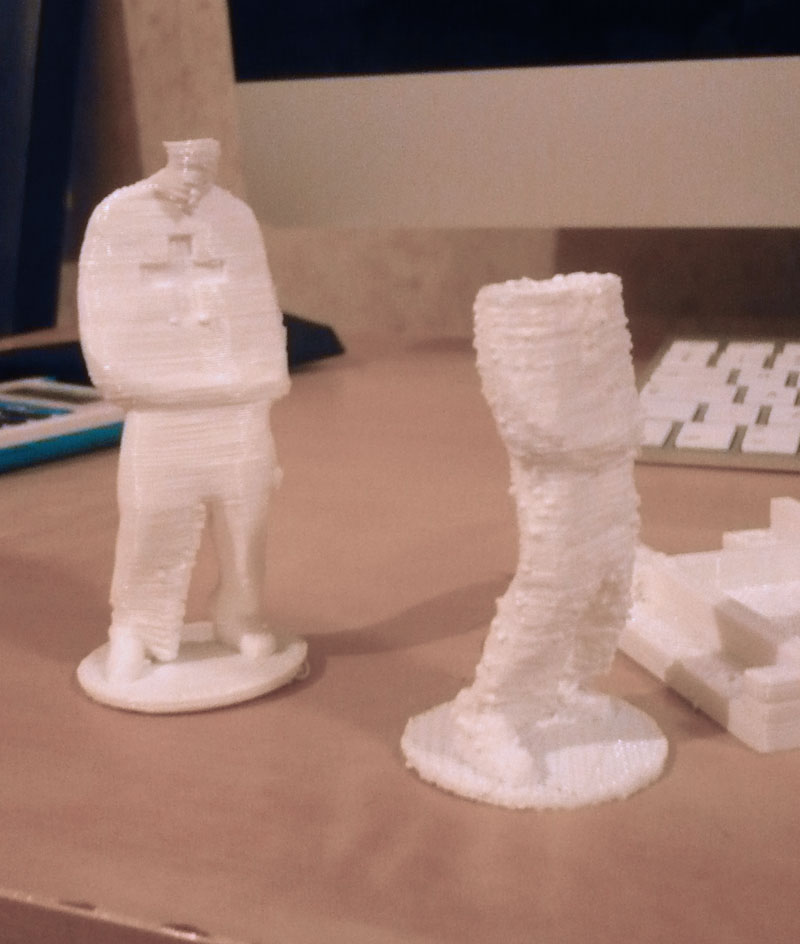
Nelson I tried your setting and i have to say that the quality increased ... but is not yet as it should be ...
the one above is the link to the image of a print with my previous setting on the left and a print with nelson setting on the right , as you can see in the second one the size of the over shoot are smaller but still exhist, any advice?
another problem is related to the picture above, I don't know how to describe it properly... let's say that when the surface is not vertical some layer thend to fall ... ? please have a look at the picture and see how the chin and the hat of the man are falling down... any advice?
forgot to mention the type of extruder ..have a look at the picture below
many thanks
Riccardo
Nelson I tried your setting and i have to say that the quality increased
... but is not yet as it should be ...
the one above is the link to the image of a print with my previous setting on the left and a print with nelson setting on the right , as you can see in the second one the size of the over shoot are smaller but still exhist, any advice?

another problem is related to the picture above, I don't know how to describe it properly... let's say that when the surface is not vertical some layer thend to fall ... ? please have a look at the picture and see how the chin and the hat of the man are falling down... any advice?
forgot to mention the type of extruder ..have a look at the picture below

many thanks
Riccardo
|
Re: Print Setting with mendel electronic gen6 and white PLA 3mm July 08, 2011 06:54AM |
Admin Registered: 12 years ago Posts: 2,569 |
sbancardo Wrote:
> another problem is related to the picture above, I
> don't know how to describe it properly... let's
> say that when the surface is not vertical some
> layer thend to fall ... ? please have a look at
> the picture and see how the chin and the hat of
> the man are falling down... any advice?
What is your extrusion temperature ? From what I read around, that kind of problem might be because of it getting too hot.
|
Re: Print Setting with mendel electronic gen6 and white PLA 3mm July 08, 2011 07:29AM |
Registered: 13 years ago Posts: 202 |
Nelsonrap: thanks for not quoting me....
(Original ogf this thread is on [forums.reprap.org])
And thats why there is SFACT now where theese instructions are on the same page as the settings....
[forums.reprap.org]
Manufacturer of low tolerance Filaments PLA, ABS, ASA, PETG, TPU, PA, PVA,
[www.miafilament.com]
[github.com]
(Original ogf this thread is on [forums.reprap.org])
And thats why there is SFACT now where theese instructions are on the same page as the settings....
[forums.reprap.org]
Manufacturer of low tolerance Filaments PLA, ABS, ASA, PETG, TPU, PA, PVA,
[www.miafilament.com]
[github.com]
|
Re: Print Setting with mendel electronic gen6 and white PLA 3mm July 08, 2011 03:55PM |
Registered: 13 years ago Posts: 862 |
ahmetcemturan Wrote:
-------------------------------------------------------
> Nelsonrap: thanks for not quoting me....
> (Original ogf this thread is on
> [forums.reprap.org]
> )
>
> And thats why there is SFACT now where theese
> instructions are on the same page as the
> settings....
>
> [forums.reprap.org]
Oops that's entirely my fault I just copied and pasted from a word doc where I had saved your calculations, I certainly do not take credit for that. You really helped me to understand my settings better.
As to the OP layers with no support will always sag a bit
__________________________________________________________________________
Experimenting in 3D in New Zealand
|
Re: Print Setting with mendel electronic gen6 and white PLA 3mm July 08, 2011 06:49PM |
Registered: 13 years ago Posts: 202 |
|
Re: Print Setting with mendel electronic gen6 and white PLA 3mm July 08, 2011 11:01PM |
Registered: 13 years ago Posts: 862 |
Sorry, only registered users may post in this forum.