A better 300 colour thingy
Posted by deckingman
|
A better 300 colour thingy April 07, 2016 04:21AM |
Registered: 8 years ago Posts: 622 |
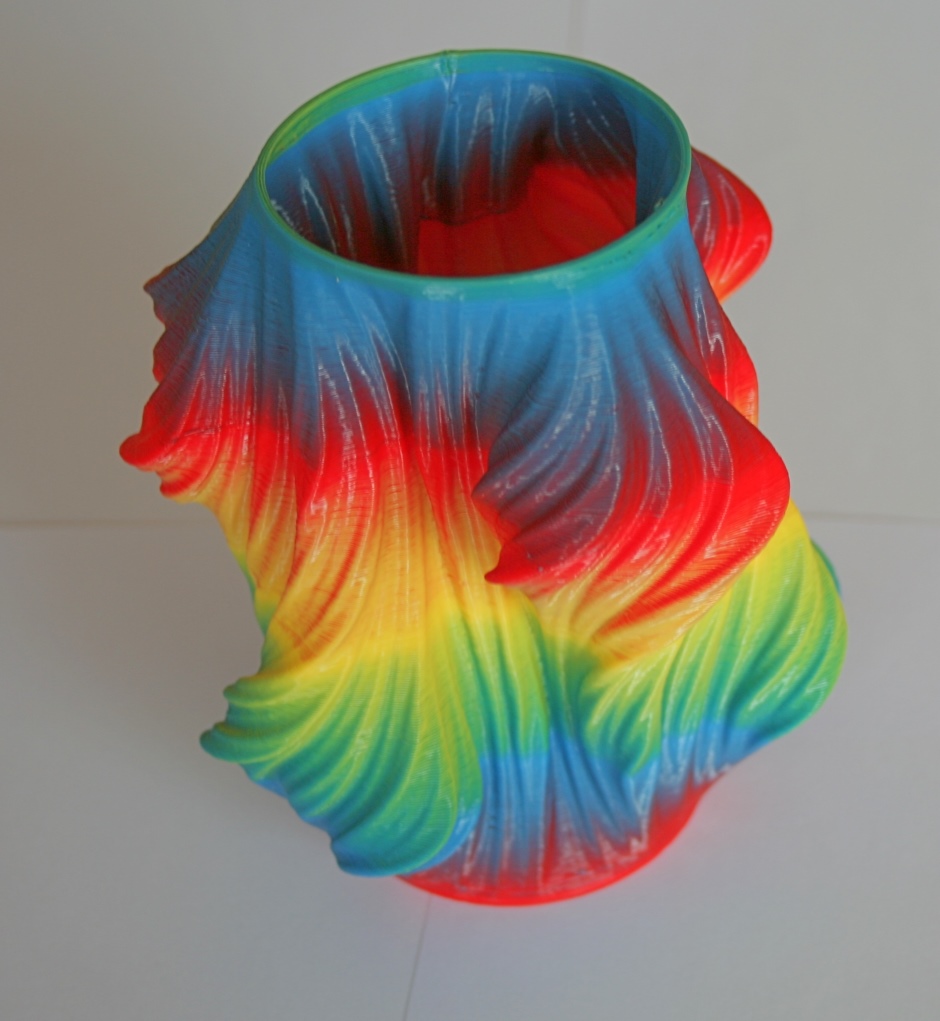
Following on from my first attempt which was just a simple cylinder, I printed this using the same technique. I can't and don't claim any credit for the design. It was this item [www.thingiverse.com] which I downloaded from "thingiverse". I'll put a picture on there too when I get time.
I downloaded the "solid" version and sliced it with no top, 3 perimeters and no infill. Then ran the script on the resultant gcode file to get the colour change every layer. Having lots of "nooks and crannies" means that the "toothpaste" effect of the diamond hot end gives vertical bands of colour as well as horizontal. What I mean is that some of the the "valleys" are different colours to the "peaks".
The total height is about 125 mm and colour change is ever 0.3 mm layer, so after 90 mm (300 layers), the colour pattern repeats.
I thought it came out rather well.
|
Re: A better 300 colour thingy April 07, 2016 04:22AM |
Registered: 9 years ago Posts: 978 |
|
Re: A better 300 colour thingy April 07, 2016 04:47AM |
Registered: 14 years ago Posts: 3,742 |

|
Re: A better 300 colour thingy April 07, 2016 11:20AM |
Registered: 10 years ago Posts: 553 |

|
Re: A better 300 colour thingy April 07, 2016 02:34PM |
Registered: 8 years ago Posts: 1,671 |
|
Re: A better 300 colour thingy April 07, 2016 09:47PM |
Admin Registered: 13 years ago Posts: 6,998 |
|
Re: A better 300 colour thingy April 08, 2016 04:36AM |
Registered: 8 years ago Posts: 5,232 |
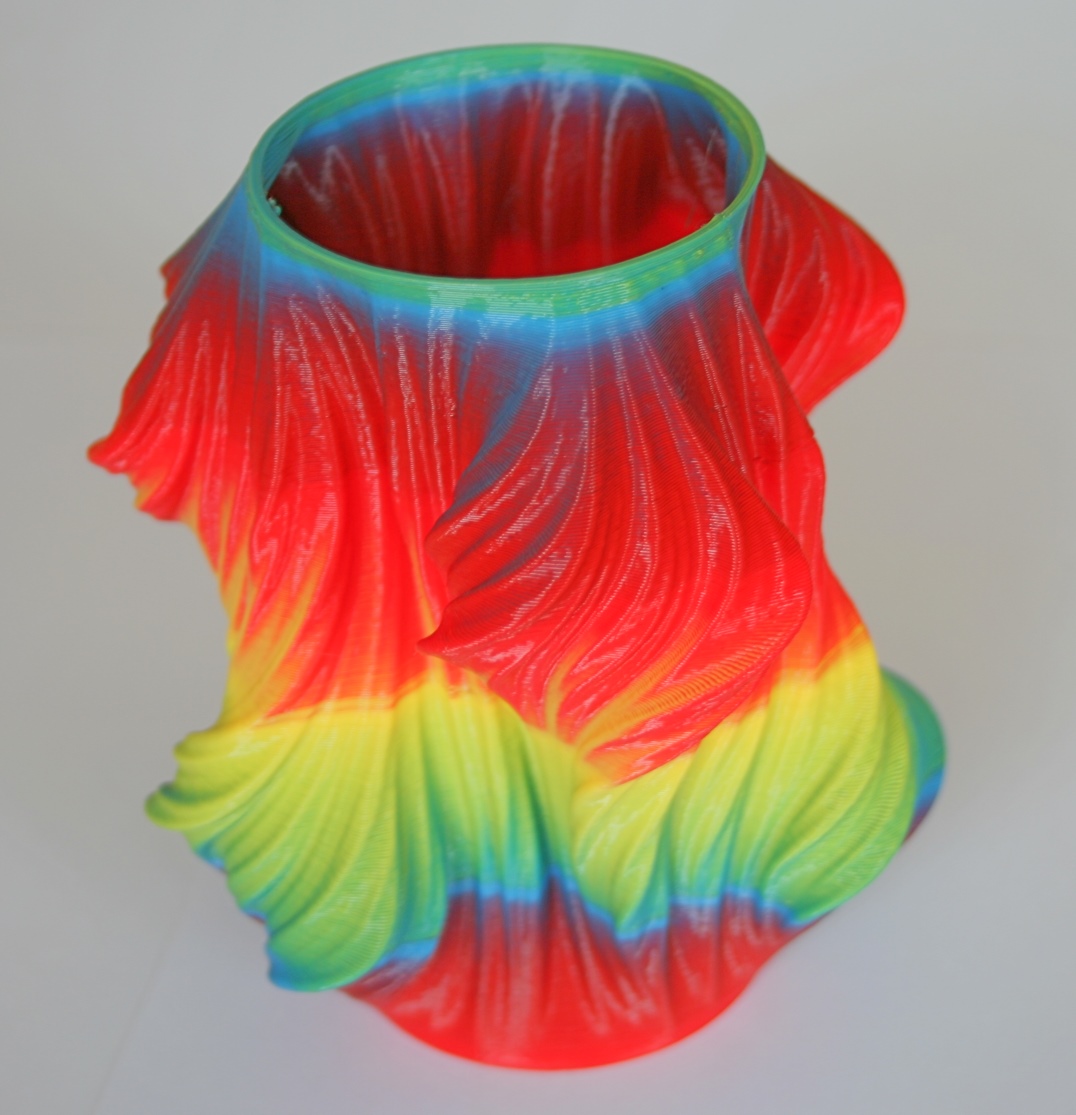
It looks really awesome, but the color mixing isn't working very well. Somehow unpredictable...
The transition from yellow to red should show some orange, but it seems to show red OR yellow instead.
Is the color the same inside and outside of the part? Or is it red inside and yellow outside and vice versa?
Is it the original diamond hotend?
The transition from yellow to red should show some orange, but it seems to show red OR yellow instead.
Is the color the same inside and outside of the part? Or is it red inside and yellow outside and vice versa?
Is it the original diamond hotend?
|
Re: A better 300 colour thingy April 09, 2016 05:34PM |
Registered: 9 years ago Posts: 978 |
Quote
o_lampe
The transition from yellow to red should show some orange, but it seems to show red OR yellow instead.
I wonder if that's due to the colours being mixed? I don't know what the OP is using, but maybe they're Red, Green, Blue where Cyan, Yellow, Magenta would be better? Or maybe one of the colours isn't the exact right hue?
|
Re: A better 300 colour thingy April 09, 2016 10:33PM |
Registered: 9 years ago Posts: 1,873 |
|
Re: A better 300 colour thingy April 12, 2016 09:24AM |
Registered: 8 years ago Posts: 622 |
Quote
o_lampe
It looks really awesome, but the color mixing isn't working very well. Somehow unpredictable...
The transition from yellow to red should show some orange, but it seems to show red OR yellow instead.
Is the color the same inside and outside of the part? Or is it red inside and yellow outside and vice versa?
Is it the original diamond hotend?
Yes, you should take a look at the text I wrote about the first "300 colour thingy" I posted. The issue is that the filament comes out like "stripey toothpaste" rather than being fully mixed. So, it all depends on what "side" you view the object from. I printed a 3 side pyramid with equal mix ratio of Red, Gold and Black. The resultant object has three different coloured sides - Dark Red, Bronze and "mostly Black". So, there is Orange in this 300 colour thingy but you need to view it from the "side" where the Blue filament enters the nozzle. Otherwise it has either a Red or Yellow bias depending on the viewing angle.
Actually I quite like that effect but if you want to achieve a precise, even colour when viewed from all angles, then this probably isn't the way to go about it. What you'd need to do is melt the 2 (or 3) colours and somehow stir them together before they exit the nozzle whilst still keeping the mixing chamber as small as possible so that you can quickly switch between colours.
RepRap.Me have advised me that the "toothpaste" effect can be eliminated by using translucent filaments. I'll give that a go when I get time.
|
Re: A better 300 colour thingy April 12, 2016 09:47AM |
Registered: 8 years ago Posts: 622 |
Quote
frankvdh
Quote
o_lampe
The transition from yellow to red should show some orange, but it seems to show red OR yellow instead.
I wonder if that's due to the colours being mixed? I don't know what the OP is using, but maybe they're Red, Green, Blue where Cyan, Yellow, Magenta would be better? Or maybe one of the colours isn't the exact right hue?
Yes, the mixing is down to the "toothpaste" effect I described before. RepRap.Me tell me that using translucent filaments will cure this but I haven't yet tried it. The colours I used were bright Red, bright Yellow and pale Blue (as that was the only Blue I had). Actually that's not true. I did have a dark Blue but it was from a different manufacturer and didn't mix well at all. Maybe there was something in the chemical make up of this filament other than just the colour pigment. This may also be something I need to be careful of but I need to do more testing to be sure.
For full true colour mixing I reckon we'd need Cyan, Magenta and Yellow but also Black (CYMK). Then of course, as we are not printing on paper, we'd need White as well. That would take care of the hue and contrast but as we always have to mix ratios that add up to 100%, we'd also need a clear filament to be able to adjust the saturation. So, I reckon we'd need a hot end that will take 6 colours and have the ability to somehow stir them all together well before they come out of the nozzle whilst keeping the mixing chamber as small as possible. But then of course, we'd also need 6 extruders ...........I think I'll just stick with what I have.
|
Re: A better 300 colour thingy April 14, 2016 10:42AM |
Registered: 10 years ago Posts: 553 |
Would a longer melt zone allow the colors to mix better? I would think it would since the filament would be spending more time in the heating area of the nozzle.
greghoge.com
HUGE 3D PRINTER PARTS SALE!!!
greghoge.com
HUGE 3D PRINTER PARTS SALE!!!
|
Re: A better 300 colour thingy April 14, 2016 01:24PM |
Registered: 8 years ago Posts: 622 |
Quote
gmh39
Would a longer melt zone allow the colors to mix better? I would think it would since the filament would be spending more time in the heating area of the nozzle.
Personally I doubt it. If you've ever tried mixing two or more colours of paint you'll know that they need to be stirred together. It doesn't matter how long they sit side by side. Increasing the melt zone would also increase the volume which will likely cause more problems. It would increase the amount of filament that needs to be extruded when switching from one colour to another so the colours would tend to run into each other unless you use large sacrificial towers.
|
Re: A better 300 colour thingy April 14, 2016 03:00PM |
Registered: 9 years ago Posts: 978 |
|
Re: A better 300 colour thingy April 15, 2016 01:26PM |
Registered: 8 years ago Posts: 622 |
Quote
frankvdh
I wonder about threading the inside of the nozzle, so that the molten filament swirls as it comes out?
That might work. I doubt if you could put a thread in a 0.4mm hole though. Maybe some kind of helical mixing chamber prior to the actual nozzle might work, but then anything which increases the volume of the mixing chamber is going to have a negative impact when changing colours quickly.
Another thing I wondered about is what effect (if any), different layer heights may have and/or slower print speed. I have my machine set up for just about the fastest print speed I can get away with. - Something else to play around with when I get time.
|
Re: A better 300 colour thingy April 16, 2016 03:34AM |
Registered: 8 years ago Posts: 5,232 |
The size of a chamber is only relevant because the slicers are not up to the multicolor task yet. Only the outer perimeters have to have a defined color while the rest( like infill and support ) could act as color change area too. The slicer would need to know how much filament has to be extruded before the "new" color is mixed.
With a bigger chamber I would ignore the higher filament cost if I get a sharp and true color change as benefit.
With a bigger chamber I would ignore the higher filament cost if I get a sharp and true color change as benefit.
|
Re: A better 300 colour thingy April 16, 2016 07:09AM |
Registered: 9 years ago Posts: 1,873 |
Quote
o_lampe
The size of a chamber is only relevant because the slicers are not up to the multicolor task yet. Only the outer perimeters have to have a defined color while the rest( like infill and support ) could act as color change area too. The slicer would need to know how much filament has to be extruded before the "new" color is mixed.
With a bigger chamber I would ignore the higher filament cost if I get a sharp and true color change as benefit.
That works for some models, but assumes that colour changes only happen in Z. For colour changes in the XY plane things get a bit more difficult, although... I guess I'm making assumptions too
 Maybe it would be possible to print a segment of 1 colour, move away to print some non-visible area or into a purge area and then return to continue the perimeter in the new colour. Man, there sure is a world of possibilities to explore here!
|
Re: A better 300 colour thingy April 16, 2016 12:39PM |
Registered: 8 years ago Posts: 622 |
Quote
JamesK
Quote
o_lampe
The size of a chamber is only relevant because the slicers are not up to the multicolor task yet. Only the outer perimeters have to have a defined color while the rest( like infill and support ) could act as color change area too. The slicer would need to know how much filament has to be extruded before the "new" color is mixed.
With a bigger chamber I would ignore the higher filament cost if I get a sharp and true color change as benefit.
That works for some models, but assumes that colour changes only happen in Z. For colour changes in the XY plane things get a bit more difficult, although... I guess I'm making assumptions too
Yes, that's the "normal" way of doing it especially if you have separate nozzles. This is where I came in with the original RepRapPro Tricolour. In that case, you need to define each hot end as a separate tool. Because each one has it's own heater, you have to set the unused nozzles to a lower standby temperature to prevent filament from oozing when they are not in use. Then, when you want to change to a different tool, you need to heat it to it's operating temperature and cool the unused tool to it's standby temperature. All this heating and cooling means that you need to print a sacrificial tower to get the filament flowing nicely before you print the object proper. I believe Cura has the ability to provide sacrificial "wiping" towers but I've never tried it. It can be done using Slic3r. It is my understanding that Slic3r prints objects in the order that they are added to the platter. So you can have tower colour A, object colour A, tower colour B, same object colour B, tower colour C, same object colour C etc. In actual fact, just using different coloured filaments in each extruder with no mixing, I've printed a few 2 and 3 colour objects with different colours on the same z layer without using towers, and because of the very small chamber, there is very little "bleeding" between.
Of course, none of that gets around the "striped toothpaste effect" when mixing filaments but as I've said before, I quite like it. Lets face it, if you have a 300 colour object it's going to be purely decorative so having different shades of colour on different sides, adds another dimension to the colour scheme.
And of course, sharp clear colour changes are perfectly possible by not trying to mix colours together. Instead, simply define 3 tools which share the same heater but different filaments and switch between them. Of course, you are then limited to 3 colours. As long as you slicer does the inner perimeters first and the object is large enough, any "mixing" happens out of site (or you could use towers as above).
Maybe the future is to fire small droplets of filament, rather than a continuous bead, in a similar fashion to how an inkjet printer works. Then we could have some fun............
|
Re: A better 300 colour thingy April 16, 2016 05:29PM |
Registered: 9 years ago Posts: 978 |
Quote
JamesK
That works for some models, but assumes that colour changes only happen in Z. For colour changes in the XY plane things get a bit more difficult, although... I guess I'm making assumptions too
While that's certainly true in general, it doesn't matter too much when printing cylinder-esque objects like the example shown. If all the colour changes happen at the nozzle exactly 10mm (say) after the change is made, and all printing is done in a(say) a clockwise direction, then all that happens is that the colour change is rotated by 10mm around the perimeter of the object.
Edited 1 time(s). Last edit at 04/16/2016 05:30PM by frankvdh.
|
Re: A better 300 colour thingy April 17, 2016 04:12AM |
Registered: 8 years ago Posts: 5,232 |
Quote
frankvdh
Quote
JamesK
That works for some models, but assumes that colour changes only happen in Z. For colour changes in the XY plane things get a bit more difficult, although... I guess I'm making assumptions too
While that's certainly true in general, it doesn't matter too much when printing cylinder-esque objects like the example shown. If all the colour changes happen at the nozzle exactly 10mm (say) after the change is made, and all printing is done in a(say) a clockwise direction, then all that happens is that the colour change is rotated by 10mm around the perimeter of the object.
That's what I meant! If the slicers would know the "color mixing offset" it would be able to print infill and support or if this is not an option print a wipe/dump tower.
Edited 1 time(s). Last edit at 04/17/2016 04:12AM by o_lampe.
|
Re: A better 300 colour thingy April 17, 2016 05:28AM |
Registered: 8 years ago Posts: 622 |
Quote
frankvdh
Quote
JamesK
That works for some models, but assumes that colour changes only happen in Z. For colour changes in the XY plane things get a bit more difficult, although... I guess I'm making assumptions too
While that's certainly true in general, it doesn't matter too much when printing cylinder-esque objects like the example shown. If all the colour changes happen at the nozzle exactly 10mm (say) after the change is made, and all printing is done in a(say) a clockwise direction, then all that happens is that the colour change is rotated by 10mm around the perimeter of the object.
That's true but also if you have 2 or more perimeters, the inner perimeters get printed before the outer perimeters so, providing the object isn't too small, then by the time the outer perimeters are printed, the new colour is correct. At least that's what I have observed using slc3r - I can't say what other slicers do.
Sorry, only registered users may post in this forum.