|
I probably made the tiniest Z-Probe and it doesn't require changes to hardware December 02, 2016 10:12AM |
Registered: 7 years ago Posts: 2 |
Hi guys! I have wanted a Z-Probe for my (delta) printer for ages now. A few months back I found one of those tiny microswitches lying around and got the simplest idea. Why not attach the switch to a little printed part that fits over the nozzle?
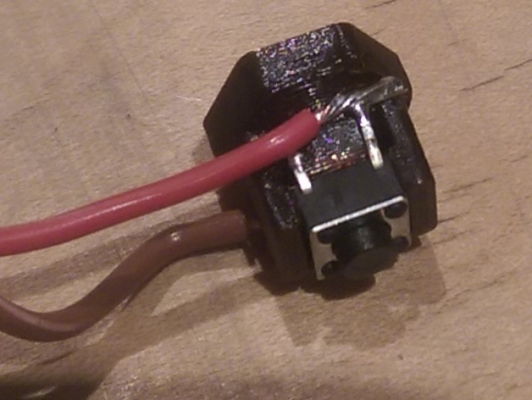
This is the assembled probe. The switch is secured with a small dab of superglue. I made a mistake when soldering the cables so I burnt the plastic a little bit. There are small tabs on each side which were originally intended to hold the switch's legs for a cleaner look. I screwed them up when designing the part so I didn't use them and just turned the switch 90 degrees.
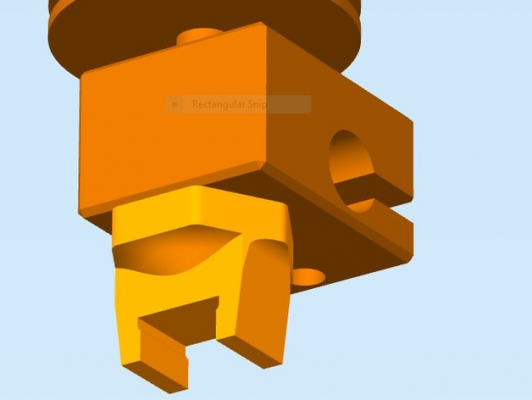
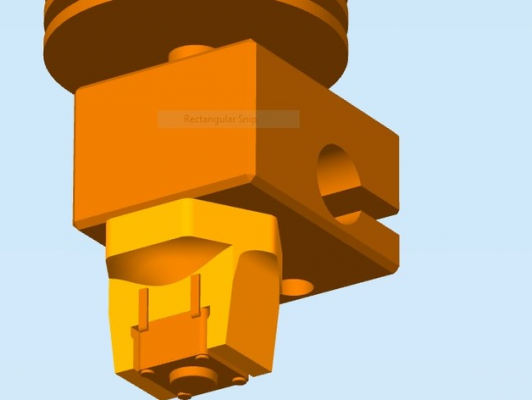
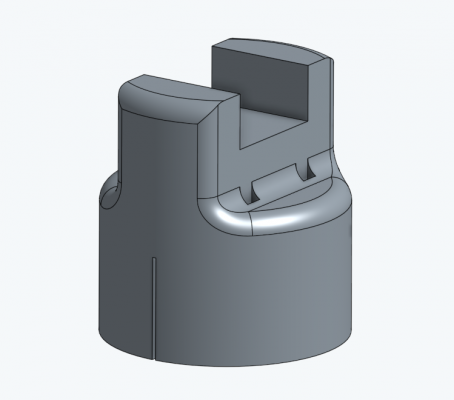
This is a screenshot from Simplify3D showing how the probe fits over a E3D V6 style nozzle. I removed the slits from the tabs in this version. They are still present in the print I use but the overall dimensions are the same.
For it to work correctly the print needs to be the right size - it shouldn't slide on or off too easily. Getting it right might require a few tries - I built in a tolerance of 0.1 or 0.2mm (don't remember) and your printer will of course require a slightly different size.
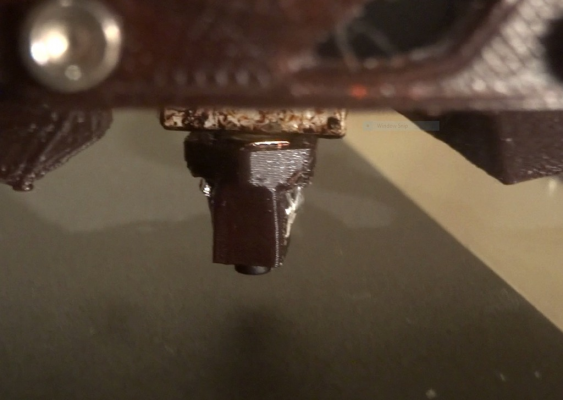
Thenozzle probe is held on by friction between the plastic and the nozzle. I have been using this exact print for the last four months and it still works like a charm so wear doesn't really seem to be a concern. I have used it maybe 50 +/-10 times. It seems to be accurate and repeatable to within less than 0.05mm. I use 0.03 to calibrate the printer and it has worked reasonably well.
Here is a video of it in action (excuse the camera movement, I'm not good at making videos that don't suck): https://www.youtube.com/watch?v=pceyhpFim1A
The part can be found on thingiverse http://www.thingiverse.com/thing:1729523 where the VERY messy onshape files can be found and edited. I would be immensely happy if someone either redid the design or altered it in such a way that switching the nozzle type it's for would be easy or even printed one and told me about their problems/what they liked. I would like to redo it such that it would be easier to print, assemble and use. It could probably use some kind of handle which could be used to easily pull it off the nozzle (something I found to be a bit of a hassle when doing it for the first few times). The version I have also required stupid tiny supports due to the tab-slits - they are gone now but I think I could do away with the tabs overall. This would make it a five-minute print.
The control board used is a smoothieboard so I can only provide config for it (sry, no Marlin or Repetier config yet) as soon as I'm near the printer again (which will be sometime tomorrow).
Edited 1 time(s). Last edit at 12/02/2016 10:12AM by D353rt.
This is the assembled probe. The switch is secured with a small dab of superglue. I made a mistake when soldering the cables so I burnt the plastic a little bit. There are small tabs on each side which were originally intended to hold the switch's legs for a cleaner look. I screwed them up when designing the part so I didn't use them and just turned the switch 90 degrees.
This is a screenshot from Simplify3D showing how the probe fits over a E3D V6 style nozzle. I removed the slits from the tabs in this version. They are still present in the print I use but the overall dimensions are the same.
For it to work correctly the print needs to be the right size - it shouldn't slide on or off too easily. Getting it right might require a few tries - I built in a tolerance of 0.1 or 0.2mm (don't remember) and your printer will of course require a slightly different size.
The
Here is a video of it in action (excuse the camera movement, I'm not good at making videos that don't suck): https://www.youtube.com/watch?v=pceyhpFim1A
The part can be found on thingiverse http://www.thingiverse.com/thing:1729523 where the VERY messy onshape files can be found and edited. I would be immensely happy if someone either redid the design or altered it in such a way that switching the nozzle type it's for would be easy or even printed one and told me about their problems/what they liked. I would like to redo it such that it would be easier to print, assemble and use. It could probably use some kind of handle which could be used to easily pull it off the nozzle (something I found to be a bit of a hassle when doing it for the first few times). The version I have also required stupid tiny supports due to the tab-slits - they are gone now but I think I could do away with the tabs overall. This would make it a five-minute print.
The control board used is a smoothieboard so I can only provide config for it (sry, no Marlin or Repetier config yet) as soon as I'm near the printer again (which will be sometime tomorrow).
Edited 1 time(s). Last edit at 12/02/2016 10:12AM by D353rt.
|
Re: I probably made the tiniest Z-Probe and it doesn't require changes to hardware December 02, 2016 08:02PM |
Registered: 9 years ago Posts: 1,873 |
|
Re: I probably made the tiniest Z-Probe and it doesn't require changes to hardware December 02, 2016 09:59PM |
Registered: 7 years ago Posts: 143 |
This is very clever. Fixing up the CAD shouldn't be difficult at all, and definitely a very quick print. I bet if you sourced the switch from a specific vendor you could get the accuracy of the switching action from the datasheet and know for sure what the measurement *should* be, then tweak the model tolerances and calibration around that.
|
Re: I probably made the tiniest Z-Probe and it doesn't require changes to hardware December 03, 2016 06:01AM |
Registered: 8 years ago Posts: 5,232 |
Did you try using the switch on a 110°C hot bed?
I always thought nozzle and bed should be at working temp before bed leveling. That wouldn't work.
I'm also concerned about the nozzle has to be perfectly clean without the smallest blob hanging out to get repeatable results.
Maybe it would be better to add a magnet on the back of the switch and let it snap to some cold and clean place ( maybe a different fan duct on the e3d ). That way you could park the probe.
|
Re: I probably made the tiniest Z-Probe and it doesn't require changes to hardware December 03, 2016 06:13AM |
Registered: 9 years ago Posts: 1,873 |
Quote
o_lampe
Did you try using the switch on a 110°C hot bed?
I always thought nozzle and bed should be at working temp before bed leveling. That wouldn't work.
I'm also concerned about the nozzle has to be perfectly clean without the smallest blob hanging out to get repeatable results.
Valid concerns, but the attraction of this approach is the absolute simplicity. I think a few trade-offs are acceptable to be able to try out bed probing so easily.
|
Re: I probably made the tiniest Z-Probe and it doesn't require changes to hardware December 03, 2016 08:43AM |
Registered: 7 years ago Posts: 2 |
Quote
o_lampe
Did you try using the switch on a 110°C hot bed?
I always thought nozzle and bed should be at working temp before bed leveling. That wouldn't work.
I'm also concerned about the nozzle has to be perfectly clean without the smallest blob hanging out to get repeatable results.
Unfortunately I destroyed my last heated bed together with the glass plate I used. The plate in the video is actually some scrap metal I found and it's noticeably warped (one more reason to get a probe..). I have a new one but I'm waiting for a new thermistor. It shouldn't be a problem though since the button touches the bed only very shortly and if there is any concern about the probe warping from the bed heat you could always turn on the print cooling fan. Of course the hotend itself needs to be cold. Maybe if it would be printed from nylon or some other high-temp material you could get away with 100° or so on the nozzle at which point the offsets would probably be quite small anyways.
But if you think about it the only thing that changes with heat is the distance between nozzle and bed. No other geometry of the printer should change. So it actually does not matter at all for any endstop corrections which is what bet tramming does on a delta printer. Also I found that changes with the hotend hot vs cold are quite small. I don't know about the bed though - it seems to depend on the mounting method used. I never had problems but my bed has always been screwed to the frame so it shouldn't really move at all.
Yes, the nozzle needs to be rather clean or it wouldn't snap on. But it isn't designed to be used before every print. Probing before every print is quite the overhead in my opinion. The offsets shouldn't change between prints and if they do there is a hardware problem somewhere else or the printer has been moved (at which point probing is probably a good idea). As long as the probe snaps on (whichever way) and stays in the same place while probing it should work. I have never had a problem though - just have your end-gcode retract a little bit and there won't be any strings hanging out or blobs on the nozzle before prints. Of course there will be problems when printing PET which really loves to crawl up the nozzle but I consider a clean nozzle part of a well maintained printer. BTW the best method I have found to clean a nozzle is to actually use a cigarette filter and push the nozzle into it while rotating the filter.
Since my effector is a b*** to disassemble and I didn't have magnets or tools to measure anything I had to go with the snap on design.
Thanks for the welcome guys! I have considered getting a better and more accurate switch (this one was part of an electronics kit) but don't have a real incentive right now.
|
Re: I probably made the tiniest Z-Probe and it doesn't require changes to hardware December 10, 2016 09:15PM |
Registered: 9 years ago Posts: 1,873 |
I printed up one of these today and it work's very well indeed. I've had great fun trying out all the bed leveling and distortion correction functions in Repetier with it. Many thanks indeed!
My nozzles are a non-standard size, so I knocked up a quick copy of your design. I was having trouble getting the exact fit right, so I added a slit on two sides to allow a bit of margin
Even if you're not a fan of ABL, it's worth having one of these to make manual leveling easier!
My nozzles are a non-standard size, so I knocked up a quick copy of your design. I was having trouble getting the exact fit right, so I added a slit on two sides to allow a bit of margin
Even if you're not a fan of ABL, it's worth having one of these to make manual leveling easier!
Sorry, only registered users may post in this forum.
