3D printed sand table mechanism
Posted by the_digital_dentist
|
3D printed sand table mechanism September 23, 2019 01:15PM |
Registered: 11 years ago Posts: 5,780 |
An update to this thread: [reprap.org]
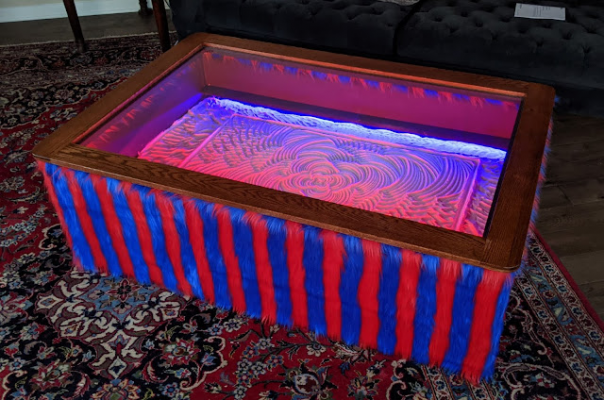
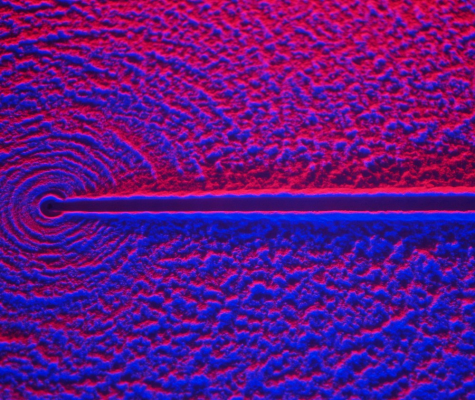
After eventually switching from cables to a stacked belt corexy configuration, and a few redesigns of the magnet carriage, changing controller boards, stepping up motor speed by 5x with pulleys and belts, and twisting belts, I now have the sand table running quietly at 500 mm/sec. Poor quality video here. The table is about 2m x 1m and the "printable area" is 740 x 1560 mm. LED lighting is red and blue only, no color changing because I want the pattern in the sand to be the center of attention, not flashing colored lights. The sand is baking soda (sand blaster medium).
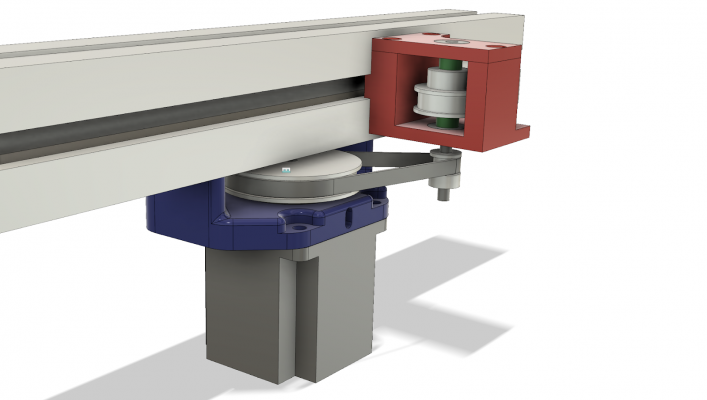
Motor speed step drive- one of two identical assemblies:
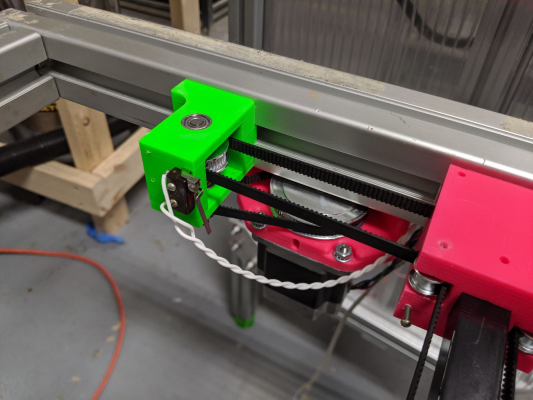
Here is the A motor side with the Y axis endstop switch:
More details here: [drmrehorst.blogspot.com]
The Fusion360 file for the whole thing is located here.
I'll be building a slightly smaller version of the table with a glass top in the next month or so.
Ultra MegaMax Dominator 3D printer: [drmrehorst.blogspot.com]
|
Re: 3D printed sand table mechanism September 23, 2019 10:59PM |
Registered: 11 years ago Posts: 5,780 |
|
Re: 3D printed sand table mechanism September 24, 2019 03:01AM |
Registered: 12 years ago Posts: 2,470 |
Cool project 
Why did you use backing soda?
[www.bonkers.de]
[merlin-hotend.de]
[www.hackerspace-ffm.de]

Why did you use backing soda?
[www.bonkers.de]
[merlin-hotend.de]
[www.hackerspace-ffm.de]
|
Re: 3D printed sand table mechanism September 24, 2019 05:35AM |
Registered: 6 years ago Posts: 1,007 |
|
Re: 3D printed sand table mechanism September 24, 2019 05:53AM |
Admin Registered: 13 years ago Posts: 7,000 |
|
Re: 3D printed sand table mechanism September 24, 2019 03:19PM |
Registered: 7 years ago Posts: 619 |
That is pretty cool. What made you conceive of this project?
DLC
Kits: Folgertech Kossel 2020 upgraded E3Dv6, Anet A8 upgraded E3Dv6, Tevo Tarantula enhanced parts and dual-head, TronXY X5SA Pro(E3DHemera).
Scratch: Large bed Cartesian, exchangeable heads, Linear slide Delta, Maker-Beam XL Micro Delta, 220x220CoreXY.
DLC
Kits: Folgertech Kossel 2020 upgraded E3Dv6, Anet A8 upgraded E3Dv6, Tevo Tarantula enhanced parts and dual-head, TronXY X5SA Pro(E3DHemera).
Scratch: Large bed Cartesian, exchangeable heads, Linear slide Delta, Maker-Beam XL Micro Delta, 220x220CoreXY.
|
Re: 3D printed sand table mechanism September 24, 2019 05:41PM |
Registered: 11 years ago Posts: 5,780 |
I'd seen other people's sand tables for a couple years and wanted to make one for the Milwaukee MakerFaire. After I built my corexy printer I thought that it was so easy I could probably make a sand table using a similar mechanism. Then I was at the local makerspace-friendly scrap yard and saw that they had a bunch of 45 mm t-slot. I spotted a door made with a t-slot frame with a plastic panel installed and decided it was time to build the table and that that door would be the top cover so that would be the final size of the table. The rest was pretty easy...
I use baking soda because it is pure white, has pretty uniform grain size (though the stuff I'm using is getting old and a little lumpy), and is cheap in large quantities. I used sand blasting media, but I think food grade stuff is finer grained. I haven't weighed it, but it seems the ideal amount of sand for the table is 5-7 lbs. It seems that the sand depth about 1/4-1/3 of the ball diameter makes for the cleanest looking patterns.
Ultra MegaMax Dominator 3D printer: [drmrehorst.blogspot.com]
|
Re: 3D printed sand table mechanism November 07, 2019 10:09AM |
Registered: 11 years ago Posts: 5,780 |
Update:
From day one running the sand table, using Sandify to generate the patterns, I found that the ball often spends too much time going back and forth, and sometimes round and round, along the edges of the table. I wanted to write a program to post-process the gcode pattern files to eliminate all that boring, time consuming, unnecessary motion. I spent months thinking about how to locate transitions from the table to the edges, etc., and got nowhere because it just looked too complicated. Then I decided to try editing a few files manually, just to take out the back and forth motion along each edge. It's a pretty easy process- just look for long sequences of G01 commands that contain the minimum or maximum X and Y values for the pattern/table, and cut out everything after the first one and before the last one- i.e. there should be no strings of commands along any one edge that is more than two G01 commands long.
I tried the edited patterns on the table and it was a huge improvement. I decided to write a program to automate it. I got a book on Perl programming and spent about a week working through examples and problems, then wrote the first part of a program to optimize the pattern files for the sand table. It worked extremely well.
Looking at the trimmed pattern files I noticed that they now contained sequences of corner moves. The corners were in the files the whole time, but separated by all the back and forth crud that was now eliminated. So I decided to attack the corner to corner sequences.
The result is that I can now edit the files to eliminate all that unnecessary motion. It literally takes under 1 second to edit even the largest pattern file. The result is a much better table-watching experience and less wear and tear on the table mechanism.
Details and a link to the optimizer program are here.
Edited 2 time(s). Last edit at 11/07/2019 12:09PM by the_digital_dentist.
Ultra MegaMax Dominator 3D printer: [drmrehorst.blogspot.com]
|
Re: 3D printed sand table mechanism March 18, 2020 11:01PM |
Registered: 4 years ago Posts: 19 |
|
Re: 3D printed sand table mechanism August 30, 2021 09:16AM |
Registered: 11 years ago Posts: 5,780 |
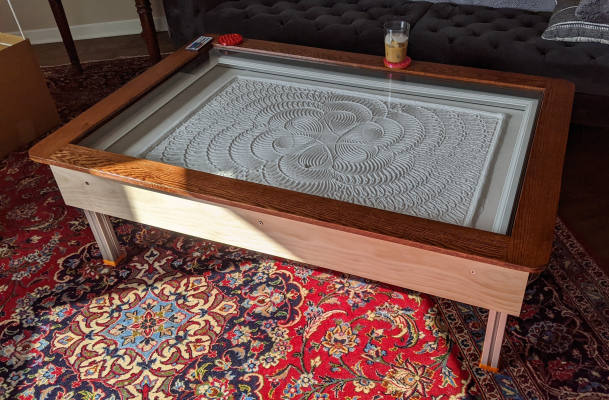
The newest version of the mechanism and table are finished. The new one is smaller, has a glass top, and uses servomotors for insane speed and acceleration.
[youtu.be]
[youtu.be]
Ultra MegaMax Dominator 3D printer: [drmrehorst.blogspot.com]
[youtu.be]
[youtu.be]
Ultra MegaMax Dominator 3D printer: [drmrehorst.blogspot.com]
|
Re: 3D printed sand table mechanism October 31, 2021 08:30AM |
Registered: 11 years ago Posts: 5,780 |
Update: Similar edge motion reduction that I had programmed in Perl is now baked into Sandify and it works better than the Perl program I wrote.
After running Arrakis at different speeds, I have found that lower speeds generally preserve pattern details better than higher speeds, so for very detailed patterns, I started setting the speed as low as 100-200 mm/sec. Drawing speed is specified in custom gcode at the start of each pattern file like "G01 F12000" to set the speed at 200 mm/sec. The problem with that is that speed is applied to all motion, drawing a detailed pattern, as well as traveling along edges of the table. I find it very boring to watch edge motion that moves that slowly, and in some patterns it really increases the drawing time. I tried to get the Sandify authors to consider adding dual speed operation to Sandify but they didn't seem too interested, so I dug out my Perl manuals again and went to work on it. It took about a week and I had a dual-speed post processor, "dual_speedify.pl", that assigns one speed to drawing the pattern on the table and another speed to the edge motion. The program adds "F" parameters to all G01 statements in the pattern file. It works by examining the lines of gcode in pairs, decides if they represent motion on the table or at the edges and then assigns user specified speed values. Unlike my first effort at removing redundant edge motion, this program appears to work with 100% accuracy.
Here's a couple videos of dual speed patterns running on Arrakis. The first file has a LOT of edge motion, the second one not so much:
[www.youtube.com]
[www.youtube.com]
Maybe dual speed operation will eventually get added to Sandify (when more tables are built with servomotors that can really take advantage of it?). In the meantime, I wrote a blog post on the program that includes a download link, here.
I also wrote a blog post on building Arrakis which includes a link to the STEP file so you can see how things were done in as much detail as you like.
Ultra MegaMax Dominator 3D printer: [drmrehorst.blogspot.com]
|
Re: 3D printed sand table mechanism October 31, 2021 11:31AM |
Admin Registered: 16 years ago Posts: 13,886 |
... when viewing your vodeos I had a "brainstorm-flash" with a slightly different variant, what could be even more "hypnotic".
The idea was about an "overturned" table, filled with water (or better oil), floating particles instead of sand and the moved ball is floating too -- then light (maybe collor-changing?) from the underside through the table, so thined tracks will be illuminated
Viktor
--------
Aufruf zum Projekt "Müll-freie Meere" - [reprap.org] -- Deutsche Facebook-Gruppe - [www.facebook.com]
Call for the project "garbage-free seas" - [reprap.org]
The idea was about an "overturned" table, filled with water (or better oil), floating particles instead of sand and the moved ball is floating too -- then light (maybe collor-changing?) from the underside through the table, so thined tracks will be illuminated

Viktor
--------
Aufruf zum Projekt "Müll-freie Meere" - [reprap.org] -- Deutsche Facebook-Gruppe - [www.facebook.com]
Call for the project "garbage-free seas" - [reprap.org]
|
Re: 3D printed sand table mechanism November 01, 2021 11:58AM |
Registered: 11 years ago Posts: 5,780 |
There are about a 1000 different things that you could do with this sort of mechanism- pen plotting, painting with an airbrush, light painting, you could use plaster powder instead of baking soda and mist it with water when the pattern finishes to harden it (or spray cyanoacrylate on baking soda for the same effect). I specifically avoided flashing lights or color cycling because I wanted the drawing to be the most interesting thing visually, and flashing lights are hard to look at for very long. The two color illumination I use seems to be pretty popular. That said, I will be looking into driving RGB LEDs from the controller so I can set different color pairs for different patterns. I believe there is a way to drive a limited number of addressable LEDs via the Duet board.
Edited 1 time(s). Last edit at 11/01/2021 12:01PM by the_digital_dentist.
Ultra MegaMax Dominator 3D printer: [drmrehorst.blogspot.com]
Edited 1 time(s). Last edit at 11/01/2021 12:01PM by the_digital_dentist.
Ultra MegaMax Dominator 3D printer: [drmrehorst.blogspot.com]
|
Re: 3D printed sand table mechanism November 28, 2023 05:49PM |
Registered: 11 years ago Posts: 5,780 |
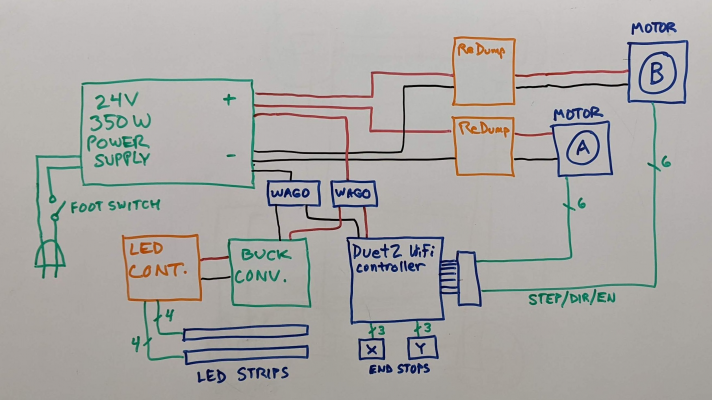
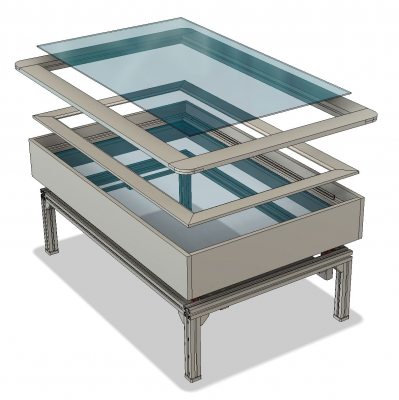
Update: The plywood bottom of Arrakis' sandbox was warping with changes in humidity, causing the normally air-gapped magnet to drag against the bottom of the sandbox, making a scraping noise. I solved that problem by using a piece of 5mm thick glass for the bottom of the new sand box. This time I used contact cement to mount fake white leather on the table bottom surface so you can't really see if the bottom of the box is showing at spots where the ball passes repeatedly. The glass is the same size as the top cover glass (I bought two pieces from a farmer who had bought a bunch of glass to make a green house and then changed his mind. I paid $6 each for the pieces of glass). I also raised the sand closer to the top of the table so it would be easier to view the drawings when seated. I was a bit concerned about sand getting stuck to the glass on the top cover, but it doesn't seem to be a problem. Maybe the polycarbonate I used in the original sand table acquired a static charge that caused the sand to stick. The sides of the sandbox are now just unfinished pine boards that are bolted on using screws and t-nuts.
I got some RGB LED strips with IR remote and a controller that drives two strips at once. I rewired the controller output so that the strips will always be different colors unless you select white, in which case all leds are lit in both strips. I also added circuits to protect the controller and power supply, and switched to a single 350W power supply to drive everything except the LED strips.
Sandify was recently updated, with changes to the output file format. I had written a PERL program to allow two speed drawing (slower on the table, faster on the edges) but it quit working when they changed Sandify. I updated it to work with the new drawing file format. The new program is called dual_speedify_v2.pl. You can get it here.
More details here and an update here.
Ultra MegaMax Dominator 3D printer: [drmrehorst.blogspot.com]
Sorry, only registered users may post in this forum.
