Fine adjusting Z=0 optical endstop
Posted by the_digital_dentist
|
Fine adjusting Z=0 optical endstop February 03, 2020 11:41AM |
Registered: 11 years ago Posts: 5,780 |
I've been converting my coreXY printer, UMMD, to optical endstops. First I did the X and Y axes and now it's time for the Z axis.
Yes, I still use a Z=0 endstop switch instead of a sensor on the extruder carriage. The old endstop used a lever and cam to effectively reduce the adjuster screw thread pitch. It worked for a snap switch, but I couldn't figure out a good way to adapt it to an optical sensor, and the amount of Z position adjustment vs the amount that the screw is turned was always a bit of a guess.
After scratching my head over it for a while I have finally figured out how to make an adjustable optical endstop in which every full turn of the screw moves the bed by 100 um.
The key is to use a differential screw. I use an M5 x0.8 screw with a thumbwheel for the adjuster and an M4 x0.7 screw to move the flag that interrupts the light beam. The flag has an M4 nut embedded in it and is prevented from rotating as the screw is turned. As the adjuster screw is turned, it moves 0.8 mm up per turn. The nut/flag on the M4 screw moves down by 0.7mm (relative to the screw) leaving a net upward motion of the nut/flag by 0.1 mm. I am building it for a total adjustment range of 2 mm. The opto endstop sensor will be on a bracket that mounts on the t-slot frame.
I am in the process of building it and installing it on the printer now.
Ultra MegaMax Dominator 3D printer: [drmrehorst.blogspot.com]
Yes, I still use a Z=0 endstop switch instead of a sensor on the extruder carriage. The old endstop used a lever and cam to effectively reduce the adjuster screw thread pitch. It worked for a snap switch, but I couldn't figure out a good way to adapt it to an optical sensor, and the amount of Z position adjustment vs the amount that the screw is turned was always a bit of a guess.
After scratching my head over it for a while I have finally figured out how to make an adjustable optical endstop in which every full turn of the screw moves the bed by 100 um.
The key is to use a differential screw. I use an M5 x0.8 screw with a thumbwheel for the adjuster and an M4 x0.7 screw to move the flag that interrupts the light beam. The flag has an M4 nut embedded in it and is prevented from rotating as the screw is turned. As the adjuster screw is turned, it moves 0.8 mm up per turn. The nut/flag on the M4 screw moves down by 0.7mm (relative to the screw) leaving a net upward motion of the nut/flag by 0.1 mm. I am building it for a total adjustment range of 2 mm. The opto endstop sensor will be on a bracket that mounts on the t-slot frame.
I am in the process of building it and installing it on the printer now.

Ultra MegaMax Dominator 3D printer: [drmrehorst.blogspot.com]
|
Re: Fine adjusting Z=0 optical endstop February 24, 2020 12:23PM |
Registered: 11 years ago Posts: 5,780 |
A bit slow in finishing this one, I managed to fabricate the hardest part- the differential screw- on Sunday. I turned an M5 screw down to 4 mm on a lathe and then used a die to cut M4x0.7 mm threads in it. I should have it finished up in a day or two.
Ultra MegaMax Dominator 3D printer: [drmrehorst.blogspot.com]

Ultra MegaMax Dominator 3D printer: [drmrehorst.blogspot.com]
|
Re: Fine adjusting Z=0 optical endstop February 24, 2020 01:33PM |
Registered: 12 years ago Posts: 1,450 |
|
Re: Fine adjusting Z=0 optical endstop February 24, 2020 02:20PM |
Registered: 11 years ago Posts: 5,780 |
It could be useful for that... I'd have to think about how to make the sliding nut stable enough for bed tramming.
Ultra MegaMax Dominator 3D printer: [drmrehorst.blogspot.com]
Ultra MegaMax Dominator 3D printer: [drmrehorst.blogspot.com]
|
Re: Fine adjusting Z=0 optical endstop February 25, 2020 02:59PM |
Registered: 11 years ago Posts: 5,780 |
My 50mm M5 screw turned out to be a little too short for my Z=0 switch, so I'll get a longer screw and try again.
Ultra MegaMax Dominator 3D printer: [drmrehorst.blogspot.com]


Ultra MegaMax Dominator 3D printer: [drmrehorst.blogspot.com]
|
Re: Fine adjusting Z=0 optical endstop March 08, 2020 09:09PM |
Registered: 11 years ago Posts: 5,780 |
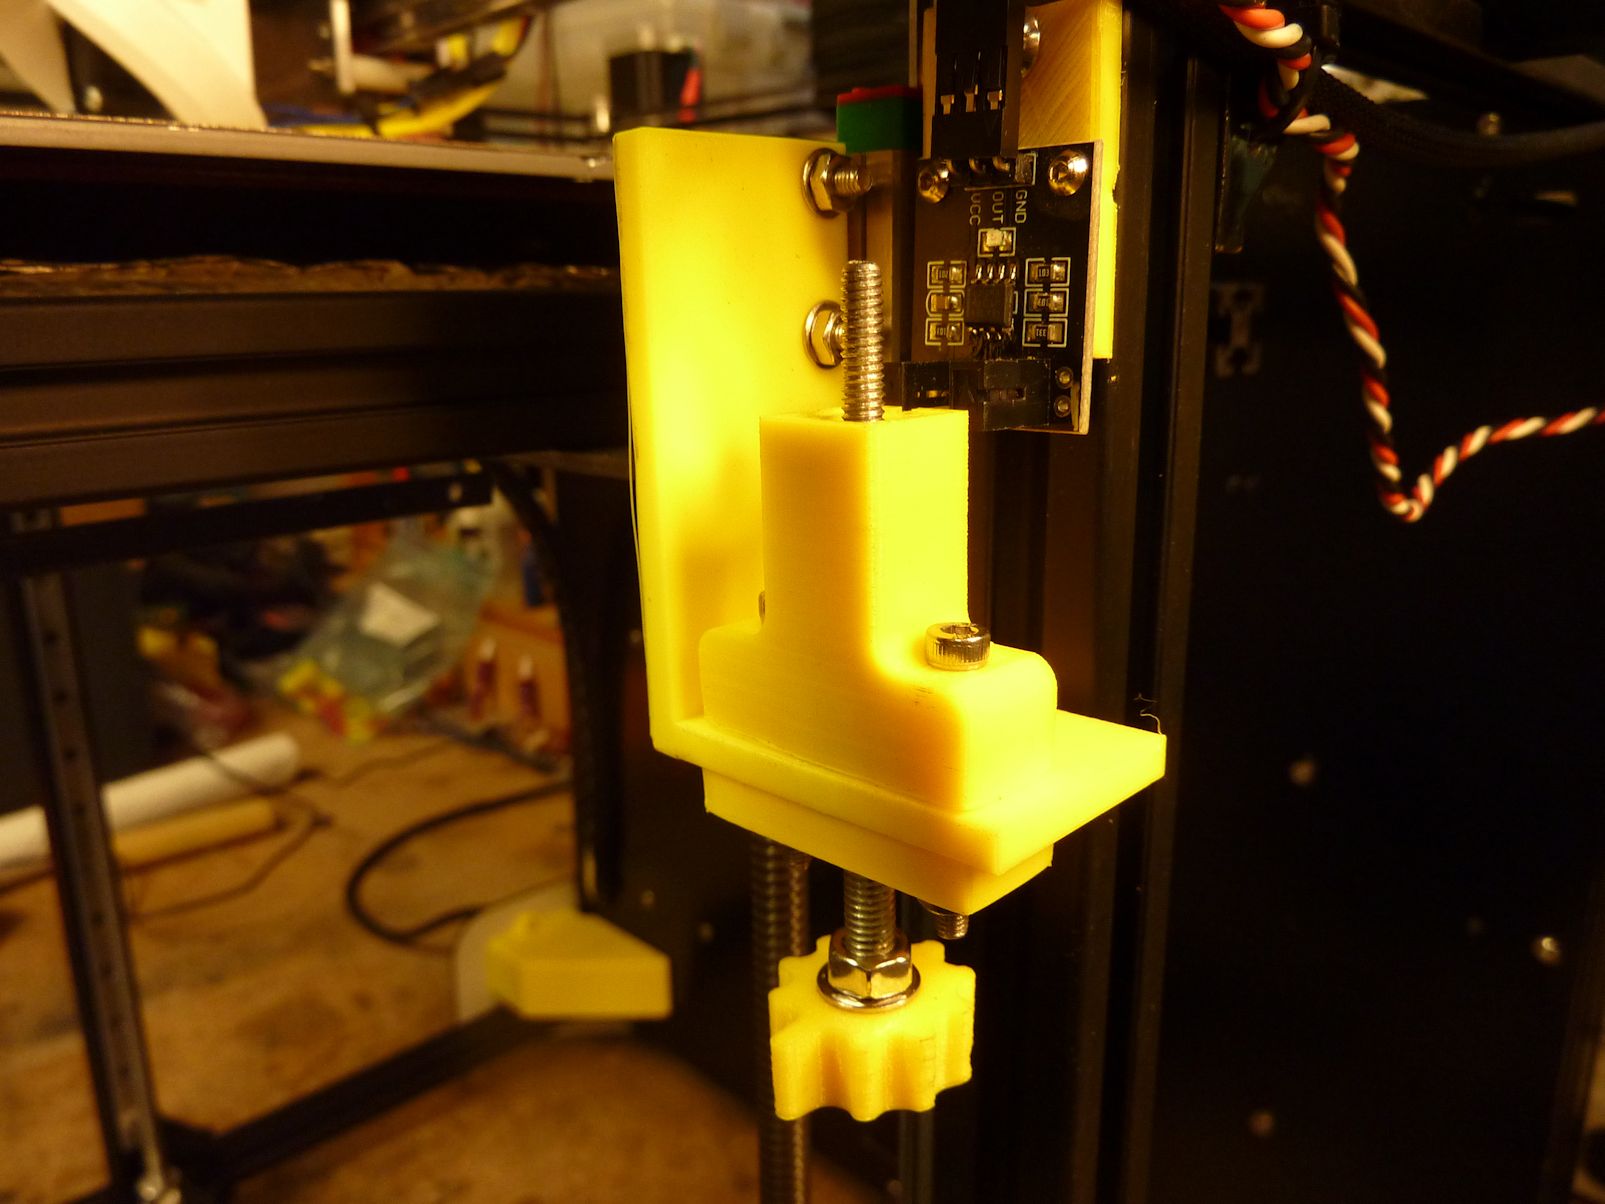
It's in and working:
More: [drmrehorst.blogspot.com]
Ultra MegaMax Dominator 3D printer: [drmrehorst.blogspot.com]

More: [drmrehorst.blogspot.com]
Ultra MegaMax Dominator 3D printer: [drmrehorst.blogspot.com]
|
Re: Fine adjusting Z=0 optical endstop March 11, 2020 11:05AM |
Registered: 7 years ago Posts: 619 |
DD,
Maybe I am just a little slow, but I don't quite understand the problem that this solves. Why not just use the M4x0.7 bolt to start with?
DLC
Kits: Folgertech Kossel 2020 upgraded E3Dv6, Anet A8 upgraded E3Dv6, Tevo Tarantula enhanced parts and dual-head, TronXY X5SA Pro(E3DHemera).
Scratch: Large bed Cartesian, exchangeable heads, Linear slide Delta, Maker-Beam XL Micro Delta, 220x220CoreXY.
|
Re: Fine adjusting Z=0 optical endstop March 11, 2020 02:59PM |
Registered: 11 years ago Posts: 5,780 |
When you turn an M4 screw 1 rev it moves 0.7 mm- >3 full print layers. How do you make the typically small adjustments needed with that?
With the differential screw I used, one full turn of the screw moves the bed 100 um, so making an adjustment of 30-50 um is easy.
Ultra MegaMax Dominator 3D printer: [drmrehorst.blogspot.com]
With the differential screw I used, one full turn of the screw moves the bed 100 um, so making an adjustment of 30-50 um is easy.
Ultra MegaMax Dominator 3D printer: [drmrehorst.blogspot.com]
|
Re: Fine adjusting Z=0 optical endstop April 06, 2020 11:58PM |
Registered: 6 years ago Posts: 33 |
|
Re: Fine adjusting Z=0 optical endstop April 07, 2020 07:59AM |
Registered: 11 years ago Posts: 5,780 |
The full CAD file is here: [a360.co] If you use Fusion360 you can download the file, edit it as you need, and export individual STLs from it.
If you're not a Fusion360 user, here are the STL files for the printable parts. I zipped them together.
Ultra MegaMax Dominator 3D printer: [drmrehorst.blogspot.com]
If you're not a Fusion360 user, here are the STL files for the printable parts. I zipped them together.
Ultra MegaMax Dominator 3D printer: [drmrehorst.blogspot.com]
|
Re: Fine adjusting Z=0 optical endstop April 07, 2020 10:20AM |
Registered: 6 years ago Posts: 33 |
|
Re: Fine adjusting Z=0 optical endstop May 08, 2020 01:53PM |
Registered: 6 years ago Posts: 33 |
DD, I've built your nifty Fine adjusting Z endstop.. I used a 70mm bolt and get 1.6MM of adjustment. Z=0 is now a breeze on my Sec-kit, I did lose a little Z height which with a little redesign could be corrected. Picture attached, don't know how to do in message pictures on this forum like you did.
Thanks for sharing.
Thanks for sharing.
|
Re: Fine adjusting Z=0 optical endstop May 08, 2020 02:49PM |
Registered: 11 years ago Posts: 5,780 |
|
Re: Fine adjusting Z=0 optical endstop May 08, 2020 03:33PM |
Registered: 6 years ago Posts: 33 |
|
Re: Fine adjusting Z=0 optical endstop May 08, 2020 04:37PM |
Registered: 11 years ago Posts: 5,780 |
It doesn't seem to be working right- but select "attach a file", then choose your file, then "attach" then "create link in message". It says files can be up to 10MB, but I tried to attach a 1.6 MB version of this and itcomplained that it was too large. This smaller one, 273KB worked.
I frequently just insert links to images on my blog or elsewhere, in which case I use the image icon to specifically link to an image.
Edited 2 time(s). Last edit at 05/08/2020 04:39PM by the_digital_dentist.
Ultra MegaMax Dominator 3D printer: [drmrehorst.blogspot.com]

I frequently just insert links to images on my blog or elsewhere, in which case I use the image icon to specifically link to an image.
Edited 2 time(s). Last edit at 05/08/2020 04:39PM by the_digital_dentist.
Ultra MegaMax Dominator 3D printer: [drmrehorst.blogspot.com]
|
Re: Fine adjusting Z=0 optical endstop May 10, 2020 04:32PM |
Registered: 6 years ago Posts: 33 |
Sorry, only registered users may post in this forum.