My first self made 3D printer presentation and ask for help
Posted by kryst3q
|
My first self made 3D printer presentation and ask for help May 12, 2023 06:54PM |
Registered: 11 months ago Posts: 3 |
Hello everyone!
I'm happy to join to this forum and announce that I finally end my first 3D printer (Prusa i3 Rework) built according to instructions from reprap wiki. My specification is:
- T2 belts (X, Z)
- 20-tooth pulleys (X, Z)
- NEMA 17 motors
- RAMPS 1.4
- Arduino MEGA 2560
- Stepper motor drivers: Y (StepStick, set to 1.22V, not so loud), X (DRV8825 based driver, set to 0.85V, louder than Y), Z (DRV8825 based driver, set to 0.85V, very loud), E (DRV8825 based driver, 1.5V, not so loud)
- Marlin firmware (version downloaded from the printer page I put link above)
I was able to perform 3 prints of calibration cube. Each one of them was better than previous one but still something needs to be calibrated. I also probably need new filament because the current one (SWIFT PET-G 1.75mm, black) was laying down few last years without moisture protection (according to what I read about it in the internet it can be a problem, right?).
As a beginner I have few questions and would be very grateful for any help.
1. In my Marlin firmware I have such configuration set currently: #define DEFAULT_AXIS_STEPS_PER_UNIT {5,5,250,30}. But those values (which led me to print the cube above) are not matching the calculations done according to this page. My question is: what is going on? Where is the problem? Why those values does not match?
2. When I click homing axes are moving very slowly (they're fast during a print). Should it be that way or I can change something so they will be as fast as during the print?
3. Connection place between extruder and it's radiator is leaking (but it's not disturbing printing process - at least on the first glance). Should I be bothered by that? What can be a cause of this?
Thank you in advance!
I'm happy to join to this forum and announce that I finally end my first 3D printer (Prusa i3 Rework) built according to instructions from reprap wiki. My specification is:
- T2 belts (X, Z)
- 20-tooth pulleys (X, Z)
- NEMA 17 motors
- RAMPS 1.4
- Arduino MEGA 2560
- Stepper motor drivers: Y (StepStick, set to 1.22V, not so loud), X (DRV8825 based driver, set to 0.85V, louder than Y), Z (DRV8825 based driver, set to 0.85V, very loud), E (DRV8825 based driver, 1.5V, not so loud)
- Marlin firmware (version downloaded from the printer page I put link above)


I was able to perform 3 prints of calibration cube. Each one of them was better than previous one but still something needs to be calibrated. I also probably need new filament because the current one (SWIFT PET-G 1.75mm, black) was laying down few last years without moisture protection (according to what I read about it in the internet it can be a problem, right?).

As a beginner I have few questions and would be very grateful for any help.
1. In my Marlin firmware I have such configuration set currently: #define DEFAULT_AXIS_STEPS_PER_UNIT {5,5,250,30}. But those values (which led me to print the cube above) are not matching the calculations done according to this page. My question is: what is going on? Where is the problem? Why those values does not match?
2. When I click homing axes are moving very slowly (they're fast during a print). Should it be that way or I can change something so they will be as fast as during the print?
3. Connection place between extruder and it's radiator is leaking (but it's not disturbing printing process - at least on the first glance). Should I be bothered by that? What can be a cause of this?

Thank you in advance!
|
Re: My first self made 3D printer presentation and ask for help May 13, 2023 12:34AM |
Admin Registered: 13 years ago Posts: 7,000 |
1) steps/mm calculations includes micro stepping. From the values you have given you have no micro stepping.
Under each stepper driver is 3 jumpers. these set the microstepping.
For the DRV8825 the tables looks like this. If the jumper is on, this is a HIGH. Off is a LOW
X and Y should be set to 1/16 microstepping
Z most people set it to 1/8 microstepping
2) homing should be slower than printing. You don't want the axis smashing the endstop. These are set with
3) Yes you need to fix it. it will gather and drip on your print, if you print white you get nasty black blobs
The blobs can also be enough to get in the way of the hotend when it is moving and make the stepper skip steps.
You need to tighten this while hot.
Don't be all touch guy with it, you will snap the threaded bit ( Heat Break )
See [wiki.e3d-online.com]
Edited 7 time(s). Last edit at 05/13/2023 01:39AM by Dust.
Under each stepper driver is 3 jumpers. these set the microstepping.
For the DRV8825 the tables looks like this. If the jumper is on, this is a HIGH. Off is a LOW

X and Y should be set to 1/16 microstepping
Z most people set it to 1/8 microstepping
2) homing should be slower than printing. You don't want the axis smashing the endstop. These are set with
// Homing speeds (linear=mm/min, rotational=°/min)
#define HOMING_FEEDRATE_MM_M { (40*60), (40*60), (6*60) }
The math is just converting form mm/minute to mm/seconds so X is 40 mm/s homing speed.3) Yes you need to fix it. it will gather and drip on your print, if you print white you get nasty black blobs
The blobs can also be enough to get in the way of the hotend when it is moving and make the stepper skip steps.
You need to tighten this while hot.
Don't be all touch guy with it, you will snap the threaded bit ( Heat Break )
See [wiki.e3d-online.com]
Edited 7 time(s). Last edit at 05/13/2023 01:39AM by Dust.
|
Re: My first self made 3D printer presentation and ask for help May 16, 2023 02:57AM |
Registered: 11 months ago Posts: 3 |
|
Re: My first self made 3D printer presentation and ask for help June 04, 2023 06:05PM |
Registered: 11 months ago Posts: 3 |
Once again thanks for help! I confirm that the root cause of poor quality was lack of microstepping. After adding jumpers according to your proposal everything started to look a lot better (see attached photos). I also added springs to my bed so it is easier to set it up, did final tightening as described in the link and added PTFE tube inside rod. No leaks for now.
Currently I'm experimenting with proper slicing settings for prints with my SWIFT PET-G filament (1.75 mm). Do you have any thoughts about this? For now the best results I'm getting by applying below settings while slicing:
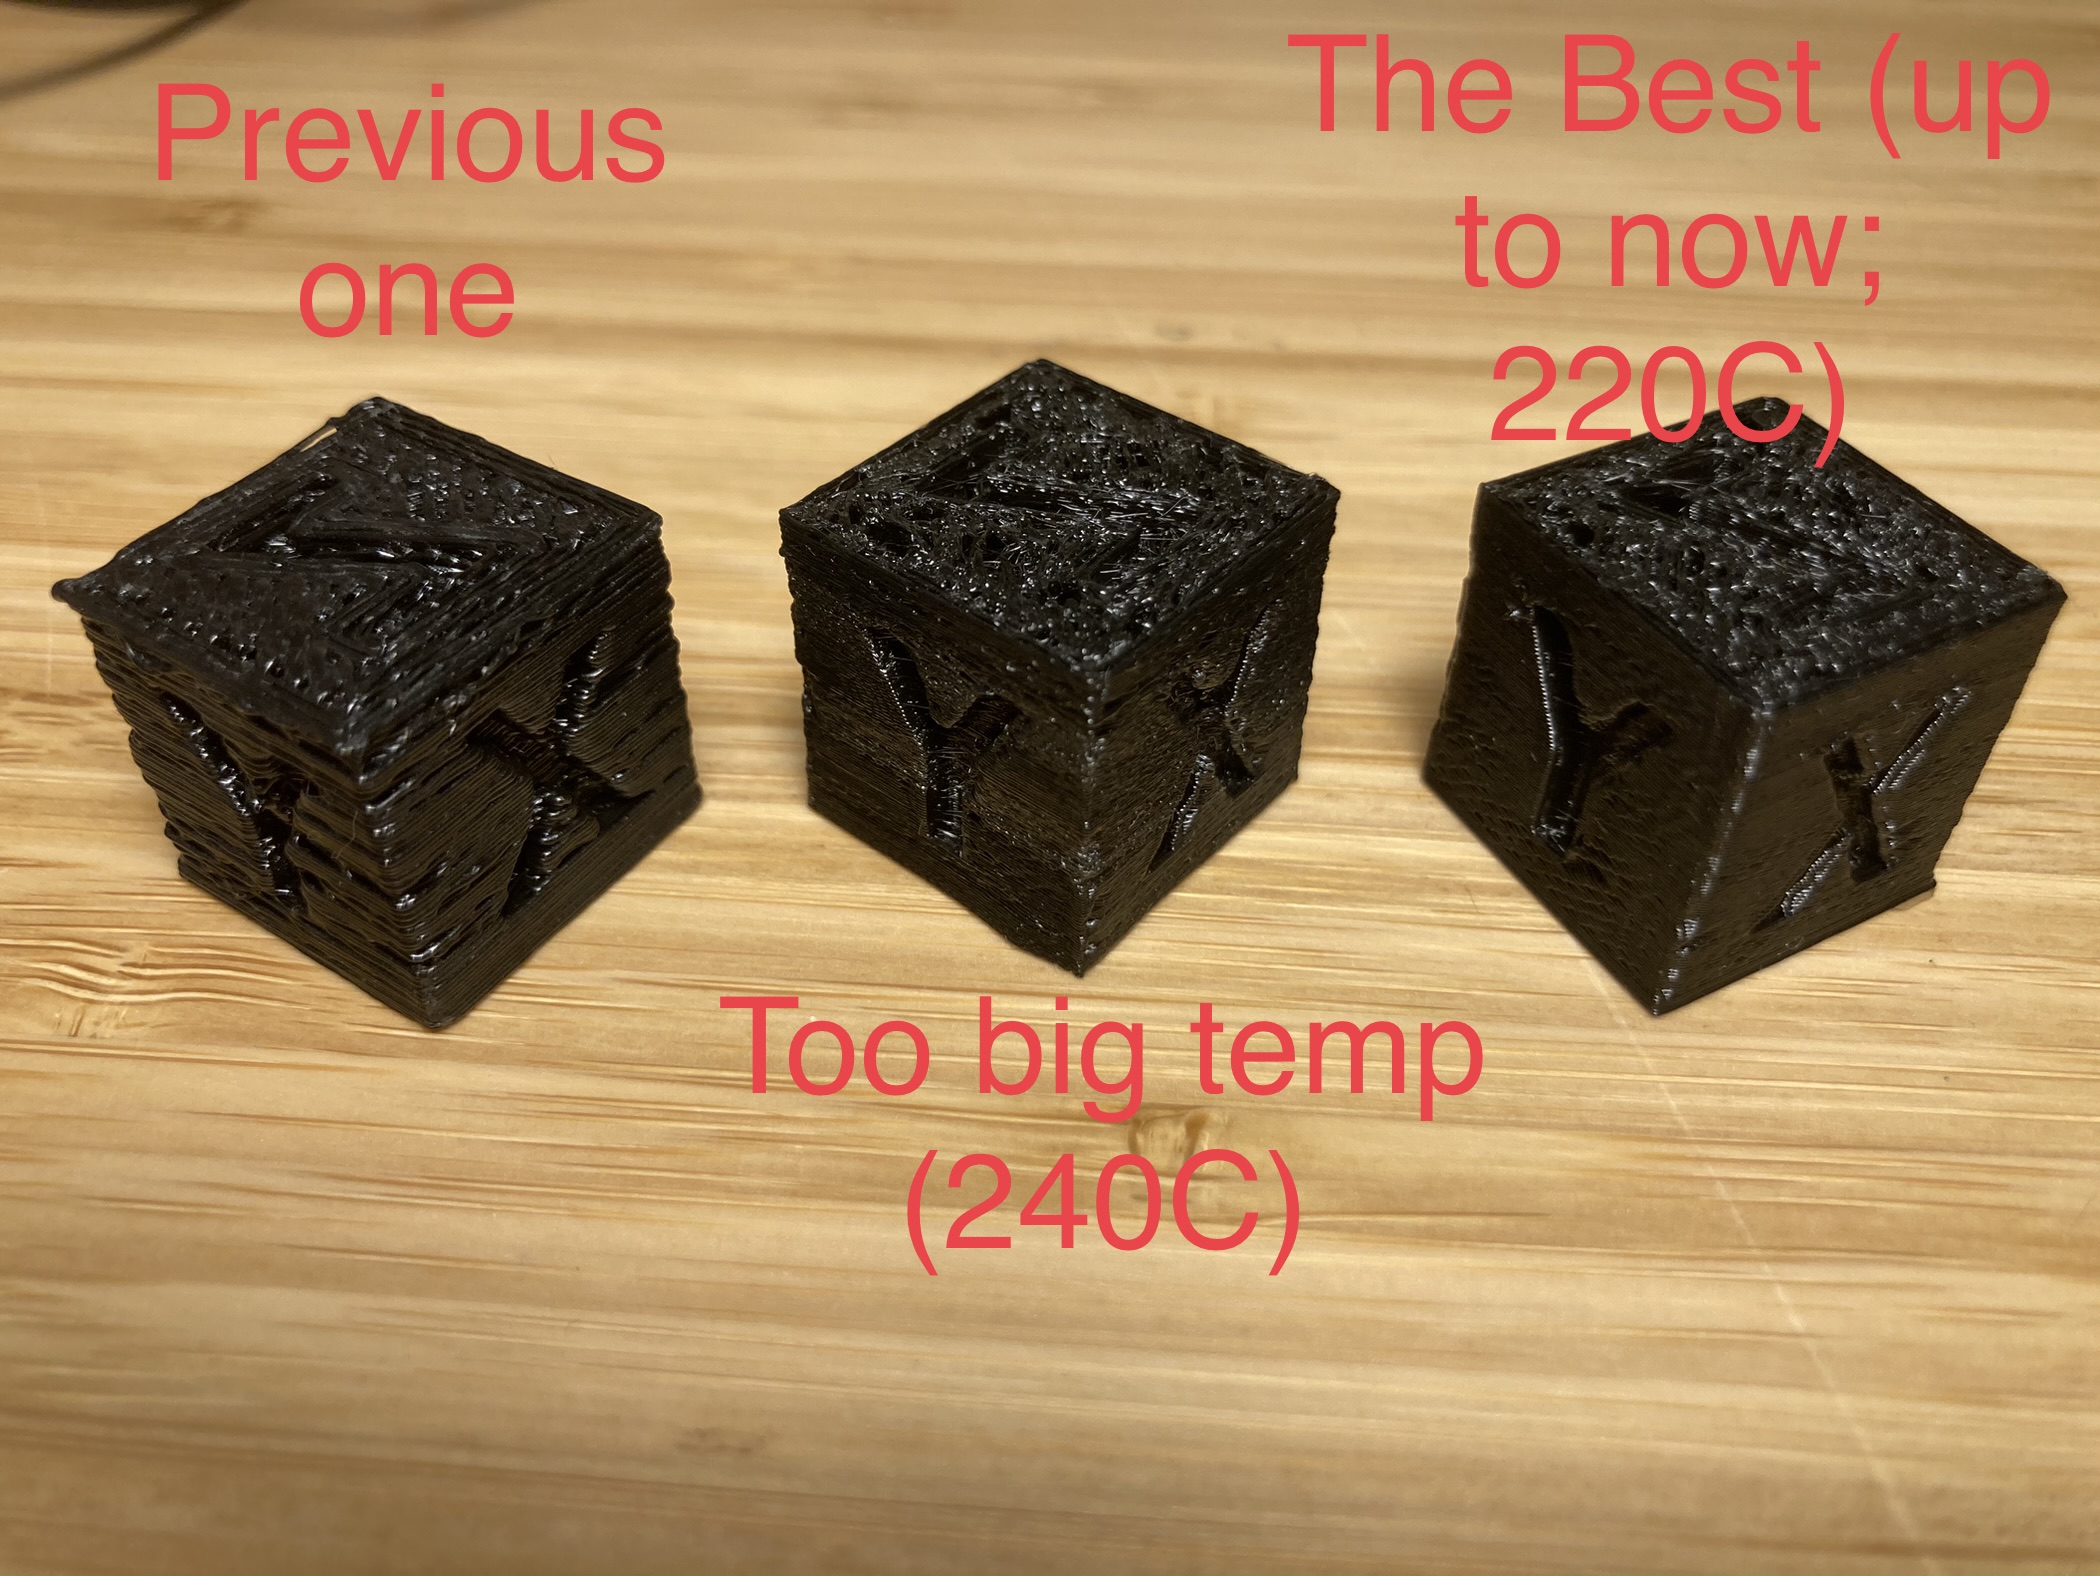
I'm mostly got rid of strings but still infill is not as solid as it should be (it should, right?) - lowering the temperature from 240 C to 220 C helped in that. Can it be improved more? Besides that I'm facing two bigger problems:
1. The last, ending layer ("Z" one) should be complete and smooth. Mine is not filled, there are gaps (see attached photo). I suppose that it can be the result of problems in few lower layers. During the print the blobs appeared there and some of them were sticking to the nozzle and the created layers were not flat.
2. There are still some "errors" on letters - not all their edges are straight and sharp.
3. Last but not least - print start. Is it always so hard? My problem is that in the last moment before print start the hotend is beeing heaten to the requested temperature and the filament starts to escape from the nozzle without beeing pushed, but because of the temperature. Then the printer runs and most of the time the filament is sticking to each other creating blob that sticks to the nozzle and gathering the one that is pushing.
This is part of my current Marlin configuration:
Thanks in advance!
Edited 1 time(s). Last edit at 06/05/2023 06:15AM by kryst3q.
Currently I'm experimenting with proper slicing settings for prints with my SWIFT PET-G filament (1.75 mm). Do you have any thoughts about this? For now the best results I'm getting by applying below settings while slicing:
slic3r
  \ --filament-diameter 1.75
  \ --temperature 220
  \ --first-layer-bed-temperature 60
  \ --bed-temperature 0
  \ --nozzle-diameter 0.4
  \ --layer-height 0.2
  \ --extrusion-width 0.5
  \ --infill-speed 40
  \ --perimeter-speed 30
  \ --bridge-speed 30
  \ xyzCalibration_cube.stl
I'm mostly got rid of strings but still infill is not as solid as it should be (it should, right?) - lowering the temperature from 240 C to 220 C helped in that. Can it be improved more? Besides that I'm facing two bigger problems:
1. The last, ending layer ("Z" one) should be complete and smooth. Mine is not filled, there are gaps (see attached photo). I suppose that it can be the result of problems in few lower layers. During the print the blobs appeared there and some of them were sticking to the nozzle and the created layers were not flat.
2. There are still some "errors" on letters - not all their edges are straight and sharp.
3. Last but not least - print start. Is it always so hard? My problem is that in the last moment before print start the hotend is beeing heaten to the requested temperature and the filament starts to escape from the nozzle without beeing pushed, but because of the temperature. Then the printer runs and most of the time the filament is sticking to each other creating blob that sticks to the nozzle and gathering the one that is pushing.
This is part of my current Marlin configuration:
#define HOMING_FEEDRATE { (40*60), (40*60), (6*60) }  // set the homing speeds (mm/min) changed z homing from 4*60 to 3*60

// default settings

#define DEFAULT_AXIS_STEPS_PER_UNIT   {80, 80, 2000, 455} //{80,80,4000,455} // default steps per unit for Baja
#define DEFAULT_MAX_FEEDRATE          {250, 250, 3.3, 25}//{250, 250, 3.3, 25}    // (mm/sec)
#define DEFAULT_MAX_ACCELERATION      {3000,3000,100,10000}    // X, Y, Z, E maximum start speed for accelerated moves. E default values are good for Skeinforge 40+, for older versions raise them a lot. //

#define DEFAULT_ACCELERATION          1000    // X, Y, Z and E max acceleration in mm/s^2 for printing moves default was 3000
#define DEFAULT_RETRACT_ACCELERATION  1000   // X, Y, Z and E max acceleration in mm/s^2 for retracts

// Offset of the extruders (uncomment if using more than one and relying on firmware to position when changing).
// The offset has to be X=0, Y=0 for the extruder 0 hotend (default extruder).
// For the other hotends it is their distance from the extruder 0 hotend.
// #define EXTRUDER_OFFSET_X {0.0, 20.00} // (in mm) for each extruder, offset of the hotend on the X axis
// #define EXTRUDER_OFFSET_Y {0.0, 5.00}  // (in mm) for each extruder, offset of the hotend on the Y axis

// The speed change that does not require acceleration (i.e. the software might assume it can be done instantaneously)
#define DEFAULT_XYJERK                20.0    // (mm/sec)
#define DEFAULT_ZJERK                 0.4     // (mm/sec)
#define DEFAULT_EJERK                 5.0    // (mm/sec)
Thanks in advance!
Edited 1 time(s). Last edit at 06/05/2023 06:15AM by kryst3q.
Sorry, only registered users may post in this forum.