Aluminium RepRap with leadscrews
Posted by samp20
|
Re: Aluminium RepRap with leadscrews January 08, 2014 07:10PM |
Registered: 10 years ago Posts: 115 |
Can you be a bit more specific describing the "vertical wall with a hole"?
This sort of test would show the issue I think you're talking about: [www.thingiverse.com]. The ringing issue was the main reason for me switching to leadscrews.
For reference here's how bad the ringing was with my old printer:
Edited 1 time(s). Last edit at 01/08/2014 07:13PM by samp20.
This sort of test would show the issue I think you're talking about: [www.thingiverse.com]. The ringing issue was the main reason for me switching to leadscrews.
For reference here's how bad the ringing was with my old printer:
Edited 1 time(s). Last edit at 01/08/2014 07:13PM by samp20.
|
Re: Aluminium RepRap with leadscrews January 08, 2014 11:14PM |
Registered: 11 years ago Posts: 334 |
If you run into stalling due to midband resonance you should consider adding dampners.
WWW.ZATOPA.COM - Your Place for high quality 3D Printing Filament and accessories
WWW.ZATOPA.COM - Your Place for high quality 3D Printing Filament and accessories
|
Re: Aluminium RepRap with leadscrews January 10, 2014 01:19PM |
Registered: 10 years ago Posts: 115 |
I don't have an issue of stalling, although some damping is still a very good idea. This video is it's first print: [www.youtube.com]. It's a mount for my RAMPS board. Cable management is also on the TODO list.
Edited 2 time(s). Last edit at 01/10/2014 01:22PM by samp20.
Edited 2 time(s). Last edit at 01/10/2014 01:22PM by samp20.
|
Re: Aluminium RepRap with leadscrews January 10, 2014 04:53PM |
Registered: 11 years ago Posts: 334 |
Samp20, I watched the video and it looks like your design is working brilliantly. Once it's complete will you be releasing a BOM and build details? If so I would love to put a post about it up on my blog.
Could you send me a link to the couplers you are using, I am having trouble finding the right size couplers for the screw I have available. Even though you are on the other side of the pond from me it might lead me to a supplier here. The screw you are using is 9mm correct?
I can't wait to see some pics of your prints after you get the machine dialed in and making bigger prints.
WWW.ZATOPA.COM - Your Place for high quality 3D Printing Filament and accessories
|
Re: Aluminium RepRap with leadscrews January 10, 2014 06:33PM |
Registered: 10 years ago Posts: 115 |
The screw I'm using is this one which is 6mm outer diameter: [www.mooreinternational.co.uk]. I had the screw turned down to 5mm each end. The couplings were these: [pages.ebay.com].
Build progress can be found on the wiki [reprap.org]. The stl files and the Sketchup model are in the linked github repo. The files may still change if I decide to reprint some parts (3D printing makes it too easy!). Also the BOM and printed parts lists on the wiki still need updating.
Edited 1 time(s). Last edit at 01/10/2014 06:34PM by samp20.
|
Re: Aluminium RepRap with leadscrews January 11, 2014 04:18PM |
Registered: 11 years ago Posts: 334 |
I have been searching for a multistart rod and cheap matching coupler and its been hard. I don't have a lathe and getting ends turned down around here is almost impossible. Everything I have found is either to expensive or it's affordable and needs the ends turned down. I may have to just buy a lathe one of these days.
WWW.ZATOPA.COM - Your Place for high quality 3D Printing Filament and accessories
WWW.ZATOPA.COM - Your Place for high quality 3D Printing Filament and accessories
|
Re: Aluminium RepRap with leadscrews January 11, 2014 05:07PM |
Registered: 10 years ago Posts: 115 |
I don't own a lathe either. The company I bought from turned them down for me. Their supplier is in Switserland: [www.gewinde.ch]. You may be able to find a nearby distributor here: [www.gewinde.ch]
Edited 2 time(s). Last edit at 01/11/2014 05:12PM by samp20.
Edited 2 time(s). Last edit at 01/11/2014 05:12PM by samp20.
|
Re: Aluminium RepRap with leadscrews January 17, 2014 01:40PM |
Registered: 12 years ago Posts: 227 |
Quote
samp20
Can you be a bit more specific describing the "vertical wall with a hole"?
This sort of test would show the issue I think you're talking about: [www.thingiverse.com]. The ringing issue was the main reason for me switching to leadscrews.
For reference here's how bad the ringing was with my old printer:
Yes! exactly what I mean.
Is ringing issue eliminated?
About video. It seems X and Y sounds are different. X carriage is more quiet. Yes?
Edited 1 time(s). Last edit at 01/17/2014 01:46PM by karabas.
|
Re: Aluminium RepRap with leadscrews January 17, 2014 06:32PM |
Registered: 10 years ago Posts: 115 |
Unfortunately the ringing issue isn't completely eliminated, but massively reduced. I think lowering the acceleration will help a bit further.Quote
karabas
Yes! exactly what I mean.
Is ringing issue eliminated?
About video. It seems X and Y sounds are different. X carriage is more quiet. Yes?
The Y axis is noisier than the X. I think the frame and bed are amplifying the vibrations a bit. Some decoupling similar to this idea could work: [www.thingiverse.com], although there's a risk of reintroducing the ringing.
|
Re: Aluminium RepRap with leadscrews January 18, 2014 04:45PM |
Registered: 12 years ago Posts: 227 |
How can it be?? Frame vibrations? I dont thinks so.Quote
samp20
Unfortunately the ringing issue isn't completely eliminatedQuote
karabas
Yes! exactly what I mean.
Is ringing issue eliminated?
About video. It seems X and Y sounds are different. X carriage is more quiet. Yes?
The only thing I can imagine is that motors cannot stop instantly...
what about car noise removing foam?Quote
The Y axis is noisier than the X. I think the frame and bed are amplifying the vibrations a bit. Some decoupling similar to this idea could work: [www.thingiverse.com], although there's a risk of reintroducing the ringing.
|
Re: Aluminium RepRap with leadscrews January 18, 2014 06:13PM |
Registered: 10 years ago Posts: 115 |
I think it might be the plastic deforming slightly. Ideally I need a stiffer leadscrew nut holder on the X carriage.Quote
karabas
How can it be?? Frame vibrations? I dont thinks so.
The only thing I can imagine is that motors cannot stop instantly...
Would this be for an enclosure? An enclosure would only hide the source of the noise rather than sorting the problem itself. That being said I have since put some felt which I had available onto the feet which reduces the noise transmitted through the floor.Quote
karabas
what about car noise removing foam?Quote
The Y axis is noisier than the X. I think the frame and bed are amplifying the vibrations a bit. Some decoupling similar to this idea could work: [www.thingiverse.com], although there's a risk of reintroducing the ringing.
I've since recorded some slow motion video (1/8 speed) of the axes with my phone. The Y axis has some obvious oscillation issues. If you look close enough at the following YouTube video the entire leadscrew is moving which indicates flexing in the thrust bearing holders: [www.youtube.com]. The distance moved is 1mm.
Edited 2 time(s). Last edit at 01/18/2014 06:15PM by samp20.
|
Re: Aluminium RepRap with leadscrews January 19, 2014 04:42AM |
Registered: 12 years ago Posts: 227 |
I see bed plays along the lead screw. It means flexible bed to nut attachment OR bed springs ( if your bed stands on springs). I have similar on my belt driven bed due to flexible belt holder and spring posts.Quote
samp20
I think it might be the plastic deforming slightly. Ideally I need a stiffer leadscrew nut holder on the X carriage.Quote
karabas
How can it be?? Frame vibrations? I dont thinks so.
The only thing I can imagine is that motors cannot stop instantly...
Would this be for an enclosure? An enclosure would only hide the source of the noise rather than sorting the problem itself. That being said I have since put some felt which I had available onto the feet which reduces the noise transmitted through the floor.Quote
karabas
what about car noise removing foam?Quote
The Y axis is noisier than the X. I think the frame and bed are amplifying the vibrations a bit. Some decoupling similar to this idea could work: [www.thingiverse.com], although there's a risk of reintroducing the ringing.
I've since recorded some slow motion video (1/8 speed) of the axes with my phone. The Y axis has some obvious oscillation issues. If you look close enough at the following YouTube video the entire leadscrew is moving which indicates flexing in the thrust bearing holders: [www.youtube.com]. The distance moved is 1mm.
|
Re: Aluminium RepRap with leadscrews January 25, 2014 03:28PM |
Registered: 10 years ago Posts: 115 |
The problem was a flexible bed to nut attachment. I've now designed and printed a sturdier mount which seems to have significantly improved things. I've also shimmed the bed to linear bearing mounts with a few pieces of paper to get the leadscrew nut holder vertically centred. The new mount and the paper have also reduced the vibration to levels I think are acceptable.
|
Re: Aluminium RepRap with leadscrews February 07, 2014 11:54AM |
Registered: 12 years ago Posts: 227 |
|
Re: Aluminium RepRap with leadscrews February 09, 2014 04:04PM |
Registered: 10 years ago Posts: 115 |
Sorry, I'm feeling a bit ill at the moment with my Crohn's, so not much more progress lately. I have done a bit of cable management since last time, but that's about it.Quote
karabas
Any news?
When I'm feeling better I'll try and make a guided tour video of the printer. Don't let me forget

|
Re: Aluminium RepRap with leadscrews February 20, 2014 05:26PM |
Registered: 10 years ago Posts: 4 |
Looking forward to seeing this all finished! I have a solidoodle3 printer and currently looking for a new bigger printer design to take my kraken 4 colour hotend... Might have to pick your brains about your lead screws...
I'm not entirely sure what the figures on pitch etc mean or how they effect the performance?
Do you mind me asking how much each one cost?
Cheers
I'm not entirely sure what the figures on pitch etc mean or how they effect the performance?
Do you mind me asking how much each one cost?
Cheers
|
Re: Aluminium RepRap with leadscrews February 21, 2014 01:34AM |
Registered: 12 years ago Posts: 227 |
I search alternative sources of these lead screws but it seems [www.mooreinternational.co.uk] the only online source. Other distribuitors have no online shops on their websites. May I missed something.
|
Re: Aluminium RepRap with leadscrews February 21, 2014 02:11AM |
Registered: 10 years ago Posts: 4 |
|
Re: Aluminium RepRap with leadscrews February 25, 2014 03:39AM |
Registered: 10 years ago Posts: 115 |
The effective pitch is the distance the leadscrew will move per 1 revolution. This will determine the steps/mm of your printer. Also you can get multi-start leadscrews which have multiple threads. This allows for a smaller diameter leadscrew. The screws I have cost roughly £45 each including the nut.Quote
Staffordknot
I'm not entirely sure what the figures on pitch etc mean or how they effect the performance?
Do you mind me asking how much each one cost?
Cheers
On a separate note I've uploaded a new YouTube video giving a quick overview of the printer. It also demonstrates some experimental firmware I'm working on which uses entirely fixed point math, and should be capable at stepping at much higher frequencies than my current RAMPS controller. All of the floating point math will be offloaded onto a microcomputer. Here's the link: [www.youtube.com]
|
Re: Aluminium RepRap with leadscrews March 04, 2014 03:58AM |
Registered: 13 years ago Posts: 78 |
|
Re: Aluminium RepRap with leadscrews March 18, 2014 07:34PM |
Registered: 10 years ago Posts: 115 |
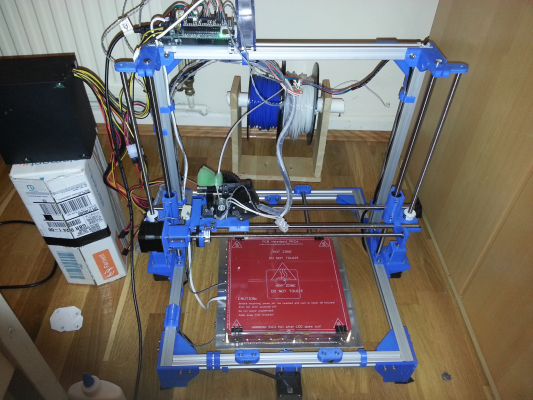
I've added some more photos onto the ScrewRap wiki page:
The machine is running fairly well right now, although with a long print I had a few skipped steps. This problem seems to have disappeared after reducing the acceleration a little.
Although the leadscrews seem to be working fairly well now, I'm not entirely happy. The vibration noise is still too much, and I'm slightly concerned this is going to wear out the Delrin nuts over time. I've decided to give belts another try. This time I'll make sure the printed parts incorporate a mechanism for tensioning the belts, something my Prusa i2 was missing.
Some people might think I'm wasting my time switching around all the time, but for me it's all a learning experience (and fun).
|
Re: Aluminium RepRap with leadscrews March 18, 2014 08:02PM |
Registered: 10 years ago Posts: 474 |
I wouldn't give up just yet if I were you I think screws are much better what I would do is go to Nema 23's you can get the same power output with a lower amperage because of the diameter there is more leverage. And use use double shaft motors and use a vibration damper on the backside of motors. The other major thing you could do to get real good quality prints is have the Z linear bearing system continuously mounted. You have a very nice-looking machine and I think you're on the right track
|
Re: Aluminium RepRap with leadscrews March 19, 2014 04:34AM |
Registered: 10 years ago Posts: 115 |
Thanks for your support cnc dick. I think I've been tackling this vibration problem the entirely wrong way. A few days ago I decided to put some rubber between the bed and leadscrew mount. Looking back, this was a silly idea since it's allowed the leadscrew mount to twist and thus sometimes bind up the nut. What I'll do is revert the change and upload a video for you to look at. It may be that I'm worrying about nothing. I'd rather not spend any more if I don't have to.
Once again thanks for keeping me on the right track
Once again thanks for keeping me on the right track

|
Re: Aluminium RepRap with leadscrews March 19, 2014 07:26PM |
Registered: 10 years ago Posts: 115 |
Here's the video demonstrating the noise: [www.youtube.com]. I lift the printer off the floor so you can hear it without the amplification from the wooden floor. Should I be worried about this, or can I just carry on printing?
|
Re: Aluminium RepRap with leadscrews March 19, 2014 08:14PM |
Registered: 10 years ago Posts: 474 |
What is the micro-stepping of the Y is it the same as the X. Definitely sounds like there is a bad bearing or something do you have a bearing mounted with the flex coupler like the X. The X sounds much better obviously. I would mount the nut on the Y as close to the motor side of the slide as possible reducing the length of the threaded rod between the motor bearing and coupling to the nut. And try to just remove the bearing on the threaded Rod of the Y rear furthest away from the motor let the threaded Rod hang in the breeze like what people do with the z-axis just as a test. There really shouldn't be any more noise or vibration on the Y than there is on the x unless you got the amperage cranked way up on the y and lower on the x. In that case a bigger motor Nema 23 dual shaft so if you had to you could run a damper would definitely do the trick as long as it was around 5volt 1.5 amp and run it around 1 AMP. A Nema 23 with those specs at 75% power should be somewhere near 100 ounce inch
Edited 12 time(s). Last edit at 03/19/2014 09:00PM by cnc dick.
Edited 12 time(s). Last edit at 03/19/2014 09:00PM by cnc dick.
|
Re: Aluminium RepRap with leadscrews March 20, 2014 07:08PM |
Registered: 10 years ago Posts: 115 |
The micro stepping is the same for the x and y axes. I've adjusted the y nut, and took the opportunity to realign the bearing mounts at the same time. The sound seems better now: [www.youtube.com]. Is a NEMA23 still necessary? Alternatively, to avoid redesigning and printing new parts, I could try a dual shaft NEMA17 with a damper.
Edited 1 time(s). Last edit at 03/20/2014 07:09PM by samp20.
Edited 1 time(s). Last edit at 03/20/2014 07:09PM by samp20.
|
Re: Aluminium RepRap with leadscrews March 20, 2014 07:29PM |
Registered: 12 years ago Posts: 227 |
Did you fix it?Quote
samp20
The problem was a flexible bed to nut attachment. I've now designed and printed a sturdier mount which seems to have significantly improved things. I've also shimmed the bed to linear bearing mounts with a few pieces of paper to get the leadscrew nut holder vertically centred. The new mount and the paper have also reduced the vibration to levels I think are acceptable.
What about "ringing" test? It's _very_important. If "ringing" still exists it means lead screws do not nessesary at all.
|
Re: Aluminium RepRap with leadscrews March 20, 2014 08:17PM |
Registered: 10 years ago Posts: 115 |
I almost forgot about that. When moving 1mm, 40mm/s and 1300mm/s^2, there's roughly 0.4mm of oscillation. That's a cause of the plastic parts flexing a little. At the moment you're right about leadscrews not being beneficial. I have two problems to solve. Firstly the leadscrew itself can move forward and back as the end bearing mounts flex a little. More significant is the leadscrew to bed mount that's flexing. These need to be stiffened up (again) and/or the distance between the leadscrew and bed needs reducing.
What level of oscillation is typically achieved with belt driven printers?
What level of oscillation is typically achieved with belt driven printers?
|
Re: Aluminium RepRap with leadscrews March 20, 2014 08:57PM |
Registered: 10 years ago Posts: 474 |
Do you have the amperage maxed for the stepper motor on the Y. If you do you get a lot of vibration from the cogging effect of the stepper most stepper motors run the smoothest at about 75% of the rated amperage. You can't really tell this cogging affect using belts but with lead screws it transfers vibrations right through the screw. That's why Nema 23 running at 75% gives you a tremendous amount of power but with very little vibration and the higher the micro-stepping is the smoother the motor runs this number is single shaft but cheap and works well KL23H 256 –20- 6a probably about 30 bucks and 75% power will give you close to 100 ounce inch with very low vibration. The dual shaft models I used to like to use are not made anymore
Edited 5 time(s). Last edit at 03/20/2014 09:14PM by cnc dick.
Edited 5 time(s). Last edit at 03/20/2014 09:14PM by cnc dick.
|
Re: Aluminium RepRap with leadscrews October 03, 2015 05:00AM |
Registered: 10 years ago Posts: 67 |
I think that you might find that some of the high frequency noise in Y is your bulldog clips vibrating. Specifically the handles vibrating against the metal clip part. I have the same problem on my printer. If you take the handles off, it will probably be much quieter.
Mike Anton
[manton.ca]
[laserlight.wikidot.com]
Mike Anton
[manton.ca]
[laserlight.wikidot.com]
Sorry, only registered users may post in this forum.


