Cheap-and-cheerful Taobao $150 knock-off running at 200mm/sec
Posted by lkcl
|
Re: Cheap-and-cheerful Taobao $150 knock-off running at 200mm/sec November 27, 2017 02:44PM |
Registered: 8 years ago Posts: 776 |
|
Re: Cheap-and-cheerful Taobao $150 knock-off running at 200mm/sec November 27, 2017 03:49PM |
Registered: 6 years ago Posts: 28 |
No idea, I'm just about to throw my duplicator i3 onto a 2020 frame and I liked how it has 2 beams in the z axis it seems like the best design for sturdiness aside from just building a box (which seems excessive on an i3 style printer).
Just need to go about designing the parts around the existing hardware I have and was looking for inspiration.
Just need to go about designing the parts around the existing hardware I have and was looking for inspiration.
|
Re: Cheap-and-cheerful Taobao $150 knock-off running at 200mm/sec November 27, 2017 06:39PM |
Registered: 8 years ago Posts: 776 |
Quote
fauxsoul
No idea, I'm just about to throw my duplicator i3 onto a 2020 frame and I liked how it has 2 beams in the z axis it seems like the best design for sturdiness aside from just building a box (which seems excessive on an i3 style printer).
Just need to go about designing the parts around the existing hardware I have and was looking for inspiration.
huh, cool.
well you'd be interested to know that, surprisingly, the frame my friend put together you can literally put it up on one corner and press down damn hard on the top, and it doesn't budge. at all. deeply impressive.... mind you there _are_ literally FORTY of those 40x40 triangles in it (!!) - he extended the lower (base) box uprights to 100x20x20 so that he could fit 3 triangles on every damn corner. it's a loootta triangles

the solid base is basically, apart from potential bending of 2020 extrusion, the equivalent of an immovable object that you really shouldn't try to put in front of an unstoppable force: the resultant explosion might take out the universe or something.
the top part however is missing triangles that help brace against side-ways (shear) force at the bottom (top's fine), but this would only really really matter if you ran at mad speeds. of much more concern is the use of rods plus LM8UU bearings, which he's currently looking to replace with low-cost high-accuracy china-sourced ball screws and MGN09H hiwin linear rails. this is definitely classed as "Research Project".
primarily, though, staying within the "mendel" realm, of deploying LM8UU bearings, 8mm rods, and 3D printing parts yourself and so on on top of a sturdy alu frame, the key most important thing that you can do is: under no circumstances use a vertical x-rod setup. it's a different story if you are using linear rails (dual linear rails) because you'd mount them on 2020 extrusion, solid as a rock, no problem, but vertical x-rods? i don't know who came up with the idea, but... well... all you really need to do to convince yourself that it's a f******g stupid idea is: grab the hotend and give it a bit of a waggle. when you've gotten over the shock of quite how much it moves for quite how little pressure you needed to apply with your little pinky, that's when you start to [only] take seriously horizontal x-carriage arrangements for mendel-style 3d printers.
the only other thing: the springs on printbeds are COMPLETELY inadequate for stopping sideways-shear/shifting. this - *sigh* - is something i've recently come to appreciate. you *will* need to take seriously one of the following schemes:
(1) a 4-spring printbed arrangement with 4 L-shaped holders one at EACH CORNER that are smooth enough but snug enough to allow VERTICAL movement of the printbed ONLY.
(2) a 3-spring printbed arrangement on a FIVE hole 3mm alu printbed (original MK3 should do the trick... or get out the drill), where the 2 spare holes have BRASS rods coming up from the under-plate with again a zero-tolerance snug fit into the 2 MK3's front holes (the side that's got the middle spring hole), the underplate should also be made of at least 3mm solid aluminium, preferably 5mm. the trick is: the 3 springs allow for levelling, and the 2 brass rods stop shear but do not restrict up/down movement required for bed-levelling.
both arrangements give you the bed-levelling required yet at the same time prevent sideways-shearing that the springs ALONE are INCAPABLE of preventing. if you don't do this, you get crap-for-brains 3d prints, as the shaking back-forth from the Y-axis, as well as the "drag" from the print-head, *will* cause the printbed to shear sideways, with the obvious result that the print ends up looking like s***e
ahh so many things to catch us out...
|
Re: Cheap-and-cheerful Taobao $150 knock-off running at 200mm/sec November 27, 2017 10:09PM |
Registered: 6 years ago Posts: 28 |
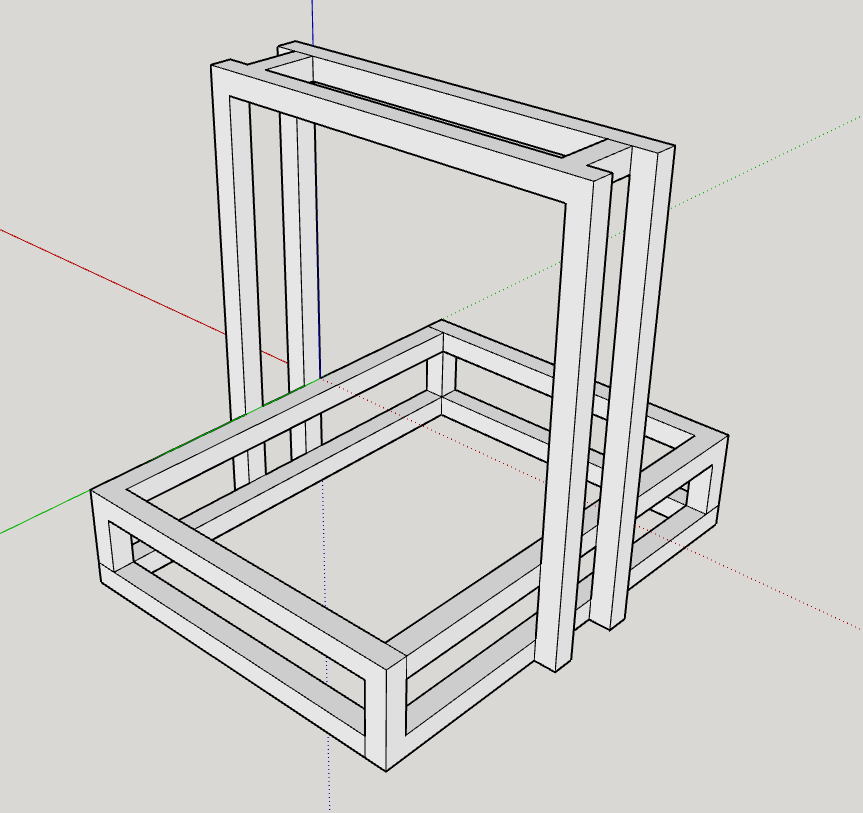
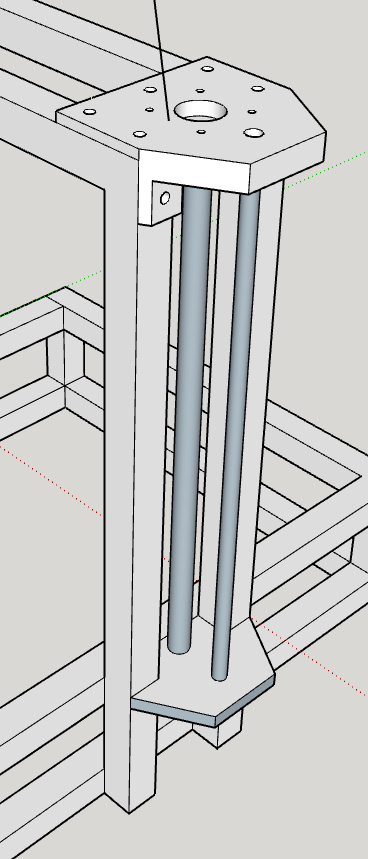
I was thinking something like this. I would like to have the z steppers mounted from the top to get the most out of the leadscrews that I have with the leadscrews going between the two main z posts.
I was thinking a horizontal layout for the x as well I'm just not sure how I am going to mount my extruder setup. I've been looking around but haven't really been able to find examples of an MK10 being mounted that way so I'm not sure how I should go about it. And I have a microswiss all metal hotend that I am happy with so I don't really want to change it. That being said I surely have time to think about it because I am going to be waiting on a lot of things from china.
As for the bed I want to convert the current 4 spring setup to a 3 spring setup with 1 of them being at a fixed height and the other 2 being adjustable. I definitely understand where you are coming from about the springs, I am going to need to source some better ones. Right now as it is the printer does pretty well with 100ms as the base speed so I think making these changes is going to improve what this machine can do quite a bit.
|
Re: Cheap-and-cheerful Taobao $150 knock-off running at 200mm/sec November 27, 2017 11:02PM |
Registered: 6 years ago Posts: 28 |
|
Re: Cheap-and-cheerful Taobao $150 knock-off running at 200mm/sec November 27, 2017 11:06PM |
Registered: 8 years ago Posts: 776 |
Quote
fauxsoul
I was thinking a horizontal layout for the x as well I'm just not sure how I am going to mount my extruder setup.
well, whenever i've started to think about a design, i make sure that i 3D model it - in as much detail as i can stand. i grab STL files if there are pre-existing components and drop those in (saves time implementing them.... or worse, making mistakes in their length.width.protrusions.etc.) - all of this so as to avoid having to pay for parts that, when received and waved about in the air, i realise, "damnit that's the wrong damn part AND i waited 2 months for it!!
Quote
I've been looking around but haven't really been able to find examples of an MK10 being mounted that way so I'm not sure how I should go about it. And I have a microswiss all metal hotend that I am happy with so I don't really want to change it. That being said I surely have time to think about it because I am going to be waiting on a lot of things from china.
perfect! you have plenty time to research, select and learn a CAD system if you don't already know one
as a libre software engineer i'd of course recommend pyopenscad. i've tried mouse-based development (and *shudder* blender) and i find it to be insanely frustrating, plus the complete lack of revision control drives me even more up the wall. i check in *all* my work into a git repository... because after all it's just python code. i can't say i put nice meaningful commit messages though, and have been caught out by that any number of times so it's my own fault. and yes i really have needed to do "git diffs" and even "git revert" on occasion.you tell me a CAD system that can selectively back-patch *specific* modifications on an assembly or revert a specific set of *parametric* modifications from a few months ago and i'll fall off my chair in shock
Quote
As for the bed I want to convert the current 4 spring setup to a 3 spring setup with 1 of them being at a fixed height and the other 2 being adjustable. I definitely understand where you are coming from about the springs, I am going to need to source some better ones. Right now as it is the printer does pretty well with 100ms as the base speed so I think making these changes is going to improve what this machine can do quite a bit.
fixed height would work great: it'd need to be gimballed though otherwise you risk twisting the plate. yes that really matters.... oh! 3 springs, right, yes, got it: no, no gimball needed, the spring *provides* flexibility due to gimballing of the plate. you'd still need one extra brass slider rod (in between the two springs) because the fixed post still won't cut it: *one* fixed screw means the plate can rotate (about the z-axis) with the z-axis being "the fixed screw". you *need* two in order to stop z-axis rotation.
basically you have 6 degrees of freedom to "fix". miss one and you're (pun intended) screwed. x-slide, y-slide, z-slide; x-rotate, y-rotate, z-rotate.
* 3 springs gives you control over z-slide, x-rotate and y-rotate
* 2 "fixed upright rods" gives you control over x-slide, y-slide and z-rotate.
the COMBINATION of the two fixes all 6 degrees of freedom.
a SINGLE fixed upright ONLY gives you control over x-slide and y-slide, it does NOT fix z-rotate. therefore you'd have one degree of freedom: z-rotate, so... the printbed would rotate freely about the z-axis in the planned scheme you outline. fix it by adding the extra brass pillar and it'll be fine.
|
Re: Cheap-and-cheerful Taobao $150 knock-off running at 200mm/sec November 27, 2017 11:15PM |
Registered: 8 years ago Posts: 776 |
Quote
fauxsoul
Was thinking something like this. I don't mean to sidetrack your thread here but this printer is pretty close to what I want.
not a problem.
hmmm... in the proposed design diagram, i would find it hard to design an x-carriage that fitted say 2 horizontal rods separated by 70mm in between them, plus say 15mm extra each side for the LM8UU bearings plus a bit extra for separation. that's looking more like... a 100mm gap plus 20mm plus 20mm for the extrusion, and it looks like you have... 45? 50mm at most? or you'd need to make the frame abouuut.... 60mm wider to accommodate 1/2 the carriage width plus a bit.
this is why i decided to move the y-rods to the front of the upright-supports-box. there you have absolutely no problem about access to the carriage, no matter if it's fully to the left or to the right.
... make sense?
|
Re: Cheap-and-cheerful Taobao $150 knock-off running at 200mm/sec November 28, 2017 06:38PM |
Registered: 6 years ago Posts: 28 |
Quote
lkcl
Quote
fauxsoul
Was thinking something like this. I don't mean to sidetrack your thread here but this printer is pretty close to what I want.
not a problem.
hmmm... in the proposed design diagram, i would find it hard to design an x-carriage that fitted say 2 horizontal rods separated by 70mm in between them, plus say 15mm extra each side for the LM8UU bearings plus a bit extra for separation. that's looking more like... a 100mm gap plus 20mm plus 20mm for the extrusion, and it looks like you have... 45? 50mm at most? or you'd need to make the frame abouuut.... 60mm wider to accommodate 1/2 the carriage width plus a bit.
this is why i decided to move the y-rods to the front of the upright-supports-box. there you have absolutely no problem about access to the carriage, no matter if it's fully to the left or to the right.
... make sense?
Yeah this definitely wasn't to scale or anything, more like a doodle. I think I'm basically going to go with this design but I need to figure out an x carriage to go with and then I'll have to figure out the dimensions.
|
Re: Cheap-and-cheerful Taobao $150 knock-off running at 200mm/sec November 28, 2017 07:20PM |
Registered: 6 years ago Posts: 28 |
The whole moving Y axis really seems non-ideal in the first place, but I'm working with what I have here for now.
My y carriage is a 5 hole 3mm aluminum plate, specifically this one:
[reprapchampion.com]
I was thinking about using a 3 hole setup mounted similar to what this person has done here (with a ball gymbal on one post and 2 other adjustable posts).
[drmrehorst.blogspot.com]
Putting some springs on rods in the other holes to increase rigidity seems like a good idea to me, so I will follow your advice there.
As far as cad goes, the only thing remotely similar that I am familiar with is Sketchup, but I've been spending some time learning Fusion 360.
For making revisions Sketchup is a joke, you have to do everything manually and very often the fixes that you make ruin faces etc. Sketchup just behaves irratically in general, but it's pretty easy to learn and good for a quick, non-mechanical sketch. I really need to look into openscad.
I'm going to figure out my x-carriage for now and go from there.
I'm supposed to be getting my extrusion tomorrow but will be waiting on bolts, nuts, angle brackets and my ramps board to arrive from China, which is probably a good thing, at least I won't rush anything.
|
Re: Cheap-and-cheerful Taobao $150 knock-off running at 200mm/sec November 29, 2017 02:33AM |
Registered: 8 years ago Posts: 776 |
Quote
fauxsoul
The whole moving Y axis really seems non-ideal in the first place, but I'm working with what I have here for now.
it seems... odd, doesn't it?
however the alternatives are that something else has to move in both X and Y. whether it be the printhead or the printbed. i've seen both. if you move the printhead you're looking at ultimaker-2 style, H-Bot, CoreXY and blah-blah-blah design.you _could_ fix the printbed and move the *entire assembly* - the entire Z-uprights - back and forth.... but that's basically a very weird H-Bot
sooo... after a bit of thought, the mendel design kiinda makes sense.
good choice. do check, by putting a straight metal rule across it, that it's not warped. i have one (EU sourced): the middle dips by 0.1mm.
Quote
I was thinking about using a 3 hole setup mounted similar to what this person has done here (with a ball gymbal on one post and 2 other adjustable posts).
[drmrehorst.blogspot.com]
Putting some springs on rods in the other holes to increase rigidity seems like a good idea to me, so I will follow your advice there.
*thumbs-up*
Quote
As far as cad goes, the only thing remotely similar that I am familiar with is Sketchup, but I've been spending some time learning Fusion 360.
For making revisions Sketchup is a joke, you have to do everything manually and very often the fixes that you make ruin faces etc. Sketchup just behaves irratically in general, but it's pretty easy to learn and good for a quick, non-mechanical sketch. I really need to look into openscad.
i initially started with mm3d, that was enough to put me off of point-based CAD development, for life. openscad.... remember that it's actually a macro system, it's *not* a programming language. that's why i use pyopenscad because i have objects, classes, modules, recursion, proper variable-scoping and everything you'd expect. openscad can't even get local / global variable scoping right.... because it's a *macro* system not a programming *language*. despite what the developer claim.
so i use pyopenscad to *auto-generate* a non-human-readable totally non-optimised scad output and just use the openscad program as in effect a "viewer plus STL converter". the fool-flow works extremely well... for me.
that having been said, what people have achieved in openscad, despite its limitations, is... incredible. the available libraries, the detail and the elegance of their designs is amazing. you will easily be able to find an x-carriage that does what you want and its bolt-holes for the extruder adapted, for example.
Quote
I'm going to figure out my x-carriage for now and go from there.
try having a look around (youmagine and equivalents). alter / design the carriage so that the mounting points (bolts) fit the extruder cleanly. mendel90 is a really good model to follow. you might find something standard already.
Quote
I'm supposed to be getting my extrusion tomorrow but will be waiting on bolts, nuts, angle brackets and my ramps board to arrive from China, which is probably a good thing, at least I won't rush anything.
yyeah been there done that...
|
Re: Cheap-and-cheerful Taobao $150 knock-off running at 200mm/sec November 29, 2017 01:50PM |
Registered: 6 years ago Posts: 28 |
Ordered a ball screw for the bed, just happen to find it while browsing banggood:
[www.banggood.com]
Eventually I do want to build a coreXY, but I will want to design my own parts because when I do build it I kind of want it to be my endgame fdm printer, but before I go and spend that kind of money I want to get my feet wet dealing with this first.
Is solid python the same thing as pyopenscad, if not do you have a link? Yeah, I have seen some pretty interesting things done with openscad but I just haven't gotten around to checking it out.
Carriage is very stiff and didn't have any apparent issues that I saw when I first got it, the bed however is a different story, but I just glass anyway.
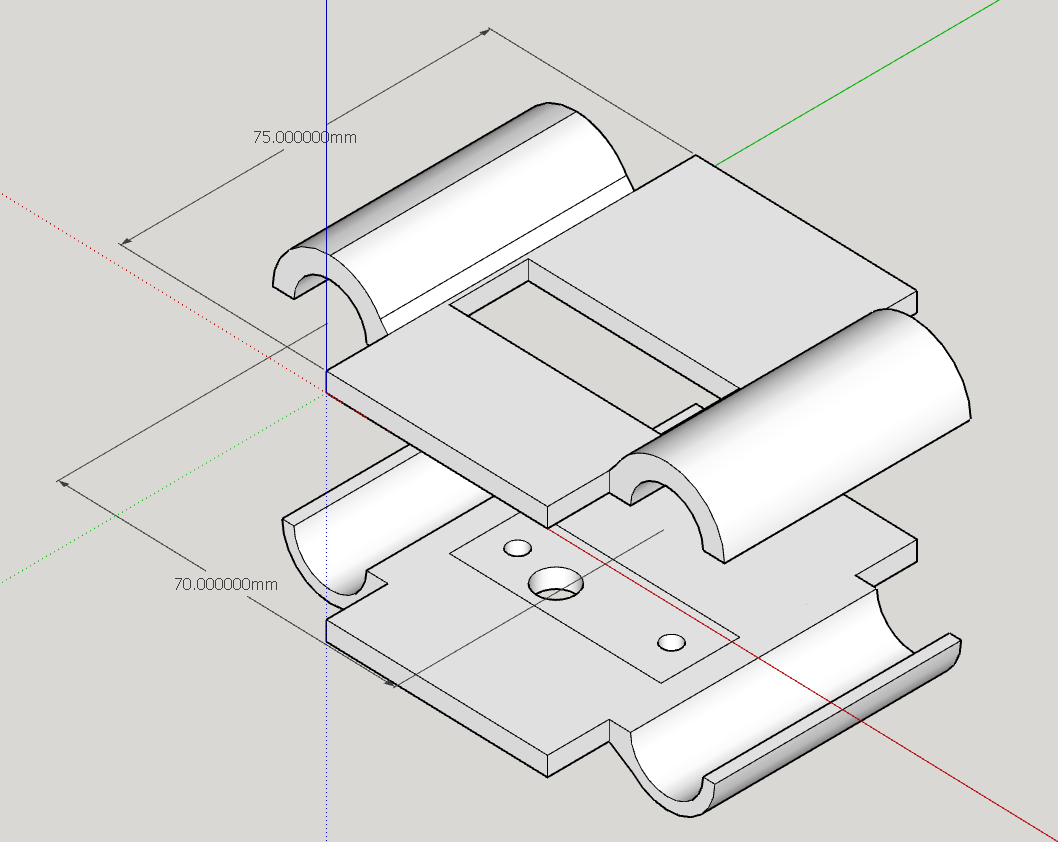
Been looking around, couldn't really find anything that satisfied me so I will just design my own, so far I'm thinking something like the attached image (of course I still need to design the endstop, cooling and belt mounting, but I will probably design that stuff after I come up with the z ends.
Thanks again for the input, will keep you updated.
[www.banggood.com]
Eventually I do want to build a coreXY, but I will want to design my own parts because when I do build it I kind of want it to be my endgame fdm printer, but before I go and spend that kind of money I want to get my feet wet dealing with this first.
Is solid python the same thing as pyopenscad, if not do you have a link? Yeah, I have seen some pretty interesting things done with openscad but I just haven't gotten around to checking it out.
Carriage is very stiff and didn't have any apparent issues that I saw when I first got it, the bed however is a different story, but I just glass anyway.
Been looking around, couldn't really find anything that satisfied me so I will just design my own, so far I'm thinking something like the attached image (of course I still need to design the endstop, cooling and belt mounting, but I will probably design that stuff after I come up with the z ends.
Thanks again for the input, will keep you updated.
|
Re: Cheap-and-cheerful Taobao $150 knock-off running at 200mm/sec December 04, 2017 11:55AM |
Registered: 6 years ago Posts: 28 |
|
Re: Cheap-and-cheerful Taobao $150 knock-off running at 200mm/sec December 04, 2017 04:13PM |
Registered: 8 years ago Posts: 776 |
|
Re: Cheap-and-cheerful Taobao $150 knock-off running at 200mm/sec December 04, 2017 04:21PM |
Registered: 8 years ago Posts: 776 |
Quote
fauxsoul
Ordered a ball screw for the bed, just happen to find it while browsing banggood:
[www.banggood.com]
Eventually I do want to build a coreXY, but I will want to design my own parts because when I do build it I kind of want it to be my endgame fdm printer, but before I go and spend that kind of money I want to get my feet wet dealing with this first.
Is solid python the same thing as pyopenscad, if not do you have a link? Yeah, I have seen some pretty interesting things done with openscad but I just haven't gotten around to checking it out.
Thanks again for the input, will keep you updated.
sorry took me a while to reply, missed this one. ok yes it *was* by the same guy who did solidpython, he wanted to convert it over to output different stuff, and also change the name, so i took what he had, kept the name pyopenscad because that's what it is: a python to openscad gateway. btw don't even *think* of trying to actually *read* the output from pyopenscad and certainly under no circumstances consider editing it: treat it as machine code in effect.
nobody else that i know of actually uses pyopenscad otther than me, so i've not set it up as a separate project. you can extract the files from various projects i've done (several). try here, that's the one i mainly keep up-to-date:
[hands.com]
you may also appreciate pyopenscadobj.py - an OO wrapper class (i use that a lot in 3D printing) as it helps actually manage the BOM as well. yes, really, just put the description into the object, then there are methods for generating a full BOM as well as the STL files.
also if you want to make REALLY complex surfaces, i recently updated polysurface.py, you specify a 2D array of 3D points, and how much spline interpolation you want between them, and what the surface thickness is to be: it creates a smooth surface with the required thickness.
the updates i did last year are to take a "normal vector" so that no matter how ridiculously curved the surface is, you always end up with a vector at right-angles to it. it's not perfect but does the job as long as you don't try to "bend" the "sheet" too much.
you will NOT find this kind of flexibility in anything other than the most advanced (expensive) CAD software.
|
Re: Cheap-and-cheerful Taobao $150 knock-off running at 200mm/sec December 04, 2017 10:42PM |
Registered: 6 years ago Posts: 28 |


Thanks for the info, when I get around to actually building the models that I am going to print I will check it out.
As far as the extrusion goes I'm only going to need a couple more meters so I can get the rest on Amazon (with prime) or apparently grainger has it @ 31.50 for 4M which seems reasonable since I can avoid shipping costs completely by picking it up in store.
I think I am just going to wait on picking that up until I get more of the stuff I'm waiting on though.
As far as the x axis goes I think I'm pretty much done with the basic layout, just a few more things to do:
Place endstop
Design cooler
Place screw holes for leadscrew and z rod.
Place screw holes for the x rods.
|
Re: Cheap-and-cheerful Taobao $150 knock-off running at 200mm/sec December 05, 2017 07:28AM |
Registered: 8 years ago Posts: 776 |
Quote
fauxsoul
As far as the x axis goes I think I'm pretty much done with the basic layout, just a few more things to do:
Place endstop
Design cooler
Place screw holes for leadscrew and z rod.
Place screw holes for the x rods.
chunkyyyyy
i have a style thing of drilling equi-distantly-spaced holes through chunky stuff, to save on plastic.btw with the belts for god's sake make sure you line up the point where the belt goes on-off the GT2 drive gears and attaches onto the carriage. i've seen so many people f*** this up... *sigh*.... if you get it wrong it actually causes *huge* nonlinear distortions for very little "accidental offset". the best case scenario is that you end up varying the tension in the belt depending on which end the carriage is. the worst case scenario is a non-linear relationship that involves multiplying by (1 + 1/tan(angle)) or something like that. get it right ok!
|
Re: Cheap-and-cheerful Taobao $150 knock-off running at 200mm/sec December 06, 2017 02:27PM |
Registered: 6 years ago Posts: 28 |
Yeah I actually modeled the belt first and then worked around that so it's going to be good there.
I'm definitely going to be changing how things look a bit by at least doing some chamfering and probably making some holes in it too, but honestly I don't really care too much about how things look.
I'm definitely going to be changing how things look a bit by at least doing some chamfering and probably making some holes in it too, but honestly I don't really care too much about how things look.
|
Re: Cheap-and-cheerful Taobao $150 knock-off running at 200mm/sec December 13, 2017 05:04AM |
Registered: 6 years ago Posts: 28 |


|
Re: Cheap-and-cheerful Taobao $150 knock-off running at 200mm/sec December 13, 2017 05:07AM |
Registered: 8 years ago Posts: 776 |
|
Re: Cheap-and-cheerful Taobao $150 knock-off running at 200mm/sec December 13, 2017 03:50PM |
Registered: 6 years ago Posts: 28 |
The bearing holding section is actually 50mm long so you could go with 3-4 lM8UUs or 2 lM8LUUs. Right now I have the 2 LM8LUUs that are on my printer and I will probably use those. Idk if I'm going to replace them or not, will probably decide later, I can always order some online if I decide to. I wish those encased IGUs were not so expensive. I would love to have linear rails but I don't want to invest that much into this printer.
|
Re: Cheap-and-cheerful Taobao $150 knock-off running at 200mm/sec December 13, 2017 06:23PM |
Registered: 8 years ago Posts: 776 |
Quote
fauxsoul
The bearing holding section is actually 50mm long so you could go with 3-4 lM8UUs or 2 lM8LUUs. Right now I have the 2 LM8LUUs that are on my printer and I will probably use those. Idk if I'm going to replace them or not, will probably decide later, I can always order some online if I decide to. I wish those encased IGUs were not so expensive. I would love to have linear rails but I don't want to invest that much into this printer.
yehyeh i know what you mean. i don't know what it is about LM8LUUs but every time i've got them i found that they rock around on the rods. with a horizontal carriage that rotational movement would result in the head being able to move side-to-side. i reeallly strongly recommend expanding out to at least 70mm minimum and using LM8UUs. apart from anything a 50mm width is hardly any space to get the hotend (and heat block) through. that's assuming you want to be able to change hotends (quick-release / butterfly nuts).
|
Re: Cheap-and-cheerful Taobao $150 knock-off running at 200mm/sec December 13, 2017 10:28PM |
Registered: 6 years ago Posts: 28 |
On this printer I am not going to be changing the hotend, it's already an all metal MK10 hotend (and again not going to be spending more money on this printer, eventually it will just be my secondary printer). The extruder assembly is going to be easy enough to remove as it is (if I need to do any maintenance). The bearing holder area is 50mm the main body is 70mm and things fit perfectly, it's definitely a snug fit but I figured I would make it as compact as I could.
I think I will follow your advice and go with a 4 LM8UU setup.
I think I will follow your advice and go with a 4 LM8UU setup.
|
Re: Cheap-and-cheerful Taobao $150 knock-off running at 200mm/sec December 13, 2017 10:36PM |
Registered: 8 years ago Posts: 776 |
Quote
fauxsoul
On this printer I am not going to be changing the hotend, it's already an all metal MK10 hotend (and again not going to be spending more money on this printer, eventually it will just be my secondary printer). The extruder assembly is going to be easy enough to remove as it is (if I need to do any maintenance). The bearing holder area is 50mm the main body is 70mm and things fit perfectly, it's definitely a snug fit but I figured I would make it as compact as I could.
I think I will follow your advice and go with a 4 LM8UU setup.
whew
btw even if you're not going to be regularly changing, just from the perspective of "fixing" things as you're developing, it's a royal pain if the chain of dependence means you.. say... have to take out the X-Rods just to get the damn extruder off! so do consider thinking it through: can i get the extruder in through a hole on the carriage in-situ pre-assembled on the x-rods *without* having to disassemble anything? and so on.
the riki200 is a bit of a pain, in that respect. it's a partial disassembly job to get the hotend off, you actually have to unscrew the heat block, that in turn requires removing the fan ducts... *sigh*
|
Re: Cheap-and-cheerful Taobao $150 knock-off running at 200mm/sec December 14, 2017 09:29AM |
Registered: 6 years ago Posts: 28 |
|
Re: Cheap-and-cheerful Taobao $150 knock-off running at 200mm/sec December 14, 2017 09:26PM |
Registered: 8 years ago Posts: 776 |
Quote
fauxsoul
All I would have to do to remove is is take 2 screws out of where the fan meets the heatsink and unscrew 2 screws from the bottom and it would lift out, if anything it's going to be easier to take off then it is right now.
nooo, you have to raise the z-height by at least 50mm, preferably 100mm (which takes quite a long time on a lead screw), then maneuvre your hand and the tool in underneath the x-carriage, making sure not to touch either the X-rods (because you musn't risk scraping them, they're meant to be to tolerances of 0.004mm) or the printbed (if you have printbite, if your fingers touch it the oil is absorbed and wrecks it)... and *then* you can take 4 screws out
consider instead deploying butterfly wing-nuts, like nophead designed for on the mendel90.
|
Re: Cheap-and-cheerful Taobao $150 knock-off running at 200mm/sec December 14, 2017 10:40PM |
Registered: 8 years ago Posts: 776 |
[www.youtube.com]
this is what my friend's done with his. he's actually replaced the y belt and rods with a pair of linear rails and a lead screw with an anti-backlash spring-loaded nut. the next experiment he wants to try is a cheap-and-cheerful chinese ball screw on Y, then redesign things on X to replace the belt with a ball screw there as well.
also you can see i recommended he get a monster piece of perspex for the plate, and he's beefed up the springs. one thing we discussed is, going to triple springs then putting in two fixed brass pillars. springs *do not* stop the plate from wobbling side-to-side. however triple springs backed up by dual fixed pillars (linear bearings would be better but it's total overkill for such a small job) would stop lateral motion and still allow up/down calibration.
any suggestions appreciated
[edit] we came up with an idea to create telescopic "surrounds" around the spring and the bolt. one part of the telescope would be bolted to the top (the nut currently on the underside of the printbed removed, telescope-half added, nut put back) and the other half would need 2 holes drilled, either side of the hole in the perspex for the adjustment bolt (with the thumb screws underneath).
this would completely stop lateral movement and be quite straightforward to make and 3D print.
Edited 1 time(s). Last edit at 12/15/2017 06:55AM by lkcl.
|
Re: Cheap-and-cheerful Taobao $150 knock-off running at 200mm/sec December 15, 2017 11:41AM |
Registered: 6 years ago Posts: 28 |
Dealing with the x carriage doesn't really bother me at all. and with this hotend there isn't clearance for wingnuts, the bolts are right on the sides of the hotend and wingnuts wouldn't spin.
When I get around to dealing with my bed leveling I think am just going to take some longish M3 and file/sand most of the threads off then put those through the empty screw holes that I have so that the bed can be leveled but won't shake, unless I find some better way to do it. I know this won't be perfect but it should be good enough, which is how I feel about a moving Y carriage design in the first place.
If you guys end up coming up with a different design let me know, that sounds interesting.
Yeah having a ball screws and linear rails would be pretty great. I want to build a hypercube next and I will be using linear rails then but this build is mainly being funded by some gift cards that I have had for a while so I'm not going there.
Will watch that video later because I'm at work right now.
|
Re: Cheap-and-cheerful Taobao $150 knock-off running at 200mm/sec December 19, 2017 08:48PM |
Registered: 6 years ago Posts: 28 |
Is that a flexible shaft / direct drive extruder a la zesty nimble? That printer looks pretty nice. Have you guys decided on what to do about part cooling?
I cut some of my aluminum and was starting to put the frame together only to realize that the aluminum extrusion that I have is special snowflake extrusion and doesn't have the regular 6mm slot that every other extrusion has (it's 5.26 iirc), and so the drop in nuts I have won't work. I had to order some slide in 'economy' type nuts.
I guess this is what I get for buying 2020 extrusion from newegg (the only reason I did that is because I had a gift card btw).
Just sitting on my desk taunting me.
I cut some of my aluminum and was starting to put the frame together only to realize that the aluminum extrusion that I have is special snowflake extrusion and doesn't have the regular 6mm slot that every other extrusion has (it's 5.26 iirc), and so the drop in nuts I have won't work. I had to order some slide in 'economy' type nuts.
I guess this is what I get for buying 2020 extrusion from newegg (the only reason I did that is because I had a gift card btw).

Just sitting on my desk taunting me.
|
Re: Cheap-and-cheerful Taobao $150 knock-off running at 200mm/sec December 19, 2017 11:45PM |
Registered: 8 years ago Posts: 776 |
Quote
fauxsoul
Is that a flexible shaft / direct drive extruder a la zesty nimble?
i have a Flex3Drive. for god's sake do not get a zesty nimble. the people who are selling it... great at sales, but they copied jason's design (they... screwed him over in the process), but they "modified" it. they reduced the size of the mesh gear (he told them don't do that, you have to calculate the correct modulus to ensure that the teeth mesh with the worm drive, otherwise you get artefacts in the prints) and they ignored him, setting the number of teeth to an EVEN number and making it too small.
so, two things happened: (a) the pressure on the zesty drive gear was massively increased, causing wear and (b) the even number of teeth resulted in there not being constant pressure on the wormdrive, causing THAT to wear out in an UNEVEN but regular pattern.
basically they're not very experienced design engineers, and they pissed jason off by srewing him, completely ignoring the years (almost a decade) of careful research that he put into the design of the Flex3Drive which they were trying to copy.
the zesty forums are now full of people experiencing *exactly* the symptoms of fundamental design flaws that jason warned them would happen, and there's nothing they can do about it as they've sold everybody on the "small size" and once you get that small you have no room to put larger or better components in.... not that you can do that anyway because you'd go out of business supplying people with competently-designed replacements.
so. no. it is NOT a zesty nimble.
it's an older G2 Flex3Drive (about 3 years old now), which i will be replacing with a Flex3Drive Direct-Drive adapter at some point. the reason is, you can take any standard direct-drive extruder, undo the bolts on the NEMA17, bolt in the Direct-Drive adapter in its place, put the NEMA17 on the other end of the DD, and... err.. you're done. now you get better accuracy, you can turn the current down massively on the stepper driver on the extruder, and lots of other advantages.... *and still get better results than any bowden ever could*.
Quote
That printer looks pretty nice. Have you guys decided on what to do about part cooling?
for the Riki200? i have a monster set of four 70mm impellers connected by home-made air ducts made from masking tape and 1mm brass wire
this machine? yyeah i was using 25mm and 40mm fans but they're hellishly noisy and high-pitched. i really want to put impellers on it, they're much quieter.
Quote
I cut some of my aluminum and was starting to put the frame together only to realize that the aluminum extrusion that I have is special snowflake extrusion and doesn't have the regular 6mm slot that every other extrusion has (it's 5.26 iirc), and so the drop in nuts I have won't work. I had to order some slide in 'economy' type nuts.
I guess this is what I get for buying 2020 extrusion from newegg (the only reason I did that is because I had a gift card btw).
Just sitting on my desk taunting me.
whoops..
|
Re: Cheap-and-cheerful Taobao $150 knock-off running at 200mm/sec December 22, 2017 03:29PM |
Registered: 6 years ago Posts: 28 |
Wasn't aware anyone else was doing that type of remote-direct drive setup. TBH not really impressed with the zesty nimble and have no want or need for one. It looks pretty janky, the idler bearing assembly looks really flimsy and I would not pay for that kind of design.
That Flex3Drive system looks pretty cool though, maybe I'll look into that next time.
Finally got my 'economy nuts' in, I'm pretty much done with the x axis, now just needs to work on the Y mounts, which should be very quick work and then the Z mounts (which are mostly done).
Still waiting on some things from china (antibacklash nuts, screws, the ball screw I ordered for the bed). So it's still going to be a while before I throw it all together. I started to put some of the extrusion pieces together, this is my first experience with it and I'm not too impressed with the metal corner brackets that I ordered, they have a lot of slop in the slots. I might just print some of my own to make getting things square easier.


Sorry, only registered users may post in this forum.