Rostock Build Log
Posted by jaguarking11
|
Rostock Build Log May 20, 2014 10:50AM |
Registered: 10 years ago Posts: 469 |
In the interest of maintaining a build log I decided to self host a small blog about my printer build. You are welcome to check it out, it is still in its infancy.
Here is the link as I do not plan on posting this log on multiple forums and its easier to maintain on a blog. I have no adds nor do I want any unwanted attention. However if you have any cunstructive criticism please do share it here.
[engineerd3d.noip.me]
-Bruno M.
Edited 1 time(s). Last edit at 05/20/2014 10:51AM by jaguarking11.
|
Re: Rostock Build Log May 20, 2014 05:24PM |
Registered: 9 years ago Posts: 21 |
Dang it! You know your blog is the excact frigging thing that I was looking for when I started my rostock build. I have all of the same components as you. Right now I am trying to get through mechanical endstop issues....the reason I have joined this forum. I will be watching your build. My blog is (email adress removed by admin)
Edited 1 time(s). Last edit at 05/21/2014 03:04AM by DeuxVis.
Edited 1 time(s). Last edit at 05/21/2014 03:04AM by DeuxVis.
|
Re: Rostock Build Log May 22, 2014 02:55PM |
Registered: 10 years ago Posts: 469 |
Well I updated my project log.
Here is the result so far. If you wish to see the nitty gritty go to the blog.
My Personal Blog. Build blog.
[engineerd3d.ddns.net]
Modicum V1 sold on e-bay user jaguarking11
Here is the result so far. If you wish to see the nitty gritty go to the blog.
My Personal Blog. Build blog.
[engineerd3d.ddns.net]
Modicum V1 sold on e-bay user jaguarking11
|
Re: Rostock Build Log May 22, 2014 02:58PM |
Registered: 10 years ago Posts: 469 |
Also forgot to mention something else regarding the spider arms, the delta radius is 205mm as per the calculations on [www.thinkyhead.com] I should be using 335mm arms instead of the 250mm arms, I can see why as the size has really diminished as far as build surface is concerned. Any input on the arm length?
My Personal Blog. Build blog.
[engineerd3d.ddns.net]
Modicum V1 sold on e-bay user jaguarking11
My Personal Blog. Build blog.
[engineerd3d.ddns.net]
Modicum V1 sold on e-bay user jaguarking11
|
Re: Rostock Build Log June 01, 2014 11:24AM |
Registered: 13 years ago Posts: 118 |
I read your blog. Are you a mechanical engineer? I have concerns about the friction of the belt on the fender washer.
On the endstop switches, the ones you have are meant to plug into the S - + on the RAMPS and have their own pull up resistor on the circuit board (along with a LED). When you flipped the connector, you shorted - and + which took out the fuse on your Arduino. Any high quality snap switch (Cherry is a good brand) mounted in a fixed spot as high up as it can go will work.
On the adjustable endstops M666 is a Gcode (if using Marlin) you should get familiar with. It allows software adjustment as small as you like though I only go to 0.01mm increments myself. I just posted a video of how I calibrate manually (https://www.youtube.com/watch?v=tDLbqLve128).
If you are using Repetier FW I have another video (https://www.youtube.com/watch?v=uDB4hE6nyYI)
|
Re: Rostock Build Log June 02, 2014 02:56PM |
Registered: 10 years ago Posts: 469 |
Quote
jaydmdigital
I read your blog. Are you a mechanical engineer? I have concerns about the friction of the belt on the fender washer.
On the endstop switches, the ones you have are meant to plug into the S - + on the RAMPS and have their own pull up resistor on the circuit board (along with a LED). When you flipped the connector, you shorted - and + which took out the fuse on your Arduino. Any high quality snap switch (Cherry is a good brand) mounted in a fixed spot as high up as it can go will work.
On the adjustable endstops M666 is a Gcode (if using Marlin) you should get familiar with. It allows software adjustment as small as you like though I only go to 0.01mm increments myself. I just posted a video of how I calibrate manually (https://www.youtube.com/watch?v=tDLbqLve128).
If you are using Repetier FW I have another video (https://www.youtube.com/watch?v=uDB4hE6nyYI)
Not a mechanical engineer by trade. I am a systems engineer.
First off thank you on the pointer of the end stops. I figured that part out a bit late. I will be trying to revive my old electronics at some point, however for now. I am replacing them, and reuse the old electronics once revived on another project I am thinking about. The switch idea is actually a very good suggestion. I have not thought about that. Worth investigating.
As for firmware, yes I will be using Marlin firmware. As of late I have not touched the printer much due to time constraints, however shortly I will be thrashing at it.
As for friction of the belts, I also share your concerns, However I will be addressing them shortly. Thinking of using a set of drive pulleys mounted to ball bearings on them. Maybe build some sort of adjustment there as well. Or simply use some teflon washers to reduce friction on the sides of the belts.
My Personal Blog. Build blog.
[engineerd3d.ddns.net]
Modicum V1 sold on e-bay user jaguarking11
|
Re: Rostock Build Log June 03, 2014 06:44PM |
Registered: 10 years ago Posts: 17 |
Dear jaguarking11
I saw your blog (nice one), and sorry for what happened,
its a real pane that small things can delay a full project
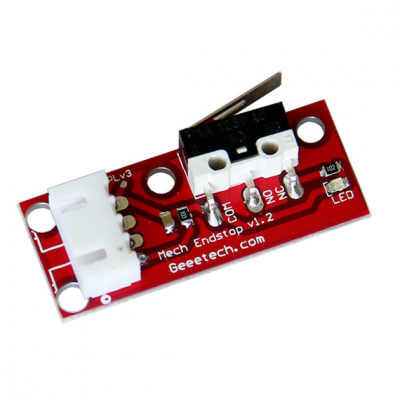
for your end-stops it seem to be the one i am using
mine is geeetech clone which is mechanical end-stops v 1.2
exactly this one in this image
4 pin in the mechanical end-stops (without any mark) should connect to 3 pin in ramp
2 of them are (+) and (-) (scary)
so i search a lot and find many people fried their ramp with this type (wrong wiring \ short (+) and (-))
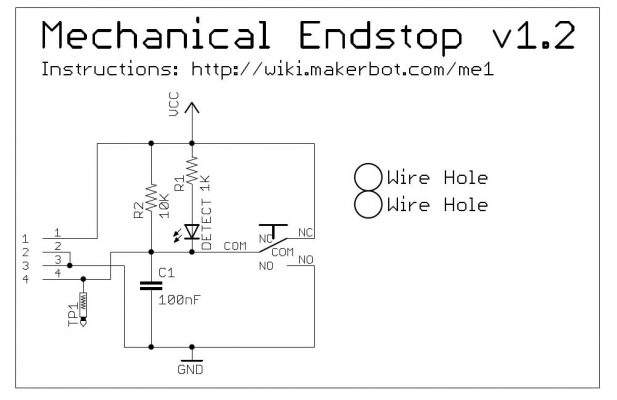
i search until i find this makerbot-mechanical-endstop-1.2 schematic
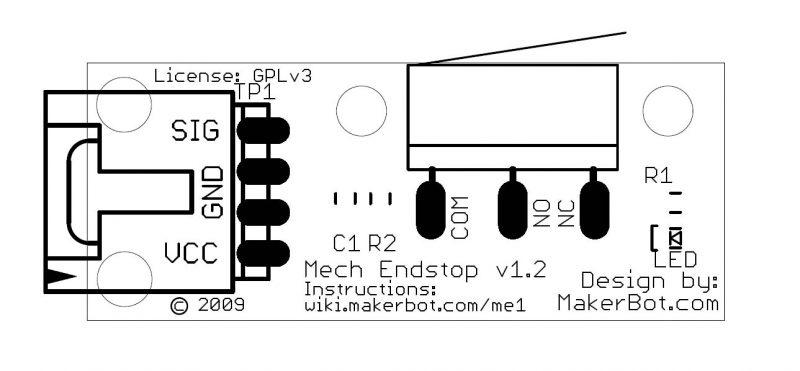
component Silkscreen
Schematic
this image from
[reprap.org]
what i did is
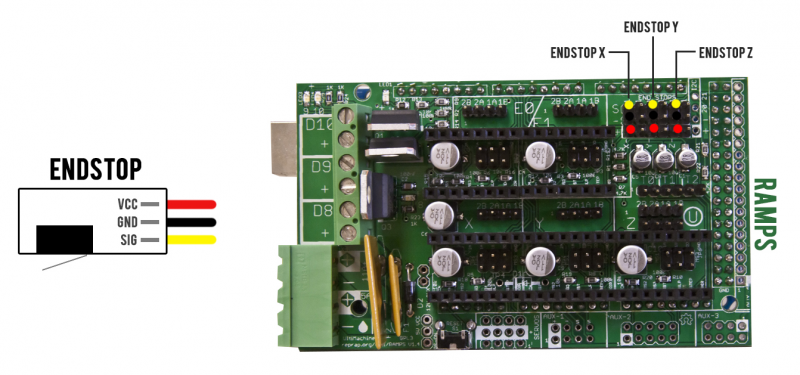
connect SIG in end-stop (pin 1 from tops as shown in pic (ComponentSilkscreen.jpg)) to S in ramp (pin 1 from top if the power is to your left as shown in pic (Cablage_endstop.jpg))
connect GND in end-stop (pin 2) to (-) in ramp (pin in middle as shown in pic)
ignore second GND (pin 3)
connect VCC (+) (pin 4) to (+) in Ramp (pin3)
this work for me
(i don't know if this will be different for same end-stop) so experts should correct me if i am wrong
sorry for my English
wish you the best
regards
|
Re: Rostock Build Log June 04, 2014 10:42AM |
Registered: 10 years ago Posts: 469 |
Much appreciate the input, I will be using your schematic.
My Personal Blog. Build blog.
[engineerd3d.ddns.net]
Modicum V1 sold on e-bay user jaguarking11
My Personal Blog. Build blog.
[engineerd3d.ddns.net]
Modicum V1 sold on e-bay user jaguarking11
Sorry, only registered users may post in this forum.


