My delta printer build
Posted by d3delta3d
|
My delta printer build December 05, 2014 05:43PM |
Registered: 9 years ago Posts: 37 |
Hi All
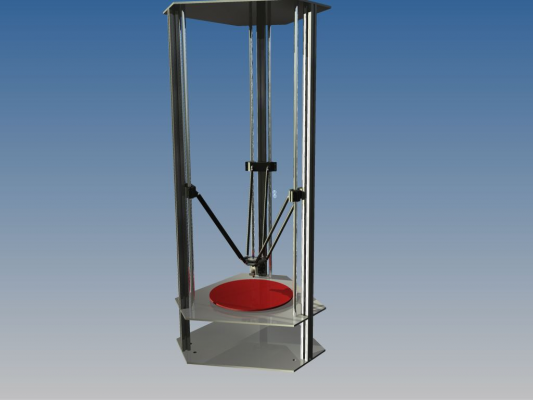
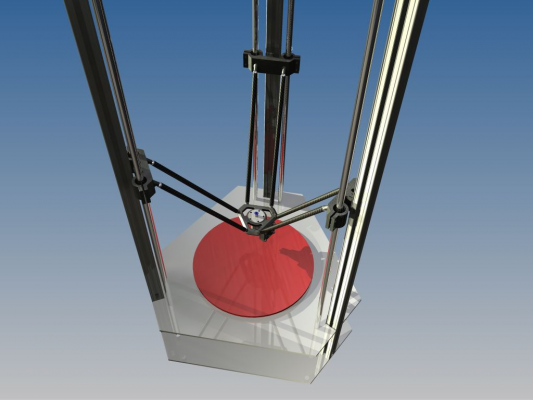
After much reading and research I have taken the plunge and am building a Delta printer and though I would document the build to give back to the community. I work with Autodesk Inventor 2015 which really makes life easy for this type of project and have settled on a build volume of 280mm diameter x 450mm high. I think this will cover almost everything I will ever print and is much larger than my UP Mini's 100mm² build volume. The UP prints great, just tired of having to glue multiple parts together when making bigger stuff. The chamber will be enclosed so it can be heated for those bigger ABS parts and will also have fume extraction.
The printer will use 30x30mm alloy extrusion for the uprights, 12mm linear rods and bearings for the carriage motion and 6mm alloy plate for the base, roof and heat bed support. The end effector is secured with 10mm diameter carbon fiber rods and magnets. My aim here is to make a rigid printer that will hopefully be able to perform at speed and retain it's accuracy.
About the only things I am undecided on at present is the end stops and which board and drivers to use. Ramps 1.4 and Auduino are a reprap staple but there are other boards like the RAMBo, Rumba etc but I have heard mixed reviews so not sure if I should stick with the tried and tested ramps? that being said Smoothieboard does look like a pretty good board also so a hard choice indeed
For end stops I was looking at mechanical limit switches, inductive proximity sensors for accuracy or making some hall effect sensors with pots to adjust the sensing distance. One question I do have however is if the printer has auto calibration, will the switches just be used so the carriages don't crash or will they still be used for calibration?
Need to learn some more C programming as well so the code will make more sense. Nothing like a challenge I say though
If you want to check out the build progress it can be found on my blog located here
Thanks for looking
Brad
Edited 5 time(s). Last edit at 12/06/2014 05:20PM by d3delta3d.
|
Re: My delta printer build December 06, 2014 07:41AM |
Registered: 9 years ago Posts: 32 |
|
Re: My delta printer build December 06, 2014 07:55AM |
Registered: 10 years ago Posts: 14,672 |
Quote
d3delta3d
Ramps 1.4 and Auduino are a reprap staple but there are other boards like the RAMBo, Rumba etc but I have heard mixed reviews so not sure if I should stick with the tried and tested ramps? that being said Smoothieboard does look like a pretty good board also so a hard choice indeed.
I have seen several people comment that Arduino Mega barely has the power to do the delta calculations, especially if you are trying to drive an LCD. So I suggest you go for one of the 32-bit controllers.Next month you will have another 32-bit board to choose from, because I am adding Delta support to the firmware for the Duet electronics.
Large delta printer [miscsolutions.wordpress.com], E3D tool changer, Robotdigg SCARA printer, Crane Quad and Ormerod
Disclosure: I design Duet electronics and work on RepRapFirmware, [duet3d.com].
|
Re: My delta printer build December 06, 2014 04:21PM |
Registered: 9 years ago Posts: 37 |
Quote
dc42
I have seen several people comment that Arduino Mega barely has the power to do the delta calculations, especially if you are trying to drive an LCD. So I suggest you go for one of the 32-bit controllers.Next month you will have another 32-bit board to choose from, because I am adding Delta support to the firmware for the Duet electronics.
I was just reading that last night about the 8-bit cpu's bogging down. I will be using an lcd interface as it seems silly to spend all this time building and not have it. The duet board looks very nice and I see it also has support for dual head extrusion which is also something I am looking at adding. I have designed the hot ends and end effector to suit but need the software to drive it. I imagine there wil be quite a lot of work in volved in writing the code to suit the delta printers but it looks like it will be worth the wait
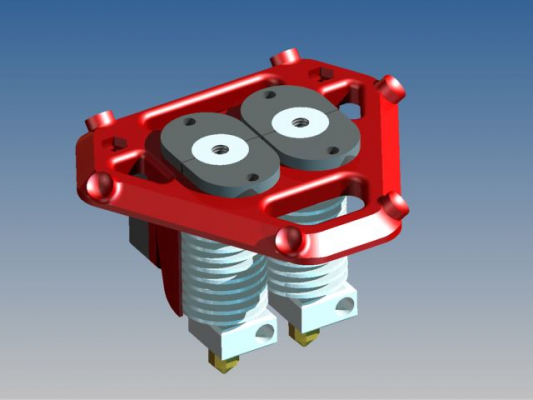
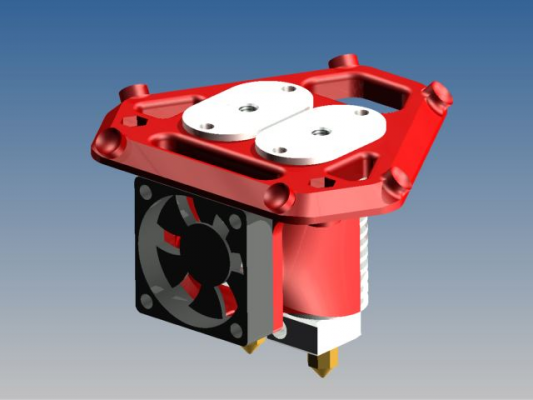
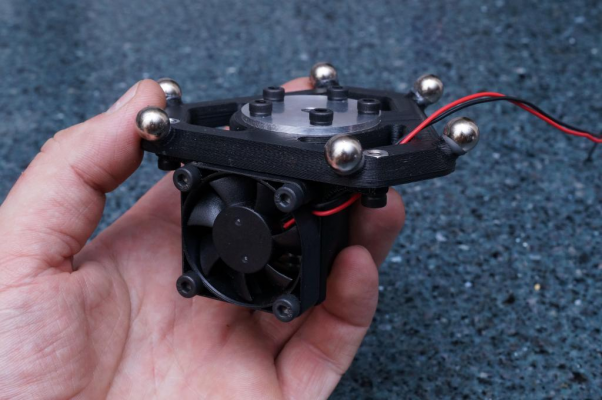
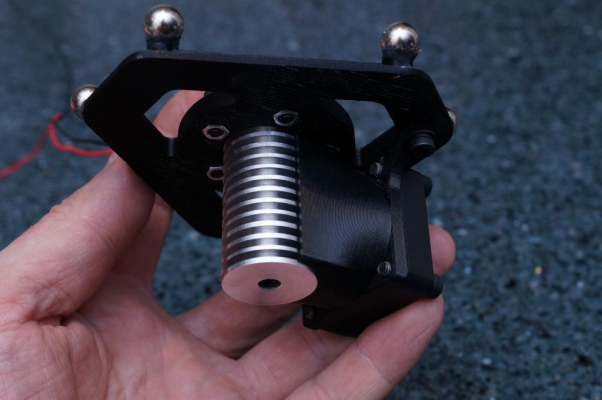
This is dual head I designed. It uses the same custom all alloy hot end and 40mm cooling fan as my single head with the ptfe tube running all the wa to the heat break. I also added adapters for the E3D hot ends.
My delta build blogspot [d3delta3d.blogspot.com.au]
Custom Delta printer
300x500 build volume
magnetic effector
Smoothieboard controlled
|
Re: My delta printer build December 06, 2014 05:17PM |
Registered: 10 years ago Posts: 515 |
|
Re: My delta printer build December 06, 2014 05:26PM |
Registered: 9 years ago Posts: 37 |
|
Re: My delta printer build December 06, 2014 06:04PM |
Registered: 10 years ago Posts: 14,672 |
I am a big fan of Duet electronics, in particular I would not want to be without the web interface. Being able to set the stepper motor currents in gcodes is useful too. You don't need to recompile the Duet firmware unless you want to change its functionality, because you can set all the important parameters using gcodes in an init file read from the SD card.
But in fairness, I should point out some things that you might regard as limitations. The Duet by itself does not support dual extruders, for that you need to add the DueX4 expansion board, and then it supports 5 in total. Some other boards such as RAMPS have support for a second hot end and extruder on the main board, as long as you don't want to use one of the 12V controlled outputs to drive a variable speed cooling fan. The stepper drivers on the Duet are good for 1A current, and 1.2A should be OK if you cool them a little. So make sure that is enough for your stepper motors. LCD support is not yet available for the Duet but there are a couple of solutions. T3P3 are changing their LCD panel to be 3.3V compatible, although AFAIK they haven't added support for it in the Duet firmware yet. The other option is a full graphics touch screen controller which is very nice indeed (ok I'm biased - it's my design) which will be in production in January, but will cost more than the simple LED displays supported by RAMPS/Marlin. Latest info and pics of it are at [forums.reprap.org]. Finally, if you blow up a stepper driver on the Duet, then you either need to replace the whole board or do some tricky SMD rework to replace the failed chip. With RAMPS, the drivers are on separate plug in boards, so you can replace them individually.
Edited 1 time(s). Last edit at 12/06/2014 07:39PM by dc42.
Large delta printer [miscsolutions.wordpress.com], E3D tool changer, Robotdigg SCARA printer, Crane Quad and Ormerod
Disclosure: I design Duet electronics and work on RepRapFirmware, [duet3d.com].
|
Re: My delta printer build December 06, 2014 07:32PM |
Registered: 9 years ago Posts: 37 |
Thanks for the detailed responc DC42. The 4.3" display would certainly add the wow factor to the printer as well as being functional.
As for blown drivers I have plenty of solder paste so no biggy. Quite satisfying soldering smt chips
My delta build blogspot [d3delta3d.blogspot.com.au]
Custom Delta printer
300x500 build volume
magnetic effector
Smoothieboard controlled
As for blown drivers I have plenty of solder paste so no biggy. Quite satisfying soldering smt chips
My delta build blogspot [d3delta3d.blogspot.com.au]
Custom Delta printer
300x500 build volume
magnetic effector
Smoothieboard controlled
|
Re: My delta printer build December 06, 2014 07:55PM |
Registered: 10 years ago Posts: 903 |
As much as I think the Duet is a nice piece of kit, buying one on the promises of features that do not exist today is a risk. Smoothieboard is 32-bit, has mature delta support including auto-calibration, includes a built-in web server, has software-adjustable stepper driver currents, and supports 5 steppers on the board natively. The pitfalls are that the native LCD support has been dragging on longer than the Duet hasn't had delta support (although it does support 12864 GLCD's in firmware and on the Azteeg X5 Mini if you wire it up), that it uses A4982 stepper drivers, and only does 1/16 microstepping. I do not have the Smoothieboard hardware to comment on it, but have Smoothieware running on an Azteeg X5 Mini with a 12864 GLCD and have no real complaints about the package.
No offense intended and I truly hope that you can get the delta support implemented on the Duet, but I think that anyone considering this platform today (12/2014) needs to know that the delta support is either vaporware or not mature at this point. OTOH, the delta support in Smoothieware has been well-debugged, and the creator of the Wolfstock delta printer was actively involved in the development.....
No offense intended and I truly hope that you can get the delta support implemented on the Duet, but I think that anyone considering this platform today (12/2014) needs to know that the delta support is either vaporware or not mature at this point. OTOH, the delta support in Smoothieware has been well-debugged, and the creator of the Wolfstock delta printer was actively involved in the development.....
|
Re: My delta printer build December 07, 2014 05:53PM |
Registered: 9 years ago Posts: 37 |
Quote
vreihen
As much as I think the Duet is a nice piece of kit, buying one on the promises of features that do not exist today is a risk. Smoothieboard is 32-bit, has mature delta support including auto-calibration, includes a built-in web server, has software-adjustable stepper driver currents, and supports 5 steppers on the board natively. The pitfalls are that the native LCD support has been dragging on longer than the Duet hasn't had delta support (although it does support 12864 GLCD's in firmware and on the Azteeg X5 Mini if you wire it up), that it uses A4982 stepper drivers, and only does 1/16 microstepping. I do not have the Smoothieboard hardware to comment on it, but have Smoothieware running on an Azteeg X5 Mini with a 12864 GLCD and have no real complaints about the package.
No offense intended and I truly hope that you can get the delta support implemented on the Duet, but I think that anyone considering this platform today (12/2014) needs to know that the delta support is either vaporware or not mature at this point. OTOH, the delta support in Smoothieware has been well-debugged, and the creator of the Wolfstock delta printer was actively involved in the development.....
Thanks for your honest and informative answer. As I said in the beginning the board has been the hardest part to choose. Guess I could always add a nice cheap ramps 1.4 without lcd, or just the basic lcd for now and upgrade when the 32bit boards have been better tested and represented on the forums. Obviously (hopefully) as the all in one boards become more popular their price will come down through economies of scale but we will see
With that said more parts have arrived for my build and I ordered the bearings, steppers, belts and pulleys last night. I also printed out the linear carriages on my UP Mini so it's all coming together nicely.
Edited 1 time(s). Last edit at 12/07/2014 06:57PM by d3delta3d.
My delta build blogspot [d3delta3d.blogspot.com.au]
Custom Delta printer
300x500 build volume
magnetic effector
Smoothieboard controlled
|
Re: My delta printer build December 08, 2014 07:21PM |
Registered: 9 years ago Posts: 37 |
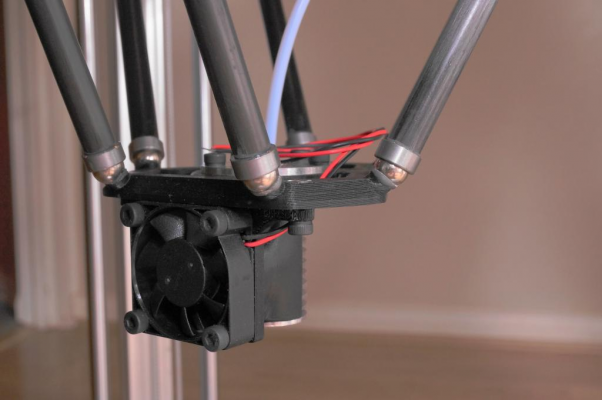
Thought I would show the printed and assebled hot end and efector. Weight wise it comes in at 135 grams. Still need to attach the heat block and nozzle though
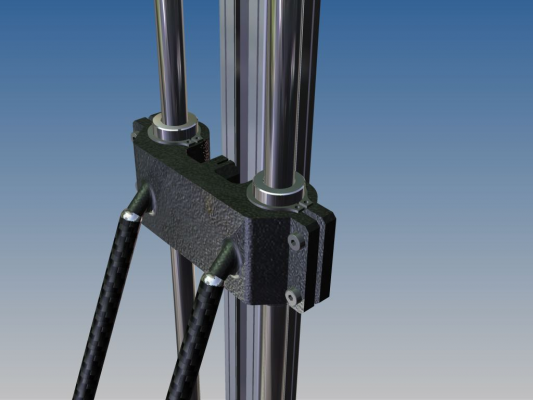
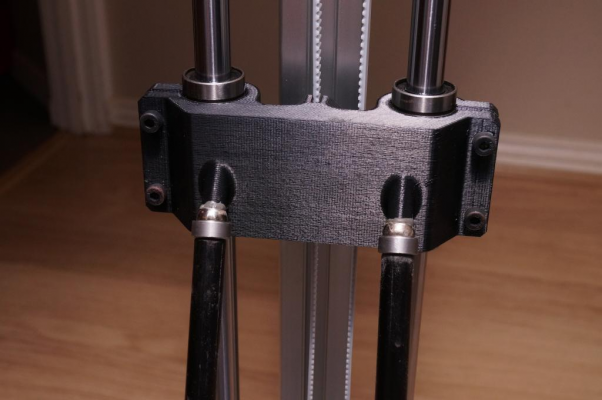
This is the printed carriage with the open ended belt attached. The blue bits in the blet loops is 1.75mm filament. Rock solid with no belt movement when the ends are tugged on. The idea of this design was to have the belts pull from the opposite side so the print layers are pulled together to stop the risk of delamination if heatinge the build chamber. I opted for the GT2.5 belt as I can get these with a metal reinforcing wire so theoretically less stetch. This cariage is designed to have LM12LUU bearings fitted.
Edited 3 time(s). Last edit at 12/09/2014 05:08PM by d3delta3d.
My delta build blogspot [d3delta3d.blogspot.com.au]
Custom Delta printer
300x500 build volume
magnetic effector
Smoothieboard controlled
|
Re: My delta printer build December 09, 2014 12:54AM |
Registered: 10 years ago Posts: 580 |
Looks good.
I have a similar effector setup, using 12mm carbon fiber rods and high temp neodymium magnets because of a heated build chamber.
I recommend getting the strongest magnets you can to start with, or under high accelerations they can disconnect.
Having a very light effector will help with that.
I plan on lightening mine up, and doubling the magnets in the rods (this is done by putting them in series the way they want to go together), and upgrading to a Smoothie.
My printer: Raptosaur - Large Format Delta - [www.paulwanamaker.wordpress.com]
Can you answer questions about Calibration, Printing issues, Mechanics? Write it up and improve the Wiki!
|
Re: My delta printer build December 09, 2014 05:47AM |
Registered: 9 years ago Posts: 37 |
Quote
Paul Wanamaker
Looks good.
I have a similar effector setup, using 12mm carbon fiber rods and high temp neodymium magnets because of a heated build chamber.
I recommend getting the strongest magnets you can to start with, or under high accelerations they can disconnect.
Having a very light effector will help with that.
I plan on lightening mine up, and doubling the magnets in the rods (this is done by putting them in series the way they want to go together), and upgrading to a Smoothie.
Thank Paul. The Raptosaur looks great.
I am hoping the N42 spheres together with solid steel concave rod end coated with adhesive teflon coating to reduce friction will do the job. If not, I will reverse the design using non magnetic balls and a rod end with magnets in it.
Edited 1 time(s). Last edit at 12/09/2014 05:48AM by d3delta3d.
My delta build blogspot [d3delta3d.blogspot.com.au]
Custom Delta printer
300x500 build volume
magnetic effector
Smoothieboard controlled
|
Re: My delta printer build December 09, 2014 07:59AM |
Registered: 9 years ago Posts: 32 |
|
Re: My delta printer build December 11, 2014 05:31PM |
Registered: 9 years ago Posts: 37 |
So nearly all of my parts have arrived so I should be able to start building soon. I must say I am a little nervous given the drama's some people have with setting up delta's but but hpoefully being able to punch in cad data for the measurement will help a lot.
build list so far is:
- 30x30 alluminium extrusion for the uprights
- 12mm linear rod for the guides secured by SHF12 supports at each end
- LM12LUU crriage bearings held with circlips and clamped
- Nema 17 48mm steppers. The ends of the shaft will also have bearing supports using 625zz bearings.
- Steel right angle brackets for the Stepper mounts
- T2.5 16 tooth alloy sprockets for the drive and idlers. The idlers will had a shaft with 2 x 625zz bearings attached
- T2.5 polyurethane steel reinforced timing belt
- 6mm alluminium plate for the base, top and heated bed support
- custom all alluminium hot end
- end effector with 10mm N42 sphere magnets
- 10mm diameter carbon fibre rod for the arms fitted with convey steel ends with teflon liners
- 12v 40w heater for the hot end
- ntc glass bulb thermistors
- 3mm Polycarbonate side panels and door
Edited 1 time(s). Last edit at 12/13/2014 06:43AM by d3delta3d.
My delta build blogspot [d3delta3d.blogspot.com.au]
Custom Delta printer
300x500 build volume
magnetic effector
Smoothieboard controlled
|
Re: My delta printer build December 13, 2014 06:32AM |
Registered: 9 years ago Posts: 37 |
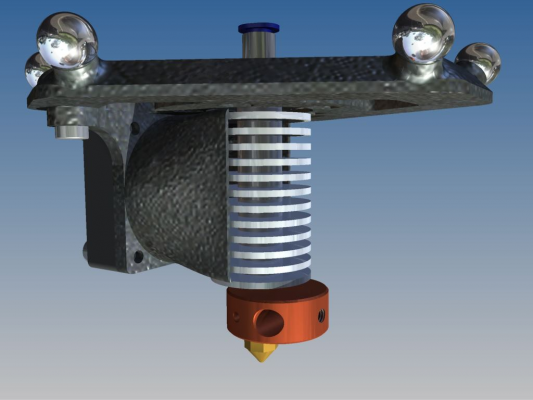
Well I've been busy printing out more parts but thought today I would desing an all copper heat block as seen in the render below. It will use a 40w heater and has provision for dual bulb ntc thermistors so one can be used for overtemp shutdown for added safety. The block is made from 25mm diameter copper bar, 10mm thick. I have a 1m of bar left over from when I made mountain bike lights and used the copper for heatsinks.
My delta build blogspot [d3delta3d.blogspot.com.au]
Custom Delta printer
300x500 build volume
magnetic effector
Smoothieboard controlled
My delta build blogspot [d3delta3d.blogspot.com.au]
Custom Delta printer
300x500 build volume
magnetic effector
Smoothieboard controlled
|
Re: My delta printer build December 19, 2014 01:12AM |
Registered: 9 years ago Posts: 37 |
After much reading and deliberation I ordered a Soothieboard 5XC, the LCD to suit (but will have to wait for the V2 shield to arrive) and voltage regulator today so hopefully that little package will arrive in the new year. Also picked up the floor, roof and bed plate from the laser cutter so at least the frame and mechanical side of things can get started. The plan was to cut the plates by hand and use the mill to drill but the holes but the center's were bigger than the mill's Y axis. Hopefully being laser cut will mean everything is nice and accurate. They do look pretty.
So to say I am getting a little excited to begin the build properly is an understatement. Love seeing designs come to life but being a lot bigger than the Up Mini I will need to find a new home for it.
My delta build blogspot [d3delta3d.blogspot.com.au]
Custom Delta printer
300x500 build volume
magnetic effector
Smoothieboard controlled
|
Re: My delta printer build December 19, 2014 07:12PM |
Registered: 12 years ago Posts: 58 |
|
Re: My delta printer build December 23, 2014 06:20AM |
Registered: 9 years ago Posts: 37 |
Thank Ross
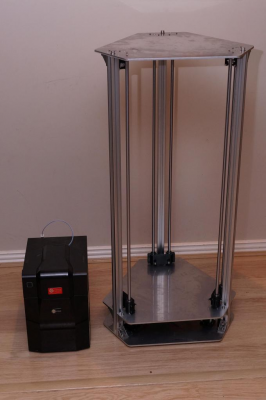
Had the day off work so managed to put some time into the printer and got the unit assembled, motors fitted and carriages mounted with the help of my 8 year old daughter. Tomorrow all going well we will fit the belts then add the build pictures into the build blog. Bit tired now to do all that.
Here's a picture next to my Up Mini. She is a lot bigger in person than I pictured in my head but the carriages are smooth as butter and dimentionally everything seems perfect but I guess until the first print we will not know. I am still amazed to this day how accurately we can 3D print parts.
Edited 2 time(s). Last edit at 12/23/2014 08:01PM by d3delta3d.
My delta build blogspot [d3delta3d.blogspot.com.au]
Custom Delta printer
300x500 build volume
magnetic effector
Smoothieboard controlled
|
Re: My delta printer build December 27, 2014 01:28AM |
Registered: 9 years ago Posts: 37 |
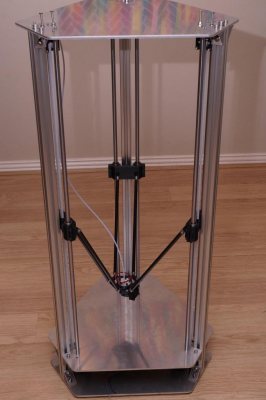
Got to love holidays. Have nearly finished the builing stage bar the electronics and extruder. The Smoothieboard has left Europe and will hopefully arrive in the next week. Here's a couple more photo's. She stands about 1100mm high
Edited 3 time(s). Last edit at 12/27/2014 01:43AM by d3delta3d.
My delta build blogspot [d3delta3d.blogspot.com.au]
Custom Delta printer
300x500 build volume
magnetic effector
Smoothieboard controlled
Edited 3 time(s). Last edit at 12/27/2014 01:43AM by d3delta3d.
My delta build blogspot [d3delta3d.blogspot.com.au]
Custom Delta printer
300x500 build volume
magnetic effector
Smoothieboard controlled
|
Re: My delta printer build December 31, 2014 07:17AM |
Registered: 9 years ago Posts: 37 |
Wired up the Smoothieboard X5 today and have it air printing and flying (speed wise). No problems at all with flex in the frame or movement in the magnetic ball joints. Still need to build the extruder and heater bed to get a true indication but seeing the printer whizzing back and forth was very satisfying. Must say it is a very easy board to use and change firmware settings so has met all my expectations.
Now to workout all the functions on Slic3r and Proterface, particularly why in pronterface models do not appear centered in the grid, yet print centered on the bed?
Happy new year everyone
Edited 1 time(s). Last edit at 12/31/2014 07:24AM by d3delta3d.
My delta build blogspot [d3delta3d.blogspot.com.au]
Custom Delta printer
300x500 build volume
magnetic effector
Smoothieboard controlled
|
Re: My delta printer build December 31, 2014 07:31PM |
Registered: 10 years ago Posts: 580 |
Congratulations on having it moving well! That is great to see.
It looks very clean.
I just ordered a Smoothie also... can't wait to get it. I'm glad to hear it's easy to set up.
My printer: Raptosaur - Large Format Delta - [www.paulwanamaker.wordpress.com]
Can you answer questions about Calibration, Printing issues, Mechanics? Write it up and improve the Wiki!
It looks very clean.
I just ordered a Smoothie also... can't wait to get it. I'm glad to hear it's easy to set up.
My printer: Raptosaur - Large Format Delta - [www.paulwanamaker.wordpress.com]
Can you answer questions about Calibration, Printing issues, Mechanics? Write it up and improve the Wiki!
|
Re: My delta printer build January 01, 2015 02:23AM |
Registered: 9 years ago Posts: 37 |
Easy was an understatement. Plug int eh motors and max endstops, load the windows driver, plug in the smoothieboard, open the config file with notpad and change the arm_length, arm_radius, motor max amps and it's ready to check the homing in Pronterface and reverse the motor directions if wrong. Then a quick z calibration using gcode script in Proterface and your away.
I'm going to upload a youtube vid of the printer later doing some drawing @ 150mm/s with a pen attachment on the end effector.
My delta build blogspot [d3delta3d.blogspot.com.au]
Custom Delta printer
300x500 build volume
magnetic effector
Smoothieboard controlled
I'm going to upload a youtube vid of the printer later doing some drawing @ 150mm/s with a pen attachment on the end effector.
My delta build blogspot [d3delta3d.blogspot.com.au]
Custom Delta printer
300x500 build volume
magnetic effector
Smoothieboard controlled
|
Re: My delta printer build January 01, 2015 10:30AM |
Registered: 10 years ago Posts: 903 |
As I've said numerous times in the past, Smoothieware is an evolution in RepRap controllers. Asking a typical printer builder to install the entire Arduino compiler tool chain and edit source code is a barrier to entry that causes weeks of frustration for non-programmers tackling what is probably their first electronics project.....
|
Re: My delta printer build January 01, 2015 03:09PM |
Registered: 10 years ago Posts: 580 |
Yes... vreihen you are so right.
In preparation to receive my Smoothie I went through the documentation on the Smoothieware website last night. I am so impressed, it's very very good!
I downloaded the sample Delta config and have updated it - very easy. The Delta auto-calibration looks very good. I'm curious how well the volumetric extrusion control works. (BTW Repetier has "Advance" which is similar, but it's NOT for delta printers at this point).
Sorry - I know this is off topic, but really - Smoothie/32-bit is the future, and it is fully mature and developed now, and open source. As a software developer for 25+ years I can see how much being chained to 8-bit has held back Reprap and the open source microcontroller community, ugh!. At the time I chose the Rumba I didn't know how well Smoothie worked, or that it supported Delta printers so well as I could not find that info at the time. I have lost many hours/days in frustration - fighting with the limitations of my Rumba and Marlin and Repetier firmwares. I am very encouraged with Smoothie. OK, sorry again, back to topic...
d3delta3d, I'm looking forward to seeing that video!
|
Re: My delta printer build January 01, 2015 06:03PM |
Registered: 9 years ago Posts: 37 |
Here's is a quick video drawing at 150mm/s after some basic setting up. Still need to build the extruder which is on today's job list but very happy with the performance. If it prints this fast with abs it will be fantastic. Smoothieboard has made my life so easy. Still lots to do but as long as the build is moving forward will be smiling.
[youtu.be]
Thanks for looking
My delta build blogspot [d3delta3d.blogspot.com.au]
Custom Delta printer
300x500 build volume
magnetic effector
Smoothieboard controlled
[youtu.be]
Thanks for looking
My delta build blogspot [d3delta3d.blogspot.com.au]
Custom Delta printer
300x500 build volume
magnetic effector
Smoothieboard controlled
|
Re: My delta printer build January 01, 2015 06:55PM |
Registered: 10 years ago Posts: 327 |
That's a nice clean build you have there, great job. I had never heard of the Smoothieboard until I read your post and after reading up on their website I really like the look of it. I love the way the configuration works, it looks so simple to set up.
Regards,
Les
Pointy's Things
Pointy's Blog
Regards,
Les
Pointy's Things
Pointy's Blog
Sorry, only registered users may post in this forum.
