RepRap 3DR Delta printer Released
Posted by richrap
|
Re: RepRap 3DR Delta printer Released September 16, 2013 11:45AM |
Registered: 12 years ago Posts: 195 |
Making some progress on mine. Here are a few tips I've discovered along the way:
BOM:
-The keystone parts for the top and bottom have only enough clearance for 10mm screws. 12mm will run into the other end of the nut trap.
-If you can't find dome or round head screws for the pulleys, 6mm pan head Philips works fine. The 6mm is critical.
-If you use 623ZZs for idlers, only an M4 will fit through the center, not M5. If you're buying M5 T-Slot nuts, you'll need to get three M4 nuts too. The bolt should be M4 20mm pan or round, or the tower covers won't fit and the idler can't be pushed all the way down. I got away with a plain M4 hex nut and a washer which barely works in Misumi 2020, but it's fiddly.
Assembly:
-Routing the cables through the center of the extrusion works ok, but you'll have trouble removing the motor without taking the extrusion along for the ride if you need to put a connector on the end. I glued a "chocolate bar" terminal block to the side of each of my tower motors so I could unscrew the wire and remove the motors later.
-Rich was spot on when he recommended getting the pulley as far down on the motor as possible. My motors spring back a little when bearing down on the axle which let the far end of the pulley rub against the extrusion and stall one of my towers. Either improvise by sanding the pulley end, or put something against the axle protruding from the other end so you can press it down a bit further.
-If you end up having to redo the stringing on a tower, don't bother removing the pulleys as it's a really tight fit on a 5mm axle. It's actually pretty easy to fish the wire through the spool while on the motor.
First get a wire twisty-tie (the kind your electronics cables come tied with or you use on produce bags) and strip off the insulation. Bend the last couple of mm into a hook. Take the motor out, then remove the screw next to the feed-through hole. Pull out the old line, then push the end of the new line into that hole. Feed the hook through the hole at the opposite end running the length of the pulley, grab the line, and pull it all the way through. You might have to futz with the wire shape to get it to fit and grab the line. Then you can string the other hole at the open end of the pulley and wind it back up. Tighten the screw back on, wind the line using blue tape on the pulley itself to hold it in place, and reinstall the motor.
-I didn't use the nylon tie on the Spectra line for initial tensioning. Instead I left the idlers loose and let them fall through until they hit the catch below. After tying the line I used a springy hook-shaped pick to lever the idler at the nut installed on the side of the bearing and ran the carriage up and down until it slackened enough to get a driver in to lock it down. YMMV depending on how much slack you left in the line initially.
|
Re: RepRap 3DR Delta printer Released September 16, 2013 06:48PM |
Registered: 10 years ago Posts: 5 |
|
Re: RepRap 3DR Delta printer Released September 16, 2013 07:42PM |
Registered: 14 years ago Posts: 47 |
|
Re: RepRap 3DR Delta printer Released September 17, 2013 12:43AM |
Registered: 10 years ago Posts: 5 |
|
Re: RepRap 3DR Delta printer Released September 17, 2013 01:58AM |
Registered: 10 years ago Posts: 219 |
Anyone finished one printer so far? I am interested in it, it all looked very sitraight forward, but when I read this thread here I somehow doubt that the design has left experimental stage.....
Blogs:
Meine 3D Druck Abenteuer
[3dptb.blogspot.de]
FLSUN Delta Drucker für Deutschland
[flsun-deutschland.blogspot.com]
Books on 3D patents:
[goo.gl] (english)
[www.amazon.de] (deutsch)
Blogs:
Meine 3D Druck Abenteuer
[3dptb.blogspot.de]
FLSUN Delta Drucker für Deutschland
[flsun-deutschland.blogspot.com]
Books on 3D patents:
[goo.gl] (english)
[www.amazon.de] (deutsch)
|
Re: RepRap 3DR Delta printer Released September 17, 2013 05:39AM |
Registered: 10 years ago Posts: 63 |
>> Anyone finished one printer so far? <<
Yes - my 3DR is up and running real nice for two weeks now.
Some things come to mind:
- for the upper Spectra line idlers, I use (in this order) a M5x18 dome head screw, two 625 bearings, M5 nut and a *large* M5 washer. Quite sturdy and fits (although tight) unter those upper covers.
- for attaching the Spectra line to the carriage, I put a long M3 (if I remember correctly) set screw into on of those square holes so it will protrude about 2mm. Tie a loop into one end of the line and slide this over the set screw (the thread will keep it from slipping away), same with the other end. If done correctly, there's no need for any tightening aids - adjusting the idlers will do just fine.
- for attaching the spools to the motor shafts, M3x6 screws worked ok initialy but proved to be too short after some use, because the spool plastic expands from the force of the screws. I switched to M3x8 and had no more problems since.
|
Re: RepRap 3DR Delta printer Released September 18, 2013 06:19AM |
Registered: 10 years ago Posts: 63 |
|
Re: RepRap 3DR Delta printer Released September 18, 2013 06:50AM |
Registered: 11 years ago Posts: 142 |
Thank you for the pictures, it looks very nice.
Did you print the parts ? They look awsome good. If yes, which slicer did you use? Is it PLA or ABS?
Thanks!
video of my 3DR
Did you print the parts ? They look awsome good. If yes, which slicer did you use? Is it PLA or ABS?
Thanks!
video of my 3DR
|
Re: RepRap 3DR Delta printer Released September 18, 2013 07:49AM |
Registered: 10 years ago Posts: 63 |
Thanks... we printed the plastic parts on a Makerbot Replicator 2 in PLA, using mostly standard settings.
I really like how the 3DR works - after the initial problems sorted out, I find no serious weak points in the design. The only thing I currently plan to modify is to build a weight optimized platform: a one piece printed part which integrates platform, j-head holder and fan mount.
Now what's left (and really bothers me) now is the well known problem of oozing bowden extruders. Tried countless slicer settings, retract strategies and parameters, nozzle temperatures, all of which could reduce but not really cure the problem. Will try a different extruder (the planetary one Johann uses for his Mini Kossel) next, also various nozzles (currently a chinese 0.4mm J-Head).
Edited 1 time(s). Last edit at 09/18/2013 07:49AM by HaDe.
|
Re: RepRap 3DR Delta printer Released September 19, 2013 12:56PM |
Registered: 12 years ago Posts: 195 |
Nice work, HaDe! Very clean build. I didn't even realize that it makes more sense to tie the Spectra to the right of the carriage instead of the left as the directions say.
Did you need a tap for the push-fit Bowden connectors, or did you self-thread it somehow? I'm stuck figuring out how that's supposed to go together.
Did you need a tap for the push-fit Bowden connectors, or did you self-thread it somehow? I'm stuck figuring out how that's supposed to go together.
|
Re: RepRap 3DR Delta printer Released September 19, 2013 01:56PM |
Registered: 10 years ago Posts: 63 |
>> Did you need a tap for the push-fit Bowden connectors, or did you self-thread it somehow? <<
Cold End: selfthreading
Hot End: I currently use one of those chinese J-Heads which already has a 1/8 thread at the top of the PEEK nozzle holder, so I could drill the J-Head mount to a constant 16mm (the OD of the nozzle holder) from top to bottom and the Pushfit went right into the nozzle holder.
Tonight I'll complete a new mount for my newly arrived hotends.com "original" J-Head, this time the Pushfit will selfthread into the mount as originally intended by Richard's design.
|
Re: RepRap 3DR Delta printer Released September 19, 2013 02:16PM |
Registered: 10 years ago Posts: 1,381 |

I'm not able to locate a BOM.
What is the source of this idler bearing and the RepRapDiscount Hall effect end-stop?
Missing link:
3 x Hall effect end-stops (I'm using RepRapDiscount versions, here)
[richrap.blogspot.co.uk]
What supporting electronics are required for the Hall effect sensor?
Tks.
A2
Edited 1 time(s). Last edit at 09/19/2013 02:16PM by A2.
|
Re: RepRap 3DR Delta printer Released September 19, 2013 02:23PM |
Registered: 10 years ago Posts: 63 |
|
Re: RepRap 3DR Delta printer Released September 19, 2013 03:36PM |
Registered: 11 years ago Posts: 142 |
Next question please.
As you have printed 3DR_Bottom_Motor_Mount_V2_001_RTP.stl you hadn t any problem with the alu extrusion. It did fit ?
If yes, which PLA did you use? I am fighting since one week, but with no success...it does not fit and I don t know if it is the slicer or the PLA material I am using.
The witdth of the printed T-Slot I get is at least 6.50 mm but on the STL it is ca. 5.60.
Thanks!
video of my 3DR
|
Re: RepRap 3DR Delta printer Released September 19, 2013 03:47PM |
Registered: 10 years ago Posts: 63 |
At first I thought it wouldn't fit, too - but after removing some artifacts from the (although fine and well calibrated) printed parts - effectively making chamfers on all edges where the extrusion has to enter, and also on the extrusion itself - it *did* fit, however very tight. The extrusions had to be pushed in with quite some force (which I believe is a good thing for precise angles).
>> which PLA did you use? <<
Nuclear Green from reprapworld.com
>> I am fighting since one week <<
If chamfering doesn't help: maybe your printer calibration is off, at least for hole sizes.
Edited 1 time(s). Last edit at 09/19/2013 03:53PM by HaDe.
>> which PLA did you use? <<
Nuclear Green from reprapworld.com
>> I am fighting since one week <<
If chamfering doesn't help: maybe your printer calibration is off, at least for hole sizes.
Edited 1 time(s). Last edit at 09/19/2013 03:53PM by HaDe.
|
Re: RepRap 3DR Delta printer Released September 19, 2013 04:00PM |
Registered: 11 years ago Posts: 142 |
Many thanks, now I know I am not alone.
So you dressed to size the printed plastic part and the aluminium extrusion. I mean you sanded them, right ?
video of my 3DR
So you dressed to size the printed plastic part and the aluminium extrusion. I mean you sanded them, right ?
video of my 3DR
|
Re: RepRap 3DR Delta printer Released September 19, 2013 04:08PM |
Admin Registered: 15 years ago Posts: 1,470 |
A2 Wrote:
-------------------------------------------------------
> I'm not able to locate a BOM.
> What is the source of this idler bearing and the
> RepRapDiscount Hall effect end-stop?
>
> Missing link:
> 3 x Hall effect end-stops (I'm using
> RepRapDiscount versions, here)
> [richrap.blogspot.co.uk]
> elta-printer-part-1-release.html
>
> What supporting electronics are required for the
> Hall effect sensor?
No supporting electronics are needed, the hall effect end-stop boards plug directly into RAMPS (or whatever electronics you are using). Source: [www.reprapdiscount.com]
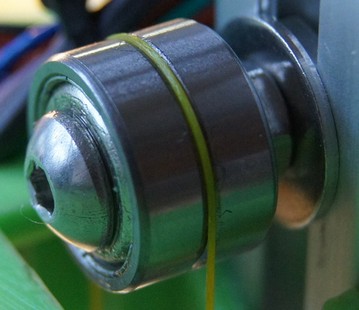
The idler is just two regular bearings, size 624 as shown in RichRap's part two blog:
-------------------------------------------------------
> I'm not able to locate a BOM.
> What is the source of this idler bearing and the
> RepRapDiscount Hall effect end-stop?
>
> Missing link:
> 3 x Hall effect end-stops (I'm using
> RepRapDiscount versions, here)
> [richrap.blogspot.co.uk]
> elta-printer-part-1-release.html
>
> What supporting electronics are required for the
> Hall effect sensor?
No supporting electronics are needed, the hall effect end-stop boards plug directly into RAMPS (or whatever electronics you are using). Source: [www.reprapdiscount.com]
The idler is just two regular bearings, size 624 as shown in RichRap's part two blog:

Quote
Make up three sets of Idler bearings for the Spectra line, try to use the same type of domed bolt, washer each side (not in between the bearings) an M4 nut and M4 penny or M5 washer - if you do that it will also grip the printed cover cap nicely. - The bearings are 2 x 624ZZ types (13mm outside and a 4mm hole) you can use whatever size fits, but I doubt 608's will work and won't fit under the printed cover cap.
|
Help improve the RepRap wiki!
Just click "Edit" in the top-right corner of the page and start typing. Anyone can edit the wiki! |
|
Re: RepRap 3DR Delta printer Released September 19, 2013 04:33PM |
Registered: 10 years ago Posts: 1,381 |
|
Re: RepRap 3DR Delta printer Released September 19, 2013 04:41PM |
Registered: 10 years ago Posts: 63 |
>> So you dressed to size the printed plastic part and the aluminium extrusion.<<
Not really resizing... I just angled (chamfered or rounded) all edges where the extrusion enters the base, using a sharp pointed knife (scalpel). This made for the extrusion slipping into the base much easier.
Not really resizing... I just angled (chamfered or rounded) all edges where the extrusion enters the base, using a sharp pointed knife (scalpel). This made for the extrusion slipping into the base much easier.
|
Re: RepRap 3DR Delta printer Released September 19, 2013 04:54PM |
Registered: 11 years ago Posts: 142 |
I don t think it will be enough in my case because I have at least + 1mm. I will have to redesign the part, cause I want to be able to disassemble the printer when needed.
Ok thanks a lot for your help. I hope we see your printer in action in near future!!
video of my 3DR
Ok thanks a lot for your help. I hope we see your printer in action in near future!!
video of my 3DR
|
Re: RepRap 3DR Delta printer Released September 20, 2013 08:25AM |
Registered: 10 years ago Posts: 46 |
|
Re: RepRap 3DR Delta printer Released September 20, 2013 11:48AM |
Registered: 10 years ago Posts: 1 |
|
Re: RepRap 3DR Delta printer Released September 21, 2013 02:39AM |
Registered: 10 years ago Posts: 6 |
Hey GPSNEW, I am currently building the 3DR, just finishing up the electronics and I printed all the parts on my RoBo3D Printer. The quality is awesome. I would love to do the parts for you. Maybe send me a PM, and I can get you more info, and costs?
- HV
Oh, and here are pictures to my 3DR build so far!
[www.dropbox.com]
- HV
Oh, and here are pictures to my 3DR build so far!
[www.dropbox.com]
|
Re: RepRap 3DR Delta printer Released September 21, 2013 07:16AM |
Registered: 10 years ago Posts: 10 |
Here is something I'd learn the hard way. Not all Traxxas joints are the same.
I ordered 12 joints froma local hobby shop. Traxxas ref. #2742
They look the right shape and size. But they are not, the rod hole is 2mm, the screw holes M3 and the hexagon shape is 6mm in width (it won't fit in 3DR's rod adapters)
I went ahead and make the holes in the joints and platform wider so I could use M3 screws and fit the carbon rods. Then I realized they only have 45 degreees of freedom. That is too few, at best it can move 8cm side to side, instead of the 17cm expected.
Now I'd ordered the ones Richrap linked KCmodels
Live and learn.
[edit: spell check]
Edited 1 time(s). Last edit at 09/22/2013 06:27PM by FraNtik.
I ordered 12 joints froma local hobby shop. Traxxas ref. #2742

They look the right shape and size. But they are not, the rod hole is 2mm, the screw holes M3 and the hexagon shape is 6mm in width (it won't fit in 3DR's rod adapters)
I went ahead and make the holes in the joints and platform wider so I could use M3 screws and fit the carbon rods. Then I realized they only have 45 degreees of freedom. That is too few, at best it can move 8cm side to side, instead of the 17cm expected.
Now I'd ordered the ones Richrap linked KCmodels
Live and learn.
[edit: spell check]
Edited 1 time(s). Last edit at 09/22/2013 06:27PM by FraNtik.
|
Re: RepRap 3DR Delta printer Released September 21, 2013 07:38AM |
Registered: 10 years ago Posts: 63 |
I didn't really like the KCmodels links (some were ok but most had too much slack) so I went for Traxxas #5347 instead.. 3mm Ball bore and M4 inside the shaft. I did not use the 3DR rod adapters but went for 5mm OD / 4mm ID carbon tubes and M4x16 set screws glued into the tube ends.
45 deg (actually a bit less with #5347) works just fine for a print radius of up to 80mm.
45 deg (actually a bit less with #5347) works just fine for a print radius of up to 80mm.
|
Re: RepRap 3DR Delta printer Released September 23, 2013 12:15AM |
Registered: 10 years ago Posts: 110 |
|
Re: RepRap 3DR Delta printer Released September 23, 2013 01:10AM |
Registered: 12 years ago Posts: 195 |
|
Re: RepRap 3DR Delta printer Released September 26, 2013 03:13PM |
Registered: 14 years ago Posts: 80 |
I am building one. Pictures coming soon. I also am doing my best to get a spreadsheet put together with a working BOM. I know RichRap is busy, but the blog post was hard to follow and had no references.
Google Docs 3DR Delta Printer BOM WIP
Maybe someone could find this useful. Includes prices, quantity, and links to possible suppliers. US based at the moment.
Edited 1 time(s). Last edit at 09/26/2013 03:27PM by CidVilas.
Google Docs 3DR Delta Printer BOM WIP
Maybe someone could find this useful. Includes prices, quantity, and links to possible suppliers. US based at the moment.
Edited 1 time(s). Last edit at 09/26/2013 03:27PM by CidVilas.
|
Re: RepRap 3DR Delta printer Released September 26, 2013 04:00PM |
Registered: 10 years ago Posts: 10 |
Good list. You are missing the RUMBA board there. And the bowden connectors and tube.
Most of the screws and nuts can be found in a decent hardware store.
For the build platform I saw this post in Delta google group: Borosilicate glass . It leads to here.
For the Europeans with no way to cut the aluminium and steel rods themselves:
I used Motedis. They cut it to the size needed, and also sell the t-nuts and plates.
I'm pretty happy with the result.
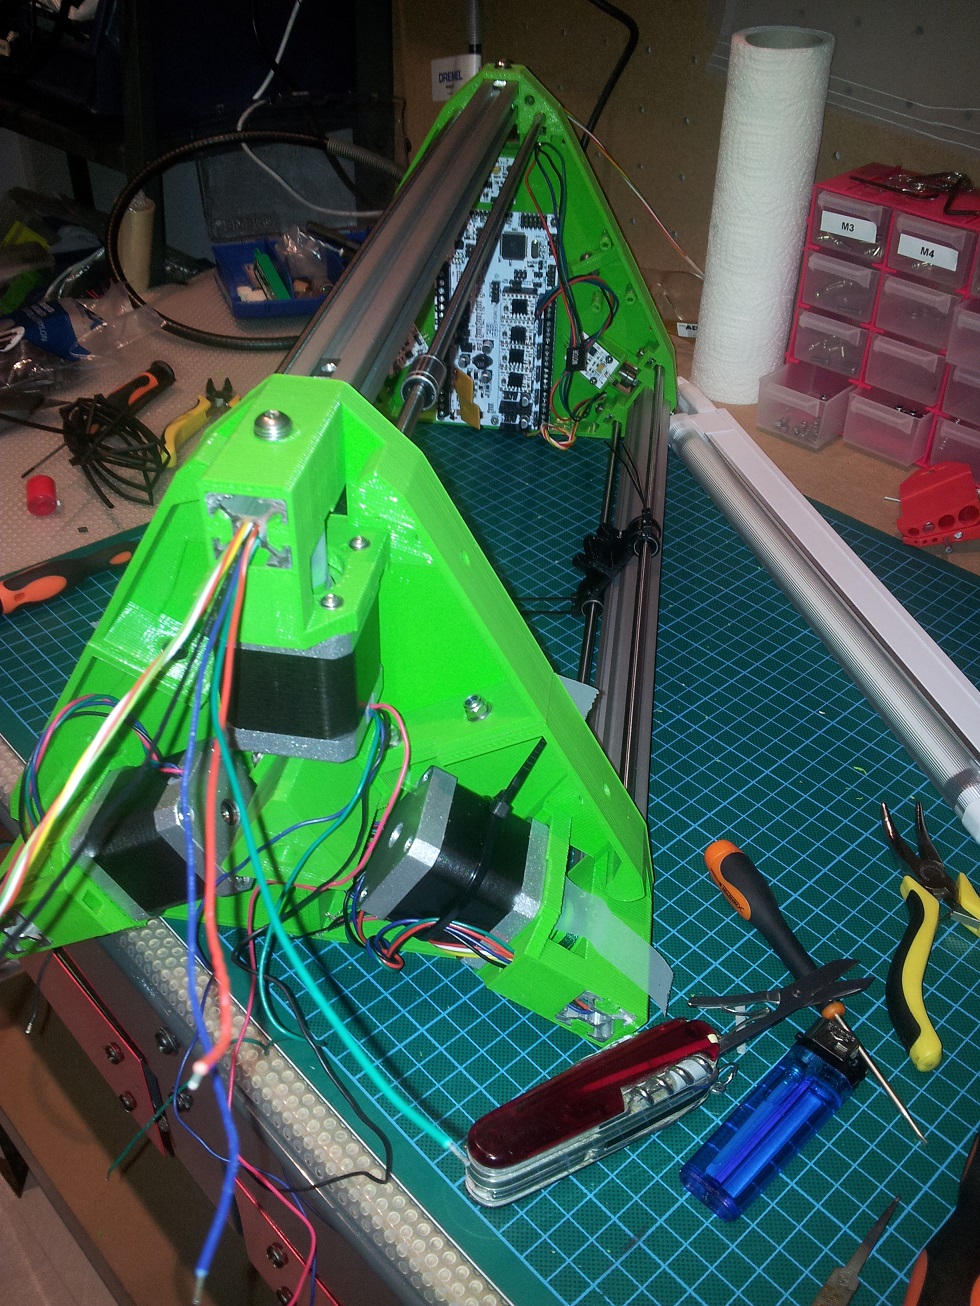
Btw, if you check the picture attached, I managed to pass the 4 motor cables and also 4 more on each column. I'm planning on adding a power connector and female USB on the base.
Edited 2 time(s). Last edit at 09/26/2013 04:11PM by FraNtik.
Most of the screws and nuts can be found in a decent hardware store.
For the build platform I saw this post in Delta google group: Borosilicate glass . It leads to here.
For the Europeans with no way to cut the aluminium and steel rods themselves:
I used Motedis. They cut it to the size needed, and also sell the t-nuts and plates.
I'm pretty happy with the result.
Btw, if you check the picture attached, I managed to pass the 4 motor cables and also 4 more on each column. I'm planning on adding a power connector and female USB on the base.
Edited 2 time(s). Last edit at 09/26/2013 04:11PM by FraNtik.
|
Re: RepRap 3DR Delta printer Released September 26, 2013 05:25PM |
Registered: 14 years ago Posts: 80 |


Sorry, only registered users may post in this forum.