3DR "Simple" Delta Printer
Posted by JohnSL
|
Re: 3DR "Simple" Delta Printer February 27, 2014 11:49PM |
Registered: 10 years ago Posts: 99 |
|
Re: 3DR "Simple" Delta Printer February 28, 2014 12:00AM |
Registered: 10 years ago Posts: 99 |
"How is everyone mounting an LCD to their machine? I'm looking to mount mine to the top of mine since it's closest to the controller. I looked at Rich's github files and found an LCD adapter but I can't for the life of me figure out how he used it!"
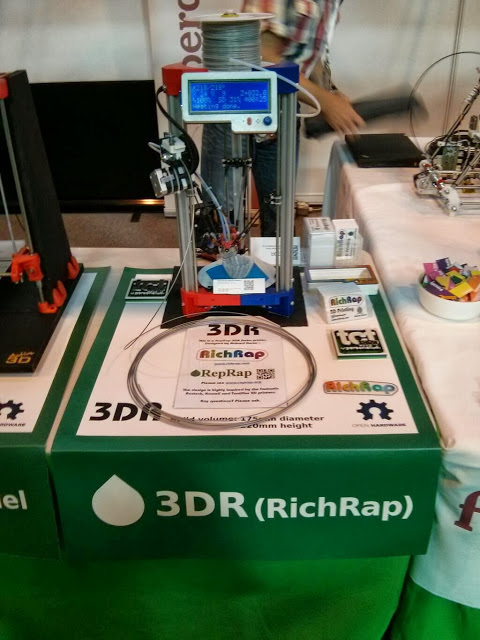
See attached. RichRap put his at the top for this model.
See attached. RichRap put his at the top for this model.
|
Re: 3DR "Simple" Delta Printer March 02, 2014 02:40PM |
Registered: 10 years ago Posts: 172 |
Rturnock,
I've seen that and looked at many different pictures. It doesn't tell me HOW the LCD is mounted. Rich has an LCD adapter in his github files but I can't figure out how it's used to mount the LCD. I even imported his parts into Solidworks and still can't quite figure it out. I'm just going to design my own mount.
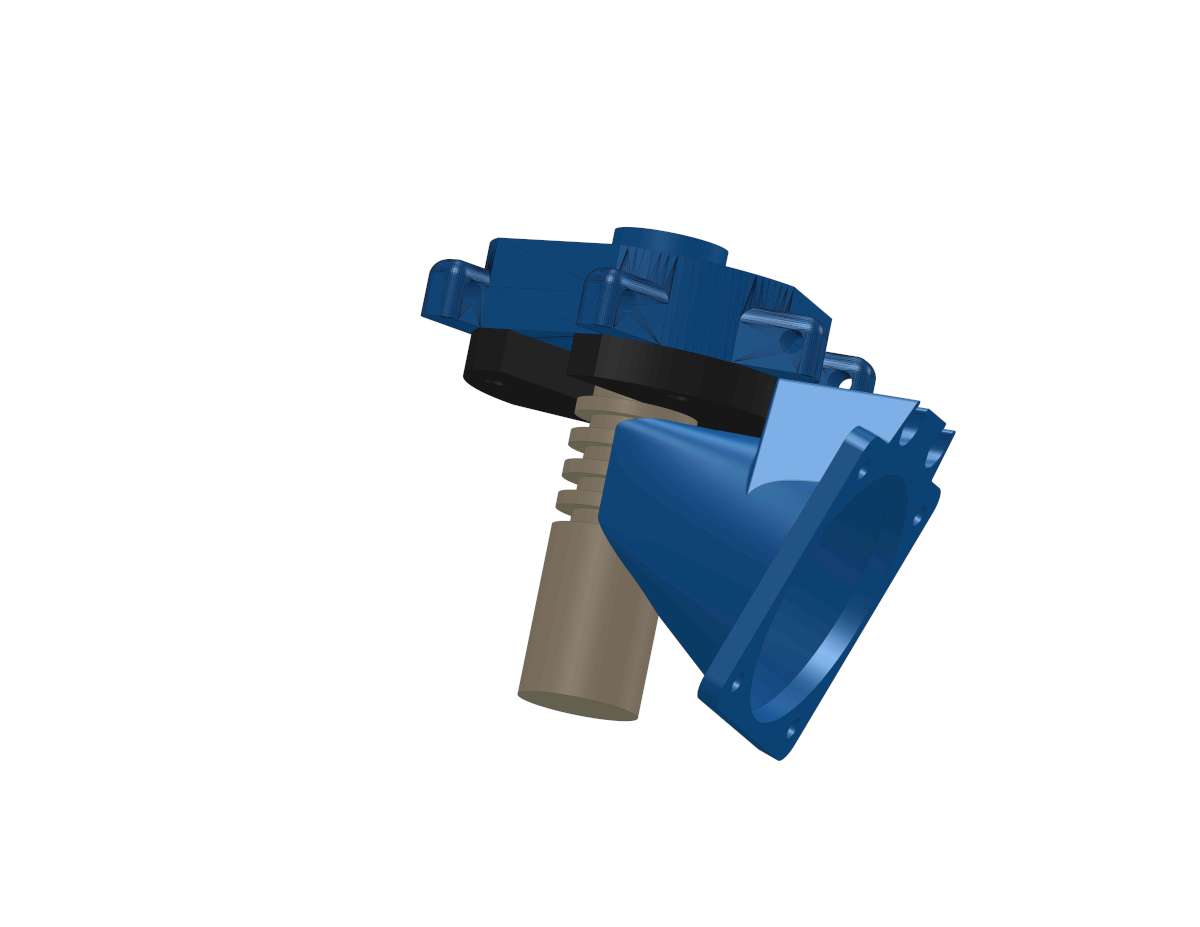
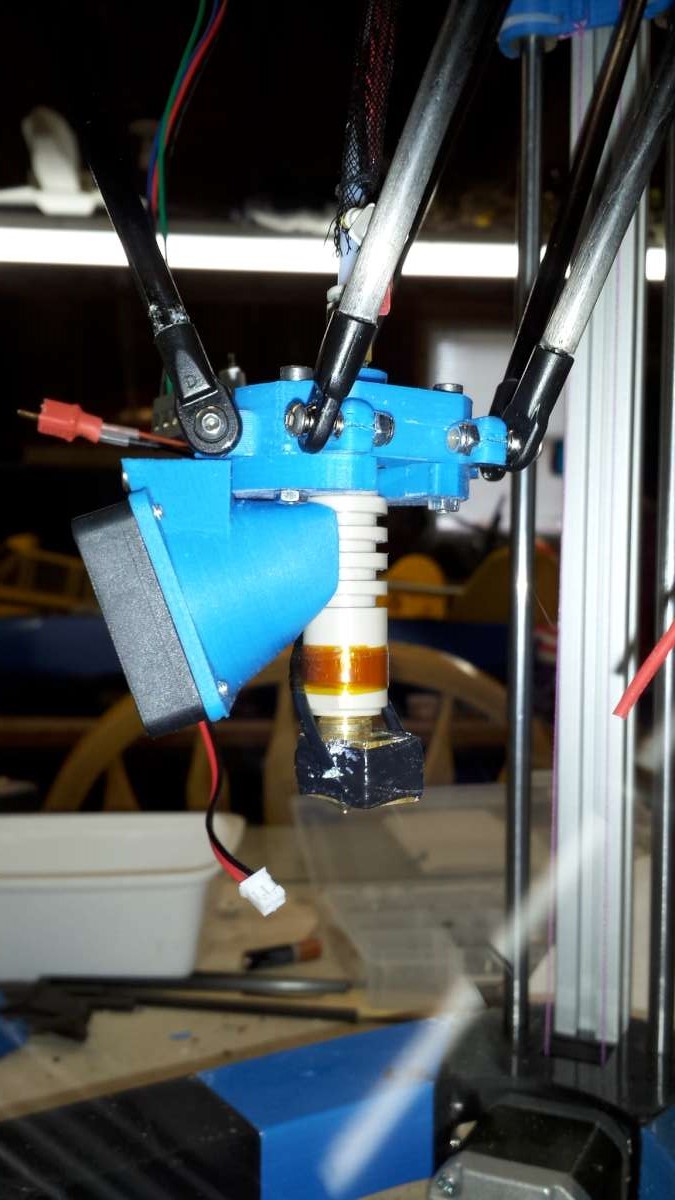
On another note, I have designed a J-Head fan duct for use with my version of the 3DR simple platform. the J-Head I got from Makerfarm.com for 1.75mm filament is an older MKII J-Head. I machined some grooves in it for cooling. I'm going to blow air across it as I do my other J-Heads to print with PLA.
See the attached. I'll create a thing on thingiverse just as soon as I can figure out how to create a new thing. They've apparently removed the links to do so or at least I can't, for the life of me, find the link to create a new thing...
I've seen that and looked at many different pictures. It doesn't tell me HOW the LCD is mounted. Rich has an LCD adapter in his github files but I can't figure out how it's used to mount the LCD. I even imported his parts into Solidworks and still can't quite figure it out. I'm just going to design my own mount.
On another note, I have designed a J-Head fan duct for use with my version of the 3DR simple platform. the J-Head I got from Makerfarm.com for 1.75mm filament is an older MKII J-Head. I machined some grooves in it for cooling. I'm going to blow air across it as I do my other J-Heads to print with PLA.
See the attached. I'll create a thing on thingiverse just as soon as I can figure out how to create a new thing. They've apparently removed the links to do so or at least I can't, for the life of me, find the link to create a new thing...
|
Re: 3DR "Simple" Delta Printer March 02, 2014 05:03PM |
Registered: 10 years ago Posts: 99 |
I am not sure either how he did it.
Here is his adapter for mounting the LCD
[github.com]
you will notice there is a way to bolt something on at a slant to the more solid part.
The part that has two holes a long ways apart is to attach screws to the under part of the top farme pieces.
Attached is a picture from JohnSL website that shows how a 3DR Simple top frame has long round columns for a screw.
I found that the long round columns will easily break off, unless i use super glue to attach them to the sides of the frame.

|
Re: 3DR "Simple" Delta Printer March 02, 2014 05:06PM |
Registered: 10 years ago Posts: 99 |
Looking again at RichRap's LCD adapter part, the part is printed upside down.
If you turn it over, it will attach to the under part of the top frame on a 3DR Delta and hold the LCD case.
I was wrong about the holes in the adapter. The outside holes that show a nut trap go on the under part of the top frame piece.
The two holes closer together are the ones that attach to the LCD.
Edited 1 time(s). Last edit at 03/02/2014 05:08PM by RTurnock.
|
Re: 3DR "Simple" Delta Printer March 02, 2014 11:55PM |
Registered: 10 years ago Posts: 110 |
Hi Everyone.
I was absent for a little while because of an issue with the forum--I was getting a message that I was banned, but I really wasn't. And then things were busy at work. In any event, someone (I can't remember who, at this point) requested that I upload STEP files onto Github so they could edit solid models instead of the mesh in the STL files. I've now done that.
I've also incorporated a few changes requested by brendanjerwin. First, I added a fillet to the screw posts on the top. I've tested the strength of the posts on my printer and they're quite strong. But it was easy to add the fillets for more strength, so I've done that. He also asked for the slot on the top motor mounts, where the stepper wires go through the part, to be on the other side. Moving it to the other side allows easier wire routing as it doesn't have to go past the end stops. Instead of moving the slot, I added a second slot. That way you can decide which way you want to route the wires.
RichRap has a photo on his blog: [richrap.blogspot.co.uk]. Search for "Wiring with RUMBA" and you will see a photo from the bottom. This photo shows that his LCD mount attaches to his printer with two screws. I didn't include these screw holes in my design for two reasons. First, I wanted curved surfaces because I thought they looked nicer. And second, I was focused on taking an inexpensive printer and making it a delta without adding too much to the initial price of the Printrbot Simple. That being said, you could probably create a mount that attached the LCD display to the bottom, using the screw posts (especially if you print my new versions that have a fillet to make them much stronger.
I must say, it's really fun to see the progress and what everyone is doing with this design. Thanks for sharing.
|
Re: 3DR "Simple" Delta Printer March 03, 2014 08:51AM |
Registered: 10 years ago Posts: 172 |
welcome back, John.
Thanks for pointing out that picture on Rich's site. that explains how the LCD adapter mounts to the printer. the adapter doesn't line up with any holes in his LCD cover backplate, however. I wonder if he just drilled some holes. I'm going to do a bit of design work and come up with something a bit more elegant. I'm considering a remix of your upper wings to include the correct mounting bosses similar to how Rich has his designed. Now that you've posted the step files, it should be a bit easier, although I had no troubles before.
Here is the link to my fan duct design. I can mod this to fit a different J-head if anyone needs it. let me know.
[www.thingiverse.com]
Edited 1 time(s). Last edit at 03/03/2014 06:26PM by umdpru.
|
Re: 3DR "Simple" Delta Printer March 05, 2014 05:48PM |
Registered: 10 years ago Posts: 99 |
|
Re: 3DR "Simple" Delta Printer March 06, 2014 10:07AM |
Registered: 10 years ago Posts: 110 |
|
Re: 3DR "Simple" Delta Printer March 06, 2014 09:58PM |
Registered: 10 years ago Posts: 99 |
Printrbot.com has changed the parts used in the Simple in several places. They sell a new metal extruder that I do not have.
I ordered the Simple kit without the wood frame so I could build a 3DR Simple with plastic parts designed by JohnSL printed on my Mini Kossel and my Printrbot Simple.
However, the new kits have a small 2.2 kg torque motor to use with the Y axis carriage and three 5.5kg torque motors for the extruder, X and Z axes.
So, now I need to buy another motor for the extruder, I will use the three 5.5kg motors for the XYZ axes.
Oh, I have lots of spare parts for my Printrbot Simple now.
I have top assembled, bottom assembled, the effector, hot end, fan mount, push fit all together with diagonal rods on the effector.
I am going going to put the spool on top like JohnSL did and then mount the printrboard underneath instead of on the frame because I broke off the screw fitting and don't want to print another part.
Slowly coming together.
|
Re: 3DR "Simple" Delta Printer March 07, 2014 10:31PM |
Registered: 10 years ago Posts: 110 |
Interesting that they have a smaller motor for Y. My original Printrbot Simple had three small motors and one large motor. If you look at my construction motors, you can see that all three of my tower motors are the small ones.
I have another Printrbot Simple hard-ware only kit I got so I could build another printer (this one laser-cut acrylic), so I'll do some experiments. I'm thinking that with a geared extruder it might be possible to user the small motor for the extruder so you can use the three larger motors for the towers. I'll also check the fit of the larger motors for the towers. I want to replace my printed spools with the metal ones from Tridprinting.com, so we'll see how that works out as well.
I have another Printrbot Simple hard-ware only kit I got so I could build another printer (this one laser-cut acrylic), so I'll do some experiments. I'm thinking that with a geared extruder it might be possible to user the small motor for the extruder so you can use the three larger motors for the towers. I'll also check the fit of the larger motors for the towers. I want to replace my printed spools with the metal ones from Tridprinting.com, so we'll see how that works out as well.
|
Re: 3DR "Simple" Delta Printer March 09, 2014 12:19AM |
Registered: 10 years ago Posts: 110 |
I switched over to using the Tridprinting.com metal spools and I really, really like them. My printed ones were always a little fussy. It was hard to get them so they were completely coaxial, and also the screws had a tendency to loosen over time. The metal one fits very snugly, without any wobble, and the set screws seems to hold very well.
Here is a link to the spools I'm now using: [www.tridprinting.com]
They're $20 for three of them, and I think well worth it.
I was also going to try one of the small stepper motors for the extruder. However, I seem to have blown the MOSFET for the cooling fan on my Printrboard, and I also need to get an extension cable for the wires on the stepper motor, so I didn't try it. The Printrboard is now on it's way back to Printrbot for a replacement. Hopefully I'll get the new board soon.
|
Re: 3DR "Simple" Delta Printer March 10, 2014 11:07PM |
Registered: 11 years ago Posts: 32 |
Just got my replacement Printrboard after my original had the USB port break off and I'm pretty close to printing now, but I'm hitting some snags in getting the firmware right. I've updated the #define MANUAL_Z_HOME_POS (in my case it is near 223.0), but when I start to print the distance between the glass and the nozzle changes pretty significantly (+/- 5mm between the towers). I've read through the RichRap firmware post (http://richrap.blogspot.com/2013/12/3dr-build-tutorial-part4-firmware.html) and through the Delta calibration post linked in the blog (http://minow.blogspot.com/index.html#4918805519571907051) and it seems that I'm able to identify different distances as described in this routine:
When I do this sequence I get the following nozzle to glass distances:
A - 0mm
B - 5mm
C - 10mm
D - 1mm
That blog post then mentions adjusting the end-stop screws, but there are no end-stop screws in this design nor are the endstops themselves adjustable. How do I account for this alignment issue?
Quote
2- Calibrate the towers to the actual build surface.
An important trick here. Set up four scripts in RepetierHost, or four user defined buttons in Pronterface, to move the carriage to four specific measurement locations on your build surface. Three locations are on a circle centered on the center of your build surface immediately in front of each of the three towers. The fourth is the actual center of your build surface. And each of the four locations is at height Z=0.
Let’s call the three tower locations A, B, and C, and the center D. The script code for each is:
Button Script
A g28 g0 f8000 x-77.94 y-45 z0
B g28 g0 f8000 x77.94 y-45 z0
C g28 g0 f8000 x0 y90 z0
D g28 g0 f8000 x0 y0 z0
When I do this sequence I get the following nozzle to glass distances:
A - 0mm
B - 5mm
C - 10mm
D - 1mm
That blog post then mentions adjusting the end-stop screws, but there are no end-stop screws in this design nor are the endstops themselves adjustable. How do I account for this alignment issue?
|
Re: 3DR "Simple" Delta Printer March 10, 2014 11:12PM |
Admin Registered: 15 years ago Posts: 1,470 |
M666Quote
PierreB
That blog post then mentions adjusting the end-stop screws, but there are no end-stop screws in this design nor are the endstops themselves adjustable. How do I account for this alignment issue?
|
Help improve the RepRap wiki!
Just click "Edit" in the top-right corner of the page and start typing. Anyone can edit the wiki! |
|
Re: 3DR "Simple" Delta Printer March 11, 2014 12:12AM |
Registered: 10 years ago Posts: 99 |
March 10 update on my blue 3DR Simple
Need to finish wiring and attaching CF rods to the carriages.
Forgot to put extra T-nuts in extrusions for attaching the extruder and anything else to the columns.
So, I need to take the top off and add them, then put the top back on.
Oh, also turning the endstop switches around, the carriage did not hit the metal properly.
Going to print a part on my Mini Kossel to attach the Printrboard in the center under the Spool holder that JohnSL suggested and was redesigned by Adam (apru)
Thanks to JohnSL and Adam and RichRap for doing all the trouble shooting and design work to make this work well for me, so far.
Blue 3DR Simple update for March 10, 2014.
|
Re: 3DR "Simple" Delta Printer March 12, 2014 10:55PM |
Registered: 11 years ago Posts: 32 |
There are two items which appear to be missing from the original BOM:
1) a small dowel pin to hold the 608zz bearing in place on the extruder idler - I've been using a piece of plastic tubing just to keep the build going along but I'm at a point now where I want to put the right part in place. Richrap's blog mentions using a M8 x 20mm smooth or threaded rod for this purpose. Anyone know where I can buy smooth rod cut to length online? I found plenty of it on McMaster, but they sell it by the foot and I don't have any tools handy to cut it. The part I'm talking about is seen here: [www.youtube.com] (side note: this video would be helpful to link in your blog to help along with assembly of the extruder). Looks like I could buy the vitamins for $20 from MakerFarm: [www.makerfarm.com]
2) long M3 screws to use to hold the idler down against the main extruder body. I bought some M3 x 45mm's thinking they'd be long enough (not listed in the BOM) and they're still too short to use with the springs from the printrbot simple (they're short just about the height of the uncompressed spring which is 20mm). The spring looks like it will compress 5mm to 10mm easily, so it appears I could get by with M3 x 60mm's, which is the longest that McMaster sells, although a set of 25 is $8.
At $8 + S/H from McMaster just for the screws, I'm tempted to just buy the hardware only kit from MakerFarm for $15 + S/H and wind up with a few spare bits, but I'm curious to know what everyone else did.
Edited 6 time(s). Last edit at 03/12/2014 10:59PM by PierreB.
|
Re: 3DR "Simple" Delta Printer March 13, 2014 11:15AM |
Registered: 10 years ago Posts: 110 |
PierreB, thanks for pointing out that they were missing from the BOM. I've just updated the BOM. In my case I used two M3 x 50 screws. I had to push against the springs to get the screws started, so they're perhaps a little short. I haven't tried 60mm screws--I'll have to see if I can get some to try them out.
As to the smooth or threaded rod, I just looked at noticed that I didn't use one--my bearing is held in as a press fit. I suspect this isn't the best solution, so I'm going to see if I can get a pin or rod to put in there. It's been printing fine without it, interestingly enough.
Also, I'm wondering if I need to add another 3/4" spring to the BOM, as I believe the Printrbot Simple only comes with one, and this extruder requires two. I've just updated Part I to include your link to the MakerFarm hardware-only kit, as this seems like the best way to get all the hardware required for the extruder. Thanks for the link!
Also, there are no end stop adjustments because they don't really have an effect on the hot end staying level--that's controlled by other values like the radius and rod lengths. If your rod lengths are slightly different, it can lead to all sorts of problems. I tried some other rods at one point and had a lot of calibration issues until I measured the rods and discovered they weren't all the same length.
RTurnock, I'm a big fan of the T nuts that you can install after the fact. Here are the ones I use: [us.misumi-ec.com]
|
Re: 3DR "Simple" Delta Printer March 13, 2014 01:47PM |
Registered: 10 years ago Posts: 67 |
McMaster Carr sells M8 dowel pins. Depending on type, you can get internally threaded for $1.50, or standard ones for $10 for a pack of 5.
Also, you can cut hardened shafts very easily with a plain dremel tool with regular cutting discs. Its amazing how well it works.
"Never argue with stupid people, they will drag you down to their level and then beat you with experience."
Also, you can cut hardened shafts very easily with a plain dremel tool with regular cutting discs. Its amazing how well it works.
"Never argue with stupid people, they will drag you down to their level and then beat you with experience."
|
Re: 3DR "Simple" Delta Printer March 13, 2014 07:02PM |
Admin Registered: 15 years ago Posts: 1,470 |
Or you can print an 8mm dowel pin for almost freeQuote
Hazer
McMaster Carr sells M8 dowel pins. Depending on type, you can get internally threaded for $1.50, or standard ones for $10 for a pack of 5.
|
Help improve the RepRap wiki!
Just click "Edit" in the top-right corner of the page and start typing. Anyone can edit the wiki! |
|
Re: 3DR "Simple" Delta Printer March 13, 2014 09:45PM |
Registered: 10 years ago Posts: 67 |
Quote
NewPerfection
Or you can print an 8mm dowel pin for almost freeQuote
Hazer
McMaster Carr sells M8 dowel pins. Depending on type, you can get internally threaded for $1.50, or standard ones for $10 for a pack of 5.
Not for an extruder idler bearing.
"Never argue with stupid people, they will drag you down to their level and then beat you with experience."
|
Re: 3DR "Simple" Delta Printer March 14, 2014 12:22AM |
Admin Registered: 15 years ago Posts: 1,470 |
Really? Why not? I do that for all of my printers with Wade-style extruders. Works well. I do print them horizontally though, with a flat spot on the bottom so it sticks well to the bed.Quote
Hazer
Quote
NewPerfection
Or you can print an 8mm dowel pin for almost freeQuote
Hazer
McMaster Carr sells M8 dowel pins. Depending on type, you can get internally threaded for $1.50, or standard ones for $10 for a pack of 5.
Not for an extruder idler bearing.
|
Help improve the RepRap wiki!
Just click "Edit" in the top-right corner of the page and start typing. Anyone can edit the wiki! |
|
Re: 3DR "Simple" Delta Printer March 14, 2014 09:12AM |
Registered: 10 years ago Posts: 88 |
|
Re: 3DR "Simple" Delta Printer March 14, 2014 10:00AM |
Registered: 12 years ago Posts: 195 |
Quote
Hazer
Quote
NewPerfection
Or you can print an 8mm dowel pin for almost freeQuote
Hazer
McMaster Carr sells M8 dowel pins. Depending on type, you can get internally threaded for $1.50, or standard ones for $10 for a pack of 5.
Not for an extruder idler bearing.
Take a look at the Airtripper sometime.
|
Re: 3DR "Simple" Delta Printer March 14, 2014 02:33PM |
Registered: 10 years ago Posts: 99 |
Quote
TheCrey
Quote
NewPerfection
Really? Why not? I do that for all of my printers with Wade-style extruders. Works well. I do print them horizontally though, with a flat spot on the bottom so it sticks well to the bed.
Do you have a stl file ?
PierreB
[www.thingiverse.com]
Here is STL file for 16mm long pin used in extruder.
|
Re: 3DR "Simple" Delta Printer March 14, 2014 02:40PM |
Registered: 10 years ago Posts: 99 |
Quote
JohnSL
RTurnock, I'm a big fan of the T nuts that you can install after the fact. Here are the ones I use: [us.misumi-ec.com]
Thanks, I saved that link and will keep that in mind if what I did does not work.
|
Re: 3DR "Simple" Delta Printer March 15, 2014 12:50AM |
Admin Registered: 15 years ago Posts: 1,470 |
Couldn't find the file I used, but I had drawn it in SolidWorks anyways (was being lazy). Here's an OpenSCAD version that I whipped up in about 5 minutes. Only took me that long because I couldn't remember some of the syntax and had to look it up (haven't opened OpenSCAD in a while...). I even commented itQuote
TheCrey
Do you have a stl file ?
The attached STL is for an 8mm diameter, 20mm long pin. Feel free to scale it, or even better use OpenSCAD to get it the right size.
pin_length = 20; //length of the pin
pin_diam = 8; //diameter of the pin
cutoff = 1; //amount to cut off of bottom of pin to make bottom flat
$fn=30; //resolution.  Increase to smooth pin at expense of larger file size

difference(){

	intersection(){

		//create the pin cylinder
		rotate([90,0,0]) cylinder(r=pin_diam/2,h=pin_length,center=true);

		//chamfer the edges using a stretched sphere
		scale([1,2,1])sphere(r=pin_length/4+1);

		}

	//cube to cut off bottom of pin
	translate([0,0,-pin_diam+cutoff])cube([pin_diam+1,pin_length+1,pin_diam],center=true);
}
|
Help improve the RepRap wiki!
Just click "Edit" in the top-right corner of the page and start typing. Anyone can edit the wiki! |
|
Re: 3DR "Simple" Delta Printer March 15, 2014 12:09PM |
Registered: 10 years ago Posts: 99 |
JohnSL,
Maybe I missed this detail when discussed earlier. I am using a MAC desktop connected via USB to Printrboard.
The Printrbot.com instructions for flash firmware are not well easy to follow for me, unfamiliar with the process.
I plugged in power, installed jumper, pushed reset and tried to connect to upload using Arduino IDE.
Of course it did not work.
Left out the step where I remove the jumper, then connect.
This procedure is unique to the Printrboard.
Oh, also downloaded the customized version of Arduino IDE from Printrbot to select the right board and serial port.
I will try these changes later today.....breakfast first...
>>>>>March 15 10am
I still can not get the Delta firmware uploaded to the Printrboard Rev. D
JohnSL? How did you do it?
I have been following the instructions by Printrbot.com about how to change the firmware but I must be missing some little step.
My key problem is that when I put the Printrboard in boot loader mode then the serial port connection is not available on the list of options.
When the printrboard is in normal operating mode, the serial port is available but of course then I can not upload the Delta firmware. Very frustrating.
when I have the printrboard powered on and in normal mode then I can connect Repetier Host and I can move motors however the settings are for cartesian motor movements and I have to be careful.
Everything works as if it was a cartensian printer.
So, I know the board works.
But how I upload the Delta configuration......I have done this many many times on my Mini Kossel with the Mega2560Ramps1.4, so I know how to use the Arduino IDE.
I am using a MAC desktop connected via USB to Printrboard.
Edited 3 time(s). Last edit at 03/15/2014 04:39PM by RTurnock.
|
Re: 3DR "Simple" Delta Printer March 15, 2014 11:23PM |
Registered: 10 years ago Posts: 99 |
I am using a MAC desktop computer.
Main page
Go down to "Other useful pages" and select "Firmware Update"
Go down to "HOW TO FLASH A HEX PROGRAM FILE TO THE PRINTRBOARD FROM A MAC COMPUTER
See the guide written by PxT here"
Select "here"
Go to the bottom of the page and download the two apps.
1. Download and install Printrbot Firmware Updater app.
2. Download and install Printrbot customized version of Arduino IDE that has additional list of Boards.
"Pre-configured Arduino build environment (Mac OS)"
Open Arduino IDE
Under Tools>>Boards
Select "[BootloaderCDC]teensyluPrintrboard"
select serial port as appropriate for your computer
for me "/dev/tty/usbmodem12341"
Under preferences check box to "show verbose output during compilation" (so later you can see the file name)
Updating Firmware
Unplug everything, including USB to Printrboard, turn off power or unplug.
Use pre-configured Arduino IDE to modify Marlin code and verify-compile. Note the file name at the end of the list.
For me:
/var/folders/6x/pk1wrcvs07s4b0c067y_3sgw0000gn/T/build6641325177505948607.tmp/Marlin.cpp.hex
Use Terminal app: open $TMPDIR
Drag and drop Marlin.cpp.hex onto Printrbot Firmware Updater app.
Follow the directions exactly.
Remove jumper
Disconnect power and then reconnect power.
Open Repetier and confirm changes.
Edited 1 time(s). Last edit at 03/15/2014 11:35PM by RTurnock.
|
Re: 3DR "Simple" Delta Printer March 16, 2014 12:17PM |
Registered: 10 years ago Posts: 172 |
Hi all,
I have some good news and bad news.
the good news is my 3DR is alive - somewhat.
The bad news is I can't get it to move via repetier host or pronterface. I don't really know repetier host yet which is why I tried pronterface.
the machine was homing and crashing right past the end-stops until I dropped the homing feedrates down from 200 to 50. Now it homes each axis properly but it just won't move after homing.
I have attached my configuration.h in hopes that someone can take a peek and let me know if they see anything obvious or provide some ideas.
I am using a ramps 1.4 controller with mechanical end-stops. I have looked through Rich's blog on firmware as well as John's blog on firmware and I just can't seem to figure out what's going on.
|
Re: 3DR "Simple" Delta Printer March 16, 2014 12:43PM |
Registered: 10 years ago Posts: 67 |


Sorry, only registered users may post in this forum.