Cherry Pi III Is Available
Posted by AndyCart
|
Re: Cherry Pi III Is Available February 15, 2015 03:34AM |
Registered: 9 years ago Posts: 1,159 |
Quote
nka
Quote
Pointy
The new carriages work, and I have gained 30mm with the flipped design. I also seem to be able to print via USB now, thanks to a new cable. (should always try the obvious things first)
The carriage is designed for Bosch Rexroth/Motedis aluminium extrusion, but could be tweaked for other makes. I am using the following fittings with mine....
M3 x25mm Socket Head Cap Screw & M3 Nut (Wheel tension adjustment)
M3 x 20mm Hex Head Screw & M3 Nut (Belt adjustment, If you don't have a M3 hex bolt, a normal SHCS will probably work if you glue it in place.)
4 x No 4 x 1/2" Pozi Flanged Self Tappering Screws (Fixings for rod carrier/carriage)
3 x M5 30mm Socket Low Head Cap Screw (to replace the M5 screws supplied with the mini v wheel kit)
2 x M2 x 6mm Socket Head Cap Screw (to hold the belt loops in place)
Regards,
Les
Oh, I might try this someday... I always wished to have a mechanical way to apply force the the belt instant of using my arm
I also need to use this new effector... if I can find a way to print ABS without heatbed and/or have my new printer !
I can vouch for the fact that they work very well along with Les's Effector mods for the E3D V6 hotend.
Doug
|
Re: Cherry Pi III Is Available February 15, 2015 06:59PM |
Registered: 10 years ago Posts: 903 |
Quote
AndyCart
It maybe that all that is required is a tube with a larger, maybe 6mm, ID. As everything is held in tension by the spring the end of the tube may be a suitable 'housing' for the ball
I have some 7mm OD x 4mm ID carbon fiber kite extrusion. My Chinese Dremel rotary bits came with a spherical grinding stone that looked about right. I hit each end of the CF tubing just enough to cup it (just like the original CP mag joints), and then applied some "secret sauce" and set the 5/16 inch metal spheres on top. The first sphere on each rod stuck after 15-20 seconds. The spheres on the other end were reluctant to stick, I suspect because there was no airflow behind the glue. A few needed to be reseated 3-4 times, and took several minutes before the glue would hold them in place enough to even turn the rods over. After a few hours, they seemed to be on there enough to slip through my pinched fingers, but I really didn't try to snap them off.
Funny thing happened while I had them sticking out of my toolbag pouch on the table facing upwards while the second spheres dried. My wife asked me what engine those pushrods were for, and why was I missing two? Sure enough, they most certainly do resemble the valve train pushrods that I pulled out of an old aircooled VW engine several years ago.....
|
Re: Cherry Pi III Is Available February 17, 2015 11:41AM |
Registered: 10 years ago Posts: 327 |
My heated bed turned up from Aliexpress today, that's much quicker than I was expecting. Not sure if I could print on it directly though, it looks a little domed when I hold a straight edge on it. It also looks like I could drill a hole in the middle, between the wire connecting points for a thermistor, as there is a small area clear of tracks. Now I just need a bigger PSU and thermistor.
Regards,
Les
Pointy's Things
Pointy's Blog
Regards,
Les
Pointy's Things
Pointy's Blog
|
Re: Cherry Pi III Is Available February 17, 2015 11:54AM |
Registered: 9 years ago Posts: 1,159 |
Quote
Pointy
My heated bed turned up from Aliexpress today, that's much quicker than I was expecting. Not sure if I could print on it directly though, it looks a little domed when I hold a straight edge on it. It also looks like I could drill a hole in the middle, between the wire connecting points for a thermistor, as there is a small area clear of tracks. Now I just need a bigger PSU and thermistor.
Regards,
Les
Les
E3D Online do the Semitec thermistor's which are quite good and I got some LED supplies of Ebay 12V 400W 32.6 amp for just over £20
|
Re: Cherry Pi III Is Available February 17, 2015 12:02PM |
Registered: 9 years ago Posts: 67 |
Depending on how good your soldering is you could use these :-
[www.ebay.co.uk]
They aren't too hard to solder and it saves drilling a hole.
[www.ebay.co.uk]
They aren't too hard to solder and it saves drilling a hole.
|
Re: Cherry Pi III Is Available February 17, 2015 12:04PM |
Registered: 9 years ago Posts: 111 |
|
Re: Cherry Pi III Is Available February 17, 2015 12:34PM |
Registered: 10 years ago Posts: 327 |
Quote
dougal1957
Les
E3D Online do the Semitec thermistor's which are quite good and I got some LED supplies of Ebay 12V 400W 32.6 amp for just over £20
Thanks Doug, Ooznest have the thermistor and I want some other bits from them too, so I'll probably just grab it from them. I have had 2 x 12V supplies already from Ebay, I would like one without a fan, the largest being 300w (£17.20), which should be plenty for my setup.
Quote
Matt,Wheatley
Depending on how good your soldering is you could use these :-
[www.ebay.co.uk]
They aren't too hard to solder and it saves drilling a hole.
Regards,
Les
I did think about SMD but don't think it's practical for this situation.
Quote
mrorange26
I just stuck it to bottom of bed and the reading is exactly the same as my infra red thermometer
Did you use thermal glue?
Pointy's Things
Pointy's Blog
|
Re: Cherry Pi III Is Available February 17, 2015 12:48PM |
Registered: 9 years ago Posts: 1,159 |
Quote
Pointy
Quote
dougal1957
Les
E3D Online do the Semitec thermistor's which are quite good and I got some LED supplies of Ebay 12V 400W 32.6 amp for just over £20
Thanks Doug, Ooznest have the thermistor and I want some other bits from them too, so I'll probably just grab it from them. I have had 2 x 12V supplies already from Ebay, I would like one without a fan, the largest being 300w (£17.20), which should be plenty for my setup.
Quote
Matt,Wheatley
Depending on how good your soldering is you could use these :-
[www.ebay.co.uk]
They aren't too hard to solder and it saves drilling a hole.
Regards,
Les
I did think about SMD but don't think it's practical for this situation.
Quote
mrorange26
I just stuck it to bottom of bed and the reading is exactly the same as my infra red thermometer
Did you use thermal glue?
Usual way is to use Kapton Tape.
|
Re: Cherry Pi III Is Available February 17, 2015 05:04PM |
Registered: 10 years ago Posts: 327 |
Quote
dougal1957
Usual way is to use Kapton Tape.
LOL!, that's me being an idiot, when he said stuck I assumed glue, had he said taped I would have guessed Kapton.
Les
Pointy's Things
Pointy's Blog
|
Re: Cherry Pi III Is Available February 17, 2015 05:05PM |
Registered: 9 years ago Posts: 111 |
|
Re: Cherry Pi III Is Available February 17, 2015 05:07PM |
Registered: 9 years ago Posts: 111 |
|
Re: Cherry Pi III Is Available February 23, 2015 09:55AM |
Registered: 9 years ago Posts: 68 |
Hi,
I'm Gary from Taunton in the UK, and a new convert to the Church of the Cherry Pi. I've just taken delivery of a IIIs Metal Kit from Andy and today was my first day of assembly. Although when I say day, what I actually mean is lunchtime. I've currently read through this thread as far as page 10, so please bear with me if I'm ask a question that has already been answered.
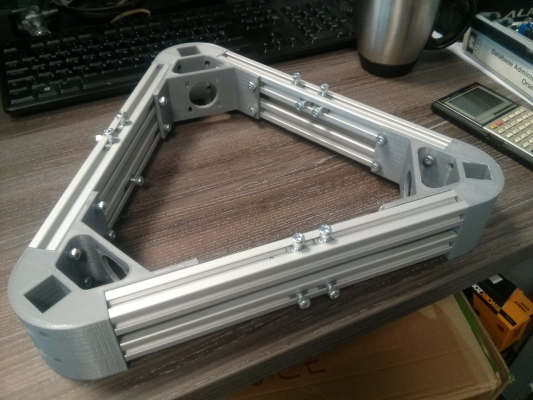
Progress so far:
Can I just check a couple of things.
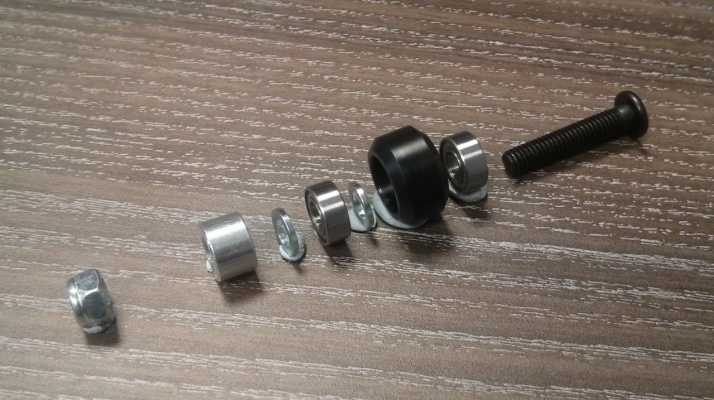
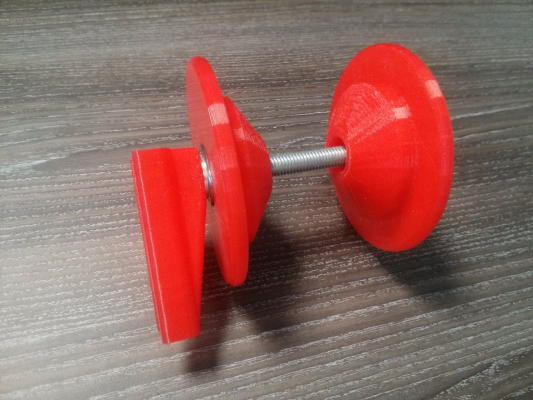
1. Is this the correct order of assembly for the V wheels? Without a washer between the bearings, I found that wheel would lock up when the bolt was tightened.
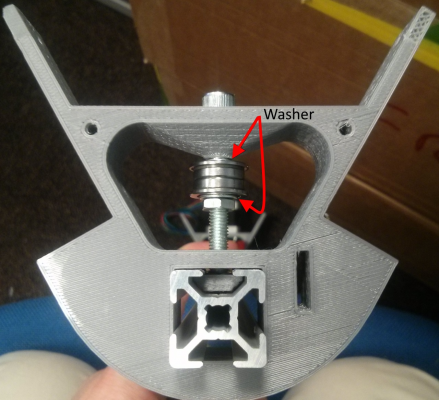
2. Have I got the head bracket assembled correctly? Should there be a lock nut to stop the current one from un-doing?
At my current speed, I'm thinking I should finish the mechanical assembly in two weeks, although I need to get some longer allen keys.
|
Re: Cherry Pi III Is Available February 23, 2015 10:37AM |
Registered: 10 years ago Posts: 327 |
Hi Gary,
1 & 2 look good to me, I made the mistake with the mini wheels first time around, and didn't put the washer in the middle.
You probably want to assemble the top and bottom frames before inserting the towers. You can use the Mini Kossel documentation here as a very rough guide to the order of building. I also used this guide to help with the extruder.
Regards,
Les
Edited 1 time(s). Last edit at 02/23/2015 10:37AM by Pointy.
Pointy's Things
Pointy's Blog
|
Re: Cherry Pi III Is Available February 23, 2015 11:17AM |
Registered: 9 years ago Posts: 68 |
Thanks for the links Les. That extruder guide should certainly help. I can't get a connection to [www.think3dprint3d.com] at the moment, but will keep trying.
|
Re: Cherry Pi III Is Available February 23, 2015 12:35PM |
Registered: 10 years ago Posts: 515 |
Hi Gary. Great you have got started. In 2 above you may need a washer under the head of the M5 bolt to avoid causing a bow in the cross member that holds the bearing. I sometimes need one. You don't need a lock nut. Just nip the nut up tight when your frame and towers are assembled. It's a good idea to build the base and the top separately and then install the towers and carriages. It's easier to get everything square. Don't forget to drill the hole in the Z tower to allow the wires from the hot end and the extruder motor to pass through to the front v slot. I included a cover strip to contain these in your kit. Drill it before you drop the cable for the Z limit switch down the central hole to the base. The position of the hole depends on how big your filament spool is and, therefore, where the extruder sits on the rear tower. The hole is drilled just below the extruder. I also included a drawing that shows how many T nuts slot into the base extrusions and where they fit. The top frame is easy, just 4 in each inner V slot.
Good luck. Keep the pictures coming. They will be great if I ever put a build manual together
Andy
Edited 1 time(s). Last edit at 02/23/2015 12:40PM by AndyCart.
Good luck. Keep the pictures coming. They will be great if I ever put a build manual together

Andy
Edited 1 time(s). Last edit at 02/23/2015 12:40PM by AndyCart.
|
Re: Cherry Pi III Is Available February 23, 2015 03:18PM |
Registered: 9 years ago Posts: 1,159 |
Looking good there Gary.
I modified the design for the top belt guides to be honest and substituted 20 tooth GT2 Pulleys (I had some spare) they are only 2$ each from robotdig so not really much more than flanged bearings and they do mold to the belt better just have to wait and see how they wear.
If they do wear badly then I will replace them with 8mm bore ones with flanged bearing's in them so no real issue as far as I am concerned.
p.s.
My hotbed heater turned up this morning so I need to get on with my Larger Slice of Pi lol
Doug
|
Re: Cherry Pi III Is Available February 23, 2015 04:04PM |
Registered: 9 years ago Posts: 111 |
|
Re: Cherry Pi III Is Available February 23, 2015 06:29PM |
Registered: 9 years ago Posts: 164 |
Gentlemen! I think I'm back in the game. I've had a little break and now have funds to attempt it again. 
Can I ask, have there been any major design changes? Andy, has the thingiverse still got files compatible with most of the kit I received? I think I need to get new carriages, rod carriers, effector assembly, filament feed assembly and the smaller top pieces to get things running (the end caps I can print once successful).
I know the carriages almost have to be made from PLA (so they have flex for adjustment, around 33% fill?) and that the effector needs to be ABS for rigidity.
There were a few things I know I could have done better originally so I'm confident build #2 is going to be successful!
|
Re: Cherry Pi III Is Available February 23, 2015 07:41PM |
Registered: 10 years ago Posts: 14,672 |
Quote
mrorange26
I have just installed a heated bed in my cherry pi.I have a big enough power supply to run it,But im finding that 5 minutes into a print the screen dims and the motors stutter and then the printer stops,Do you think this is a heat issue.
Measure the voltages on the 5V rail and the 12V rail when the problem occurs, to check whether it is just the 5V rail that is dropping, or the 12V rail is dropping too.
If the 12V rail is dropping substantially (it will need to drop to below 7V to make the LCD dim), then you have a power supply problem. If it is an ATX power supply, you need to provide a minimum load on the 5V and 12V outputs.
If only the 5V rail is dropping, and your electronics is Arduino/RAMPS, then the voltage regulator on the Arduino is overheating. It's not really up to the job of powering both the Arduino and the LCD backlight. In this case there are a few options:
1. Get a better electronics board with a decent 5V regulator. Modern 32-bit boards typically include a 5V switching regulator capable of supplying a lot more current than the puny linear regulator on the Arduino.
2. Use a fan to cool the Arduino board down, in particular the end with the voltage regulator.
3. If you are using an ATX power supply, then use it to provide the 5V supply and remove the diode on the RAMPS that supplies 12V to the Arduino voltage regulator.
4. Disconnect the LCD backlight from the 5V supply, and connect it via a series resistor to the +12V supply instead.
Edited 1 time(s). Last edit at 02/23/2015 07:41PM by dc42.
Large delta printer [miscsolutions.wordpress.com], E3D tool changer, Robotdigg SCARA printer, Crane Quad and Ormerod
Disclosure: I design Duet electronics and work on RepRapFirmware, [duet3d.com].
|
Re: Cherry Pi III Is Available February 24, 2015 03:13AM |
Registered: 10 years ago Posts: 515 |
Quote
pugzor
Gentlemen! I think I'm back in the game. I've had a little break and now have funds to attempt it again.
Can I ask, have there been any major design changes? Andy, has the thingiverse still got files compatible with most of the kit I received? I think I need to get new carriages, rod carriers, effector assembly, filament feed assembly and the smaller top pieces to get things running (the end caps I can print once successful).
I know the carriages almost have to be made from PLA (so they have flex for adjustment, around 33% fill?) and that the effector needs to be ABS for rigidity.
There were a few things I know I could have done better originally so I'm confident build #2 is going to be successful!
Welcome back. All the files for your parts are on the Cherry Pi IIIS Thingiverse page all the parts are printed with 33% in fill and yes, all PLA apart from the effector.
The only thing I've added whilst you were away is a new effector design but Les has made some interesting additions to the carriages and rod plates for his build
|
Re: Cherry Pi III Is Available February 24, 2015 10:20AM |
Registered: 9 years ago Posts: 68 |
Day 2
Progress today was to finish the carriage roller assemblies, cut the pads off the corner pieces and start assembling the base. I spent quite a while assembling T-nuts.
I labelled the lower cross members with a CD pen down in the groove, inserted the T-nuts and taped them in place rady for tomorrow. I managed to get one corner bracket attached.
The lesson for today was "Don't tighted the cap screws beyond a pinch until the base is fully assembled". I tweaked the bars apart as the top one wasn't level, only to hear a crack. It turns out one of the layers has come away. I'll run some CA into it.
If no-one objects, I'd like to keep a build log in this thread to help any other noob following behind. I could start a dedicated thread if you prefer.
And thanks for all the tips.
Edited 1 time(s). Last edit at 02/24/2015 10:21AM by gowen.
|
Re: Cherry Pi III Is Available February 25, 2015 12:13PM |
Registered: 9 years ago Posts: 68 |
Day 3,
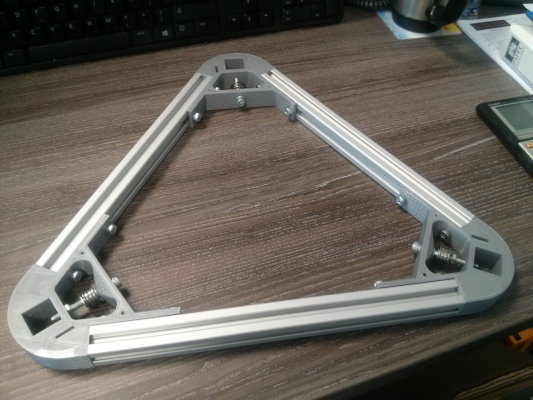
Got the base complete after checking and rechecking the T-nut positions.
In the end I adopted the method shown for the kossel mini to close the triangle as I was having trouble gettting the T-nuts in the right place.
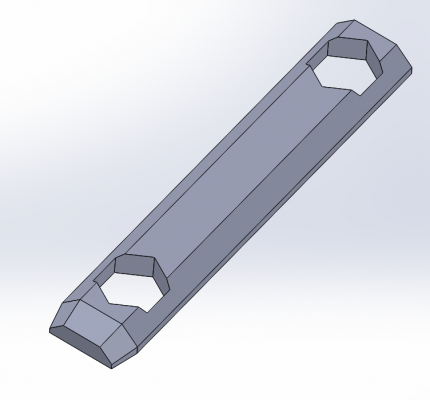
Getting the T-nuts nearest the corner to align was still fiddly, but you only need to do it once. I did wonder if a special nut holder with a draft angle at one end could speed up this part of the assembly. Something like this:
I had about 15 minutes left after finishing the base, so used this time to complete the carriages with the spring attachment.
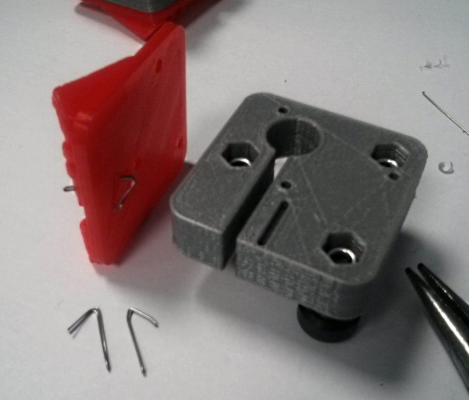
I bent up the wire, pushed it through the hole and then widened out the loop with a fine screwdriver so I could thread the spring on.
The filament spool that came with the kit is 200mm dia, so do drill the hole about150mm 240mm from the lower end of the Z-tower. Other than stability, is there another reason to keep it as low as possible?
Edited 1 time(s). Last edit at 02/26/2015 09:54AM by gowen.
Got the base complete after checking and rechecking the T-nut positions.
In the end I adopted the method shown for the kossel mini to close the triangle as I was having trouble gettting the T-nuts in the right place.
Getting the T-nuts nearest the corner to align was still fiddly, but you only need to do it once. I did wonder if a special nut holder with a draft angle at one end could speed up this part of the assembly. Something like this:
I had about 15 minutes left after finishing the base, so used this time to complete the carriages with the spring attachment.
I bent up the wire, pushed it through the hole and then widened out the loop with a fine screwdriver so I could thread the spring on.
Quote
AndyCart
Don't forget to drill the hole in the Z tower to allow the wires from the hot end and the extruder motor to pass through to the front v slot. ...The position of the hole depends on how big your filament spool is and, therefore, where the extruder sits on the rear tower. The hole is drilled just below the extruder.
Andy
The filament spool that came with the kit is 200mm dia, so do drill the hole about
Edited 1 time(s). Last edit at 02/26/2015 09:54AM by gowen.
|
Re: Cherry Pi III Is Available February 25, 2015 12:20PM |
Registered: 10 years ago Posts: 515 |
If you use the spool that came with your kit the hole through the Z tower needs to be about 240mm from the bottom end of the extrusion. I normally manage to get the thermistor and heater cartridge wires to reach the RAMPS board at this height. If you go higher you will need to extend them. The higher you go the longer your bowden tube needs to be too. I normally cut mine around 450 - 500mm
|
Re: Cherry Pi III Is Available February 26, 2015 10:08AM |
Registered: 9 years ago Posts: 68 |
Day 4
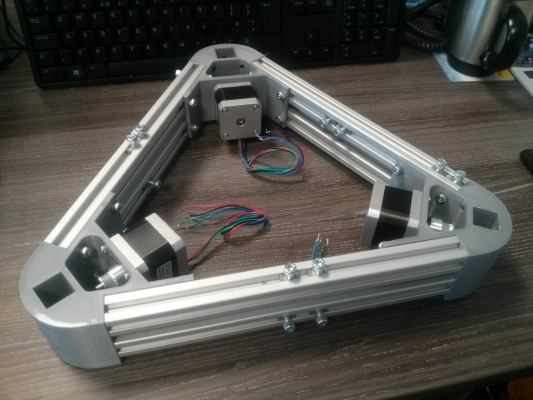
Got the top frame built with the flanged bearing pullys. Added the stepper motors and felt pads to the lower frame. Had a clear out of the box and moved all the small parts into a compartment tray.
I'm thinking, I'll assemble the extruder tomorrow.
Managed to sneak in the spool holder as well. One of the bearings slid in easy, the other I pressed in a vice.
Edited 1 time(s). Last edit at 02/26/2015 10:54AM by gowen.
|
Re: Cherry Pi III Is Available February 26, 2015 06:01PM |
Registered: 9 years ago Posts: 164 |
Has anyone else had issues printing the effector (non-magnetic one, of course) hosted on Thingiverse? This is the one titled "Z_Probe_Effector_J_Head_Non_Magentic". I just had someone off 3DHubs try to print it, but it's failed on what I think are the loops for the bolt which holds on the fan. When I import the model into Solidworks it says there are over 2,000 errors with faces, which it fails to heal.
I'm sure it's just my bad luck, as usual, haha.
EDIT: Your build is looking really nice gowen! Keep it up!
Edited 1 time(s). Last edit at 02/26/2015 06:02PM by pugzor.
I'm sure it's just my bad luck, as usual, haha.
EDIT: Your build is looking really nice gowen! Keep it up!
Edited 1 time(s). Last edit at 02/26/2015 06:02PM by pugzor.
|
Re: Cherry Pi III Is Available February 26, 2015 06:48PM |
Registered: 10 years ago Posts: 515 |
Quote
pugzor
Has anyone else had issues printing the effector (non-magnetic one, of course) hosted on Thingiverse? This is the one titled "Z_Probe_Effector_J_Head_Non_Magentic". I just had someone off 3DHubs try to print it, but it's failed on what I think are the loops for the bolt which holds on the fan. When I import the model into Solidworks it says there are over 2,000 errors with faces, which it fails to heal.
I'm sure it's just my bad luck, as usual, haha.
EDIT: Your build is looking really nice gowen! Keep it up!
You shouldn't have an issue. All the models I posted to Thingiverse were checked in Nettfab first. No one else has reported a problem. I print the effector in ABS with a 0.2mm layer height and 33% in fill
|
Re: Cherry Pi III Is Available February 26, 2015 06:53PM |
Registered: 9 years ago Posts: 164 |
So just my luck? Hahaha. I'm sure there's nothing wrong with the model, just might be a random error, possibly localised to Australia!Quote
AndyCart
Quote
pugzor
Has anyone else had issues printing the effector (non-magnetic one, of course) hosted on Thingiverse? This is the one titled "Z_Probe_Effector_J_Head_Non_Magentic". I just had someone off 3DHubs try to print it, but it's failed on what I think are the loops for the bolt which holds on the fan. When I import the model into Solidworks it says there are over 2,000 errors with faces, which it fails to heal.
I'm sure it's just my bad luck, as usual, haha.
EDIT: Your build is looking really nice gowen! Keep it up!
You shouldn't have an issue. All the models I posted to Thingiverse were checked in Nettfab first. No one else has reported a problem. I print the effector in ABS with a 0.2mm layer height and 33% in fill
|
Re: Cherry Pi III Is Available February 27, 2015 02:53AM |
Registered: 10 years ago Posts: 515 |
You can check and repair any model with this website. It uses the full on pro version of NetFab.
[modelrepair.azurewebsites.net]
It's excellent, fast and free
[modelrepair.azurewebsites.net]
It's excellent, fast and free
|
Re: Cherry Pi III Is Available February 27, 2015 08:37AM |
Registered: 9 years ago Posts: 164 |
Quote
AndyCart
You can check and repair any model with this website. It uses the full on pro version of NetFab.
[modelrepair.azurewebsites.net]
It's excellent, fast and free
Does seem awesome but didn't seem to do anything? Solidworks still found the same number of face errors in the -fixed file?
|
Re: Cherry Pi III Is Available February 27, 2015 11:08AM |
Registered: 10 years ago Posts: 515 |
Quote
pugzor
Does seem awesome but didn't seem to do anything? Solidworks still found the same number of face errors in the -fixed file?
That's probably something to do with the Solidworks import. The .stl file is fine. Try downloading NetFab Basic and checking your .stl files with that. I've never had a file that NetFab says is O.K that didn't print!
Sorry, only registered users may post in this forum.


