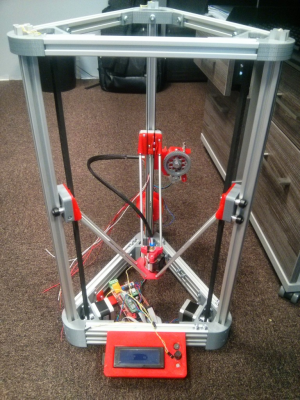
Cherry Pi III Is Available
Posted by AndyCart
|
Re: Cherry Pi III Is Available March 10, 2015 06:21PM |
Registered: 9 years ago Posts: 68 |
I downloaded and printed your calibration guide earlier today, but haven't read it through yet. Without your expereince would running the auto calibration save me some time, even if I need to fine tune the calibration manually afterwards?Quote
AndyCart
Looks like you are nearly there. If you want to make use of the auto calibration routine in the Rich Cattell Marlin firmware make up a flying lead with the normal 2 pin RAMPS limit switch connector on one end and two croc clips on the other end. Clip one to your hot end and one to your aluminium bed and plug, temporarily, into Z Min. As the nozzle touches the bed it closes the circuit and allows the auto calibration to function. Or just follow my calibration guide and do it manually.
Is there a part you would recommend I download and print to check my dimensional accuracy?
|
Re: Cherry Pi III Is Available March 10, 2015 07:04PM |
Registered: 10 years ago Posts: 515 |
|
Re: Cherry Pi III Is Available March 10, 2015 07:35PM |
Registered: 10 years ago Posts: 903 |
Quote
mrorange26
Should my printer be moving on the wheel like this video link attached.
[www.youtube.com]
That is way too much mechanical play for my liking.....
|
Re: Cherry Pi III Is Available March 10, 2015 07:37PM |
Registered: 9 years ago Posts: 111 |
|
Re: Cherry Pi III Is Available March 10, 2015 07:44PM |
Registered: 9 years ago Posts: 111 |
|
Re: Cherry Pi III Is Available March 10, 2015 08:39PM |
Registered: 9 years ago Posts: 164 |
I had a funny movement on my delta last night while autocalibrating.
[www.youtube.com]
Funnily enough it did end up succeeding. I'm pretty confident that it was just the switch on the effector being triggered by movement of the fan. Check this if you're having similar issues! I'm going to shave some off my fan's flange before actually trying to print.
[www.youtube.com]
Funnily enough it did end up succeeding. I'm pretty confident that it was just the switch on the effector being triggered by movement of the fan. Check this if you're having similar issues! I'm going to shave some off my fan's flange before actually trying to print.
|
Re: Cherry Pi III Is Available March 10, 2015 08:41PM |
Registered: 9 years ago Posts: 111 |
|
Re: Cherry Pi III Is Available March 10, 2015 08:42PM |
Registered: 9 years ago Posts: 111 |
|
Re: Cherry Pi III Is Available March 10, 2015 09:21PM |
Registered: 9 years ago Posts: 164 |
|
Re: Cherry Pi III Is Available March 11, 2015 04:50AM |
Registered: 10 years ago Posts: 515 |
Quote
pugzor
I had a funny movement on my delta last night while autocalibrating.
[www.youtube.com]
Funnily enough it did end up succeeding. I'm pretty confident that it was just the switch on the effector being triggered by movement of the fan. Check this if you're having similar issues! I'm going to shave some off my fan's flange before actually trying to print.
I think you will find that the issue is with the pressure applied by the screw that triggers the Z Min limit switch in the effector. If it's not set just right torque from the Bowden tube can cause that type of false triggering. Of course you don't want the screw too slack as that would mean the head has to press on the bed too hard to trigger the switch. There is a happy medium in the middle that you can get to with M119 and finger pressure on the nozzle. Or just by listening for the click!
|
Re: Cherry Pi III Is Available March 11, 2015 03:59PM |
Registered: 9 years ago Posts: 68 |
Day 12 - Crimptastic
Made a good start on connecting all the wiring. Having a proper crimping tool certainly helped. I got the X, Y & Z motors connected and got plugs on the microswitch wires. I also added a plug and socket to the fan. I don't know if that was intended, but it seemed a good idea and saved me from having to break out the soldering iron. I also got the effector cabling ran back through the wrap with the bowden tube. I would have liked to do more, but one of my colleagues was taking an interest. That seems to be happening more and more as it gets closer to completion.
I need to have a read up on the ramps to see where everything else plugs in.
|
Re: Cherry Pi III Is Available March 11, 2015 07:13PM |
Registered: 9 years ago Posts: 68 |
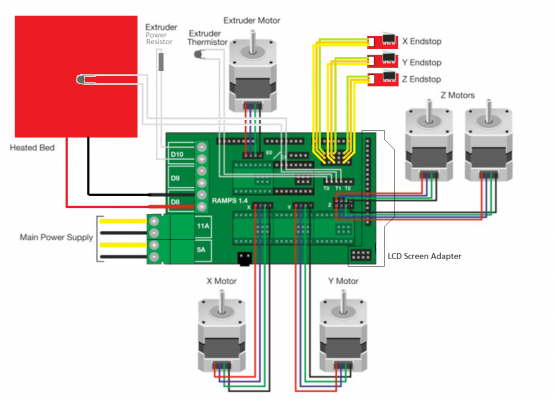
I found this image showing how to wire the RAMPS board. It shows an extra Z motor, but it was the clearest I could find. I assume as we only have a 12V supply we only connect to the 5A power input.
|
Re: Cherry Pi III Is Available March 11, 2015 07:48PM |
Registered: 10 years ago Posts: 903 |
|
Re: Cherry Pi III Is Available March 11, 2015 11:38PM |
Registered: 9 years ago Posts: 164 |
Woo hoo, mine finally printed last night! Well it didn't complete a print but there was melted plastic and it was glorious! Would have put a full layer down if it wasn't for the filament having a bit of a delayed start.
Don't suppose anyone wants to post up their Repetier Host settings to give me a better starting point? Mostly just wanted to get similar speed settings to print relatively high quality. If anyone has any sweet guides to adjusting the more plastic-dependent settings, it'd be good too!
Don't suppose anyone wants to post up their Repetier Host settings to give me a better starting point? Mostly just wanted to get similar speed settings to print relatively high quality. If anyone has any sweet guides to adjusting the more plastic-dependent settings, it'd be good too!
|
Re: Cherry Pi III Is Available March 12, 2015 03:50AM |
Registered: 10 years ago Posts: 515 |
Quote
gowen
I found this image showing how to wire the RAMPS board. It shows an extra Z motor, but it was the clearest I could find. I assume as we only have a 12V supply we only connect to the 5A power input.
That image is fine in the most part. For the power connections just loop your 12V in to both sets of connectors as you need to power the board and the bed from a single supply. You, obviously, only need one Z motor. It doesn't matter which set of pins you choose. The end stop connections shown are for the MIN endstops, you need to use the MAX which, in each case are the adjacent pins, so from left to right on the schematic, X Min, X Max, Y Min, Y Max, Z Min, Z Max. Make sure you connect only to Gnd and Sig on the set of three pins. From outboard in (top down) the pins for each set of three are Sig, Gnd, +VE. If you inadvertently connect to the bottom two of the three as soon as the towers home you will short out the 5V supply and pop the 5V regulator on the Arduino. Ask me how I know !!! The only other common 'gotcha' is to have an endstop on the wrong motor I.e Z motor on Z tower but Z tower endstop connected to either X Max or Y Max. Makes homing fun! The tower designations are as per the T Nut Placement image you have I.e front left is X front right is Y rear is Z
Good Luck
Andy
|
Re: Cherry Pi III Is Available March 12, 2015 04:06AM |
Registered: 10 years ago Posts: 515 |
Quote
pugzor
Woo hoo, mine finally printed last night! Well it didn't complete a print but there was melted plastic and it was glorious! Would have put a full layer down if it wasn't for the filament having a bit of a delayed start.
Don't suppose anyone wants to post up their Repetier Host settings to give me a better starting point? Mostly just wanted to get similar speed settings to print relatively high quality. If anyone has any sweet guides to adjusting the more plastic-dependent settings, it'd be good too!
I use Cura for slicing, which you can now use to slice in RH. I normally print at 80mm/S with Travel moves at 150 and infill at 100 outer perimeters at 60 and inner at 70. My retraction settings for PLA are 3mm @ 20mm/S. I normally untick all the 'Fix Horrible' settings in Expert Settings and have a Z hop equivalent to my layer height which is normally 0.3 mm. How much plastic squirts out can be set with the Flow % but it's better if you calibrate your extruder steps per mm. Just Mark your filament 100mm away from where it enters the extruder. Get to correct nozzle temp and extrude 50mm of plastic. Then check the distance actually extruded by measuring back to your mark. It should be 50mm away from your extruder. If not adjust with M92 Ennn where nnn is the new steps per mm value based on (current E steps per mm * 50) / actual extrusion length = new E step value. You then need to save this to EEPROM with M500.
|
Re: Cherry Pi III Is Available March 12, 2015 04:19AM |
Registered: 9 years ago Posts: 1,159 |
Quote
AndyCart
Quote
pugzor
Woo hoo, mine finally printed last night! Well it didn't complete a print but there was melted plastic and it was glorious! Would have put a full layer down if it wasn't for the filament having a bit of a delayed start.
Don't suppose anyone wants to post up their Repetier Host settings to give me a better starting point? Mostly just wanted to get similar speed settings to print relatively high quality. If anyone has any sweet guides to adjusting the more plastic-dependent settings, it'd be good too!
I use Cura for slicing, which you can now use to slice in RH. I normally print at 80mm/S with Travel moves at 150 and infill at 100 outer perimeters at 60 and inner at 70. My retraction settings for PLA are 3mm @ 20mm/S. I normally untick all the 'Fix Horrible' settings in Expert Settings and have a Z hop equivalent to my layer height which is normally 0.3 mm. How much plastic squirts out can be set with the Flow % but it's better if you calibrate your extruder steps per mm. Just Mark your filament 100mm away from where it enters the extruder. Get to correct nozzle temp and extrude 50mm of plastic. Then check the distance actually extruded by measuring back to your mark. It should be 50mm away from your extruder. If not adjust with M92 Ennn where nnn is the new steps per mm value based on (current E steps per mm * 50) / actual extrusion length = new E step value. You then need to save this to EEPROM with M500.
You also want to enable a Skirt in the Cura settings under Structures I use a 1 line skirt at 5mm distance. This will always give the extruder time to start squirting plastic before it needs to print the actual part.
I will refer to these settings when I come to commission my Larger Slice later in the week.

|
Re: Cherry Pi III Is Available March 12, 2015 10:32AM |
Registered: 9 years ago Posts: 68 |
Day 13
I got most of the connections completed today. The hot end and extruder wiring has been fed though and down the Z column. I need to extend the hot-end thermister wires about 100mm to reach their header pins. I take it the hot-end cooling fan connects to D9. My only other question concerns the two lengths of mains cable included in the kit. I take it one is for the cable run from the power supply socket to the RAMPS. What's the other one for, or is this a legacy from when a PC PSU was used?
It's an INSET day tomorrow so no progress until Monday.
|
Re: Cherry Pi III Is Available March 12, 2015 10:46AM |
Registered: 9 years ago Posts: 1,159 |
Quote
gowen
Day 13
I got most of the connections completed today. The hot end and extruder wiring has been fed though and down the Z column. I need to extend the hot-end thermister wires about 100mm to reach their header pins. I take it the hot-end cooling fan connects to D9. My only other question concerns the two lengths of mains cable included in the kit. I take it one is for the cable run from the power supply socket to the RAMPS. What's the other one for, or is this a legacy from when a PC PSU was used?
It's an INSET day tomorrow so no progress until Monday.
IMHO
Connect the Hotend cooling fan directly to your 12V in and the Part cooling fan would go to D9 (If you have one)
the reasoning is that the hot end needs to be cooled above the heater block else you would end up with all sorts of jams/blockages etc.
Doug
Think Andy will confirm this as well
ps My Build is coming on Nicely as well My Delta
|
Re: Cherry Pi III Is Available March 12, 2015 10:58AM |
Registered: 10 years ago Posts: 515 |
Yes. Definitely connect the hot end fan to the 12V supply rail. The extra mains flex is a 'just in case' addition. The output from D9 is controlled via the gcode from your slicer and, as Doug says, is intended for a parts cooling fan if you fit one. My experience with Cherry Pi is that it doesn't make much difference to finished part quality. Take a look a bit further up the thread at my 'Adalina the Singing Dragon' print. Done without a fan and the author on Thingiverse suggests it's a difficult print!
|
Re: Cherry Pi III Is Available March 12, 2015 11:47AM |
Registered: 9 years ago Posts: 68 |
|
Re: Cherry Pi III Is Available March 12, 2015 08:11PM |
Registered: 9 years ago Posts: 164 |
Quote
dougal1957
Quote
AndyCart
Quote
pugzor
Woo hoo, mine finally printed last night! Well it didn't complete a print but there was melted plastic and it was glorious! Would have put a full layer down if it wasn't for the filament having a bit of a delayed start.
Don't suppose anyone wants to post up their Repetier Host settings to give me a better starting point? Mostly just wanted to get similar speed settings to print relatively high quality. If anyone has any sweet guides to adjusting the more plastic-dependent settings, it'd be good too!
I use Cura for slicing, which you can now use to slice in RH. I normally print at 80mm/S with Travel moves at 150 and infill at 100 outer perimeters at 60 and inner at 70. My retraction settings for PLA are 3mm @ 20mm/S. I normally untick all the 'Fix Horrible' settings in Expert Settings and have a Z hop equivalent to my layer height which is normally 0.3 mm. How much plastic squirts out can be set with the Flow % but it's better if you calibrate your extruder steps per mm. Just Mark your filament 100mm away from where it enters the extruder. Get to correct nozzle temp and extrude 50mm of plastic. Then check the distance actually extruded by measuring back to your mark. It should be 50mm away from your extruder. If not adjust with M92 Ennn where nnn is the new steps per mm value based on (current E steps per mm * 50) / actual extrusion length = new E step value. You then need to save this to EEPROM with M500.
You also want to enable a Skirt in the Cura settings under Structures I use a 1 line skirt at 5mm distance. This will always give the extruder time to start squirting plastic before it needs to print the actual part.
I will refer to these settings when I come to commission my Larger Slice later in the week.
Awesome, thanks for those tips guys.
I've played with my steps/mm settings but without actually extruding anything (I removed the bowden tube from the hotend and just extruded into air). I found that 690 steps/mm was sweet. So are you saying Andy that I should actually extrude through my hotend to do that test? What are the commands to get the hotend up to temp?
Does anyone change print speed depending on height and detail wanted? I saw a thing on RichRap's blog which suggested this might be something cool to do. Will give Cura a go as well.
|
Re: Cherry Pi III Is Available March 12, 2015 11:17PM |
Registered: 9 years ago Posts: 164 |
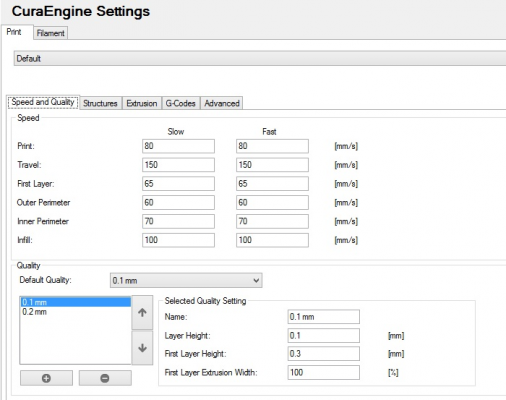
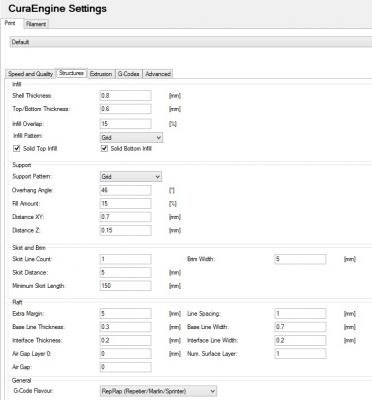
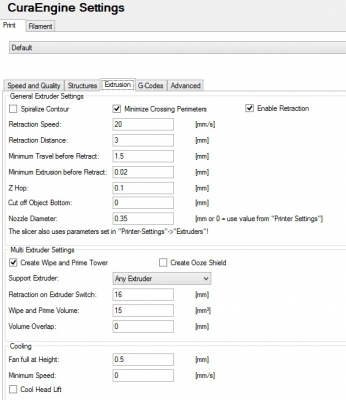
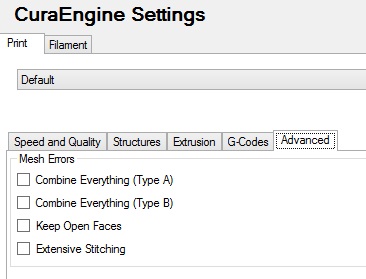
Can anyone see something stupid here? I have terrible luck with not checking the one important box I'm meant to...
Yeah, I'm trying to go through this process with some documentation so there's less bother to other people looking for the same info haha.
Speed & Quality tab:
Structures tab:
Extrusion tab:
Not game to go into the Gcode tab! Hahaha. Nah, just don't think there's likely to be anything here that I need to change. Maybe when I want to try something tricky when I'm more learned.
Advanced tab:
Edited 2 time(s). Last edit at 03/12/2015 11:19PM by pugzor.
|
Re: Cherry Pi III Is Available March 12, 2015 11:26PM |
Registered: 9 years ago Posts: 164 |
Actually, come to think of it, a "finished print" retraction piece of code might be kind of handy. I've had an idea to make quick release filament holders for multi-filament machines, which I'd like to explore down the track. Might even make the things a little bit easier to transport. I'm totally keen to use a Chimera E3D hotend, but it might justify making a completely new printer since it needs a larger PSU, etc. Either that or a large scale (probably core XY) with a Kraken hotend.
Enough dreaming, I really need to learn how to calibrate a single extruder first....
Enough dreaming, I really need to learn how to calibrate a single extruder first....
|
Re: Cherry Pi III Is Available March 13, 2015 03:53AM |
Registered: 10 years ago Posts: 515 |
Your Cura settings look OK apart from Nozzle, maybe. Have you got a 0.35 nozzle? If so that's fine but you should maybe tweak your Shell Thickness to be a multiple of it I.e 0.7.
I would always advise calibrating your extruder by actually squirting plastic as it check things like filament tension, etc. 690 steps/mm sounds about right I have 700 as the default in my firmware. Variations between hobbed bolts can mean that needs to vary a bit sometimes. You can get your hot end to temp by clicking on the icon on the Manual tab in Repetier Host or from the LCD Prepare or Control menus
You will most definitely need to play with height and speed parameters for different models, as well as temperatures, retraction settings and most of the other numbers too. Even different colour filament can mean changes are required. I would probably advise a 0.3 layer height for your first few prints as it get the model finished quicker. Adjust your top and bottom thickness to be a multiple (your 0.6 would be fine but I prefer three layers of solid infill top and bottom so for a 0.3 layer height I set 0.9)
It's also worth checking your default Start and End gcode. Cura has some weird settings sometimes for G28. This is also where you would add your G29 command if you want to auto level before each print.
Edited 1 time(s). Last edit at 03/13/2015 04:03AM by AndyCart.
|
Re: Cherry Pi III Is Available March 13, 2015 07:06PM |
Registered: 9 years ago Posts: 111 |
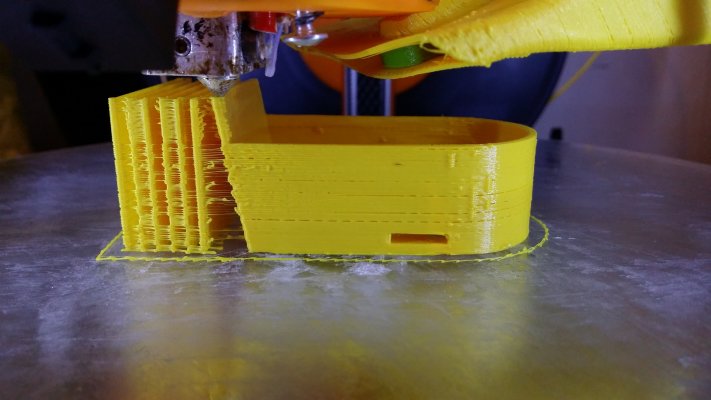
Got rid off the print shifting now as my rollers weren't tight,But now its doing this what would cause horizontal lines in the print.its printed at 0.2mm height,0.8mm shell thickness,50mm print speed,40 infill speed,40 top/bottom speed,40 outer,40 inner.
|
Re: Cherry Pi III Is Available March 13, 2015 07:14PM |
Registered: 9 years ago Posts: 68 |
I've got a problem with my XBox ONE power supply. I cut the plug off and stripped back the sheathing so I could solder it to the barrel plug and put a meter across the cables to check which was the 12V and 5V lines. There are Red, Black, Green and White wires, with the red and black ones being of a heavier gauge then the green and white. So I assumed the Red/Black are the 12V/12A lines and the green/white are the 5V/1A. I could measure 5V on the green(ground)/white(+5V) pair, but I get nothing from the Red wire. The black is a common ground with the green. I don't know if there is a trip or fuse in the supply as I can't see an obvious way to open the case and I can't return it having cut the plug off. XBox PSU's seem quite cheap on eBay so I'll probably just pick up a used one.
One thing I have found that although the may look the same the XBox ONE power supply plug is ever so slightly bigger than the XBox 360 slim one and won't fit in the 360 slim socket.
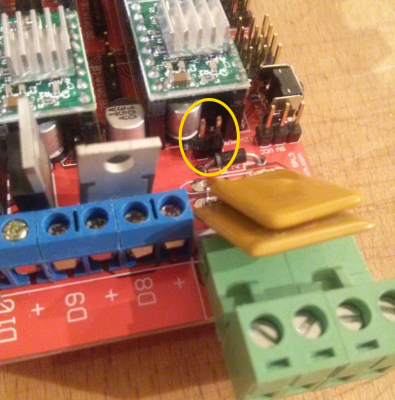
It's not all bad tales of woe. I brought the ramps board home and soldered a 2 pin header on the 12V aux pads for my hot end fan (after checking the circuit board design).
|
Re: Cherry Pi III Is Available March 14, 2015 04:01AM |
Registered: 10 years ago Posts: 515 |
Quote
gowen
I've got a problem with my XBox ONE power supply. I cut the plug off and stripped back the sheathing so I could solder it to the barrel plug and put a meter across the cables to check which was the 12V and 5V lines. There are Red, Black, Green and White wires, with the red and black ones being of a heavier gauge then the green and white. So I assumed the Red/Black are the 12V/12A lines and the green/white are the 5V/1A. I could measure 5V on the green(ground)/white(+5V) pair, but I get nothing from the Red wire. The black is a common ground with the green. I don't know if there is a trip or fuse in the supply as I can't see an obvious way to open the case and I can't return it having cut the plug off. XBox PSU's seem quite cheap on eBay so I'll probably just pick up a used one.
When you plug the PSU into the mains there should be a red led illuminated on the unit. If you short the green and white wires together it should turn green, at which point you should have 12V on the red and black wires.
|
Re: Cherry Pi III Is Available March 14, 2015 04:09AM |
Registered: 10 years ago Posts: 515 |
Quote
mrorange26
Got rid off the print shifting now as my rollers weren't tight,But now its doing this what would cause horizontal lines in the print.its printed at 0.2mm height,0.8mm shell thickness,50mm print speed,40 infill speed,40 top/bottom speed,40 outer,40 inner.
This looks like an extrusion issue I.e not enough plastic is being deposited. Whenever I have had something similar it's always been accompanied with the extruder hobbed bolt 'skipping' on the filament. It may also be a problem with your retraction settings. You appear to have quite a bit of stringing on the LHS of the model. First of all calibrate your extruder as per the post above. Once this is spot on, if the problem persists, check the tension on the screws on the extruder hinge. You may need to nip them up a bit. Also try printing at a slightly higher nozzle temperature. It's all a matter of finding the right settings for that filament and that model. Great that you found the source of your other issue. It's always worth keeping an eye on the mechanics and belt tension.
|
Re: Cherry Pi III Is Available March 14, 2015 08:00AM |
Registered: 9 years ago Posts: 111 |
Sorry, only registered users may post in this forum.
