Cherry Pi III Is Available
Posted by AndyCart
|
Re: Cherry Pi III Is Available July 17, 2015 11:55AM |
Registered: 9 years ago Posts: 68 |
|
Re: Cherry Pi III Is Available July 17, 2015 05:23PM |
Registered: 10 years ago Posts: 92 |
Quote
gowen
It's an X-Box One power supply that Andy supplied with my kit. The label quotes 12VDC @ 17.9A which by my maths is 215 W.
I just "upgraded" to an X-box 360 203W supply last weekend. Had exactly the same problem and wound up back at the ATX PSU I had been using. I don't think their power ratings are all that accurate.
EDIT: I take that back, now that I think about it my problem was different. My prints were coming to a dead stop maybe 15 layers in. I could turn the supply off for 10 minutes and it would come back, but the same problem would occur.
Edited 1 time(s). Last edit at 07/17/2015 05:26PM by maso.
|
Re: Cherry Pi III Is Available July 17, 2015 06:28PM |
Registered: 9 years ago Posts: 67 |
I had on overheat issue when I had a ramps controller without a relay or SSR, the the effect was different, it would get to around 80 Degrees and then just cut out all power to the bed, which would then drop back to room temperature. Your seeing the bed get to a temp and not get any hotter, which I would say either means your bed can't get any hotter because of the element size or not enough power. I would have thought though if the power was't enough the whole machine would go down when the heat bed tried to draw the full load.
|
Re: Cherry Pi III Is Available July 18, 2015 03:18AM |
Registered: 10 years ago Posts: 14,672 |
gowen, how large is the print bed, and what bed heater are you using? What voltage are you getting on the bed terminals when the bed heater is on?
Large delta printer [miscsolutions.wordpress.com], E3D tool changer, Robotdigg SCARA printer, Crane Quad and Ormerod
Disclosure: I design Duet electronics and work on RepRapFirmware, [duet3d.com].
Large delta printer [miscsolutions.wordpress.com], E3D tool changer, Robotdigg SCARA printer, Crane Quad and Ormerod
Disclosure: I design Duet electronics and work on RepRapFirmware, [duet3d.com].
|
Re: Cherry Pi III Is Available July 18, 2015 05:09AM |
Registered: 9 years ago Posts: 68 |
Quote
dc42
gowen, how large is the print bed, and what bed heater are you using? What voltage are you getting on the bed terminals when the bed heater is on?
The bed is about 200mm, aluminium with a built-in heater. I haven't checked the voltage across the terminals. I'll do that on Monday.
I'm trying to get all the parts ready to swap the ramps over to a Duet.
|
Re: Cherry Pi III Is Available July 18, 2015 08:17AM |
Registered: 10 years ago Posts: 14,672 |
Quote
gowen
Quote
dc42
gowen, how large is the print bed, and what bed heater are you using? What voltage are you getting on the bed terminals when the bed heater is on?
The bed is about 200mm, aluminium with a built-in heater. I haven't checked the voltage across the terminals. I'll do that on Monday.
I'm trying to get all the parts ready to swap the ramps over to a Duet.
Also measure the resistance between the bed terminals if you can. There was a thread recently in which it turned out that a whole batch of PCB heaters had too high a resistance. Possibly the manufacturer used 1oz copper instead of 2oz, or something like that.
Large delta printer [miscsolutions.wordpress.com], E3D tool changer, Robotdigg SCARA printer, Crane Quad and Ormerod
Disclosure: I design Duet electronics and work on RepRapFirmware, [duet3d.com].
|
Re: Cherry Pi III Is Available July 20, 2015 08:50AM |
Registered: 9 years ago Posts: 68 |
Quote
dc42
Quote
gowen
Quote
dc42
gowen, how large is the print bed, and what bed heater are you using? What voltage are you getting on the bed terminals when the bed heater is on?
The bed is about 200mm, aluminium with a built-in heater. I haven't checked the voltage across the terminals. I'll do that on Monday.
I'm trying to get all the parts ready to swap the ramps over to a Duet.
Also measure the resistance between the bed terminals if you can. There was a thread recently in which it turned out that a whole batch of PCB heaters had too high a resistance. Possibly the manufacturer used 1oz copper instead of 2oz, or something like that.
I've run the heater up again this lunchtime with a similar result.

At the start the voltage across the heater terminals was 11.94V to 11.96V. The input voltage to the RAMPS board was 12.22V.
At 71°C the voltage across the heater terminals was 11.98 to 12.1V. The multimeter I have only goes down to 2kOhm, so the bed resistance was measured as 0.002 to 0.003 kOhm or 2 to 3 Ohm.
Attached is a picture of the bed. It measures 220mm diameter.

|
Re: Cherry Pi III Is Available July 20, 2015 10:14AM |
Registered: 10 years ago Posts: 14,672 |
I don't know that particular heat bed, but I would expect the resistance to be more like 1.0 to 1.2 ohms for a properly designed bed of that size. You are getting a reasonable voltage across it, so the heater is either faulty or just underpowered.
Large delta printer [miscsolutions.wordpress.com], E3D tool changer, Robotdigg SCARA printer, Crane Quad and Ormerod
Disclosure: I design Duet electronics and work on RepRapFirmware, [duet3d.com].
Large delta printer [miscsolutions.wordpress.com], E3D tool changer, Robotdigg SCARA printer, Crane Quad and Ormerod
Disclosure: I design Duet electronics and work on RepRapFirmware, [duet3d.com].
|
Re: Cherry Pi III Is Available July 20, 2015 11:07AM |
Registered: 9 years ago Posts: 210 |
A few random ideas from someone who doesn't have any experience with heated beds:
2 Ohm at 12 V would be 72 Watts and 6 amps. 1 Ohm at 12 V would be 144W (V^2 / R) and 12 amps. That is not too much compared to a light bulb.
Maybe you need to configure the resistance of your heat bed in your firmware? If it assumes it's a smaller bed with a lower resistance then it could be too timid on the heating. But I would think the firmware would calibrate that itself.
You could try isolating the bottom of the heat bed.
If you can you could get a 24 V power supply instead of 12 V. If your electronics works with that. But then you might need 24V fans and stuff.
If you want to measure low resistance more precisely you could temporary put a 1 ohm resistor in series to the bed and measure the voltage instead. You'd have to look up the formula though. Or ask the seller about the precise resistance.
|
Re: Cherry Pi III Is Available July 20, 2015 11:33AM |
Registered: 9 years ago Posts: 68 |
Hi dejay & dc42.
Thanks for your thoughts.
I've got a better multimeter at home. I plan bring it in tomorrow to get a more accurate value for the the resistance .
I have thought of this. The steppers would be OK at 24V, but the bed is only rated to 12V, so I'd need a new one anyway.
The firmware is currently configured bang-bang (full on or full off) so I don't think it could be that.
The only other option I can see is to build a thermal enclosure to prevent the heat being lost to atmosphere. For now, the bed resistance looks like the best avenue to follow.
Thanks for your thoughts.
Quote
Dejay
If you want to measure low resistance more precisely you could temporary put a 1 ohm resistor in series to the bed and measure the voltage instead. You'd have to look up the formula though. Or ask the seller about the precise resistance.
I've got a better multimeter at home. I plan bring it in tomorrow to get a more accurate value for the the resistance .
Quote
Dejay
If you can you could get a 24 V power supply instead of 12 V. If your electronics works with that. But then you might need 24V fans and stuff.
I have thought of this. The steppers would be OK at 24V, but the bed is only rated to 12V, so I'd need a new one anyway.
Quote
Dejay
Maybe you need to configure the resistance of your heat bed in your firmware? If it assumes it's a smaller bed with a lower resistance then it could be too timid on the heating. But I would think the firmware would calibrate that itself.
The firmware is currently configured bang-bang (full on or full off) so I don't think it could be that.
The only other option I can see is to build a thermal enclosure to prevent the heat being lost to atmosphere. For now, the bed resistance looks like the best avenue to follow.
|
Re: Cherry Pi III Is Available July 21, 2015 10:56AM |
Registered: 9 years ago Posts: 68 |
With the better multimeter the current heater has a resistance of 2.5 Ohm which equates to 57.6 Watts or 1.5 kW/m². Considering the Think3dprint3d.com kapton heater can do 6 kW/m², I suspect the heating element is the problem. Can anyone recommend a source for a higher power rated 220mm bed?
|
Re: Cherry Pi III Is Available July 21, 2015 11:00AM |
Registered: 9 years ago Posts: 67 |
|
Re: Cherry Pi III Is Available July 21, 2015 11:31AM |
Registered: 9 years ago Posts: 1,159 |
Quote
gowen
With the better multimeter the current heater has a resistance of 2.5 Ohm which equates to 57.6 Watts or 1.5 kW/m². Considering the Think3dprint3d.com kapton heater can do 6 kW/m², I suspect the heating element is the problem. Can anyone recommend a source for a higher power rated 220mm bed?
How about Silicon heater this is a mains powered 200 mm dia one drive it with a ac-ac SSR and stick it under your existing Aluminium bed or get a thicker piece of Alloy for it ( I use a piece of EcoCast 6mm thick tool plate which is machined flat on both sides stuck a 300 mm dia pad on it and it heats to around 130 in about 5 mins put a piece of thickish cork under it and it is even quicker (Still got to do that to mine but I have it ready to go.
hth Doug
|
Re: Cherry Pi III Is Available July 21, 2015 04:26PM |
Registered: 10 years ago Posts: 515 |
Hi Guys
I've been away from the forum for a while due to being really busy at work and with an aeroplane renovation project I'm in the middle of. I've just about caught up with posts. For some reason new post notifications have stopped hitting my email
@gowen - The heatbed on your machine is only really suitable for PLA. I chose it due to the low current requirement (about 5A) I know the PSU is rated at 17.9A on the label but I don't think you could reliably draw more than 12A from it. With hot-end, motors and the supplied heatbed that's about what you will draw. If you want to go ABS then the best option is a mains powered silicon mat. Just wire a relay to the RAMPS heatbed terminals to switch the mains current. If you go with a 120W 12V PCB type you will probably burn the MOSFET on your RAMPS board out.
Andy
|
Re: Cherry Pi III Is Available July 21, 2015 04:26PM |
Registered: 10 years ago Posts: 14,672 |
.Quote
dougal1957
Quote
gowen
With the better multimeter the current heater has a resistance of 2.5 Ohm which equates to 57.6 Watts or 1.5 kW/m². Considering the Think3dprint3d.com kapton heater can do 6 kW/m², I suspect the heating element is the problem. Can anyone recommend a source for a higher power rated 220mm bed?
How about Silicon heater this is a mains powered 200 mm dia one drive it with a ac-ac SSR and stick it under your existing Aluminium bed or get a thicker piece of Alloy for it ( I use a piece of EcoCast 6mm thick tool plate which is machined flat on both sides stuck a 300 mm dia pad on it and it heats to around 130 in about 5 mins put a piece of thickish cork under it and it is even quicker (Still got to do that to mine but I have it ready to go.
hth Doug
I use something similar to that, see [miscsolutions.wordpress.com]. However, for a 200mm bed you ought to be able to get 12V heater with a resistance of around 1 ohm that would do the job. Here is one possibility: [www.ebay.co.uk]
Large delta printer [miscsolutions.wordpress.com], E3D tool changer, Robotdigg SCARA printer, Crane Quad and Ormerod
Disclosure: I design Duet electronics and work on RepRapFirmware, [duet3d.com].
|
Re: Cherry Pi III Is Available July 21, 2015 06:04PM |
Registered: 10 years ago Posts: 903 |
Quote
gowen
With the better multimeter the current heater has a resistance of 2.5 Ohm which equates to 57.6 Watts or 1.5 kW/m². Considering the Think3dprint3d.com kapton heater can do 6 kW/m², I suspect the heating element is the problem. Can anyone recommend a source for a higher power rated 220mm bed?
I would try feeding it 24V through an external SSR for kicks and giggles. I over-volt my 300mm 12V SeeMeCNC Onyx to about 19.5V, and it gets up to ABS temps in about 6 minutes versus 45+ minutes on 12V.
If you're in the USA or don't mind the shipping cost, the SeeMeCNC Orion is probably a safe bet:
http://seemecnc.com/products/orion-heated-bed
Check out their forums for additional advice, as they are a hotspot of Delta activity.....
|
Re: Cherry Pi III Is Available July 22, 2015 02:48AM |
Registered: 9 years ago Posts: 1,159 |
There is also this one 220 mm dia aluminium heat bed Can vouch for the supplier (use them a lot as they are local to me in Sheffield and I can just walk in and get what I need usually!) but not the bed itself
Doug
Doug
|
Re: Cherry Pi III Is Available July 22, 2015 03:41AM |
Registered: 9 years ago Posts: 68 |
Thanks for all your input guys. It looks like a silicone mat heater is the way to go.
Just a thought. Does anyone know of a source of flat circular steel plate? On the 3D Today podcast they use a heated steel bed with removable glass on top. The steel provides enough mass to trigger the inductive leveling probe at its full 4mm range. so above the glass.
Just a thought. Does anyone know of a source of flat circular steel plate? On the 3D Today podcast they use a heated steel bed with removable glass on top. The steel provides enough mass to trigger the inductive leveling probe at its full 4mm range. so above the glass.
|
Re: Cherry Pi III Is Available July 22, 2015 04:17AM |
Registered: 9 years ago Posts: 67 |
There are a few places available that will custom cut sheet metal material, just send them an email with thickness and diameter and they will give you a price. One such place I found on ebay was :-
[stores.ebay.co.uk]
But there are others. I don't think you will find a 220mm steel round disc off the shelf.
[stores.ebay.co.uk]
But there are others. I don't think you will find a 220mm steel round disc off the shelf.
|
Re: Cherry Pi III Is Available July 22, 2015 04:30AM |
Registered: 9 years ago Posts: 1,159 |
Quote
gowen
Thanks for all your input guys. It looks like a silicone mat heater is the way to go.
Just a thought. Does anyone know of a source of flat circular steel plate? On the 3D Today podcast they use a heated steel bed with removable glass on top. The steel provides enough mass to trigger the inductive leveling probe at its full 4mm range. so above the glass.
try this one Round MS Plate it is 240mm dia (you will need it larger than the silicon pad to allow for mounting holes anyway) make sure it is thick enough problem you may have is flatness.
Your other option is to use one of DC42's excellent mini IR sensor's which work of the top of the build surface and will work on just about anything except a mirror this also means that the only thing that needs to be flat is your actual build surface.
Doug
|
Re: Cherry Pi III Is Available July 22, 2015 05:45AM |
Registered: 9 years ago Posts: 68 |
 . Thanks for pointing me in the right direction.
|
Re: Cherry Pi III Is Available July 24, 2015 06:33PM |
Registered: 9 years ago Posts: 76 |
So what are the slic3r settings (Or different slicer software) that is max for a cherry pi for speed?
Retraction, Speed, ect. (So far I am printing starting around 30mm/s for settings [www.youtube.com] )
I want to see what other peoples speeds are for printing with the cherry pi?
Retraction, Speed, ect. (So far I am printing starting around 30mm/s for settings [www.youtube.com] )
I want to see what other peoples speeds are for printing with the cherry pi?
|
Re: Cherry Pi III Is Available July 25, 2015 11:44PM |
Registered: 9 years ago Posts: 164 |
Gentlemen, I think you will be quite humoured to know I too have been playing with heatbeds. Naturally I've hit problems too. As you'd expect most of it is to do with ignoring thermodynamics.
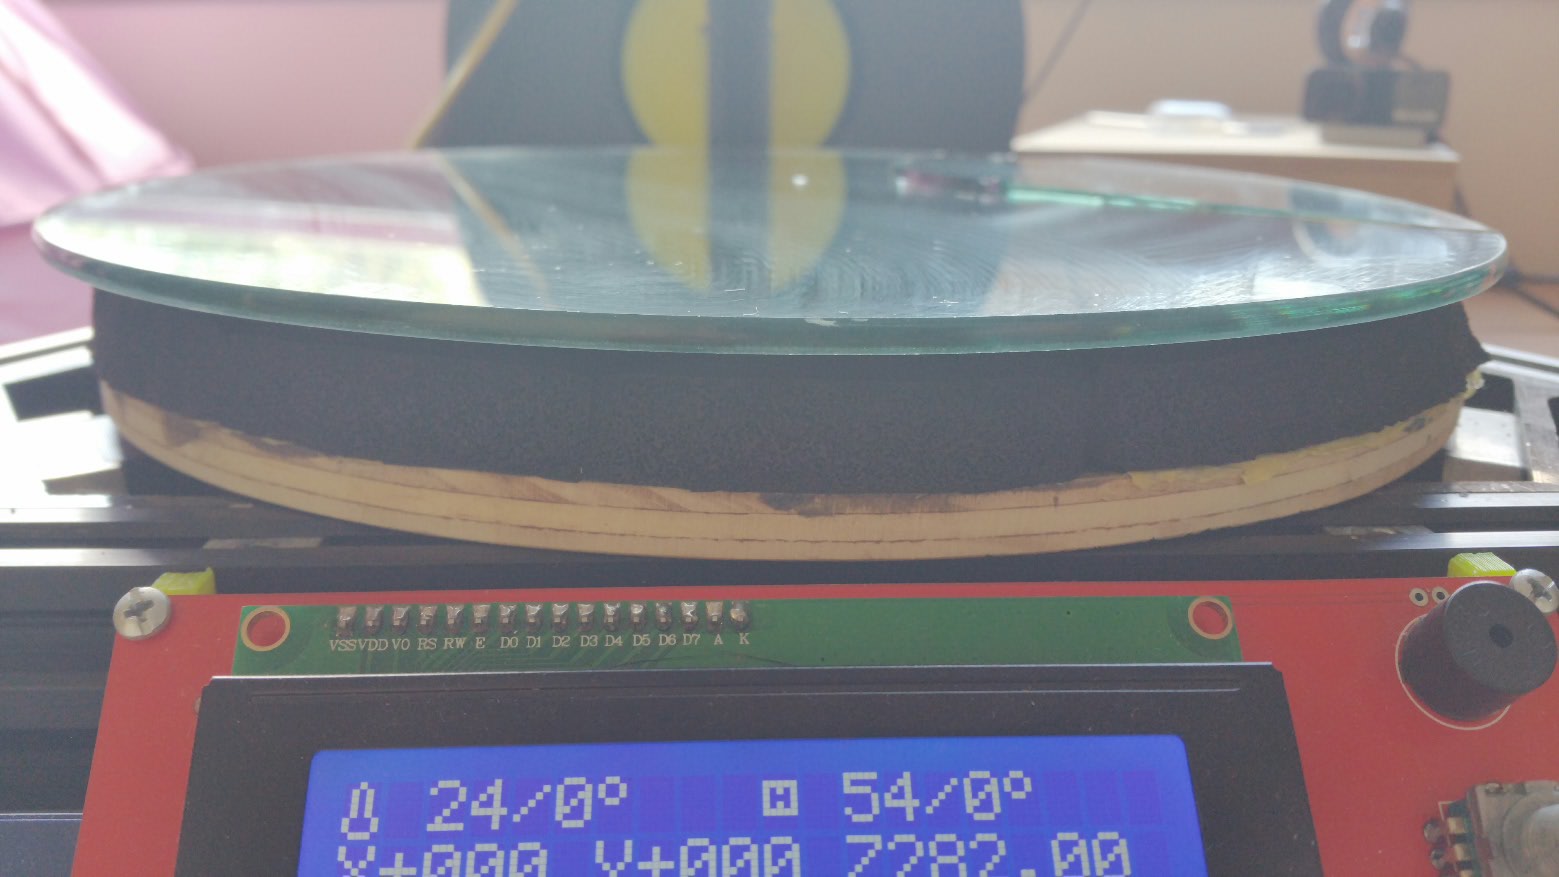
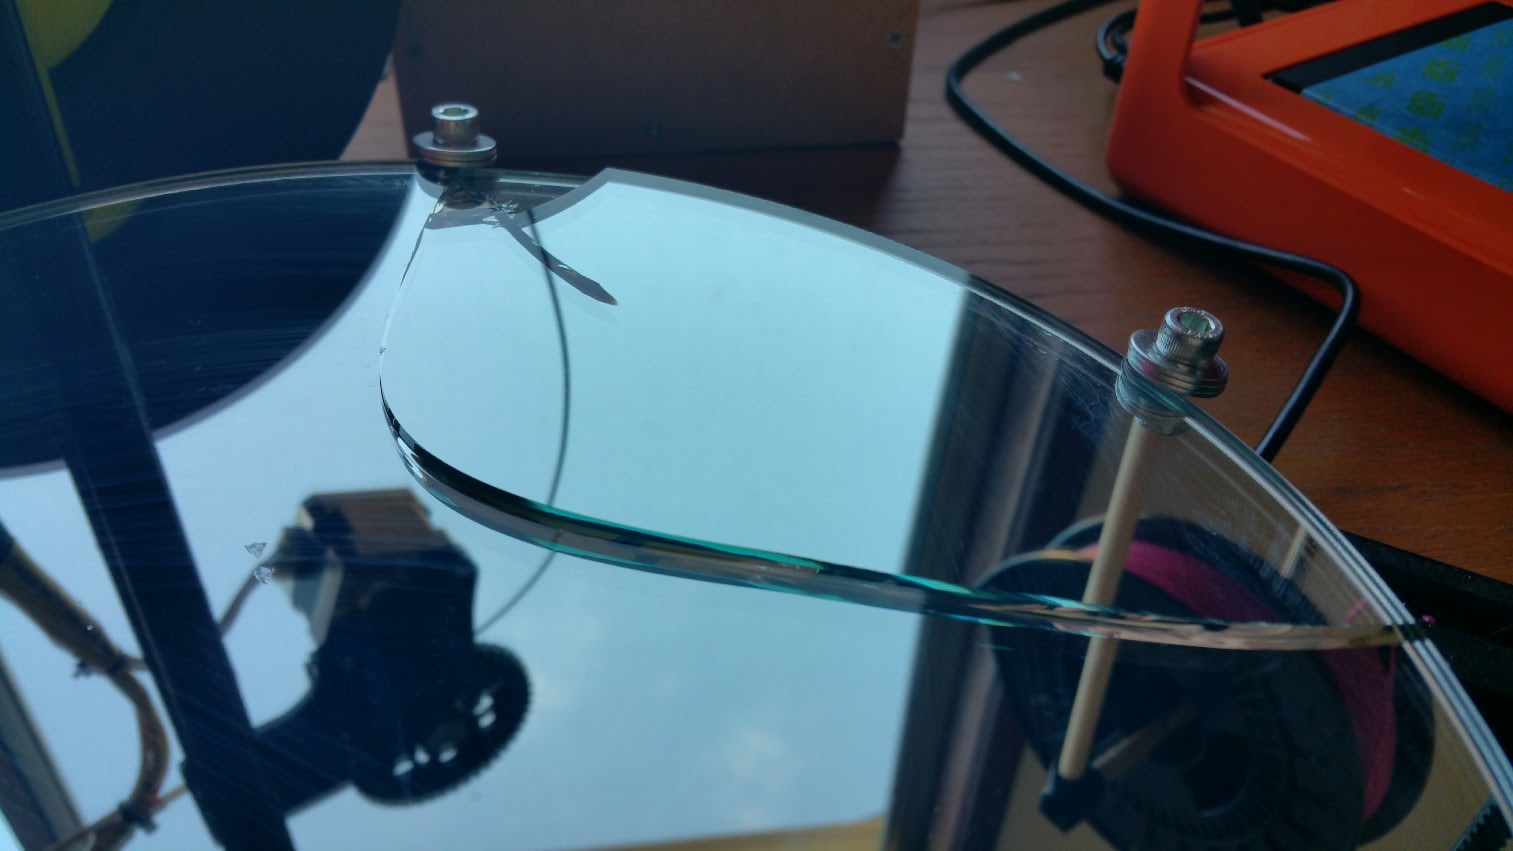
Case in point, see the attached pics.
I'd heated my bed to 80 degrees before clamping it down. Ends up the high density, high temperature rubber foam I was using tends to expand under heat, and contracts a bit when cooled. I noticed this when none of my clamping bolts were tight at room temperature, and my printing was having issues as it was a touch too far off the bed when printing at 60 degrees.
Anyway, I tightened down the bolts (not too tight I thought). I cranked it up to 100 degrees and that's when I saw a tiny crack begin to form. Obviously the heating had begun and it was past the point of no return. I just turned off the heat and exited the room, allowing glass fragments to fly everywhere as both the build plate and my morale fractured into a thousand pieces.
As you can see, I thought that more insulation would be better. Please learn from me. That is not the case. More foam meant more expansion when heated. That meant more pressure on the glass.
I'm going to keep the plywood layer but replace the foam with a silicone layer, from a silicone 'cake pan'. Expansion after heating should be much lower and able to be kept in place by the bolts, with the plywood shielding the electronics for the most part.
The tricky thing for me now is to remove the aluminium type heat bed from the back of the glass, which I'd welded there with some high temp epoxy and a good layer of thermal grease (aka heat sink compound).
Hope this at least provided something useful and maybe a laugh.
|
Re: Cherry Pi III Is Available July 26, 2015 09:40AM |
Registered: 9 years ago Posts: 893 |
I think your technique of using screws and washers to hold down the glass may have contributed to your problem!
I designed some hold-downs that were printed in ABS, and which seem to work very well - I've attached some files...
I designed some hold-downs that were printed in ABS, and which seem to work very well - I've attached some files...
|
Re: Cherry Pi III Is Available July 27, 2015 04:30PM |
Registered: 9 years ago Posts: 76 |
|
Re: Cherry Pi III Is Available July 29, 2015 07:40AM |
Registered: 9 years ago Posts: 164 |
As suspected it seems that the issue was the foam. Replaced it with a layer of silicone (cut from a silicone 'cake pan') and it seems great. Bolts and washers are fine, has been tested to 110 degrees Celsius. Calibrated super quick (only had a couple of minutes to take pics) and it's printing now.
Looking promising.
Looking promising.
|
Re: Cherry Pi III Is Available July 29, 2015 07:24PM |
Registered: 9 years ago Posts: 164 |
Well, I'm quite happy with the first print. There's adjustment to be done but overall it's one of the best my delta has put out so far.
Click here for the pic
Does anyone know how I can improve this? There's a few layers in the middle which came out primo, but the rest seemed to occasionally be under extruding.
I'm currently using retraction; would turning that off have a positive effect?
I think my feed settings are good (100mm jogged = 100mm of filament moved). Nozzle size is set as 0.4mm. Can post up other slic3r settings if that'd help...
Edited 1 time(s). Last edit at 07/29/2015 07:25PM by pugzor.
|
Re: Cherry Pi III Is Available August 01, 2015 09:22AM |
Registered: 9 years ago Posts: 164 |
Ends up my filament was slipping. Fixed it up though. Had to shave a bit off some of the assembly because clamped down the bearing wasn't actually connecting with the top of the filament...
Anyway, now it's printing freaking AWESOMELY.
One question though; what retraction are people running? I think that's the only thing that's off for me now as my models are really messy when it jumps between areas.
Anyway, now it's printing freaking AWESOMELY.
One question though; what retraction are people running? I think that's the only thing that's off for me now as my models are really messy when it jumps between areas.
|
Re: Cherry Pi III Is Available August 04, 2015 04:08PM |
Registered: 8 years ago Posts: 3 |
Hello all,
I started building a Cherry Pi IIIs a while ago and at the moment I'm busy wiring up.
So far it is going well but there are two things I'm concerned about.
1. Inductive sensor output voltage
I made a simple voltage divider using two 15kOhm resistors for my Sensor according to this Video. The measured output voltage is 6,1 V. This seems a little high to me. Can I still use it to connect it to my Duet board? Or will the board take damage?
2. Sensor wiring
All the wiring diagrams or descriptions I found are referring to another typ of sensor (e.g. here). What is the right way to connect my sensor to the Duet?
Maybe like this?
Sensor - Board
12V in (Brown) - 12V PSU
Output (Black) - TXD1 Pin on the expansion header
GND (Blue) - GND PSU
Thank you in advance.
BR
Simon
|
Re: Cherry Pi III Is Available August 04, 2015 04:58PM |
Registered: 10 years ago Posts: 14,672 |
Quote
YDKJ
Hello all,
I started building a Cherry Pi IIIs a while ago and at the moment I'm busy wiring up.
So far it is going well but there are two things I'm concerned about.
1. Inductive sensor output voltage
I made a simple voltage divider using two 15kOhm resistors for my Sensor according to this Video. The measured output voltage is 6,1 V. This seems a little high to me. Can I still use it to connect it to my Duet board? Or will the board take damage?
2. Sensor wiring
All the wiring diagrams or descriptions I found are referring to another typ of sensor (e.g. here). What is the right way to connect my sensor to the Duet?
Maybe like this?
Sensor - Board
12V in (Brown) - 12V PSU
Output (Black) - TXD1 Pin on the expansion header
GND (Blue) - GND PSU
Thank you in advance.
BR
Simon
You need to drop the voltage to below 3.3V. Also, higher value resistors will protect the Duet input if there is over-voltage. I suggest 10K to ground and 33K to the sensor output, or 15K to ground and 47K to the sensor output. Connect the junction of those resistors to the expansion connector pin as shown here for the blue wire:

Edited 1 time(s). Last edit at 08/04/2015 04:59PM by dc42.
Large delta printer [miscsolutions.wordpress.com], E3D tool changer, Robotdigg SCARA printer, Crane Quad and Ormerod
Disclosure: I design Duet electronics and work on RepRapFirmware, [duet3d.com].


Sorry, only registered users may post in this forum.