Folger Tech Kossel Delta 2020 Full 3D Printer Kit w/Auto-Level
Posted by Kasahabo
|
Re: Folger Tech Kossel Delta 2020 Full 3D Printer Kit w/Auto-Level November 02, 2015 10:47PM |
Registered: 8 years ago Posts: 90 |
|
Re: Folger Tech Kossel Delta 2020 Full 3D Printer Kit w/Auto-Level November 02, 2015 11:02PM |
Registered: 8 years ago Posts: 432 |
|
Re: Folger Tech Kossel Delta 2020 Full 3D Printer Kit w/Auto-Level November 02, 2015 11:32PM |
Registered: 8 years ago Posts: 90 |
|
Re: Folger Tech Kossel Delta 2020 Full 3D Printer Kit w/Auto-Level November 03, 2015 01:49AM |
Registered: 9 years ago Posts: 445 |
Quote
paul_delta
Koenig, I respect your patience but I'm really tired of your RADIIProbably it's just terms misuse...
Again, I'm talking about per axe size disproportion of printed item. This is what DIAGONAL correction does (Corr. diagonal A/B/C in Repetier). I don't care what is the reason of such disproportion - I just know that diagonal rod corection per tower is the way to handle it, with minimum AVR computation power. I don't need ABC/XYZ delta radius compensation because I have no gaps with Z0 across A/B/C towers - everything is flat enough to forget about delta radius correction PER TOWER.
PS: and it's not correct to use "tower offset" in this matter, because it's linked to endstop adjustment - both in Marlin and Repetier.
And what you fail to comprehend is that by adjusting each towers radii (tower offset towards a middlepoint (Something called delta_smooth_rod_offset in the picture I posted earlier) you are also correcting per axe size disproportion of printed item.
but it would be the correct way to do it if you know your rod lengths are the same.
Why go trying to correct something that is correct from the get go is beyond my understanding + that trying to do so introduces other errors.....
You just won't take anything in of what other people write right...?
Here's the base for my claims:
Quote
Perhaps the most common problem with Delta printers is dimensional inaccuracy. I am not sure if this calibration method produces other undesirable results, and your milage may vary. My Rostock had a discrepancy of ~0.3mm in Tower A, and this is how I corrected it. It took me a few iterations of this process before I was able to print an asterisk that is symmetrical to 0.05 - 0.1mm, which should be good enough to produce parts for another printer (an oversized Kossel is my next project).
Here is a test object that I use for calibration. It's quite simple. It's an asterisk with the diagonal lines running parallel to each tower, with a horizontal line through the centre. It should be rotated so that the diagonal lengths are parallel to Towers A and B.
The purpose of this shape is to try and isolate movement from each tower to determine whether the 'lines' each one draws is equal. Inevitable inaccuracies in the build (radial positioning of towers, distance from centre and rod length) will produce distortions in the X and Y axes.
These errors are best accounted for by assigning individual DELTA_RADIUS values for each tower. If you happen to have uneven rods, I recommend remaking them.
In order to allow for individual DELTA_RADIUS values for each tower, add the following lines to your Marlin Configuration.h file:
// Tower position correction
#define DELTA_TOWER1_CORRECTION 0.0 // front left tower
#define DELTA_TOWER2_CORRECTION 0.0 // front right tower
#define DELTA_TOWER3_CORRECTION 0.0 // back middle tower
And find these lines in Marlin_main.cpp (2 places):
float delta_tower1_x = -SIN_60 * delta_radius; // front left tower
float delta_tower1_y = -COS_60 * delta_radius;
float delta_tower2_x = SIN_60 * delta_radius; // front right tower
float delta_tower2_y = -COS_60 * delta_radius;
float delta_tower3_x = 0; // back middle tower
float delta_tower3_y = delta_radius;
And alter them to look like this:
// Effective X/Y positions of the three vertical towers.
float delta_tower1_x = -SIN_60 * (delta_radius + DELTA_TOWER1_CORRECTION); // front left tower
float delta_tower1_y = -COS_60 * (delta_radius + DELTA_TOWER1_CORRECTION);
float delta_tower2_x = SIN_60 * (delta_radius + DELTA_TOWER2_CORRECTION); // front right tower
float delta_tower2_y = -COS_60 * (delta_radius + DELTA_TOWER2_CORRECTION);
float delta_tower3_x = 0; // back middle tower
float delta_tower3_y = delta_radius + DELTA_TOWER3_CORRECTION;
You'll need a pair of calipers for this part. I find that it's best to use them as a kind of feeler gauge, rather than relying on the reading they give. You'll probably find that the length changes a little depending on where you measure and how much pressure you apply. With any luck, the lengths of the lines will be very close to one another. If you have large discrepancies (> 1mm), I suggest backtracking and looking for errors in the build. It is important that you measure test prints once they have properly cooled. ABS will shrink more than PLA, so it might be a good idea to do this with PLA.
Measure each length of the asterisk, taking note of the differences between them. Pick the two lengths that are closest to one another, or the length closest to your target size and use that as your reference point.
Start by adjusting the tower correction value for your innacurate tower(s) by twice the negated value of the difference. If you have two towers that are out of kilter, just start by adjusting one of them. For example, you have a difference of -0.3mm in Tower A, set the correction value to be 0.6mm.
Adjusting the radii of each tower will affect the endstop calibration for that tower (if you increased DELTA_RADIUS, it'll raise the effector at the base of the tower). You might also need to tweak the overall DELTA_RADIUS value (start by making a +/- 0.25mm adjustment to DELTA_SMOOTH_ROD_OFFSET).
In any case, get the effector moving flat once more (again, it shouldn't matter if it's not perfect, as you'll be tweaking things again) and perform another test print. Measure and repeat.
Once you're happy with the symmetry of your asterisk, work on getting each tower perfectly level and the effector moving dead flat. You should be able to send it moving all over the build platform without having it lift or dip.
Now these lines are included in newer version of Marlin but not the version from FT.
They are also included in thevisad's repo
davidf01 can add them himself the the FT version if he prefers that one.
The instructions were taken from a delta calibration instruction that has been referred and linked to hundreds of times on this forum, unfortunately it's no longer online, this is the link: [delta-calibration.s3-website-us-west-2.amazonaws.com]
For davidf01: This also includes a small guide as how to use your measured inaccuracy and implement it in the firmware.
Edited 3 time(s). Last edit at 11/03/2015 02:25AM by Koenig.
|
Re: Folger Tech Kossel Delta 2020 Full 3D Printer Kit w/Auto-Level November 03, 2015 01:57AM |
Registered: 9 years ago Posts: 445 |
Quote
paul_delta
AFAIK RAMPS doesn't support 1/32.
This is just plain wrong!!!
RAMPS do support 1/32 stepping.
If you wish to use the DRV8825's and still get 1/16 stepping you must alter the small jumpers underneath the driver on the RAMPS.
Just have a look under: "Step (and microstep) size"
on this page: [www.pololu.com]
Or:
Look under: "Configuring the micro stepping"
On this page: [www.my-home-fab.de]
But if you wish to use the 1/32 micostepping then altering firmware accordingly (doubling your steps/mm) is the way to go.
Edited 2 time(s). Last edit at 11/03/2015 02:06AM by Koenig.
|
Re: Folger Tech Kossel Delta 2020 Full 3D Printer Kit w/Auto-Level November 03, 2015 08:10AM |
Registered: 8 years ago Posts: 432 |
Quote
Koenig
Why go trying to correct something that is correct from the get go is beyond my understanding + that trying to do so introduces other errors.....
You just won't take anything in of what other people write right...?
Here's the base for my claims:
Now I see what you meant and it makes sense.
|
Re: Folger Tech Kossel Delta 2020 Full 3D Printer Kit w/Auto-Level November 03, 2015 12:37PM |
Registered: 8 years ago Posts: 107 |
I have my next problem. When I try to move the printer head to a specified location in the Z-axis only, it doesn't move any where near straight down.
The guy here that knows a tiny bit about 3D printers stated that it might have something to do with the steps. I currently have them set as:
#define DEFAULT_AXIS_STEPS_PER_UNIT {80, 80, 80, 100}
It seemed to me that if the three axis are set the same, then it should move the same? I can see that I might be thinking about this incorrectly too though. Is this a possibility, that they're just set incorrectly?
Another (more mechanical guy) says that it might be drag on a couple of the axis (an answer I better understand). I will mention one caveat: When I assembled the roller sliders onto the rails, they were so tight that they cause the three rollers to be flexed out. There is a screw that goes thru the two sides which you would use to bring the rollers closer together, but that will never be used because the slider unit was so tight. Did I get a bad set of printed parts? Is it supposed to flex out when assembled? The rollers will move but they're pretty stiff.The part I'm talking about is this one:

|
Re: Folger Tech Kossel Delta 2020 Full 3D Printer Kit w/Auto-Level November 03, 2015 02:37PM |
Registered: 8 years ago Posts: 28 |
Quote
Legrand
I have my next problem. When I try to move the printer head to a specified location in the Z-axis only, it doesn't move any where near straight down.
The guy here that knows a tiny bit about 3D printers stated that it might have something to do with the steps. I currently have them set as:
#define DEFAULT_AXIS_STEPS_PER_UNIT {80, 80, 80, 100}
It seemed to me that if the three axis are set the same, then it should move the same? I can see that I might be thinking about this incorrectly too though. Is this a possibility, that they're just set incorrectly?
Another (more mechanical guy) says that it might be drag on a couple of the axis (an answer I better understand). I will mention one caveat: When I assembled the roller sliders onto the rails, they were so tight that they cause the three rollers to be flexed out. There is a screw that goes thru the two sides which you would use to bring the rollers closer together, but that will never be used because the slider unit was so tight. Did I get a bad set of printed parts? Is it supposed to flex out when assembled? The rollers will move but they're pretty stiff.The part I'm talking about is this one:
Are you homing it prior to trying to move the Z axis? Not sure if it is normal behavior, but if I try to doa Z move right after power up it acts very strange. If I home it first, then all is well.
As for the roller carriages, the ones that came with my kit were tight. I printed new ones on my other printer that came out beautiful, and they were tight as well. I found that after running them up and down for a while (both manually and after the printer was working) they loosened up nicely. I used the tensioning screw to then lock in the good setting.
|
Re: Folger Tech Kossel Delta 2020 Full 3D Printer Kit w/Auto-Level November 03, 2015 02:42PM |
Registered: 8 years ago Posts: 107 |
|
Re: Folger Tech Kossel Delta 2020 Full 3D Printer Kit w/Auto-Level November 03, 2015 02:48PM |
Registered: 9 years ago Posts: 445 |
|
Re: Folger Tech Kossel Delta 2020 Full 3D Printer Kit w/Auto-Level November 03, 2015 02:51PM |
Registered: 10 years ago Posts: 14,672 |
Try adding an F parameter to your G0 Z200 command, e.g. F1000, to specify the speed. It may be trying to move too fast for your combination of motor rated current, current set on the drivers, and supply voltage.
Large delta printer [miscsolutions.wordpress.com], E3D tool changer, Robotdigg SCARA printer, Crane Quad and Ormerod
Disclosure: I design Duet electronics and work on RepRapFirmware, [duet3d.com].
Large delta printer [miscsolutions.wordpress.com], E3D tool changer, Robotdigg SCARA printer, Crane Quad and Ormerod
Disclosure: I design Duet electronics and work on RepRapFirmware, [duet3d.com].
|
Re: Folger Tech Kossel Delta 2020 Full 3D Printer Kit w/Auto-Level November 03, 2015 02:51PM |
Registered: 8 years ago Posts: 432 |
Quote
Legrand
I have been homing prior to any move. The move I've been inputting is "G0 Z200" (or some other Z value) immediately after sending it home and it doesn't move vertically, but rather at some sort of diagonal.
Did you check Drivers Vref voltage (small boards on RAMPS that manage steppers)? If carriages are tight and one of drivers underpowers stepper motor - the behavior could be like you described.
Try to change two boards, for example move X to Y and Y to X and see if there is any change in diagonal move.
|
Re: Folger Tech Kossel Delta 2020 Full 3D Printer Kit w/Auto-Level November 03, 2015 03:11PM |
Registered: 8 years ago Posts: 107 |
Quote
Koenig
Quote
Legrand
I have been homing prior to any move. The move I've been inputting is "G0 Z200" (or some other Z value) immediately after sending it home and it doesn't move vertically, but rather at some sort of diagonal.
How many of the motors actually move when you give the command?
All three motors move, just some more than others.
Quote
dc42
Try adding an F parameter to your G0 Z200 command, e.g. F1000, to specify the speed. It may be trying to move too fast for your combination of motor rated current, current set on the drivers, and supply voltage.
Lower feedrate did not affect movement. Slowed it all the way down to 100 and still received same result (end location of printer head).
Quote
paul_delta
Did you check Drivers Vref voltage (small boards on RAMPS that manage steppers)? If carriages are tight and one of drivers underpowers stepper motor - the behavior could be like you described.
Try to change two boards, for example move X to Y and Y to X and see if there is any change in diagonal move.
I have not tested the voltage nor tuned it per the instructions here: A498 Tuning I will try to change two boards tomorrow as I'm out of time here right now. Does anyone have any better instructions than given on that sheet? They're not really all that great and I don't want to toast something. It mentions removing a capacitor and such from the boards... I'm a little concerned about that.
|
Re: Folger Tech Kossel Delta 2020 Full 3D Printer Kit w/Auto-Level November 03, 2015 03:26PM |
Registered: 8 years ago Posts: 432 |
Quote
Legrand
I have not tested the voltage nor tuned it per the instructions here: A498 Tuning I will try to change two boards tomorrow as I'm out of time here right now. Does anyone have any better instructions than given on that sheet? They're not really all that great and I don't want to toast something. It mentions removing a capacitor and such from the boards... I'm a little concerned about that.
You should tune your Vref first. You are trying to drive car with flat tires.
|
Re: Folger Tech Kossel Delta 2020 Full 3D Printer Kit w/Auto-Level November 03, 2015 04:14PM |
Registered: 10 years ago Posts: 14,672 |
Also check that you have the microstepping jumpers set to x16 (i.e. all 3 jumpers present) under all of the drivers.
Large delta printer [miscsolutions.wordpress.com], E3D tool changer, Robotdigg SCARA printer, Crane Quad and Ormerod
Disclosure: I design Duet electronics and work on RepRapFirmware, [duet3d.com].
Large delta printer [miscsolutions.wordpress.com], E3D tool changer, Robotdigg SCARA printer, Crane Quad and Ormerod
Disclosure: I design Duet electronics and work on RepRapFirmware, [duet3d.com].
|
Re: Folger Tech Kossel Delta 2020 Full 3D Printer Kit w/Auto-Level November 03, 2015 04:35PM |
Registered: 8 years ago Posts: 432 |
Quote
Legrand
Does anyone have any better instructions than given on that sheet? They're not really all that great and I don't want to toast something. It mentions removing a capacitor and such from the boards... I'm a little concerned about that.
It's easy. Actually, you don't have to change anything, just set Vref voltage. Hook your multimeter "-" probe to the ground (on RAMPS board, for example, one of "-" marked pins and your "+" multimeter probe to the center of potentiometer. Adjust potentiometer, using provided ceramic screwdriver, to get 0.35v on your multimeter. For extruder driver set it to 0.5v. I think it will fix all your issues with motors.
|
Re: Folger Tech Kossel Delta 2020 Full 3D Printer Kit w/Auto-Level November 03, 2015 04:57PM |
Registered: 9 years ago Posts: 445 |
Quote
paul_delta
Quote
Legrand
Does anyone have any better instructions than given on that sheet? They're not really all that great and I don't want to toast something. It mentions removing a capacitor and such from the boards... I'm a little concerned about that.
It's easy. Actually, you don't have to change anything, just set Vref voltage. Hook your multimeter "-" probe to the ground (on RAMPS board, for example, one of "-" marked pins and your "+" multimeter probe to the center of potentiometer. Adjust potentiometer, using provided ceramic screwdriver, to get 0.35v on your multimeter. For extruder driver set it to 0.5v. I think it will fix all your issues with motors.
I think 0.35V is a little high on the small motors provided by FT, if they haven't changed it they ship this kit with Chinese a4988 pololus that have 0.1Ohm sense resistors which would result in a 0.7A current for a motor that is only rated for 0.4A.
There are some reports about melted/deformed corners due to hot motors.
On the other hand this means you can turn up the extruder to 0.6-0.65V without issues.
This might have changed though, so best check your what value you have on your sense resistors first.
|
Re: Folger Tech Kossel Delta 2020 Full 3D Printer Kit w/Auto-Level November 03, 2015 05:03PM |
Registered: 8 years ago Posts: 432 |
Quote
Koenig
I think 0.35V is a little high on the small motors provided by FT, if they haven't changed it they ship this kit with Chinese a4988 pololus that have 0.1Ohm sense resistors which would result in a 0.7A current for a motor that is only rated for 0.4A.
There are some reports about melted/deformed corners due to hot motors.
.
Yes, they are slightly overpowered, but revision B. of Folgertech Kossel has aluminum corners that work like heatsinks. My motors are just slightly warm after 5 hours of printing.
|
Re: Folger Tech Kossel Delta 2020 Full 3D Printer Kit w/Auto-Level November 03, 2015 05:15PM |
Registered: 9 years ago Posts: 445 |
Quote
paul_delta
Quote
Koenig
I think 0.35V is a little high on the small motors provided by FT, if they haven't changed it they ship this kit with Chinese a4988 pololus that have 0.1Ohm sense resistors which would result in a 0.7A current for a motor that is only rated for 0.4A.
There are some reports about melted/deformed corners due to hot motors.
.
Yes, they are slightly overpowered, but revision B. of Folgertech Kossel has aluminum corners that work like heatsinks. My motors are just slightly warm after 5 hours of printing.
Right, forgot about the aluminum corners, it has happened a bit since I bought this kit.
|
Re: Folger Tech Kossel Delta 2020 Full 3D Printer Kit w/Auto-Level November 03, 2015 10:35PM |
Registered: 8 years ago Posts: 90 |
I think I finally got my printer to travel the correct distance, although I had to both use just the M3 jumper, AND double the step rate in the FW to get the 8825 stepper drivers to cooperate ( including taking the extruder motor up to 200). MANUAL_Z_HOME_POS has been set to 267.2 for it to pass the paper test.
The issue I am now running into is when I start a print, it attempts to move clear off the bed in the Y+ direction, which buries the the carriage on the X tower in the lower end stop. It appears to be moving flat so I haven't messed with Smooth Rod Offset... I left the print radius at the default +-76, which is slightly smaller than the bed.
Also when I start a print, it jumps the temp from the PLA 185C preset I selected, and waits to hit 205C, I don't get that part either. Nowhere in the settings does it say 205C.
I don't understand how it is trying to move outside of the print radius that is set?
|
Re: Folger Tech Kossel Delta 2020 Full 3D Printer Kit w/Auto-Level November 04, 2015 08:17AM |
Registered: 8 years ago Posts: 9 |
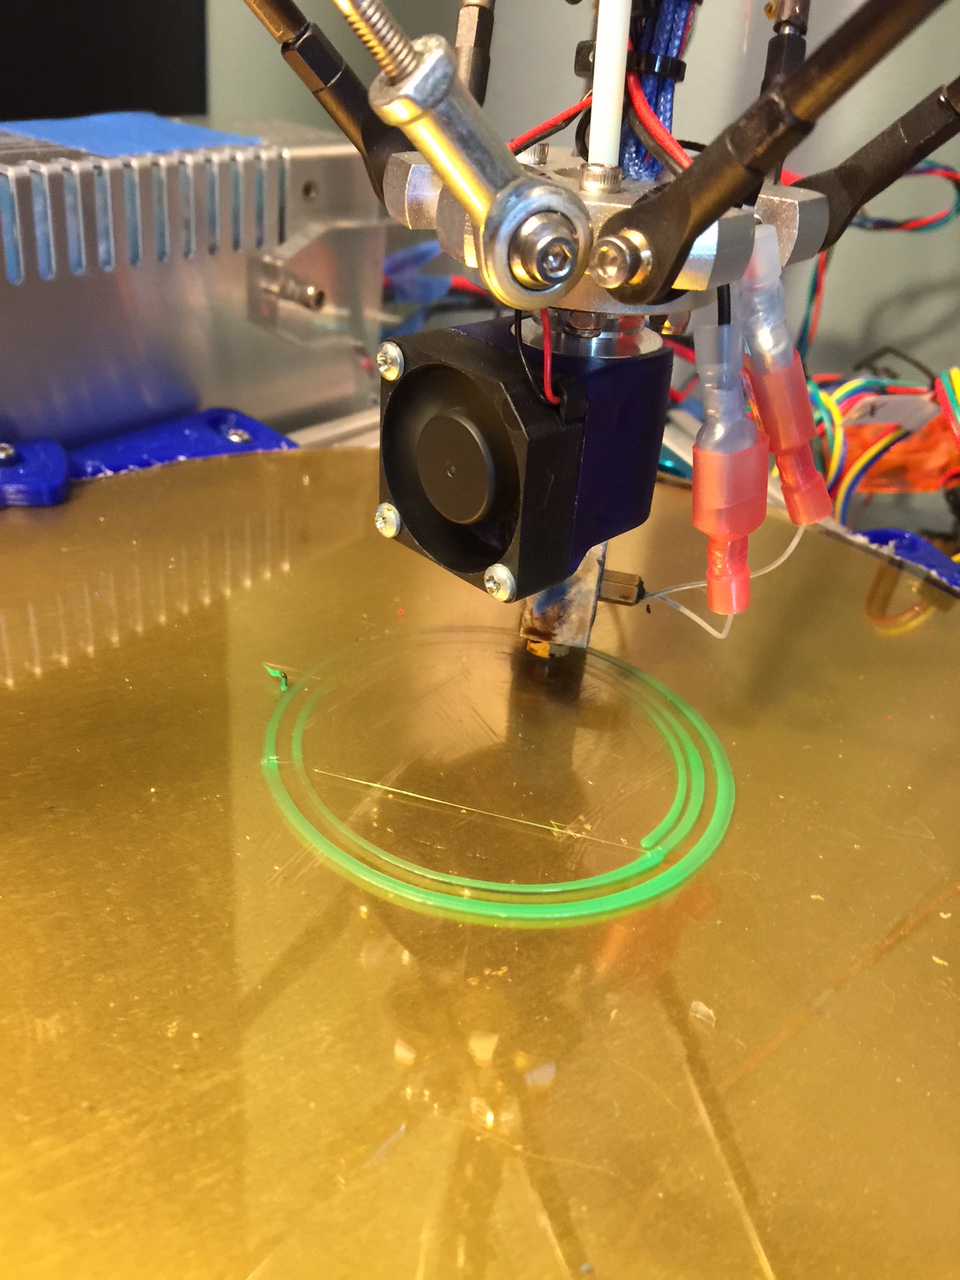
Ok, Yet another calibration question.
First of all the attached image is a little old, I've since improved calibration a lot, but it still lacks that last touch from being perfect.
Does anyone know by looking at the picture, where the filament does not appear what I need to tweak?
It's closest to the Z tower but it's not directly in front of it, more like at the 11:53 position if the Z tower is at 12:00.
I feel like perhaps my X arms are slightly longer than the Z/Y, could that cause it?
I dont have the exact endstop offset's (at work) but I'm pretty sure X is about 0, Y is around -5 and Z is around -6 does that in itself sound fishy?
Any help is appreciated thanks.
EDIT: I also wonder if it could be an issue with either the bed itself not being perfectly flat, or the PEI sheet. Anyway of knowing that?
Edited 1 time(s). Last edit at 11/04/2015 08:18AM by Seriouspete.
|
Re: Folger Tech Kossel Delta 2020 Full 3D Printer Kit w/Auto-Level November 04, 2015 09:13AM |
Registered: 8 years ago Posts: 432 |
Quote
fattmann
Also when I start a print, it jumps the temp from the PLA 185C preset I selected, and waits to hit 205C, I don't get that part either. Nowhere in the settings does it say 205C.
Check your slicing software and inspect generated g-code. There is definitely temp. command in g-code that waits for 205.
Quote
fattmann
I don't understand how it is trying to move outside of the print radius that is set?
Because the model you are trying to print is bigger than your radius or has too big offset from the center of bed (because of wrong setting is slicing software, for example).
|
Re: Folger Tech Kossel Delta 2020 Full 3D Printer Kit w/Auto-Level November 04, 2015 09:19AM |
Registered: 8 years ago Posts: 90 |
Quote
Check your slicing software and inspect generated g-code. There is definitely temp. command in g-code that waits for 205.
Will do.
Quote
Because the model you are trying to print is bigger than your radius or has too big offset from the center of bed (because of wrong setting is slicing software, for example).
The model I was trying to print was only the size of a Nickel, so I know the object wasn't too big. I will investigate this offset setting. Thanks!
|
Re: Folger Tech Kossel Delta 2020 Full 3D Printer Kit w/Auto-Level November 04, 2015 09:23AM |
Registered: 8 years ago Posts: 432 |
Quote
fattmann
The model I was trying to print was only the size of a Nickel, so I know the object wasn't too big. I will investigate this offset setting. Thanks!
Check your printer settings in slicing software, looks like there is default cartesian printer setting. You need to select Delta and 0,0 coordinate will be in the center this way.
|
Anonymous User
Re: Folger Tech Kossel Delta 2020 Full 3D Printer Kit w/Auto-Level November 04, 2015 09:38AM |
Quote
paul_delta
Quote
fattmann
The model I was trying to print was only the size of a Nickel, so I know the object wasn't too big. I will investigate this offset setting. Thanks!
Check your printer settings in slicing software, looks like there is default cartesian printer setting. You need to select Delta and 0,0 coordinate will be in the center this way.
Look here: http://forums.reprap.org/read.php?178,579566,579683#msg-579683
Looks like the same issue...
|
Re: Folger Tech Kossel Delta 2020 Full 3D Printer Kit w/Auto-Level November 04, 2015 11:33AM |
Registered: 8 years ago Posts: 107 |
Quote
paul_delta
It's easy. Actually, you don't have to change anything, just set Vref voltage. Hook your multimeter "-" probe to the ground (on RAMPS board, for example, one of "-" marked pins and your "+" multimeter probe to the center of potentiometer. Adjust potentiometer, using provided ceramic screwdriver, to get 0.35v on your multimeter. For extruder driver set it to 0.5v. I think it will fix all your issues with motors.
Tuned all motors, thanks for the simple instructions, still not working correctly.... BUT:
Quote
dc42
Also check that you have the microstepping jumpers set to x16 (i.e. all 3 jumpers present) under all of the drivers.
I looked under the boards to check out the jumpers (which were all installed at the factory) and one jumper was missing. Found a spare and installed it and it's moving properly in Z now! Woot!
Next up is that I will try to figure out why it's not going to the center of the bed when I hit the center (X/Y) button in Pronterface.....
|
Re: Folger Tech Kossel Delta 2020 Full 3D Printer Kit w/Auto-Level November 04, 2015 11:51AM |
Registered: 9 years ago Posts: 445 |
Quote
Legrand
Next up is that I will try to figure out why it's not going to the center of the bed when I hit the center (X/Y) button in Pronterface.....
Do you mean it doesn't go down to the bed, or that it just doesn't center in the plane it is over the bed?
Have you set that you have a circular build platform in pronterface?
|
Re: Folger Tech Kossel Delta 2020 Full 3D Printer Kit w/Auto-Level November 04, 2015 12:32PM |
Registered: 8 years ago Posts: 107 |
Quote
Koenig
Quote
Legrand
Next up is that I will try to figure out why it's not going to the center of the bed when I hit the center (X/Y) button in Pronterface.....
Do you mean it doesn't go down to the bed, or that it just doesn't center in the plane it is over the bed?
Have you set that you have a circular build platform in pronterface?
I mean that it doesn't center in the plane over the bed. It just drives one motor pushing the head to one side.
I do have the circular build platform checked (now), but it doesn't change anything.
|
Re: Folger Tech Kossel Delta 2020 Full 3D Printer Kit w/Auto-Level November 04, 2015 12:36PM |
Registered: 8 years ago Posts: 432 |
Go to command console and manually enter G28 to get home. Then enter G1 Z150 F1000. What is the result?
Quote
Legrand
Quote
Koenig
Quote
Legrand
Next up is that I will try to figure out why it's not going to the center of the bed when I hit the center (X/Y) button in Pronterface.....
Do you mean it doesn't go down to the bed, or that it just doesn't center in the plane it is over the bed?
Have you set that you have a circular build platform in pronterface?
I mean that it doesn't center in the plane over the bed. It just drives one motor pushing the head to one side.
I do have the circular build platform checked (now), but it doesn't change anything.
|
Re: Folger Tech Kossel Delta 2020 Full 3D Printer Kit w/Auto-Level November 04, 2015 12:43PM |
Registered: 8 years ago Posts: 90 |
Quote
Legrand
Quote
Koenig
Quote
Legrand
Next up is that I will try to figure out why it's not going to the center of the bed when I hit the center (X/Y) button in Pronterface.....
Do you mean it doesn't go down to the bed, or that it just doesn't center in the plane it is over the bed?
Have you set that you have a circular build platform in pronterface?
I mean that it doesn't center in the plane over the bed. It just drives one motor pushing the head to one side.
I do have the circular build platform checked (now), but it doesn't change anything.
Mine does this too. If I hit the general Home button in the bottom left, it homes just fine. If I use G28, it homes just fine.
But if I hit that red X/Y home button in the middle- all hell breaks loose as it rams to one side and I have to power it off.
Edited 1 time(s). Last edit at 11/04/2015 12:47PM by fattmann.


Sorry, only registered users may post in this forum.