My Delta build based on Cherry Pi (A Larger Slice of)
Posted by dougal1957
|
My Delta build based on Cherry Pi (A Larger Slice of) January 27, 2015 11:56AM |
Registered: 9 years ago Posts: 1,159 |
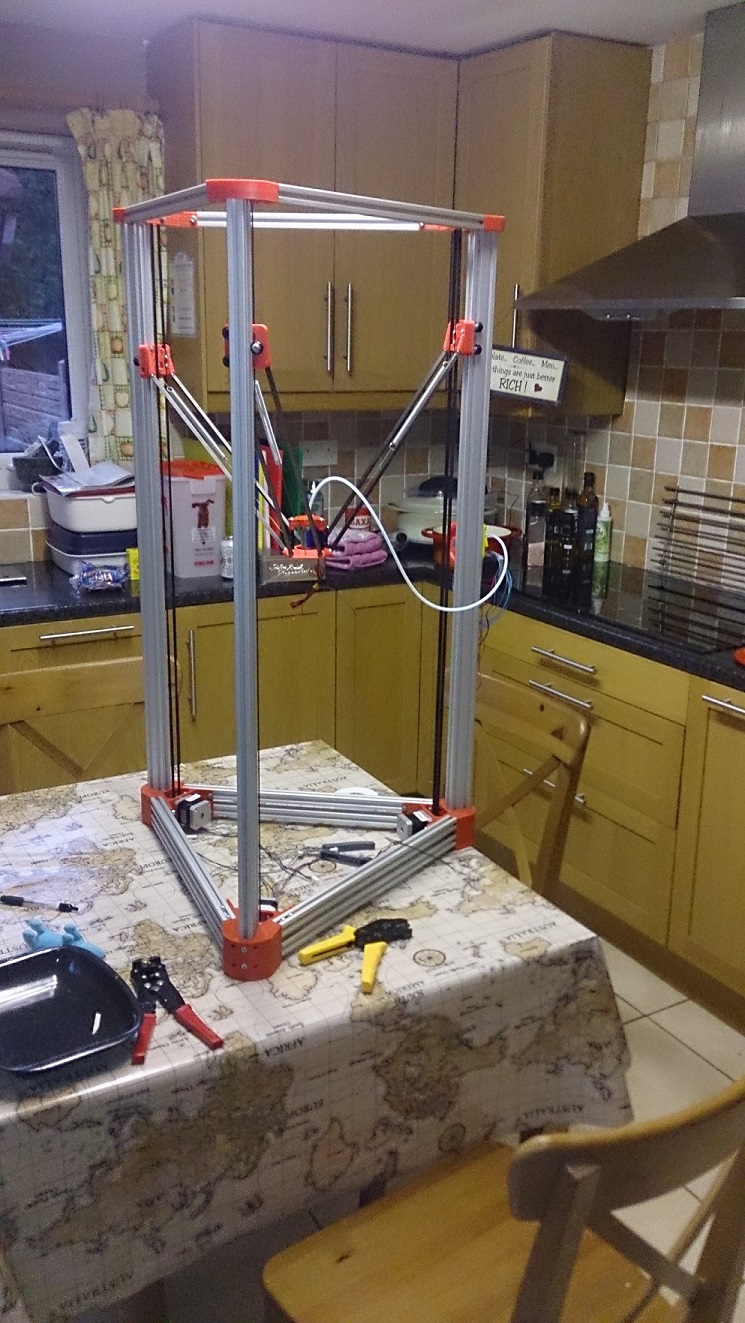
Well this is progress so far
Waiting for bed plate to arrive Mirror Glass and some ally plate for under and over the frame for mounting the electronics etc.
Then need a suitable enclosure and mount for my PanelDue Display module.
more to come as it progresses
Doug
ps many thanks to AndyCart for his design.
Edited 1 time(s). Last edit at 01/27/2015 12:02PM by dougal1957.
|
Re: My Delta build based on Cherry Pi (A Larger Slice of) January 28, 2015 02:12AM |
Registered: 10 years ago Posts: 515 |
|
Re: My Delta build based on Cherry Pi (A Larger Slice of) January 28, 2015 02:51AM |
Registered: 9 years ago Posts: 1,159 |
Quote
AndyCart
Hi Doug
It looks great
Andy
It's getting there Andy will be using a Duet Controller with the display panel on the beast.
Hope to be ably to at least do some setup on it over the next couple of days or so But I am suspicious that one of my rods may be slightly long as the effector is going out of level at one extreme of travel?
Doug
|
Re: My Delta build based on Cherry Pi (A Larger Slice of) January 28, 2015 01:54PM |
Registered: 10 years ago Posts: 327 |
Glad to see you are making progress Doug. What are the dimensions?
Les
Pointy's Things
Pointy's Blog
Les
Pointy's Things
Pointy's Blog
|
Re: My Delta build based on Cherry Pi (A Larger Slice of) January 28, 2015 03:36PM |
Registered: 9 years ago Posts: 1,159 |
Quote
Pointy
Glad to see you are making progress Doug. What are the dimensions?
Les
1000mm high towers and 450mm side extrusion's the arms are 360mm each though I have a feeling that one is a little out as I am getting some tilting of the effector at extreme away from the Z Tower need to work that out?
It will have a 400mm dia build plate but I will prob restrict it a little more.
I Have designed some printed feet today ant printed 6 of them to mount to the bottom of the side extrusions and raise the whole thing by 35mm or so (This will allow me to put a plate on the bottom to attach the controller and Such to it to keep it away from the heater for the bed.
Got the Duet and the PanelDue ready for it as well so well on the way.
Doug
|
Re: My Delta build based on Cherry Pi (A Larger Slice of) January 30, 2015 06:28PM |
Registered: 11 years ago Posts: 805 |
|
Re: My Delta build based on Cherry Pi (A Larger Slice of) January 31, 2015 03:27AM |
Registered: 9 years ago Posts: 1,159 |
Quote
sungod3k
Im building a similar size now, have you thought about cross bracing?
Yes I have and it will be done by Alloy sheet on the 2 rear side and a pieces of Perspex on the front so that it acts as a heated chamber.
I am about to start cutting some Ally sheet for the top and bottom.
also it is already quite rigid (the Tower extrusions are 20x40).
Doug
|
Re: My Delta build based on Cherry Pi (A Larger Slice of) February 16, 2015 12:52PM |
Registered: 9 years ago Posts: 1,159 |
OK
Build has progressed a little now Duet is mounted in a box under the bottom plate New legs fitted to lift the whole thing to allow this (May need to increase them a bit more tho so PSU will also fit under there.
400mm build plate fitted (Still waiting for the heater mind)
PanelDue also in its box still need to decide how to fit to the frame.
More to come later
Doug
Build has progressed a little now Duet is mounted in a box under the bottom plate New legs fitted to lift the whole thing to allow this (May need to increase them a bit more tho so PSU will also fit under there.
400mm build plate fitted (Still waiting for the heater mind)
PanelDue also in its box still need to decide how to fit to the frame.

More to come later
Doug
|
Re: My Delta build based on Cherry Pi (A Larger Slice of) February 16, 2015 02:24PM |
Registered: 10 years ago Posts: 14,672 |
Quote
dougal1957
Build has progressed a little now Duet is mounted in a box under the bottom plate New legs fitted to lift the whole thing to allow this (May need to increase them a bit more tho so PSU will also fit under there.
Make sure you can still get at the Erase and Reset buttons so that you can flash new firmware, or else add flying leads to new buttons. I have suggested to T3P3 that on the next iteration of the Duet, they use horizontal mounting push buttons on the same edge of the board as the connectors.
Quote
dougal1957
400mm build plate fitted (Still waiting for the heater mind)
With such a large build plate, I guess you will be using a mains powered heater and zero crossing SSR?
Quote
dougal1957
PanelDue also in its box still need to decide how to fit to the frame.
For my Mini Kossel I drilled two 3mm holes in the bottom edge of the enclosure and screwed it on top of the front top extrusion. As your printer is larger, I guess you could also fit it underneath the top extrusion.
Large delta printer [miscsolutions.wordpress.com], E3D tool changer, Robotdigg SCARA printer, Crane Quad and Ormerod
Disclosure: I design Duet electronics and work on RepRapFirmware, [duet3d.com].
|
Re: My Delta build based on Cherry Pi (A Larger Slice of) February 16, 2015 02:56PM |
Registered: 9 years ago Posts: 1,159 |
Quote
dc42
Quote
dougal1957
Build has progressed a little now Duet is mounted in a box under the bottom plate New legs fitted to lift the whole thing to allow this (May need to increase them a bit more tho so PSU will also fit under there.Quote
dc42
Make sure you can still get at the Erase and Reset buttons so that you can flash new firmware, or else add flying leads to new buttons. I have suggested to T3P3 that on the next iteration of the Duet, they use horizontal mounting push buttons on the same edge of the board as the connectors.
Fair point will have to think about that wonder if I could maybe arrange something like Bowden tube with filament thru it as remote push buttons? is there breakouts for the buttons on the expansion header by any Chance will have to have a look at the diagrams I think?
Quote
dougal1957
400mm build plate fitted (Still waiting for the heater mind)Quote
dc42
With such a large build plate, I guess you will be using a mains powered heater and zero crossing SSR?
Yes 220v AC 300mm diameter, under the mirror is a 5mm thick aluminium blank at 400mm dia
Quote
dougal1957
PanelDue also in its box still need to decide how to fit to the frame.Quote
dc42
For my Mini Kossel I drilled two 3mm holes in the bottom edge of the enclosure and screwed it on top of the front top extrusion. As your printer is larger, I guess you could also fit it underneath the top extrusion.
I have drawn up a bracket that mounts to the extrusions and then the Panel will sit on that unfortunately my I3 thru a wobbly yesterday and looks like my PSU has either blown a fuse or has died (Not had chance to check it out yet)!
Dave I do have a question though my build height (Bed to Nozzle) when homed is approx. 515 mm what would you suggest as the homed height setting in the Config.g file does it need to be more than this say 530?
Doug
|
Re: My Delta build based on Cherry Pi (A Larger Slice of) February 16, 2015 03:38PM |
Registered: 10 years ago Posts: 14,672 |
Initially, set the homed height slightly higher than the vertical range at the centre so that you are sure of being able to reach the bed. Once you have a working Z probe, you can use G32 to set the homed height along with the endstop corrections and delta radius.
You will also need to edit homedelta.g to increase the amount of movement allowed when homing.
Large delta printer [miscsolutions.wordpress.com], E3D tool changer, Robotdigg SCARA printer, Crane Quad and Ormerod
Disclosure: I design Duet electronics and work on RepRapFirmware, [duet3d.com].
You will also need to edit homedelta.g to increase the amount of movement allowed when homing.
Large delta printer [miscsolutions.wordpress.com], E3D tool changer, Robotdigg SCARA printer, Crane Quad and Ormerod
Disclosure: I design Duet electronics and work on RepRapFirmware, [duet3d.com].
|
Re: My Delta build based on Cherry Pi (A Larger Slice of) February 16, 2015 03:48PM |
Registered: 9 years ago Posts: 1,159 |
Quote
dc42
Initially, set the homed height slightly higher than the vertical range at the centre so that you are sure of being able to reach the bed. Once you have a working Z probe, you can use G32 to set the homed height along with the endstop corrections and delta radius.
You will also need to edit homedelta.g to increase the amount of movement allowed when homing.
Thanks Dave I now understand what that setting does I Guess that the erase and reset switches aren't passed to the expansion header Shame that will have to have a think about this May end up mounting on the Z Tower instead Or thinking about it when I enclose the sides with Ally sheet it can go on one side maybe that's a plan?
Doug
ps have you had any more thoughts on a generic IR probe for Deltas?
Edited 1 time(s). Last edit at 02/16/2015 03:49PM by dougal1957.
|
Re: My Delta build based on Cherry Pi (A Larger Slice of) February 16, 2015 06:21PM |
Registered: 10 years ago Posts: 14,672 |
Reset is available on the expansion header. I suggest a 100 ohm resistor in series with a push button between reset and ground. Erase is not available on the expansion header, but it would not be difficult to solder wires to the Erase switch contacts on the top of the board
Large delta printer [miscsolutions.wordpress.com], E3D tool changer, Robotdigg SCARA printer, Crane Quad and Ormerod
Disclosure: I design Duet electronics and work on RepRapFirmware, [duet3d.com].
Large delta printer [miscsolutions.wordpress.com], E3D tool changer, Robotdigg SCARA printer, Crane Quad and Ormerod
Disclosure: I design Duet electronics and work on RepRapFirmware, [duet3d.com].
|
Re: My Delta build based on Cherry Pi (A Larger Slice of) February 17, 2015 06:04AM |
Registered: 10 years ago Posts: 327 |
Looking good Doug, glad the carriers worked for you.
Regards,
Les
PS. Do you not get nagged for hogging the kitchen table?
Pointy's Things
Pointy's Blog
Regards,
Les
PS. Do you not get nagged for hogging the kitchen table?
Pointy's Things
Pointy's Blog
|
Re: My Delta build based on Cherry Pi (A Larger Slice of) February 17, 2015 06:13AM |
Registered: 9 years ago Posts: 1,159 |
Quote
Pointy
Looking good Doug, glad the carriers worked for you.
Regards,
Les
PS. Do you not get nagged for hogging the kitchen table?
you better believe it fortunately it is fairly easy to move into the garage when I finish whatever I am doing with it at the Time.
Mind I had to take the bed of it to move it it was to heavy with it on.
need to redo my legs tho as they are not quite tall enough to get the PSU under it but that's a fairly minor thing to do.
The thumb nuts I got work really well as well just a nice size to fit.
Just need Dave to come up with a IR sensor that we can fit then we'll have everything one could want lol.
Really like the DUET and PanelDue (It is extremely Cool)
Doug
|
Re: My Delta build based on Cherry Pi (A Larger Slice of) March 11, 2015 04:03PM |
Registered: 9 years ago Posts: 1,159 |
Right
Made some progress this week.
Got the Electronics/PSU mounted under the bottom plate
Mounted a Mendel Mini Extruder to rear tower
Got the heat bed mounted (300mm Diam Mains powered Silicon heater attached to a 400mm dia 5mm thick Heat spreader then topped with a 400 mm diam Mirror)
Tower carriages are Les's (Pointy) modified ones to give better tensioning and increased Z Height.
Towers are all within 0.25 degrees of vertical with the bed perfectly level (Using a digital inclinometer for checking).
Controller is a Duet with DC42's excellent Firmware fork and Zombiepantslol Web interface.
Still to mount the PanelDue, finish wiring the Mains side and USB for the Duet (For Flashing of Firmware only) Reset and Erase buttons have been extended to a panel on the front of the Machine.
Hopefully tomorrow I will finish the wiring for the mains Earth everything in site mount the Display Wire the Extruder motor Fan and fit the Thermistor to the Heat Block and start to commission the beast.
Should be quite quick as it has a E3D hotend with a Volcano fitted and a 1.2mm dia nozzle (got the full set of nozzles for it so can go from 0.8 to 1.2 in 0.2 steps if needed).
Think I may need to brace the top and bottom together to avoid twisting etc (I have the Extrusion to do this so that is also on the to do list).
More Later.
Made some progress this week.
Got the Electronics/PSU mounted under the bottom plate

Mounted a Mendel Mini Extruder to rear tower

Got the heat bed mounted (300mm Diam Mains powered Silicon heater attached to a 400mm dia 5mm thick Heat spreader then topped with a 400 mm diam Mirror)

Tower carriages are Les's (Pointy) modified ones to give better tensioning and increased Z Height.

Towers are all within 0.25 degrees of vertical with the bed perfectly level (Using a digital inclinometer for checking).
Controller is a Duet with DC42's excellent Firmware fork and Zombiepantslol Web interface.
Still to mount the PanelDue, finish wiring the Mains side and USB for the Duet (For Flashing of Firmware only) Reset and Erase buttons have been extended to a panel on the front of the Machine.
Hopefully tomorrow I will finish the wiring for the mains Earth everything in site mount the Display Wire the Extruder motor Fan and fit the Thermistor to the Heat Block and start to commission the beast.
Should be quite quick as it has a E3D hotend with a Volcano fitted and a 1.2mm dia nozzle (got the full set of nozzles for it so can go from 0.8 to 1.2 in 0.2 steps if needed).
Think I may need to brace the top and bottom together to avoid twisting etc (I have the Extrusion to do this so that is also on the to do list).
More Later.
|
Re: My Delta build based on Cherry Pi (A Larger Slice of) April 24, 2015 09:17AM |
Registered: 9 years ago Posts: 1,159 |
Update
I have now braced the frame and have now got ALL elements within 0.08 degrees of true using a calibrated inclinometer.
All mains wiring complete
Heatbed tested and gets to 115 degrees in around 3.5 mins or less
Extruder Step's/mm calibrated
PanelDue fitted and tested.
All movements tested
Fitted one of DC42 differential IR Z Sensor's
lengthened the diagonal rods as wasn't happy with first set.
Still to run thru the calibration but all being well that should go fairly easily now I have it all solid and aligned correctly
Photo's to show tower carriages
These are Pointy's excellent modified ones with the lower belt clamp sliding in a V Groove tensioned by a M3 thumbnut (Makes life very easy).
More later as I get it setup
I have now braced the frame and have now got ALL elements within 0.08 degrees of true using a calibrated inclinometer.
All mains wiring complete
Heatbed tested and gets to 115 degrees in around 3.5 mins or less
Extruder Step's/mm calibrated
PanelDue fitted and tested.

All movements tested
Fitted one of DC42 differential IR Z Sensor's

lengthened the diagonal rods as wasn't happy with first set.
Still to run thru the calibration but all being well that should go fairly easily now I have it all solid and aligned correctly
Photo's to show tower carriages

These are Pointy's excellent modified ones with the lower belt clamp sliding in a V Groove tensioned by a M3 thumbnut (Makes life very easy).
More later as I get it setup
|
Re: My Delta build based on Cherry Pi (A Larger Slice of) April 24, 2015 10:22AM |
Registered: 10 years ago Posts: 14,672 |
You should have said you wanted a right angle connector on the sensor board, I could have fitted one for you instead of the usual straight one!
Do the ball ends sit directly in the printed parts, or is there some sort of spherical socket embedded in them?
Edited 1 time(s). Last edit at 04/24/2015 10:23AM by dc42.
Large delta printer [miscsolutions.wordpress.com], E3D tool changer, Robotdigg SCARA printer, Crane Quad and Ormerod
Disclosure: I design Duet electronics and work on RepRapFirmware, [duet3d.com].
|
Re: My Delta build based on Cherry Pi (A Larger Slice of) April 24, 2015 10:42AM |
Registered: 9 years ago Posts: 1,159 |
Quote
dc42
You should have said you wanted a right angle connector on the sensor board, I could have fitted one for you instead of the usual straight one!
Do the ball ends sit directly in the printed parts, or is there some sort of spherical socket embedded in them?
Didnt know I would need a right angle connector at the time no worries Maybe you could pop a spare in with the mini board once they are ready.
Yes the ball ends sit straight to the printed parts (Small smear of silicon grease applied first).
Think I will have to move the whole hotend to below the effector to be able to fit the board underneath Shouldn't be hard to modify it.
Doug
Oh have also ordered a circular Cork pad (10 mm thick) to insulate under the bed Cork Mat
Edited 1 time(s). Last edit at 04/24/2015 10:45AM by dougal1957.
|
Re: My Delta build based on Cherry Pi (A Larger Slice of) April 24, 2015 11:05AM |
Registered: 10 years ago Posts: 14,672 |
Quote
dougal1957
Quote
dc42
You should have said you wanted a right angle connector on the sensor board, I could have fitted one for you instead of the usual straight one!
Didnt know I would need a right angle connector at the time no worries Maybe you could pop a spare in with the mini board once they are ready.[/quote]
Will do!
Quote
dougal1957
Think I will have to move the whole hotend to below the effector to be able to fit the board underneath Shouldn't be hard to modify it.
Maybe you could shorten the spacers you are using between the upper and lower printed parts, if that still leaves room for the hot end fan? The mini board is 19mm high.
Large delta printer [miscsolutions.wordpress.com], E3D tool changer, Robotdigg SCARA printer, Crane Quad and Ormerod
Disclosure: I design Duet electronics and work on RepRapFirmware, [duet3d.com].
|
Re: My Delta build based on Cherry Pi (A Larger Slice of) April 24, 2015 11:13AM |
Registered: 9 years ago Posts: 1,159 |
Quote
dc42
Quote
dougal1957
Quote
dc42
You should have said you wanted a right angle connector on the sensor board, I could have fitted one for you instead of the usual straight one!
Didnt know I would need a right angle connector at the time no worries Maybe you could pop a spare in with the mini board once they are ready.
Will do!
Quote
dougal1957
Think I will have to move the whole hotend to below the effector to be able to fit the board underneath Shouldn't be hard to modify it.
Maybe you could shorten the spacers you are using between the upper and lower printed parts, if that still leaves room for the hot end fan? The mini board is 19mm high.[/quote]
That was my original plan those spacers are actully a pair of 15 mm long Alloy posts so losing one would give me approx 30 mm below the effector, problem would be the fan?
Doug
Edited 1 time(s). Last edit at 04/24/2015 11:13AM by dougal1957.
|
Re: My Delta build based on Cherry Pi (A Larger Slice of) April 26, 2015 01:51PM |
Registered: 9 years ago Posts: 76 |
|
Re: My Delta build based on Cherry Pi (A Larger Slice of) April 26, 2015 02:19PM |
Registered: 9 years ago Posts: 1,159 |
Quote
mikes3ds
Looking really good.
It would be but for a couple of stupid little niggles that are causing some grief Can't get it to calibrate and it looks like the Effector id not tracking straight so need to double check that.
If I can get that sorted it will calibrate and print I am Sure.
I am not entirely happy with my top and bottom Corner brackets so have ordered some Aluminium extruded ones from Robotdigg Corner parts(They are for a Kossel but I am Sure they will do for this as well)
Thing is that the Duet is absolutely the Dogs Bolxxxx if you know what I mean it is fast easy to configure and the autocal is a dream (as long as you don't have silly things happening like I do) and the Web interface is to die for.
Connect it to your network fire up the web page and you can upload all your Print files new config files etc and print remotely without even being in the same room and What is there to say about the PanelDue from DC42.
When I get it going I will video it doing all of this from the Panel just to show what it can do
|
Re: My Delta build based on Cherry Pi (A Larger Slice of) April 27, 2015 01:51PM |
Registered: 9 years ago Posts: 1,159 |
Well i an having some issues and would like some guidance from the community please?
I have done some tests using a piece of CF square tube rubber banded to the Effector and it definately isn't tracking correctly
Looking from the front when at the Z tower the effector is rotated anti clockwise by around 2 mm over a 250 mm length
at the X tower it is now clockwise by around 3-3.5 mm and at the Y tower it is again Anti Clockwise by around 3 mm
Anyone have any idea what could cause this.
I have checked that everything is as true as I can get it (within 0.8 degrees best is spot on) all the diagonal rods appear to be the same length certainly within 0.1 0.2 mm
any help very much appreciated before I junk what I have done so far and start again.
Doug
|
Re: My Delta build based on Cherry Pi (A Larger Slice of) April 27, 2015 05:19PM |
Registered: 9 years ago Posts: 76 |
I have a feeling I will be running into similar problems very soon. I have all three axis built, I am still milling the rods and frame.
@dougal1957 Maybe some adjustable cross beam supports/ or wires to get them perpendicular, just a idea might not be a solution. (Also maybe you should start a new post for help)
Edited 1 time(s). Last edit at 04/27/2015 05:20PM by mikes3ds.
@dougal1957 Maybe some adjustable cross beam supports/ or wires to get them perpendicular, just a idea might not be a solution. (Also maybe you should start a new post for help)
Edited 1 time(s). Last edit at 04/27/2015 05:20PM by mikes3ds.
|
Re: My Delta build based on Cherry Pi (A Larger Slice of) April 29, 2015 12:33AM |
Registered: 11 years ago Posts: 364 |
i have a similar issue on my 3dr which uses the same spring joints as the cherry pi. I measured the rods and made them accurate to within 0.02 mm but still the carriage tilts in the yz plane by about 0.5mm .. i made the carriages twice ,, the rods 2 times... changed springs from softer to harder ones. lubricated joints .. but nothing works... the printer can print out good parts anyways ... so i gave up on solving it.. when i get time i will rip the printer apart and rebuid it using tarrax joints..
|
Re: My Delta build based on Cherry Pi (A Larger Slice of) April 29, 2015 02:47AM |
Registered: 9 years ago Posts: 1,159 |
Quote
ekaggrat
i have a similar issue on my 3dr which uses the same spring joints as the cherry pi. I measured the rods and made them accurate to within 0.02 mm but still the carriage tilts in the yz plane by about 0.5mm .. i made the carriages twice ,, the rods 2 times... changed springs from softer to harder ones. lubricated joints .. but nothing works... the printer can print out good parts anyways ... so i gave up on solving it.. when i get time i will rip the printer apart and rebuid it using tarrax joints..
I don't think it matter's that there is a slight tilt on the effector as long as it is constant ie it track true in my case it tracks in a concave manner.
Having made a few check's suggested by DC42 it look's like the distance between the rods is different on mine between the effector and the carriages and I am just getting to the end of re-printing them with a smaller nozzle and layer heights and they look much better
Will try and get them fitted later today and try again.
Doug
|
Re: My Delta build based on Cherry Pi (A Larger Slice of) April 29, 2015 03:39PM |
Registered: 9 years ago Posts: 76 |
I am kind of lost on what is you think is wrong. So you think the distance between the rods and carriage varies between each carriage due to the carriages print layer heights not being even?
Just wondering so I don't make the same mistake.
Edited 1 time(s). Last edit at 04/29/2015 03:54PM by mikes3ds.
Just wondering so I don't make the same mistake.
Edited 1 time(s). Last edit at 04/29/2015 03:54PM by mikes3ds.
|
Re: My Delta build based on Cherry Pi (A Larger Slice of) April 29, 2015 04:30PM |
Registered: 9 years ago Posts: 1,159 |
Quote
mikes3ds
I am kind of lost on what is you think is wrong. So you think the distance between the rods and carriage varies between each carriage due to the carriages print layer heights not being even?
Just wondering so I don't make the same mistake.
I think there is a definate error in the distance between the rods which I think has been compounded by me printing them with a 0.8 mm nozzle at 0.6 mm layer height.
I have re-printed the parts with a 0.4 nozzle and 0.2 layer and it is much improved but still not quite right.
I am now in the process of printing a set of std CP3 carriage assemblies just in case Pointy's modified ones are slightly of I think mine would probably calibrate manually if I were to take a time over it but I really want it to auto Calibrate with the DUET and DC42 IR sensor.
I am adamant that I will beat this thing.
Should be able to get a little further tomorrow and will post the results.
Doug
Sorry, only registered users may post in this forum.