Delta Printer bad prints
Posted by Stephanel
|
Re: Delta Printer bad prints February 18, 2015 04:51PM |
Registered: 9 years ago Posts: 113 |
Hehe it's own design  Just a stepper motor and a standard end stop attached to the effector.
Indeed, Slic3r contains a function to auto lift the extruder for xx millimeter when it moves across the extruded product. Sadly, it appears that for some reason it does not always execute this. In this case, it did not, while a bit further in the G code it did move it up by a millimeter or so.
As you pointed out, indeed my printer is (again) off calibration It seems like I never stop calibrating this thing... I now calibrated it again, but as it is an iterative procedure, you can never really stop calibrating... For some reason, I keep going lower with my end stops (M666 X Y Z), and then having to adjust the R and H parameter, after which my end stops have to go lower...
I now restarted the autocalibration starting from the current settings. I will see what this brings!
Just a stepper motor and a standard end stop attached to the effector. Indeed, Slic3r contains a function to auto lift the extruder for xx millimeter when it moves across the extruded product. Sadly, it appears that for some reason it does not always execute this. In this case, it did not, while a bit further in the G code it did move it up by a millimeter or so.
As you pointed out, indeed my printer is (again) off calibration
It seems like I never stop calibrating this thing... I now calibrated it again, but as it is an iterative procedure, you can never really stop calibrating... For some reason, I keep going lower with my end stops (M666 X Y Z), and then having to adjust the R and H parameter, after which my end stops have to go lower...I now restarted the autocalibration starting from the current settings. I will see what this brings!
|
Re: Delta Printer bad prints February 18, 2015 05:42PM |
Registered: 9 years ago Posts: 113 |
You know what they say: despare is closest to victory! :-)
Thanks to you Doug, I checked my calibration again, but I also re-measured all the important parameters (as listed in this good reference picture). I had changed my effector, but neglected to update some of the important parameters like:
That didn't help the auto calibration, as it started from totally incorrect values. I now updated them and reran the calibration. An lo and behold, the results are already much better:
Left before adjustment, right after.
Hope that this helps somebody to avoid stranding in the woods like me :-)
I still have the issue with the hot end hitting the product, but I will do additional checks to make sure that the plane now is calibrated properly.
Thanks again!
Thanks to you Doug, I checked my calibration again, but I also re-measured all the important parameters (as listed in this good reference picture). I had changed my effector, but neglected to update some of the important parameters like:
#define DELTA_SMOOTH_ROD_OFFSET 150 // mm
#define DELTA_EFFECTOR_OFFSET 18 // mm
#define DELTA_CARRIAGE_OFFSET 40 // mm
That didn't help the auto calibration, as it started from totally incorrect values. I now updated them and reran the calibration. An lo and behold, the results are already much better:

Left before adjustment, right after.
Hope that this helps somebody to avoid stranding in the woods like me :-)
I still have the issue with the hot end hitting the product, but I will do additional checks to make sure that the plane now is calibrated properly.
Thanks again!
|
Re: Delta Printer bad prints February 18, 2015 08:09PM |
Registered: 10 years ago Posts: 903 |
From personal experience, I will say that *any* minor inaccuracies of the probe repeatability will negatively impact auto tuning. I consider it a gimmick now, and always do my calibrations manually. There are several guides out there, and even Jay's (?) video tutorial on YouTube. Seriously, with just a little practice, you can do the job quicker manually using the gray matter between your ears than the printer can do it electronically! The best part is that when you're done, you will understand how DELTA_RADIUS causes concave/convex motions across the build surface (why the hotend doesn't track evenly across the bed).....
|
Re: Delta Printer bad prints February 18, 2015 09:11PM |
Registered: 10 years ago Posts: 14,672 |
Quote
vreihen
Seriously, with just a little practice, you can do the job quicker manually using the gray matter between your ears than the printer can do it electronically!
It took me 4 iterations and the best part of an hour to do the initial manual calibration of my Mini Kossel. Now that I have implemented auto calibration, it takes 30 seconds, and it is highly repeatable. So i disagree strongly with your statement. But I agree with you that the Z probe needs to give consistent results for it to work well, and that it is good to understand the effect of changing the delta radius.
Large delta printer [miscsolutions.wordpress.com], E3D tool changer, Robotdigg SCARA printer, Crane Quad and Ormerod
Disclosure: I design Duet electronics and work on RepRapFirmware, [duet3d.com].
|
Re: Delta Printer bad prints February 19, 2015 04:40PM |
Registered: 9 years ago Posts: 113 |
Hey!
Interesting discussion :-) For me the auto bed leveling helps me to get the initial calibration right, without too much trouble. It is however as vreihen says good to first learn by doing the calibration yourself. This way, I got indeed a better feeling of what are the important settings. Especially since after better setting all parameters, I could much better do the auto calibration...
So it seems my printer is now better able to print. However, apparently I'm not yet there. This is a more complex model that I try to print, using the following parameters:
As you can see, the print is less than perfect. I will try to change the parameters to see what improves the print. I tried looking at the Printing Troubleshoot Guide, but it seems not to include such defects... Do note that I do not use a heated bed.
This print quality naturally is insufficient, also because the print head violently hits the misformed print product, cause all kinds of bad vibrations in the machine...
Interesting discussion :-) For me the auto bed leveling helps me to get the initial calibration right, without too much trouble. It is however as vreihen says good to first learn by doing the calibration yourself. This way, I got indeed a better feeling of what are the important settings. Especially since after better setting all parameters, I could much better do the auto calibration...
So it seems my printer is now better able to print. However, apparently I'm not yet there. This is a more complex model that I try to print, using the following parameters:
22:11:33.704 : echo: Steps per unit:
22:11:33.704 : echo:  M92 X80.00 Y80.00 Z80.00 E120.00
22:11:33.704 : echo: Maximum feedrates (mm/s):
22:11:33.704 : echo:  M203 X500.00 Y500.00 Z500.00 E200.00
22:11:33.704 : echo: Maximum Acceleration (mm/s2):
22:11:33.719 : echo:  M201 X9000 Y9000 Z9000 E2000
22:11:33.719 : echo: Acceleration: S=acceleration, T=retract acceleration
22:11:33.719 : echo:  M204 S900.00 T900.00
22:11:33.719 : echo: Advanced variables: S=Min feedrate (mm/s), T=Min travel feedrate (mm/s), B=minimum segment time (ms), X=maximum XY jerk (mm/s),  Z=maximum Z jerk (mm/s),  E=maximum E jerk (mm/s)
22:11:33.719 : echo:  M205 S0.00 T0.00 B20000 X20.00 Z20.00 E20.00
22:11:33.735 : echo: Home offset (mm):
22:11:33.735 : echo:  M206 X0.00 Y0.00 Z0.00
22:11:33.735 : echo: Endstop adjustment (mm):
22:11:33.735 : echo:  M666 X-1.46 Y-0.63 Z-1.19
22:11:33.735 : echo: Delta Geometry adjustment:
22:11:33.735 : echo:  M666 A-0.66 B0.36 C0.30 E-0.50 F-0.50 G0.00 R92.50 D216.00 H288.40 P0.00
22:11:33.735 : echo: PID settings:
22:11:33.735 : echo:   M301 P22.20 I1.08 D114.00

As you can see, the print is less than perfect. I will try to change the parameters to see what improves the print. I tried looking at the Printing Troubleshoot Guide, but it seems not to include such defects... Do note that I do not use a heated bed.
This print quality naturally is insufficient, also because the print head violently hits the misformed print product, cause all kinds of bad vibrations in the machine...
|
Re: Delta Printer bad prints February 19, 2015 05:15PM |
Registered: 9 years ago Posts: 113 |
I now tried out the following settings:
Note that the X,Y,Z,E parameters are much slower now (both feed rate as the acceleration). Sadly it does not solve the issue. The print nozzle even blocks because the pressure build up is too great. The vibrations are still there.
It seems to be caused because the extruder is extruding too much material. However, if I lower the E factor, nothing much happens. Also increasing the M92 H factor does not help, as this severely impacts the printing quality.
I will look further for potential parameters that I can change. I would imagine that:
For now, the printer will not work, as this vibration issue really is a show stopper. I hope to fix it over the weekend! :-)
22:56:29.659 : echo: Steps per unit:
22:56:29.659 : echo:  M92 X80.00 Y80.00 Z80.00 E120.00
22:56:29.659 : echo: Maximum feedrates (mm/s):
22:56:29.659 : echo:  M203 X250.00 Y250.00 Z250.00 E40.00
22:56:29.659 : echo: Maximum Acceleration (mm/s2):
22:56:29.675 : echo:  M201 X2000 Y2000 Z9000 E1200
22:56:29.675 : echo: Acceleration: S=acceleration, T=retract acceleration
22:56:29.675 : echo:  M204 S900.00 T900.00
22:56:29.675 : echo: Advanced variables: S=Min feedrate (mm/s), T=Min travel feedrate (mm/s), B=minimum segment time (ms), X=maximum XY jerk (mm/s),  Z=maximum Z jerk (mm/s),  E=maximum E jerk (mm/s)
22:56:29.675 : echo:  M205 S0.00 T0.00 B20000 X20.00 Z20.00 E20.00
22:56:29.690 : echo: Home offset (mm):
22:56:29.690 : echo:  M206 X0.00 Y0.00 Z0.00
22:56:29.690 : echo: Endstop adjustment (mm):
22:56:29.690 : echo:  M666 X-1.46 Y-0.63 Z-1.19
22:56:29.690 : echo: Delta Geometry adjustment:
22:56:29.690 : echo:  M666 A-0.66 B0.36 C0.30 E-0.50 F-0.50 G0.00 R92.50 D216.00 H288.40 P0.00
22:56:29.690 : echo: PID settings:
22:56:29.690 : echo:   M301 P22.20 I1.08 D114.00
Note that the X,Y,Z,E parameters are much slower now (both feed rate as the acceleration). Sadly it does not solve the issue. The print nozzle even blocks because the pressure build up is too great. The vibrations are still there.
It seems to be caused because the extruder is extruding too much material. However, if I lower the E factor, nothing much happens. Also increasing the M92 H factor does not help, as this severely impacts the printing quality.
I will look further for potential parameters that I can change. I would imagine that:
- I need to preserve the distance of the print nozzle to the bed (paper width with Z=0)
- I need to ensure that the bed is level at all places (checked within 0.2mm, and always lower than Z = 0)
- I need to limit (for now) the speed of the printer
For now, the printer will not work, as this vibration issue really is a show stopper. I hope to fix it over the weekend! :-)
|
Re: Delta Printer bad prints February 20, 2015 04:44AM |
Registered: 9 years ago Posts: 58 |
Quote
Stephanel
I tried decreasing the M666 Hxxx value by a few tens of millimeter, but this significantly worsened the print.
Try increasing Hxxx value so the nozzle moves closer to the bed. Print one layer of test print with maybe 3 perimeters, no infill. If the first layer perimeter is equal to or thicker than what you set in your slicer, the nozzle is still too high. Increase Hxxx a bit more until the first layer is slightly thinner than the set value. Then your H is set correctly.
Edited 1 time(s). Last edit at 02/20/2015 04:52AM by boksbox.
|
Re: Delta Printer bad prints February 20, 2015 03:56PM |
Registered: 9 years ago Posts: 11 |
I assume you have your belts tensioned correctly?
If your belts are too floppy it will cause all sorts of issues.
( I ignored belt tensions on my kossel for a while because I thought if the belts are not skipping that is good enough but then I properly tensioned my loose belts and print quality improved 100%, no more dragging over printed lines etc)
I added a set of these to my kossel to tension the belts and it is probably the biggest improvement in print quality I have seen with my printer so far.
[www.thingiverse.com]
|
Re: Delta Printer bad prints February 20, 2015 04:13PM |
Registered: 9 years ago Posts: 569 |
|
Re: Delta Printer bad prints February 20, 2015 09:27PM |
Registered: 10 years ago Posts: 27 |
Going back to your original prints, to me, it looked like you were printing with too little filament. As already indicated, you'll need to ensure your extruder is calibrated (meaning when you tell the printer to feed 10mm of filament, the stepper actually feeds exactly 10mm) . And, you need to measure the diameter of your filament. Yes, I know it's supposed to be 1.75mm, but sometimes it's thicker, sometimes thinner. Put the actual measurement in your slicing program, and then you can usually add/subtract some percentage for fine tuning.
As to the latest image, I agree that it looks like your mechanical setup has a lot of slop in it somewhere. The direction changes are not crisp.
HTH
Dave
As to the latest image, I agree that it looks like your mechanical setup has a lot of slop in it somewhere. The direction changes are not crisp.
HTH
Dave
|
Re: Delta Printer bad prints February 20, 2015 10:37PM |
Registered: 9 years ago Posts: 58 |
Quote
lokidude
I assume you have your belts tensioned correctly?
If your belts are too floppy it will cause all sorts of issues.
( I ignored belt tensions on my kossel for a while because I thought if the belts are not skipping that is good enough but then I properly tensioned my loose belts and print quality improved 100%, no more dragging over printed lines etc)
I added a set of these to my kossel to tension the belts and it is probably the biggest improvement in print quality I have seen with my printer so far.
[www.thingiverse.com]
This is what I made for my Kossel Mini.
[www.thingiverse.com]
|
Re: Delta Printer bad prints February 22, 2015 02:59AM |
Registered: 9 years ago Posts: 569 |
|
Re: Delta Printer bad prints February 22, 2015 07:04AM |
Registered: 9 years ago Posts: 113 |
Hey all!
Thanks for all your input! Following your advises, I have spent the better part of this weekend trying to increase the accuracy of my prints.
I tried to do this, but to ensure that I can set the height to the maximum, I had to have a perfect level bed. That proved to be quite challenging...
Great tip! I used this one, as my printer was not accurate enough to print the tensioner from boksbox. Before, I used simple tension springs, but you cannot adjust these. I though they were set sufficiently strong, but apparently I could still signficantly increase the tension using these tensioners. After a while, I noticed that the movement of the carriages was more difficult, because the belts were too tight. That was the point to which I increased the tension.
I will probably move to modify the mounts of my motors, so that I can slide them into place and tension the belts accordingly. Also, I will change my carriages to enable easier mounting of the belts.
The filament extrusion is kinda odd. I had set it perfectly (extrude 10mm would move the filament 10mm), but that did not extrude well (too little material in the product). Then I increased the material extrusion per mm and things improved.
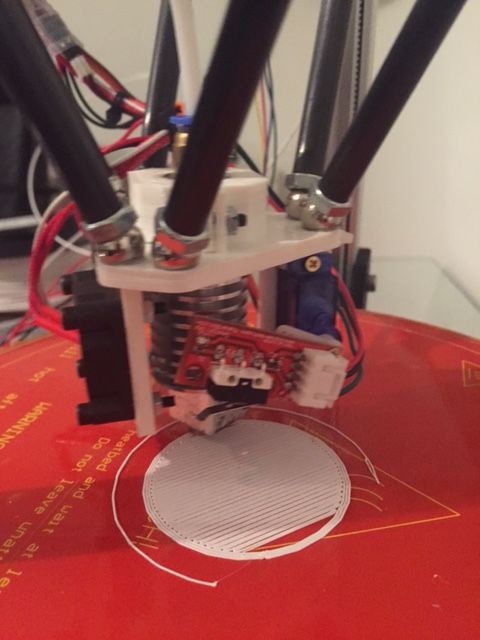
Now, back to the test product. This is the result I get now:
I have indicated some defects:
I continue my tests hoping to get to an acceptable print quality!
Edited 2 time(s). Last edit at 02/22/2015 08:03AM by Stephanel.
Thanks for all your input! Following your advises, I have spent the better part of this weekend trying to increase the accuracy of my prints.
Quote
boksbox
Try increasing Hxxx value so the nozzle moves closer to the bed. Print one layer of test print with maybe 3 perimeters, no infill. If the first layer perimeter is equal to or thicker than what you set in your slicer, the nozzle is still too high. Increase Hxxx a bit more until the first layer is slightly thinner than the set value. Then your H is set correctly.
I tried to do this, but to ensure that I can set the height to the maximum, I had to have a perfect level bed. That proved to be quite challenging...
Quote
lokidude
I assume you have your belts tensioned correctly?
If your belts are too floppy it will cause all sorts of issues.
( I ignored belt tensions on my kossel for a while because I thought if the belts are not skipping that is good enough but then I properly tensioned my loose belts and print quality improved 100%, no more dragging over printed lines etc)
I added a set of these to my kossel to tension the belts and it is probably the biggest improvement in print quality I have seen with my printer so far.
[www.thingiverse.com]
Great tip! I used this one, as my printer was not accurate enough to print the tensioner from boksbox. Before, I used simple tension springs, but you cannot adjust these. I though they were set sufficiently strong, but apparently I could still signficantly increase the tension using these tensioners. After a while, I noticed that the movement of the carriages was more difficult, because the belts were too tight. That was the point to which I increased the tension.
I will probably move to modify the mounts of my motors, so that I can slide them into place and tension the belts accordingly. Also, I will change my carriages to enable easier mounting of the belts.
Quote
triplanedave
Going back to your original prints, to me, it looked like you were printing with too little filament. As already indicated, you'll need to ensure your extruder is calibrated (meaning when you tell the printer to feed 10mm of filament, the stepper actually feeds exactly 10mm) . And, you need to measure the diameter of your filament. Yes, I know it's supposed to be 1.75mm, but sometimes it's thicker, sometimes thinner. Put the actual measurement in your slicing program, and then you can usually add/subtract some percentage for fine tuning.
As to the latest image, I agree that it looks like your mechanical setup has a lot of slop in it somewhere. The direction changes are not crisp.
The filament extrusion is kinda odd. I had set it perfectly (extrude 10mm would move the filament 10mm), but that did not extrude well (too little material in the product). Then I increased the material extrusion per mm and things improved.
Now, back to the test product. This is the result I get now:

I have indicated some defects:
- Here I stopped the print.
- These are the start points per layer but also places where the printer briefly stopped because the RAMPS board could not follow the print speed. This can only be fixed by lowering the print speed or changing to a Duet or similar platform.
- These ridges are formed as the nozzle pushed the previous layer a bit up. I am unsure how to fix this, because I risk getting voids if I increase the distance between the lines.
- These bulging areas is plastic coming loose from the bed. I think I can only minimize this by using a heated bed.
- Here I drastically decreased the print speed. You can see that the next lines are a bit thicker, resulting again in worse ridges.
- Difficult to see on the picture, but these are small empty spaces. This is caused by the fact that my nozzle is 0.4mm, and the diameter of the circle is not a multiple of that (50mm) at those positions.
- Currently I use a RAMPS 1.4 board. Apparently, the Duet is better able to approximate circles than my board is. I will see the difference once I use the Duet.
I continue my tests hoping to get to an acceptable print quality!
Edited 2 time(s). Last edit at 02/22/2015 08:03AM by Stephanel.
|
Re: Delta Printer bad prints February 22, 2015 08:02AM |
Registered: 9 years ago Posts: 113 |
Hi!
In answer to the remark of triplanedave, I have reset the extruder feed parameter
M92 E90.9
This to ensure that the correct amount of filament is put into the hot end. I set this before to E120 to ensure that the lines would tough eachother. Now that I have changed this many settings and parameters (tension of belts, perfect alignment of towers, bed leveling, ...), it was indeed a good idea to revisit this parameter.
So after changing the parameter, what were the results?
So, again some progress. Given that I come from:
I am already quite happy. But we still can improve!
In answer to the remark of triplanedave, I have reset the extruder feed parameter
M92 E90.9
This to ensure that the correct amount of filament is put into the hot end. I set this before to E120 to ensure that the lines would tough eachother. Now that I have changed this many settings and parameters (tension of belts, perfect alignment of towers, bed leveling, ...), it was indeed a good idea to revisit this parameter.
So after changing the parameter, what were the results?

- This is when I stopped the print.
- You still see the dots in at the border. This definitely is because my board cannot cope with the print speed.
- This was a blob attached to my nozzle when it started printing. This worsened the print locally, but has nothing to do with the changed E setting.
- You can see that the lines are finer, and they do not overlap. The problem now is that they not always perfectly touch. This I can probably fix by slightly increasing the E parameter.
- Also note that the lines are very nicely parallel.
- The gaps are now much more pronounced. This again is because the circle at these positions is not a multiple of the nozzle diameter (0.4mm).
- The linearisation of the circle circumflex naturally has not disappeared.
So, again some progress. Given that I come from:

I am already quite happy. But we still can improve!
|
Re: Delta Printer bad prints February 22, 2015 08:10AM |
Registered: 10 years ago Posts: 14,672 |
I'm a little puzzled by the references to add-on belt tensioning devices for the Mini Kossel, because my kit from Think3DPrint3D came with belt tensioning screws at the top of the towers. See [docs.google.com].
If you do switch to the Duet, you may find my blog entry here [miscsolutions.wordpress.com] useful.
To give an idea of how he auto calibration converges, here is an extract from the log displayed in the web interface. At the bottom, I have reset the endstop corrections to zero, the delta radius to the value used by T3P3 (which turns out to be nearly 2mm too high) and the homed height to 234mm. It takes 2 iterations to converge to 0.1mm error, and after 3 iterations it's giving consistent results to within about 0.02mm.
The values (in particular, homed height) change somewhat depending on hot end and bed temperature, which is not surprising.
The G32 auto calibration operation currently does just 1 iteration and takes 35 seconds. I'll probably change the G32 macro file to do 2 iterations instead of just one, which will save some time as the probe will only need to be deployed and retracted once.
Edited 1 time(s). Last edit at 02/22/2015 09:15AM by dc42.
Large delta printer [miscsolutions.wordpress.com], E3D tool changer, Robotdigg SCARA printer, Crane Quad and Ormerod
Disclosure: I design Duet electronics and work on RepRapFirmware, [duet3d.com].
Quote
Stephanel
Currently I use a RAMPS 1.4 board. Apparently, the Duet is better able to approximate circles than my board is. I will see the difference once I use the Duet.
If you do switch to the Duet, you may find my blog entry here [miscsolutions.wordpress.com] useful.
To give an idea of how he auto calibration converges, here is an extract from the log displayed in the web interface. At the bottom, I have reset the endstop corrections to zero, the delta radius to the value used by T3P3 (which turns out to be nearly 2mm too high) and the homed height to 234mm. It takes 2 iterations to converge to 0.1mm error, and after 3 iterations it's giving consistent results to within about 0.02mm.
Quote
12:45:22 G32
Endstops X0.23 Y0.16 Z-0.39, radius 104.68, height 234.35
12:39:41 G32
Endstops X0.23 Y0.17 Z-0.40, radius 104.67, height 234.35
12:39:06 G32
Endstops X0.24 Y0.18 Z-0.41, radius 104.67, height 234.33
12:38:30 G32
Endstops X0.30 Y0.21 Z-0.51, radius 104.74, height 234.33
12:37:48 G32
Endstops X0.35 Y0.23 Z-0.58, radius 105.17, height 234.48
12:36:47 M666
Endstop adjustments X0.00 Y0.00 Z0.00
12:36:43 M665
Delta diagonal: 215.00, delta radius: 106.50, homed height: 234.00, bed radius: 85.000000
The values (in particular, homed height) change somewhat depending on hot end and bed temperature, which is not surprising.
The G32 auto calibration operation currently does just 1 iteration and takes 35 seconds. I'll probably change the G32 macro file to do 2 iterations instead of just one, which will save some time as the probe will only need to be deployed and retracted once.
Edited 1 time(s). Last edit at 02/22/2015 09:15AM by dc42.
Large delta printer [miscsolutions.wordpress.com], E3D tool changer, Robotdigg SCARA printer, Crane Quad and Ormerod
Disclosure: I design Duet electronics and work on RepRapFirmware, [duet3d.com].
|
Re: Delta Printer bad prints February 22, 2015 08:43AM |
Registered: 9 years ago Posts: 113 |
Hey Doug
thanks for the info. Currently, my machine is nicely calibrated and indeed, I only need one or two iterations. Given that I keep on tweaking, I still have to recalibrated often.
As for the tensioning, I designed the machine myself, and I neglected to add tensioning screws. That's something I will definitely add next time!
Also, I had problems with keeping the belt pulley at the top in position. It is put on a M4 bolt with some teflon. But it moves away from its perfect position. i could only add a stopper to the other end to ensure it stayed in (almost) the same position... Not sure how this is fixed in other machines...

|
Re: Delta Printer bad prints February 22, 2015 10:37AM |
Registered: 9 years ago Posts: 58 |
Quote
Stephanel
( B ) These are the start points per layer but also places where the printer briefly stopped because the RAMPS board could not follow the print speed. This can only be fixed by lowering the print speed or changing to a Duet or similar platform.
You don't need to upgrade your electronics yet. I also use RAMPS. At first I had this problem too. In your firmware, try to reduce DELTA_SEGMENTS_PER_SECOND to 80. (default is 200) Some people go as low as 50.
You can print at normal speed.
also I follow this guide especially E Steps Fine Tuning here > [reprap.org]
Edited 1 time(s). Last edit at 02/22/2015 11:09AM by boksbox.
|
Re: Delta Printer bad prints February 22, 2015 10:46AM |
Registered: 9 years ago Posts: 113 |
Quote
vreihen
Quote
Stephanel
Can it be that there is some kind of buffer issue if you print too fast? It seems that my printer can follow quite well, but still it blocks every once in a while (= a few times per layer) for about 100-400msec or so. It seems to wait for a commands from the PC.
Maybe something to do with the baudrate (set to 250000)?
Do you have the option to print from an SD card? Do you have a GLCD connected? Unless you can see the USB buffering stats, I'm inclined to think that you are maxing out an 8-bit controller with delta calculations. There's a reason why delta printer owners are leading the charge to 32-bit electronics, like Smoothie, Duet, RADDS, etc.....
I have found myself an SD card reader for the RAMPS. Sadly, it does not help the stuttering of the printing. The RAMPS apparently is not able to print fluently in Delta (at least not for a circle), unless I decrease the speed significantly. So, in the end, an upgrade to 32-bit electronics will be required...
|
Re: Delta Printer bad prints February 22, 2015 11:37AM |
Registered: 9 years ago Posts: 113 |
Quote
boksbox
Quote
Stephanel
( B ) These are the start points per layer but also places where the printer briefly stopped because the RAMPS board could not follow the print speed. This can only be fixed by lowering the print speed or changing to a Duet or similar platform.
You don't need to upgrade your electronics yet. I also use RAMPS. At first I had this problem too. Try to reduce DELTA_SEGMENTS_PER_SECOND to 80. (default is 200) Some people go as low as 50.
You can print at normal speed.
also I follow this guide especially E Steps Fine Tuning here > [reprap.org]
Hey!
Good point! Great tip! Didn't change this value too much. Now it also prints much faster. That fast that my Bowden extruder cannot follow anymore, so I had to slow it down :-) Now, there are no issues at the border anymore, and quite frankly, I do not see much difference in the accuracy...
|
Re: Delta Printer bad prints February 22, 2015 12:28PM |
Registered: 9 years ago Posts: 58 |
Quote
Stephanel
Hey!
Good point! Great tip! Didn't change this value too much. Now it also prints much faster. That fast that my Bowden extruder cannot follow anymore, so I had to slow it down :-) Now, there are no issues at the border anymore, and quite frankly, I do not see much difference in the accuracy...
Don't slow it down. Adjust E Steps using guide.

|
Re: Delta Printer bad prints February 22, 2015 03:24PM |
Registered: 9 years ago Posts: 113 |
|
Re: Delta Printer bad prints February 22, 2015 11:34PM |
Registered: 9 years ago Posts: 58 |
Quote
Kurzaa
Question, how do you know how tight the tension needs to be?
There are complex engineering formulas for this but I'm too lazy. My reference is my inkjet printer. I check the tension of the belt driving the printhead. I believe the engineers at Canon and Epson already did the math and any tighter than that would already be too much.
I don't tighten my GT2 belts as much but I make sure they don't flop around loose either. I observe the belt from above while it is printing (under dry run) fast honeycomb patterns. When it is no longer vibrating like a plucked guitar string, I add a wee bit more tension for good measure while being careful not to go tighter than the inkjet belt tension.
I'm happy with the prints and confident that I didn't add any unnecessary stress on my drive system.
|
Re: Delta Printer bad prints February 24, 2015 03:15PM |
Registered: 9 years ago Posts: 113 |
I continued the discussion in a second thread about calibration for ABS printing with a heated bed.
My print now looks like this:
Thanks to all for your great input!
Edited 1 time(s). Last edit at 02/24/2015 03:16PM by Stephanel.
My print now looks like this:

Thanks to all for your great input!
Edited 1 time(s). Last edit at 02/24/2015 03:16PM by Stephanel.
|
Re: Delta Printer bad prints February 24, 2015 04:18PM |
Registered: 9 years ago Posts: 113 |
|
Re: Delta Printer bad prints February 25, 2015 01:29PM |
Registered: 9 years ago Posts: 569 |
Quote
Stephanel
I continued the discussion in a second thread about calibration for ABS printing with a heated bed.
My print now looks like this:
[attachment 49959 PLAResult.jpg]
Thanks to all for your great input!
Glad to hear. Now could you come over and fix mine?
|
Re: Delta Printer bad prints February 25, 2015 06:38PM |
Registered: 9 years ago Posts: 189 |
In my case lose endstops at the top caused printing problem for a while.
Calibrations need to be done properly:
Stepper motor current calibration
Center of bed, the Z height
Leveling the bed
Dimensional calibration
Extruder feed rate
Temperature calibration for the filament type, i.e. 1.75 mm PLA
Flow rate
Enclosure improves the printing quality greatly too.
Calibrations need to be done properly:
Stepper motor current calibration
Center of bed, the Z height
Leveling the bed
Dimensional calibration
Extruder feed rate
Temperature calibration for the filament type, i.e. 1.75 mm PLA
Flow rate
Enclosure improves the printing quality greatly too.

Sorry, only registered users may post in this forum.