almost working
Posted by DrDoggy
|
almost working December 08, 2015 11:00AM |
Registered: 8 years ago Posts: 31 |
I think i got everything working now! and i am able to do small prints, but with larger prints I get curving after about 1-2cm tall where the print starts to curl up , then gets stuck on the nozzel and with enough force lifts off the bed and ruins the print . ( it is sticking ok on first layers)
so far my solution is to pause the print, warm it with a heat gun, then press it back down with a small screwdriver, but i dont like this very much....
One thing I read is to create a heat enclosure for the bed, but will this work enough, any thing else i can try?
so far my solution is to pause the print, warm it with a heat gun, then press it back down with a small screwdriver, but i dont like this very much....
One thing I read is to create a heat enclosure for the bed, but will this work enough, any thing else i can try?
|
Re: almost working December 08, 2015 12:17PM |
Registered: 10 years ago Posts: 14,672 |
What material are you printing with: PLA, ABS, or something else? Is the curl up happening just on overhangs, or more generally?
Large delta printer [miscsolutions.wordpress.com], E3D tool changer, Robotdigg SCARA printer, Crane Quad and Ormerod
Disclosure: I design Duet electronics and work on RepRapFirmware, [duet3d.com].
Large delta printer [miscsolutions.wordpress.com], E3D tool changer, Robotdigg SCARA printer, Crane Quad and Ormerod
Disclosure: I design Duet electronics and work on RepRapFirmware, [duet3d.com].
|
Re: almost working December 08, 2015 01:23PM |
Registered: 8 years ago Posts: 31 |
abs, its like a rectangle about the size of a hotdog, it is folding up to the shape of a bow, so the center is flat on the bed but all corners are 5mm off the ground
It does not happen till after about 10 layers or so, turning down the temp on the bed made it worse, temp on bed struggles to hold at 110 celcius, so turning it up isnt an option
It does not happen till after about 10 layers or so, turning down the temp on the bed made it worse, temp on bed struggles to hold at 110 celcius, so turning it up isnt an option
|
Re: almost working December 08, 2015 01:35PM |
Registered: 8 years ago Posts: 197 |
Quote
DrDoggy
abs, its like a rectangle about the size of a hotdog, it is folding up to the shape of a bow, so the center is flat on the bed but all corners are 5mm off the ground
It does not happen till after about 10 layers or so, turning down the temp on the bed made it worse, temp on bed struggles to hold at 110 celcius, so turning it up isnt an option
Picutre of printer.
Does your hot end fan blow on the heat bed?
ABS doesnt need a layer fan like pla.
|
Re: almost working December 08, 2015 01:46PM |
Registered: 8 years ago Posts: 31 |
|
Re: almost working December 08, 2015 02:41PM |
Registered: 10 years ago Posts: 14,672 |
Warping is hard to avoid with ABS unless you have a heated chamber. Try printing with PLA instead, it's easier. Or PETG. If for some reason you must use ABS, here are a few tips:
1. Ensure that the hot end cooling fan is only blowing through the cooling fins of the hot end. Make sure it isn't blowing on the print as well. Also check for backwash from the fan, and if there is any, use a fan inlet duct to prevent it.
2. Shield the printer from draughts.
3. Use a bed temperature of 100-110C, and use ABS juice or similar on the bed to improve adhesion.
4. I made a makeshift heated enclosure by putting two plastic bags over the whole printer, and this greatly improved my ABS prints. If you do this, make sure the electronics is kept cool.
Large delta printer [miscsolutions.wordpress.com], E3D tool changer, Robotdigg SCARA printer, Crane Quad and Ormerod
Disclosure: I design Duet electronics and work on RepRapFirmware, [duet3d.com].
|
Re: almost working December 08, 2015 05:13PM |
Registered: 8 years ago Posts: 197 |
Quote
DrDoggy
I have been leaving the cooling fan off with no results, will get pics tonite
(layer fan?) you mean the fan that cools extruder heat sink?
No.
There is normally a fan that blows on the heat sink. That fan should be on all the time or else the filament will jam in the heatsink.
Layer fans are fan that are pointed at the nozzle or the bed. There use to cool the filament as it exits the hotend.
This helps with printing bridges, over hang. And cools pla so your print doesnt start to melt due to to much heat held inside.
What i am asking.
Is does your heat sink fan blow on the bed? Or is there a layer fan that is turn on?
|
Re: almost working December 09, 2015 11:13AM |
Registered: 9 years ago Posts: 346 |
You don't need heated-enclosure for normal ABS printing.
(1) Increase the Z-length by 0.2 (printer settings). and set the first layer bed height to 0.3 (slicer settings).
This will push your nozzle closer to the bed. Do this even if you think you have perfect bed alignment. This will "trick" the printer into really pushing the first print layers onto the bed.
Have a look at these images to understand. To a very rough first approximation, the more pushed into the bed the better bed adhersion. But at a cost of print quality. But get your printer working, then you can start making better print.
(2) Increase the hotend temperature by 7 deg C.
(3) Spray the bed with hairspray. A thin layer after heatup and just before printer starts. Don't start with ABS juice, if you can't make it stick just with hairspray, it is because you are doing something wrong.
|
Re: almost working December 10, 2015 08:45AM |
Registered: 8 years ago Posts: 31 |
only one fan.... got a pic so i can see what i need to get?
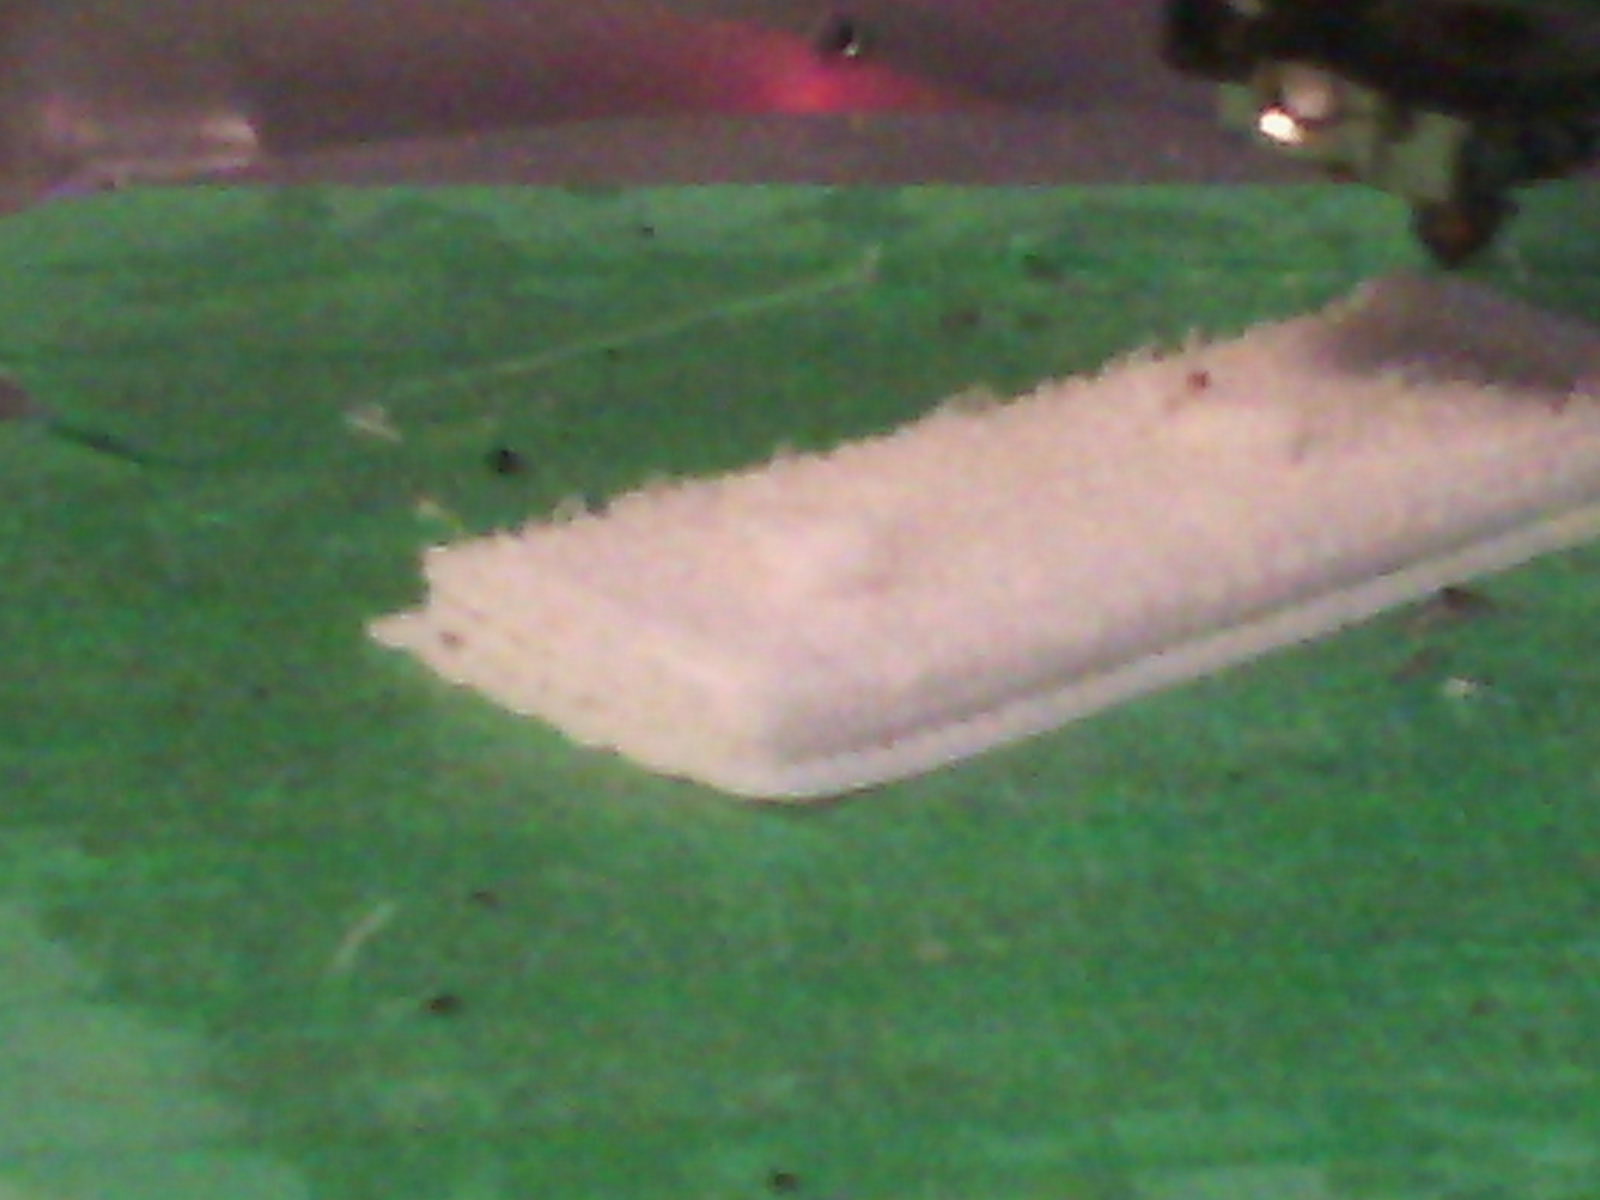
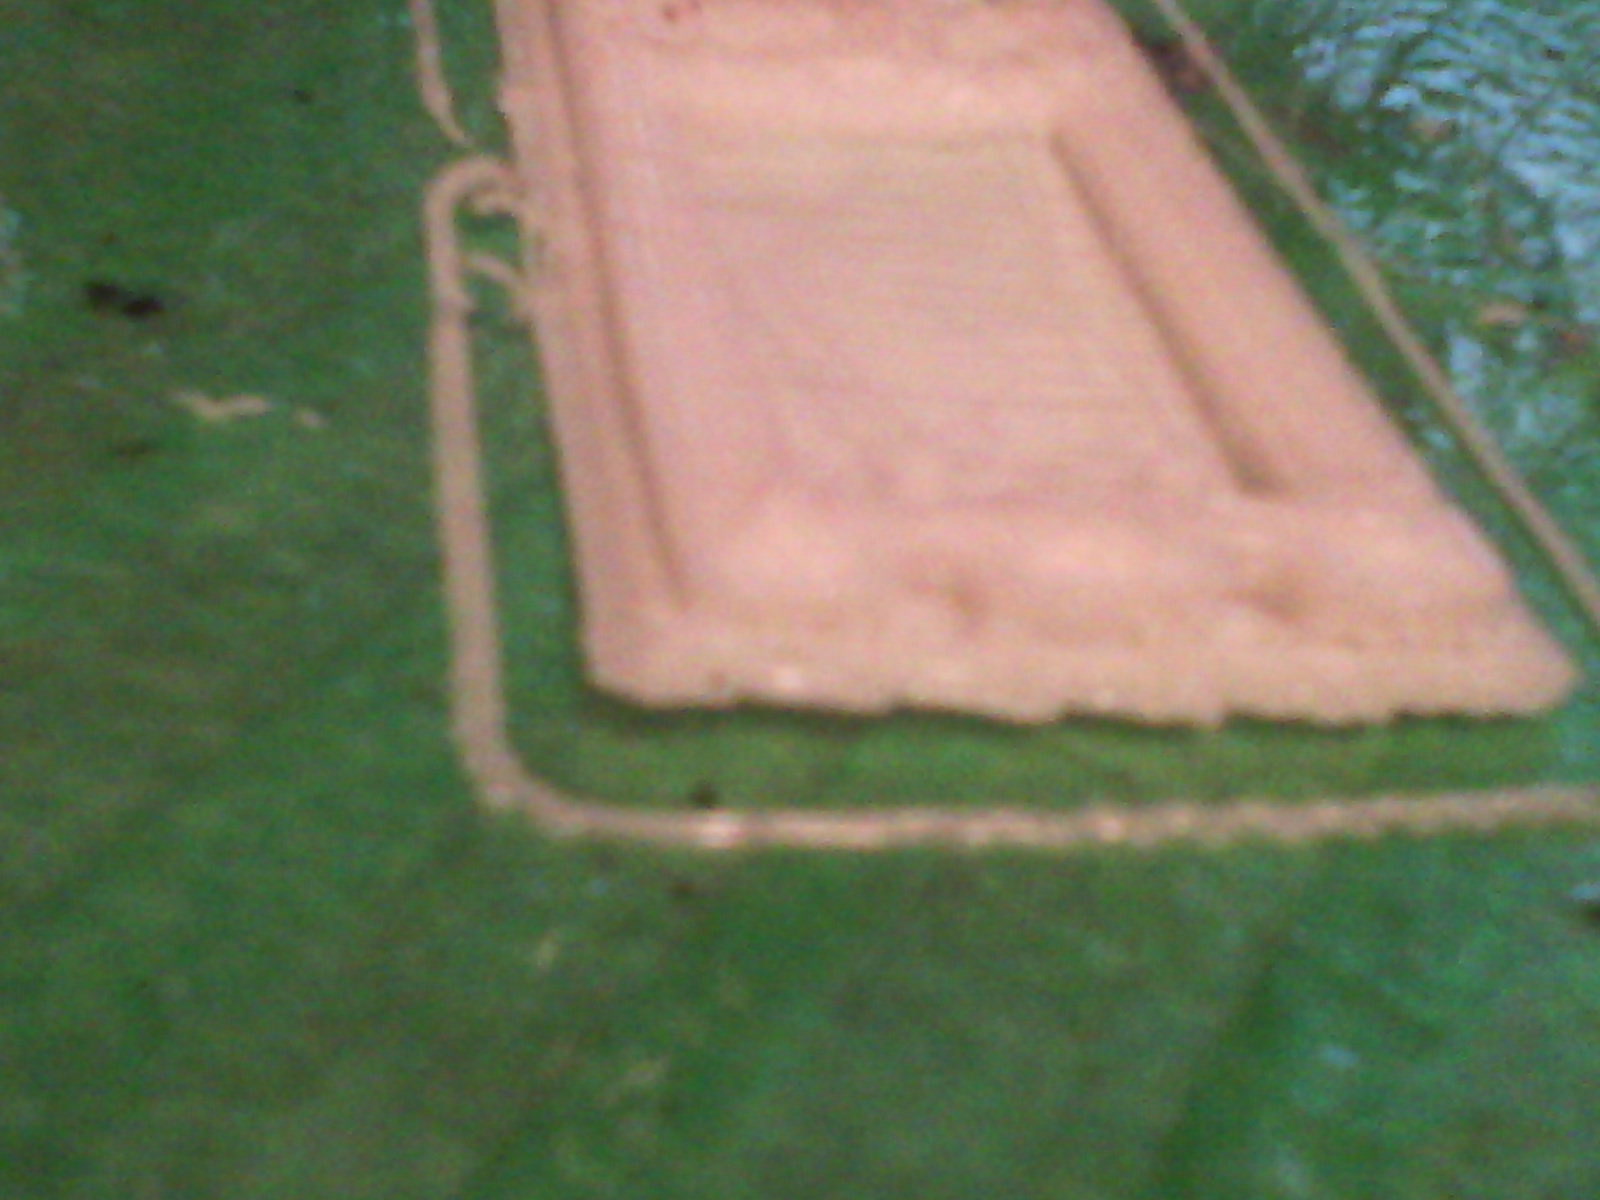
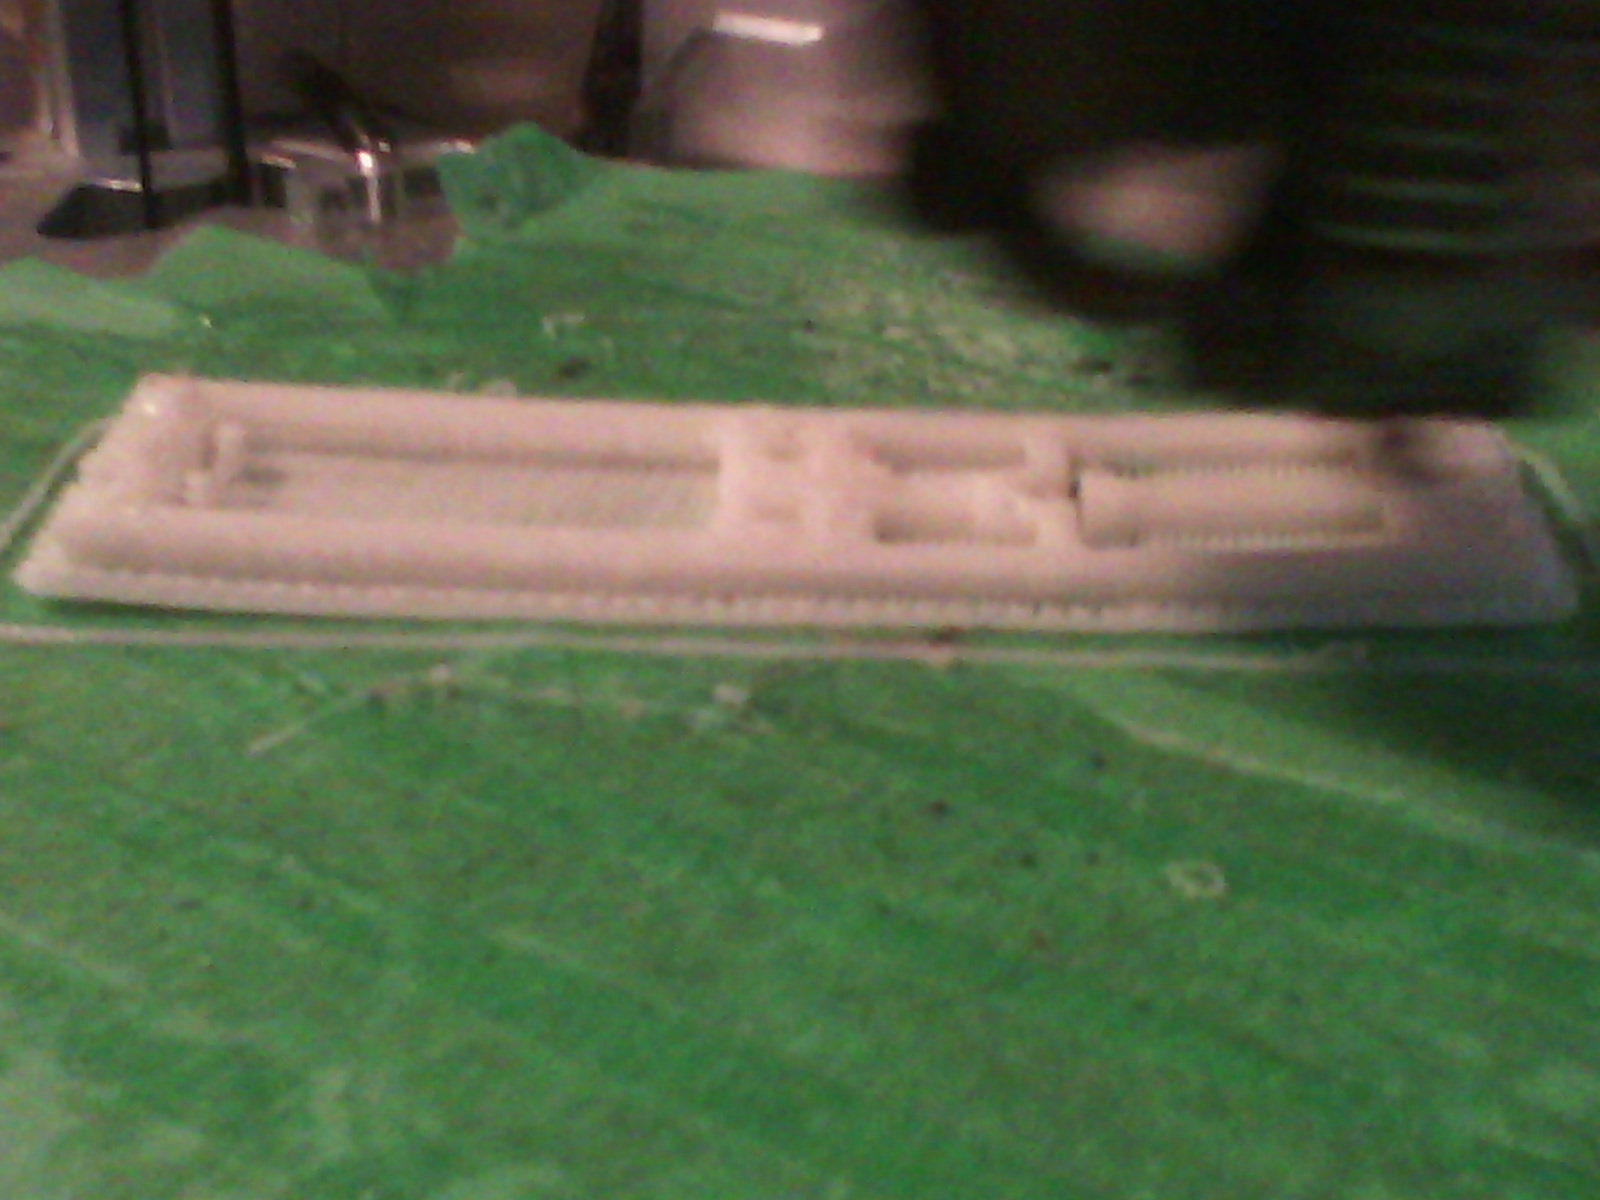
first layer prints fine, im using kapton tape and hot glue until i get some hairspray, works ok but leaves sticky layer on bottom which i dont mind for now since i pull first layer off anyway, but watch as it builds up, you will see it gradually warp. first two pics you can see the shadow where it starts to curl, in third pic you can really see the warp, after a few more layers the curve lifts enough to get caught in the nozzel and with the warp and it no longer sticking to the bed, shifts the print out of place and ruins.
if i catch it in time i can pause print , use heat gun to smoothen flat , then thick layer of hot glue around the short edges for adhesion, then i turn off bed completely let hot glue cool and continue print OK (as long as the print is thick enough), however this is not ideal for several reasons.
I had successful print the other day, not sure why, was a bit warm that day, but would +10/20 degrees in room temp really have that much impact, i will try full enclosure next....
Edited 1 time(s). Last edit at 12/10/2015 08:49AM by DrDoggy.
|
Re: almost working December 10, 2015 09:10AM |
Registered: 8 years ago Posts: 31 |
|
Re: almost working December 10, 2015 11:36AM |
Registered: 9 years ago Posts: 346 |
Quote
DrDoggy
only one fan.... got a pic so i can see what i need to get?
first layer prints fine, im using kapton tape and hot glue until i get some hairspray, works ok but leaves sticky layer on bottom which i dont mind for now since i pull first layer off anyway, but watch as it builds up, you will see it gradually warp. first two pics you can see the shadow where it starts to curl, in third pic you can really see the warp, after a few more layers the curve lifts enough to get caught in the nozzel and with the warp and it no longer sticking to the bed, shifts the print out of place and ruins.
if i catch it in time i can pause print , use heat gun to smoothen flat , then thick layer of hot glue around the short edges for adhesion, then i turn off bed completely let hot glue cool and continue print OK (as long as the print is thick enough), however this is not ideal for several reasons.
I had successful print the other day, not sure why, was a bit warm that day, but would +10/20 degrees in room temp really have that much impact, i will try full enclosure next....
You are doing a number of things wrong:
1) Remove the Kapton tape if you have glass underneath. It does not help you. Get some hairspray. You can't seriously be thinking of making an enclosure before applying the number one solution for ABS printing (?). Inform if you have a different material then glass underneath.
2) Your fan needs to be ducted. Not like it is now. You can find a fan duct of your liking on Thingiverse and print that.
3) Your first layer is not OK. Do as I said. But maybe just lower the nozzle by 0.15 and set first layer height as 0.3
|
Re: almost working December 10, 2015 11:43AM |
Registered: 9 years ago Posts: 346 |
I should also mention that when doing the model you are showing in the photos, you don't need to let it finish. As soon as any corner lifts from the bed you might as well stop and start over. That model you are doing should be able to print flawless if you have a heated bed. And also 10 degree higher room temperature can make the difference. Yes.
|
Re: almost working December 10, 2015 01:41PM |
Registered: 8 years ago Posts: 31 |
bed is metal/steel,
will duct fan, np, found some i like already
should i get other fan, also if i understand it should point at tip of nozzel , or top layer of plastic, but not at bed?
i dont let finish, i pause flatten and continue...but not a good thing to do... each print is getting better as i resolve settings for now i dont mind a little sloppy , more concerned with all the plastic i have wasted.
Also I should highlight that first layer does stay flat until i get to z=3mm which is when first pic is taken(pls re-confirm , and i will post a pic tonite)
bed struggles to hold 107degrees, maybe there is somthing additional i can get? ... first i will see if enclosure works...
basement is cold, i feel we maybe right about enclosure, will try that next, any ideas of something more perminate, like with a door so i can get in and out easier?
I fear adjusting levels, i set up bed so it spreads perfect, but will try adjusting first layer height .
""That model you are doing should be able to print flawless if you have a heated bed. And also 10 degree higher room temperature can make the difference. Yes. ""
--thanks i will strive to retain every degree then!
|
Re: almost working December 10, 2015 03:09PM |
Registered: 8 years ago Posts: 197 |
|
Re: almost working December 10, 2015 04:28PM |
Registered: 9 years ago Posts: 346 |
Quote
DrDoggy
bed is metal/steel,
I have no experience with that, so I will let someone else be smart about if you should continue with Kapton tape or no.
Quote
DrDoggy
should i get other fan, also if i understand it should point at tip of nozzel , or top layer of plastic, but not at bed?
You should under no circumstance be blowing anything at your print or your bed or you nozzle tip. The only part that you should be cooling is the cooling ribs of your hotend.
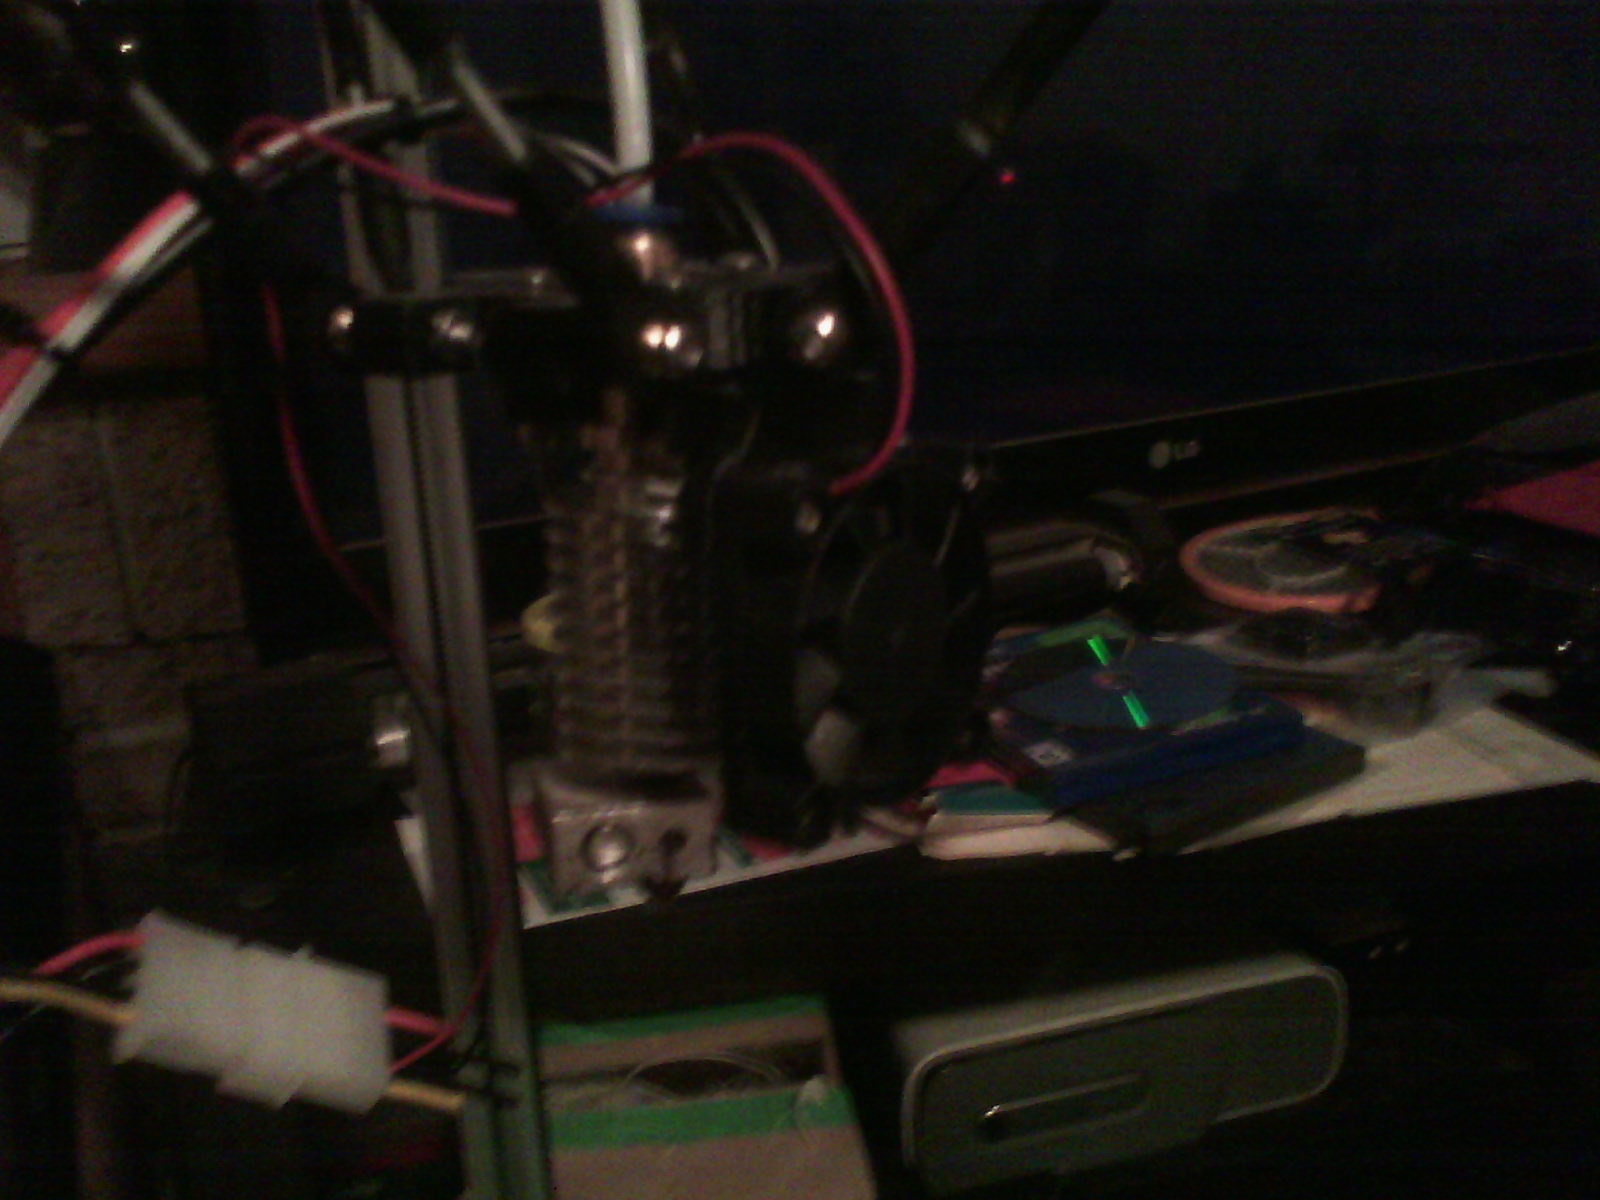
You can see my hotend by following this link - See how my hotend is entirely enclosed and I even have the airflows directed upwards. You want absolutely zero moving air around your print. You will be OK for most parts if you just go with a normal ducting.
Finally, as Xile6 is also saying, your nozzle height is not OK. Don't be afraid to lower it those ~0.2 ish (as changed in "Max Z Height". You just change it in EEPROM and you can always change it back. It will not affect your bed alignment, only push the nozzle closer to the bed.
|
Re: almost working December 10, 2015 07:16PM |
Registered: 8 years ago Posts: 31 |
|
Re: almost working December 10, 2015 07:59PM |
Registered: 8 years ago Posts: 197 |
Yea change the z probe z height offset.Quote
DrDoggy
ok I will change it , thanks for all the great help guys!
but in regards to this , should i change the z probe offset value?
OR (should i say)
does the g29 code actually autolevel and reset the base location in firmware?
I do the paper test first to find the offset in the center then i start with a test 20mm cube and watch the skirt and frist layer, then change the offset as needed.
You want a nice flat skirt and first layer
|
Re: almost working December 10, 2015 08:22PM |
Registered: 8 years ago Posts: 916 |
Quote
LarsK
(1) Increase the Z-length by 0.2 (printer settings). and set the first layer bed height to 0.3 (slicer settings).
This will push your nozzle closer to the bed. Do this even if you think you have perfect bed alignment. This will "trick" the printer into really pushing the first print layers onto the bed.
Have a look at these images to understand. To a very rough first approximation, the more pushed into the bed the better bed adhersion. But at a cost of print quality. But get your printer working, then you can start making better print.
I strongly disagree with doing things this way. You should set the first layer in your slicing software, rather than miscalibrating your machine.
The way to get good squish on the first layer is to set your first layer extrusion width to be more than your nozzle width in your slicer. I'm having good results with 0.5-0.7mm while using a 0.4mm nozzle. Don't use a percentage, use a manual extrusion width.
The difference between our approaches is that setting this in your slicer will widen the distance between lines in the first layer, meaning the perfect amount of plastic will be extruded. Your print quality won't suffer.
Doing things by miscalibrating your first layer height will result in a lot of overextrusion, which looks ugly, squishes plastic around the edges of your print, and doesn't give as good an adhesion as just setting the first layer extrusion width properly. You said it yourself: at a cost of print quality. It doesn't have to be that way.
I hope this helps.
Edited 1 time(s). Last edit at 12/10/2015 08:22PM by nebbian.
|
Re: almost working December 10, 2015 10:09PM |
Registered: 8 years ago Posts: 28 |
You can put a large cardboard box upside down over your printer. Way cheap enclosure, and it helps. The best thing for you I think is a PEI bed. You can get 1/8 inch sheets from Grainger, but they are $80. You can go cheaper with a 1/32 inch sheet and laminate it to borosilicate glass, and the glass is around $15, plus $23 for the 1/32 PEI. ABS sticks to this stuff incredibly well, in fact if you really get your first layer pressed down into the PEI you can have trouble removing the print. When set up right you stop getting lifting corners and the object pops off the bed when the bed cools below 60 degrees C. I think it's worth the extra cost, which you get back with a lot fewer failed prints.
ABS curls because the higher layers cool off and shrink. The lowest layers are kept warm by the bed. An enclosure keeps the whole object warmer, so less shrinking / curling. Oh, all the prices I listed were for 300x300mm , or 12x12in
If you don't upgrade I would try ABS slurry, made by dissolving waste filament in acetone overnight, which make a sort of ABS glue, spread over the print surface before printing. If you decide to try that there is a lot of info already out there, or I can go into more detail.
David
|
Re: almost working December 11, 2015 05:56AM |
Registered: 9 years ago Posts: 346 |
Quote
nebbian
Quote
LarsK
(1) Increase the Z-length by 0.2 (printer settings). and set the first layer bed height to 0.3 (slicer settings).
This will push your nozzle closer to the bed. Do this even if you think you have perfect bed alignment. This will "trick" the printer into really pushing the first print layers onto the bed.
Have a look at these images to understand. To a very rough first approximation, the more pushed into the bed the better bed adhersion. But at a cost of print quality. But get your printer working, then you can start making better print.
I strongly disagree with doing things this way. You should set the first layer in your slicing software, rather than miscalibrating your machine.
The way to get good squish on the first layer is to set your first layer extrusion width to be more than your nozzle width in your slicer. I'm having good results with 0.5-0.7mm while using a 0.4mm nozzle. Don't use a percentage, use a manual extrusion width.
The difference between our approaches is that setting this in your slicer will widen the distance between lines in the first layer, meaning the perfect amount of plastic will be extruded. Your print quality won't suffer.
Doing things by miscalibrating your first layer height will result in a lot of overextrusion, which looks ugly, squishes plastic around the edges of your print, and doesn't give as good an adhesion as just setting the first layer extrusion width properly. You said it yourself: at a cost of print quality. It doesn't have to be that way.
I hope this helps.
Good points. I have no experience with that approach. I can't seem to find the option in Slic3r? But next time I need Cura I will see about it.
In this particular case I think that the general alignment is still a little off, if you look at the marked red circle here:

|
Re: almost working December 12, 2015 02:24PM |
Registered: 8 years ago Posts: 31 |
thnk guys, all these tidbits are really helping, and dev my understandings,
as for mucking firmware , this was a kit , so it was prolly never right anyway, and had to start fresh.
i also changed the z offset to get as close in there as it could but if i get any lower, its too low and blocks nozzle on the one side, but is still not spreading that flat thin on the other side,
so i re-evaluated my rod and offset values as well as took a closers look at some of the dimensions, for example i correctd my z-probe x,y offset and the increment value , and brought the anomolies in bed down to a range of 0.3mm, here is G29 results:
0.262 0.262 0.262 0.337 0.5 0.5 0.50
0.262 0.262 0.3 0.312 0.387 0.55 0.55
0.325 0.3 0.3 0.338 0.35 0.425 0.49
0.35 0.3 0.325 0.4 0.425 0.362 0.36
0.362 0.25 0.312 0.35 0.362 0.275 0.28
0.387 0.387 0.362 0.4 0.387 0.312 0.31
0.537 0.537 0.537 0.512 0.437 0.437 0.44
one thing that i cant figure out how to get out is how to get that u shape we are seeing across that one diagional (bottom left to top right), but again the g29 should resolve that , no?
Ima head off to the store now, get some acetone and a box, see if that help me any, will update post soon
|
Re: almost working December 12, 2015 07:03PM |
Registered: 8 years ago Posts: 197 |
Quote
DrDoggy
.....one thing that i cant figure out how to get out is how to get that u shape we are seeing across that one diagional (bottom left to top right), but again the g29 should resolve that , no?
Ima head off to the store now, get some acetone and a box, see if that help me any, will update post soon
G29 doesnt fix all that. If the printer isnt build correct or the information is off in the firmware, it will not move flat across the bed.
I had the carbon rods. I would do about 3 to 4 prints and then i would have problems. lifting comers or effector just not being flat.
Turns out my rods werent glued and the threads they made suck. So as the effector moved the rods would get longer and uneven.
New metal threaded rods and a recalibate fix that.
|
Re: almost working December 13, 2015 12:23AM |
Registered: 8 years ago Posts: 31 |
hmm, well used glue and a nail to align, still only 0.3 mm in the bed, shouldn't be a problem ? is there a way to make up for exclusively z-rods offset in the code?
so what does g29 exactly do , just diagnostic report? no calibration what so ever?, kinda misleading!
also! slury worked great! stuck right to the bed, when the curl happened it even pulled the tape off a bit, but the tape was able to resist enough to continue the print, also i am finding slurry globs makes great reinforcement when curles start. Thanks again!
Another thing that concerns me is the motor that feeds the filimant, it seemed to strip the material alot and i always had to brush it out, so what i did was added a reinforcement post to help the spring, just a notch, so now the motor skips a step when the filiment isnt feeding instead of stripping. but i hear it skip alot , right now i have it at 30mm/s to work does that sound like an ideal speed? would it be smrt to turn the extruder temperature up so it can push out faster?
|
Re: almost working December 13, 2015 03:45AM |
Registered: 10 years ago Posts: 14,672 |
Quote
DrDoggy
Another thing that concerns me is the motor that feeds the filimant, it seemed to strip the material alot and i always had to brush it out, so what i did was added a reinforcement post to help the spring, just a notch, so now the motor skips a step when the filiment isnt feeding instead of stripping. but i hear it skip alot , right now i have it at 30mm/s to work does that sound like an ideal speed? would it be smrt to turn the extruder temperature up so it can push out faster?
Reduce the motor current so that when the nozzle is obstructed, the motor skips steps instead of the extruder chewing the filament.
30mm/sec filament feed into the hot end is much faster than you need.
Large delta printer [miscsolutions.wordpress.com], E3D tool changer, Robotdigg SCARA printer, Crane Quad and Ormerod
Disclosure: I design Duet electronics and work on RepRapFirmware, [duet3d.com].
|
Re: almost working December 13, 2015 09:17AM |
Registered: 8 years ago Posts: 916 |
Quote
LarsK
Quote
nebbian
The way to get good squish on the first layer is to set your first layer extrusion width to be more than your nozzle width in your slicer. I'm having good results with 0.5-0.7mm while using a 0.4mm nozzle. Don't use a percentage, use a manual extrusion width.
Good points. I have no experience with that approach. I can't seem to find the option in Slic3r? But next time I need Cura I will see about it.
I use slic3r as well, the relevant setting is here:

|
Re: almost working December 13, 2015 01:23PM |
Registered: 9 years ago Posts: 346 |
Hey,
Thanks Nebbian - Learning everyday. Actually I am relearning. I realize now that I used that setting back when I made my own Delta and then I have gone and forgotten all about it
@ DrDoggy, at the risk of getting another telling off from Nebbian - You don't actually need there to be any extrusion everywhere on the first layer. Assuming your Delta is badly calibrated and you don't have any ways to fix it;
It is better to have zero extrusion on some spots but great contact on other spots, then it is to have extrusion everywhere but poor contact on some spots. This is because there is always a second layer. So even if you get zero extrusion on some areas of the bed on the first layer it will come by with a second layer and redo it. Meanwhile, if you do not get good bed-contact then that will never improve with the next layer.
If you do as DC instructs you, reduce the current so that the extruder just misses steps, then it will not harm anything that it does this in some areas of your first layer.
Obviously the above is a bit of cowboy method, but so is the slurry that you are using now and the z-offset you already made, so well -
What I'm saying, if you wanna print something even bigger and you start to have bed contact problems again, then you just go and double that "First layer" extrusion and reduce the Z-height offset a little more. While printing with that, you can order new rods
Thanks Nebbian - Learning everyday. Actually I am relearning. I realize now that I used that setting back when I made my own Delta and then I have gone and forgotten all about it
@ DrDoggy, at the risk of getting another telling off from Nebbian
- You don't actually need there to be any extrusion everywhere on the first layer. Assuming your Delta is badly calibrated and you don't have any ways to fix it;It is better to have zero extrusion on some spots but great contact on other spots, then it is to have extrusion everywhere but poor contact on some spots. This is because there is always a second layer. So even if you get zero extrusion on some areas of the bed on the first layer it will come by with a second layer and redo it. Meanwhile, if you do not get good bed-contact then that will never improve with the next layer.
If you do as DC instructs you, reduce the current so that the extruder just misses steps, then it will not harm anything that it does this in some areas of your first layer.
Obviously the above is a bit of cowboy method, but so is the slurry that you are using now and the z-offset you already made, so well -
What I'm saying, if you wanna print something even bigger and you start to have bed contact problems again, then you just go and double that "First layer" extrusion and reduce the Z-height offset a little more. While printing with that, you can order new rods
|
Re: almost working December 14, 2015 09:44AM |
Registered: 8 years ago Posts: 31 |
BANG, right on the head!
So that was my problem, my infill was set to 100% and extruder feed at 30mm/s, which was also the print speed i was using! Which is what i did earlier to try to compensate for a jamming problem i had(mostly a newb thing). Then excess fill was causing friction for my nozzle, and when it got to the higher layers the plastic was cooling enough on the bed so that the nozzle couldn't reheat it in time, causing a push on the model and eventually getting stuck and lifting!
Got my first half a$$ print to finish yesterday without any lifting what so ever!! but should be able to perfect next run.
any chance we could post the other slicer settings , i would like to see what you guys use for layers, infill , support and speed.
thanks again!
|
Re: almost working December 15, 2015 09:49AM |
Registered: 8 years ago Posts: 916 |
Quote
DrDoggy
Got my first half a$$ print to finish yesterday without any lifting what so ever!! but should be able to perfect next run.
any chance we could post the other slicer settings , i would like to see what you guys use for layers, infill , support and speed.
Good to hear that you're making progress. It can be frustrating when you've got a problem that's stopping you from making an acceptable print.
Here are my settings, for what they're worth. Note that I've only really tweaked the speeds here, the rest of the screens are close to stock. I'm reasonably happy with these settings for what I print most (small bricks, similar to lego pieces).
I used to think that using a raft was the best way to get good adhesion. But now that I know about the trick of using a wide extrusion on the first layer to get good squish, I much prefer to go without a raft. When you use a raft you end up with a stringy bottom layer on the piece, which isn't that great to look at.


Edited 1 time(s). Last edit at 12/15/2015 09:51AM by nebbian.
|
Re: almost working December 16, 2015 08:41AM |
Registered: 8 years ago Posts: 31 |
yes finally getting the butterflies now that i should have 2 months ago when i finished building, I just cant believe the new low in customer care that this company provided, they had good build instructions , but no usage instructions. I really appreciate your guys help for picking up that slack. As a newb I would have been lost!
lol, I was just noticing sloppy raft layer too, i think i will turn mine off as well. I think i will order more rods, also my next question was can i get a 1mm tip, I see by the settings that i can!
btw.. is 40-60mm/s the fastest i should go? ,, even with my 4mm tip?
also what software do we use for designing 3d models? so far i have been using autodesk inventor. which works pretty good, but just wondering about other popular options?
so now that i got it all together , lets take it all apart...!!
1) Already i want to create attachments to my print head, was thinking about adding one of these first:
[www.gizmag.com]
2) It would also be neat to have a liquid extruder for chocolate and sugar!
3) I also want to attach a balpoint pen or magic marker mount for 2d sketching, idk why
4) maybe a mount for dremmel or laser head?
5) anything else cool that i can get?
Is my printer/adruino board/firmware able to accept all these upgrades what would it take? and where should i get them?
ps. btw, how associated are you guys with the firmware/ and inner calcuations of deltas? ie one example , equations to calculate the deltas to get xyz pos. and such? or adding additional extruders & components.
Edited 2 time(s). Last edit at 12/16/2015 08:44AM by DrDoggy.
|
Re: almost working December 16, 2015 06:08PM |
Registered: 9 years ago Posts: 346 |
Hey,0.1mm is too thin. Stick to your 0.4. That's a great size.
There is a ton of threads and opinions about 3d design . inventor is a solid program. I use sw.
All the other stuff is doable and people are more or less doing it - the exception is the dremel, that will not work.removing material is an entirely different story then adding it.
There is a ton of threads and opinions about 3d design . inventor is a solid program. I use sw.
All the other stuff is doable and people are more or less doing it - the exception is the dremel, that will not work.removing material is an entirely different story then adding it.

Sorry, only registered users may post in this forum.