FLSUN from AliExpres
Posted by LVD
|
Re: FLSUN from AliExpres June 22, 2016 10:14AM |
Registered: 7 years ago Posts: 35 |
|
Re: FLSUN from AliExpres June 27, 2016 06:16PM |
Registered: 7 years ago Posts: 3 |
The models on the sd card shipped with the recent batch of the printers are still the same - mine came a week ago and the models are still like there: [www.thingiverse.com]
|
Re: FLSUN from AliExpres June 27, 2016 06:27PM |
Registered: 7 years ago Posts: 3 |
|
Re: FLSUN from AliExpres June 28, 2016 04:23PM |
Registered: 7 years ago Posts: 35 |
Thanks guys. Reason I wanted the STLs was that I was having trouble with the supplied injection-moulded limit-switch blocks because the holes are much larger that the M2.5 bolts used to secure the microswitches. I tried wrapping the screw threads in PTFE tape, using Blu-Tak etc, but couldn't get them tight enough. There was still some tiny movement whenever the printer homed - not good. The old-style blocks are too narrow for the current version of the carriages so I was hoping the newer version was available. Instead I have modified the old ones in OpenSCAD to make them the same horizontal thickness as the current version and they are now working great on my printer: the endstops are held nice and secure.
I'm attaching my re-mixed version in case they're of use to anyone else.
I'm attaching my re-mixed version in case they're of use to anyone else.
|
Re: FLSUN from AliExpres June 28, 2016 04:57PM |
Registered: 7 years ago Posts: 3 |
Had the same problem. I did put thin chip of plastic cutted off with sharp knife into each hole and screwed the screws in - holds OK.
Tried to print new blocks after that just like you - found the same thing - they are too thin.) Thanks for your remix. Maybe we should inform the manufacturer?
Tried to print new blocks after that just like you - found the same thing - they are too thin.) Thanks for your remix. Maybe we should inform the manufacturer?
|
Re: FLSUN from AliExpres July 07, 2016 04:18PM |
Registered: 8 years ago Posts: 108 |
|
Re: FLSUN from AliExpres July 08, 2016 07:12AM |
Registered: 8 years ago Posts: 165 |
Look at [forums.reprap.org]
|
Re: FLSUN from AliExpres July 13, 2016 08:52AM |
Registered: 7 years ago Posts: 1 |
Hello all,
just as a FYI. I just received the kit from FLSUN and wanted to share some updates/changes that I spotted.
My kit was ordered with the heatbed option. I notice that the board is a MKS mini-B V1.0 with screw terminals for the heated bed. So AFAICS no need for the MOS board or sth. It also came with a bigger PSU in addition to the "normal" power brick. I will build the kit quite soon and should I find more changes/interesting stuff I will update this post.
Jan
Edited 1 time(s). Last edit at 07/13/2016 08:54AM by jwildeboer.
|
Re: FLSUN from AliExpres July 19, 2016 11:09AM |
Registered: 8 years ago Posts: 108 |
|
Re: FLSUN from AliExpres July 20, 2016 02:26PM |
Registered: 7 years ago Posts: 3 |
I got my FLSUN Kossel printer a couple of months ago.
When building the printer, I noted that the endstop supports had their screw holes too big. I used polyurethane glue (Gorilla glue) to glue the screws into the holes.
I also received the new MKS mini-B board. The supplied power cable to the larger power supply is too small to carry the current needed. The power connector was overheating and connection was becoming erratic. To resolve the issue, I replaced the connector and directly soldered a larger cable to the board. I no longer have power cable/connector overheating problems.
I replaced the supplied bowden tube with a "white" one from ebay/aliexpress. The original tube seemed too tight and created excessive friction and caused the extruder to skip. With the new tube and a shorter path between the extruder and the effector, I no longer have skipping issues.
One minor change I did was to add some insulation under the heated bed. I went to a local textile store and purchased material to insulate kitchen oven gloves. I cut two circles the size of the bed and placed them under the bed. I don't know how much cooler the electronics remains or how much faster the bed heats up
Apart from these few changes, the printer is pretty much as I received it from China.
The printer prints nice. I ran PLA and now print with PETG (very slowly - not unusual with PETG). I have never tried printing ABS.
Calibration was another matter. I worked tirelessly to get the calibration right. My first prints were printing with dimensions errors. An object 60mm long would be 58mm long. I tried to get the the autobed calibration working (both firmware versions in this thread) but I was never able the get standard deviation below 0.20mm. Even at the flattest I could get it, the "elevations" at the columns and opposite to the columns were quite off (up to 0.5mm differences). It was not until I started using the procedure and delta calibration object on thingiverse (http://www.thingiverse.com/thing:745523) that I was able to get the standard deviation down to more reasonable levels.
I used the calibration object and firmware adjustments as well as the manual calibration procedure described in the video in between every calibration object print. [youtu.be] It's a great video that describes the process manual calibration.
I printed, measured, adjusted the parameters about 20 times (it's an iterative process) until I could get the bed flat enough to print without running the autocalibrate routine before printing. It turned out that the lengths of each arm was sufficiently off to make calibration difficult. Once adjusted, all I need is to get the bed autolevel routine run and I can print without issues. The dimensions of my prints are now good enough for me to design something, print it and use it with other mechanical parts.
If I reset or restart the printer, all I need is to run bed autolevel and I can print for days without the need for any adjustments.
(Note that autocalibration and bed autolevel are different routines.)
Edited 2 time(s). Last edit at 07/20/2016 02:36PM by jpconstantineau.
|
Re: FLSUN from AliExpres July 22, 2016 02:56PM |
Registered: 8 years ago Posts: 165 |
Here’s the latest update of the FLSun-AC firmware:
Tower corrections are now functional and a new M667 command has been added for advanced calibration with the procedure described in http://www.thingiverse.com/thing:745523
Don't forget to reset the eeprom with M502 M500
Edited 1 time(s). Last edit at 07/23/2016 03:17AM by LVD.
Tower corrections are now functional and a new M667 command has been added for advanced calibration with the procedure described in http://www.thingiverse.com/thing:745523
Don't forget to reset the eeprom with M502 M500
Edited 1 time(s). Last edit at 07/23/2016 03:17AM by LVD.
|
Re: FLSUN from AliExpres August 04, 2016 01:50PM |
Registered: 8 years ago Posts: 165 |
|
Re: FLSUN from AliExpres August 05, 2016 03:50AM |
Registered: 9 years ago Posts: 127 |
Hi there,
I have just received a kit with a brand new FLSUN Printer including heated bed.....woohoo ! Assembly will start this Weekend.
Don´t have any experience with Printers so far, but this thread is very informative !
I think the kit is fine, I just recognized the following while looking through:
- The holes within the plastic sliders on which the endstops are mounted using M4 are bit too tight. Think it´s getting easier Drilling them a Little bit larger.
- The parts on which the diagonal rods are mounted and will be screwed on the Tower sliders: Screws are Little bit too Long/ hole within the part not deep enough so that the diagonal rods cannot be tightened firmly. Just shorten the screws thread a little bit.
Highly appreciating all your Informations here and of course I will try to use LVD´s Firmware (although I do not understand everything fully yet... ;-)).
Kind regards,
Mike
|
Re: FLSUN from AliExpres August 13, 2016 12:59PM |
Registered: 9 years ago Posts: 127 |
Hi,
just want to share my experience...:
After about three (short) evenings the printer assembly was finished and I printed two times the 1 cm^3 test cube, which came out quite fine.
I use LVD´s software, which works flawlessly!! :-) Also, with his tutorial the calibration was quite easy . Thank you so much !!! :-))
Here´s a photograph of the printer...I mounted it onto some raw wood boards which also contain the power supply.
So, here´s my third printed part (can be found here: [www.thingiverse.com] ):
OK, there´s much stringing, but after removing them with a sharp knife (took less than 5 minutes) I´m quite happy with the part !
Perhaps someone has a hint how to reduce the stringing ??
Material: PLA
My parameters using RepetierHost with Slicer:
just want to share my experience...:
After about three (short) evenings the printer assembly was finished and I printed two times the 1 cm^3 test cube, which came out quite fine.
I use LVD´s software, which works flawlessly!! :-) Also, with his tutorial the calibration was quite easy . Thank you so much !!! :-))
Here´s a photograph of the printer...I mounted it onto some raw wood boards which also contain the power supply.

So, here´s my third printed part (can be found here: [www.thingiverse.com] ):


OK, there´s much stringing, but after removing them with a sharp knife (took less than 5 minutes) I´m quite happy with the part !
Perhaps someone has a hint how to reduce the stringing ??
Material: PLA
My parameters using RepetierHost with Slicer:
[filament: PLA01]
bed_temperature = 55
bridge_fan_speed = 100
cooling = 1
disable_fan_first_layers = 3
extrusion_multiplier = 1
fan_always_on = 0
fan_below_layer_time = 60
filament_colour = #FFFFFF
filament_diameter = 1.75
first_layer_bed_temperature = 60
first_layer_temperature = 210
max_fan_speed = 100
min_fan_speed = 100
min_print_speed = 10
slowdown_below_layer_time = 30
temperature = 205

[print: PLA01]
avoid_crossing_perimeters = 0
bottom_solid_layers = 3
bridge_acceleration = 0
bridge_flow_ratio = 1
bridge_speed = 60
brim_width = 0
complete_objects = 0
default_acceleration = 0
dont_support_bridges = 1
external_fill_pattern = rectilinear
external_perimeter_extrusion_width = 0
external_perimeter_speed = 50%
external_perimeters_first = 0
extra_perimeters = 1
extruder_clearance_height = 20
extruder_clearance_radius = 20
extrusion_width = 0
fill_angle = 45
fill_density = 20%
fill_pattern = honeycomb
first_layer_acceleration = 0
first_layer_extrusion_width = 200%
first_layer_height = 0.1
first_layer_speed = 10
gap_fill_speed = 20
gcode_comments = 0
infill_acceleration = 0
infill_every_layers = 1
infill_extruder = 1
infill_extrusion_width = 0
infill_first = 0
infill_only_where_needed = 0
infill_overlap = 15%
infill_speed = 80
interface_shells = 0
layer_height = 0.2
max_print_speed = 80
max_volumetric_speed = 0
min_skirt_length = 0
notes =
only_retract_when_crossing_perimeters = 1
ooze_prevention = 0
output_filename_format = [input_filename_base].gcode
overhangs = 1
perimeter_acceleration = 0
perimeter_extruder = 1
perimeter_extrusion_width = 0
perimeter_speed = 60
perimeters = 3
post_process =
raft_layers = 0
resolution = 0
seam_position = aligned
skirt_distance = 6
skirt_height = 1
skirts = 1
small_perimeter_speed = 15
solid_infill_below_area = 70
solid_infill_every_layers = 0
solid_infill_extruder = 1
solid_infill_extrusion_width = 0
solid_infill_speed = 20
spiral_vase = 0
standby_temperature_delta = -5
support_material = 0
support_material_angle = 0
support_material_contact_distance = 0.2
support_material_enforce_layers = 0
support_material_extruder = 1
support_material_extrusion_width = 0
support_material_interface_extruder = 1
support_material_interface_layers = 3
support_material_interface_spacing = 0
support_material_interface_speed = 100%
support_material_pattern = pillars
support_material_spacing = 2.5
support_material_speed = 60
support_material_threshold = 0
thin_walls = 1
threads = 2
top_infill_extrusion_width = 0
top_solid_infill_speed = 15
top_solid_layers = 3
travel_speed = 150
xy_size_compensation = 0

[printer: PLA01]
bed_shape = 89.507x9.40756,88.0333x18.7121,85.5951x27.8115,82.2191x36.6063,77.9423x45,72.8115x52.9007,66.883x60.2218,60.2218x66.883,52.9007x72.8115,45x77.9423,36.6063x82.2191,27.8115x85.5951,18.7121x88.0333,9.40756x89.507,0x90,-9.40756x89.507,-18.7121x88.0333,-27.8115x85.5951,-36.6063x82.2191,-45x77.9423,-52.9007x72.8115,-60.2218x66.883,-66.883x60.2218,-72.8115x52.9007,-77.9423x45,-82.2191x36.6063,-85.5951x27.8115,-88.0333x18.7121,-89.507x9.40756,-90x0,-89.507x-9.40756,-88.0333x-18.7121,-85.5951x-27.8115,-82.2191x-36.6063,-77.9423x-45,-72.8115x-52.9007,-66.883x-60.2218,-60.2218x-66.883,-52.9007x-72.8115,-45x-77.9423,-36.6063x-82.2191,-27.8115x-85.5951,-18.7121x-88.0333,-9.40756x-89.507,0x-90,9.40756x-89.507,18.7121x-88.0333,27.8115x-85.5951,36.6063x-82.2191,45x-77.9423,52.9007x-72.8115,60.2218x-66.883,66.883x-60.2218,72.8115x-52.9007,77.9423x-45,82.2191x-36.6063,85.5951x-27.8115,88.0333x-18.7121,89.507x-9.40756,90x0
before_layer_gcode =
end_gcode = M104 S0 ; turn off temperature\nG28 X0  ; home X axis\nM84     ; disable motors\n
extruder_offset = 0x0
gcode_flavor = reprap
layer_gcode =
nozzle_diameter = 0.4
octoprint_apikey =
octoprint_host =
pressure_advance = 0
retract_before_travel = 2
retract_layer_change = 0
retract_length = 2
retract_length_toolchange = 10
retract_lift = 0
retract_restart_extra = 0
retract_restart_extra_toolchange = 0
retract_speed = 40
start_gcode = G28 ; home all axes\nG1 Z5 F5000 ; lift nozzle\n
toolchange_gcode =
use_firmware_retraction = 0
use_relative_e_distances = 0
use_volumetric_e = 0
vibration_limit = 0
wipe = 0
z_offset = 0
|
Re: FLSUN from AliExpres August 14, 2016 06:52AM |
Registered: 8 years ago Posts: 165 |
|
Re: FLSUN from AliExpres August 14, 2016 09:29AM |
Registered: 9 years ago Posts: 127 |
|
Re: FLSUN from AliExpres August 21, 2016 08:59AM |
Registered: 9 years ago Posts: 127 |
Hi there,
today I printed the small calibration part for the advanced calibration.
Measured lengths are:
x: 59.05 mm
y: 58.59 mm
z: 59.05 mm
Average: 58.8966 mm
Unfortunately I´m a little bit confused what to tell the firmware. --> How to calculate the correction?
@LVD, I´m afraid your .pdf is not fully clear in that part.
Under "advanced Calibration" there´s the sentence: "set the differences to the average of the three
XYZ measurements ...with M667 X-0.01 Y-0.01 Z0.02. "
--> for x: (59.05 - 58.8966)/58.8966 = 0.0026
The above would lead to: M667 X0.0026 Y-0.0052 Z0.0026
Using following instruction: "The number required for these are: measured difference/object size (60) * diagonal
rod (218) "
my correction would look like:
M667 X-3.45166 Y-5.123 Z-3.45166
That seems way too much.
So I have different values and I do not know if they are correct and/or which I have to use,
Kind regards,
Mike
|
Re: FLSUN from AliExpres August 22, 2016 01:04PM |
Registered: 8 years ago Posts: 165 |
|
Re: FLSUN from AliExpres August 23, 2016 04:38PM |
Registered: 8 years ago Posts: 165 |
|
Re: FLSUN from AliExpres September 08, 2016 12:58PM |
Registered: 7 years ago Posts: 10 |
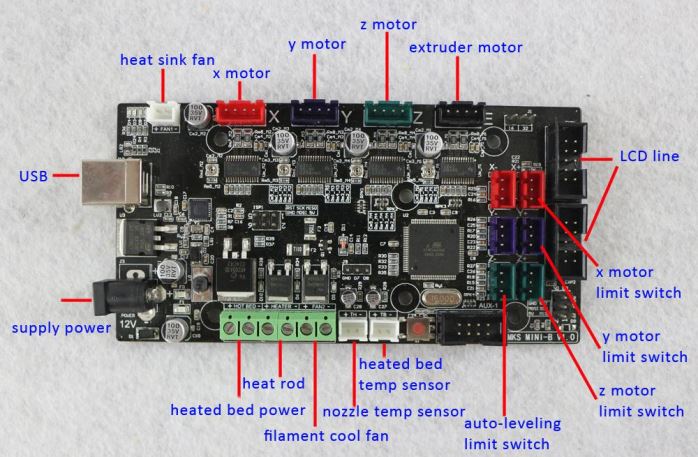
I bought the FLSUN kit with hotbed from Aliexpress, got it put together and began printing with moderate success. Looking at using the latest of LVD's firmware for my calibration tonight. But the reason I am on here right now is my Hot bed will not heat up for the life of me. At first i was getting no temp readings at all, then I changed the #define TEMP_SENSOR_BED 0 to 1 in Marlin and i was getting the ambient temp. I set my hot bed to heat to 50°C and the screen says it's heating but it never does. I have the board shown in the picture below, with the hotbed plugged into the two connectors labeled heated bed power. Is there some setting I am missing to get this going, or do I have a defective bed?
Thanks in Advance
-Troy
Thanks in Advance
-Troy
|
Re: FLSUN from AliExpres September 09, 2016 09:11AM |
Registered: 7 years ago Posts: 10 |
|
Re: FLSUN from AliExpres September 24, 2016 08:43AM |
Registered: 7 years ago Posts: 23 |
Hello to everyone, just registered to this forum ;-)
bought FLsun from ali, build it up, installed last LVD's Marlin version (good work, THX) and everything runs smooth incl. auto level functions
doing some upgrades - printed by the little brother of the FLsun, a CTC china clone => every 3D printer should print the parts for a brother or sister (real replication ;-) )
i am happy with the FLsun printer - just doing his job - apart one little thing:
the "change filament"-function :-(
when i start it, the extruder is running to "somewhere" (small steps on each tower), but extruder is not heating up and feeder stepper will not move
any idea about that and the basic "change filament function" on the FLsun ?
Mike
|
Re: FLSUN from AliExpres October 01, 2016 05:31PM |
Registered: 7 years ago Posts: 3 |
Hello All,
I'm also new to this... forum and 3d printing ;-)
Bought a FLsun for a very good price on the internet.
Building it was really al lot of fun. And managed to print some decent parts.
I'm very curious after the LVD version of Marlin firmware.
Thanks you all for the fun reading on this forum.
I'm also new to this... forum and 3d printing ;-)
Bought a FLsun for a very good price on the internet.
Building it was really al lot of fun. And managed to print some decent parts.
I'm very curious after the LVD version of Marlin firmware.
Thanks you all for the fun reading on this forum.
|
Re: FLSUN from AliExpres October 03, 2016 10:34PM |
Registered: 8 years ago Posts: 108 |
|
Re: FLSUN from AliExpres October 06, 2016 10:38AM |
Registered: 8 years ago Posts: 108 |
Found one and was a nice redesign to adapt a spring so now my auto level doesn't get stuck anymore.
Thingiverse
Thingiverse
|
Re: FLSUN from AliExpres October 06, 2016 10:44AM |
Registered: 8 years ago Posts: 108 |
Check the wires going to the bed and change (decrease the number) the gauge, if you are using #18 then change to #14, on my prusa i3 that was the problem so when I built my kossel I used thicker wires for the bed and not the ones they sent.
Edited 1 time(s). Last edit at 10/06/2016 10:45AM by slanwar.
Edited 1 time(s). Last edit at 10/06/2016 10:45AM by slanwar.
|
Re: FLSUN from AliExpres October 09, 2016 07:28PM |
Registered: 7 years ago Posts: 23 |
|
Re: FLSUN from AliExpres October 09, 2016 07:31PM |
Registered: 7 years ago Posts: 23 |
about effector:
just printing this one
[www.thingiverse.com]
will test it ;-)
Edited 1 time(s). Last edit at 10/09/2016 07:32PM by Mike60.
just printing this one
[www.thingiverse.com]
will test it ;-)
Edited 1 time(s). Last edit at 10/09/2016 07:32PM by Mike60.
|
Re: FLSUN from AliExpres October 09, 2016 07:42PM |
Registered: 8 years ago Posts: 108 |
FLSUN sent to me a firmware for this machine yesterday, I didn't test yet and I'm not sure if is the same as LVD. Anyway today I tested ABS with this printer using the PEI surface and sticked really good with no glue or any other material, was set 100C for the bed and 240C start then reduced only the extruder temp to 230C. Now a question about the second fan (LVD), is the fan connected to the same fan as the extruder's fan? If it is how do you turn off the fan when printing ABS?
|
Re: FLSUN from AliExpres October 09, 2016 08:26PM |
Registered: 8 years ago Posts: 108 |


Sorry, only registered users may post in this forum.