FLSUN from AliExpres
Posted by LVD
|
Re: FLSUN from AliExpres April 18, 2016 04:09PM |
Registered: 8 years ago Posts: 13 |
autolevel not stored so need to be repeated at reset/poweron? or every print?
What is the best way to adjust lift the head 0.2 after auto level? I find that all the points are a touch too low although they are closer to each other than after original autolevelling
Is this line affecting the results or only the probing or both?
#define Z_PROBE_OFFSET_FROM_EXTRUDER -0.275 //Automatic leveling settings,too high reduce,low increases
Currently applying 0.2 Z-offset in Repetier-host
|
Re: FLSUN from AliExpres April 18, 2016 06:10PM |
Registered: 8 years ago Posts: 165 |
|
Re: FLSUN from AliExpres April 18, 2016 06:34PM |
Registered: 8 years ago Posts: 165 |
Quote
JanR
How set up the heated bed in Configuration.h ?
I ordered and received:
* PCB Heatbed MK2Y 200
* MKS HOTBed MOS V0.1
* Temp sensor
The temp sensor is not responding in Repetier, and its not possible to switch the heater on.
And how did you mount the heatbed to the Delta Printer ?
The heat bed plate is not really flat by itself.
But I guess that when the glass plate is clamped on top of the heatbed it will not be an issue.
in configuration.h
#define TEMP_SENSOR_BED 5 //or whatever type sensor you have
I drilled the holes of the heat-bed and countersunk them to accommodate M4 flathead screws and fixed the bed to the frame on 3x1mm layers of cork insulation using 3 screws. The other 3 holes I use to keep the cork ,in place. I also drilled a 2.5mm hole in the centre not all the way trough in which I fixed the temp sensor with some thermo conductive paste. The bed I have came a little bid bent as well: there was a little wobble in one direction putting the glass plate or a ruler on it. I fixed that by clamping the heat-bed halfway to the workbench and applying some gentle force to straighten it, now it is a flat as the glass bed.
|
Re: FLSUN from AliExpres April 19, 2016 06:40AM |
Registered: 8 years ago Posts: 11 |
|
Re: FLSUN from AliExpres April 19, 2016 10:13AM |
Registered: 8 years ago Posts: 165 |
|
Re: FLSUN from AliExpres April 19, 2016 12:12PM |
Registered: 8 years ago Posts: 165 |
Here’s the latest version of the FLSun firmware:
G29 now takes some parameters to overrule the default settings in configuration.h:
G29 P(number of grid Points, min 3 max 10) B(bed probable radius)
G33 now probes multiple points as well (upto 12*3 + 6 centre points): use A to run autocalibration, without A is just checks if the calibration is OK. Beware in order to speed up things the iteration starts with lesser points as given with the P-parameter, once the calibration is almost ok it switches to the denser grid defined by P.
G33 P(number of grid Points, min 1max 12) B(bed probable radius) A(auto-calibrate)
M206 has been reworked for deltas. The normal Cartesian M206 has been disabled, but a M206 D now sets the Delta parameters as described in previous posts to compensate for the centre of the frame triangles not being the exact centre.
M206 D(delta mode) H(z-Height - sets Cartesian Z adjustment) X Y Z (measured smooth rod offsets - sets incremental Cartesian XY adjustments) R (Reset Cartesian XY adjustments to zero)
Calibrate the printer with a low number of points e.g. G33 A P3, measure the distance from nozzle to the 3 towers and set the those with M206 D XYZ and recalibrate, iterate a couple of times to get it spot on. Finally calibrate the printer with the maximum points G33 A P12. M503 also prints those incremental smooth rod offsets so you can use them as factory defaults in configuration.h; a M502 will refer to those.
#define DELTA_SMOOTH_ROD_OFFSET_X 150.73
#define DELTA_SMOOTH_ROD_OFFSET_Y 149.25
#define DELTA_SMOOTH_ROD_OFFSET_Z 149.28
M212 sets the Z-offset to the probe
M212 Z(Z-offset probe)
M320 enable auto-level
M321 disable auto-level
M322 reset auto-level
M665 and M66 are the rest of the Delta geometry:
M665 R(delta Radius) D(Diagonal rod) S(Segments per seconds)
M666 X Y Z(end-stops)
Edited 4 time(s). Last edit at 04/21/2016 07:25AM by LVD.
|
Re: FLSUN from AliExpres April 19, 2016 07:12PM |
Registered: 8 years ago Posts: 7 |
Can you create a step by step guide for your firmware?
I tried to follow and grip as much as possible but i still failed to get meaningful print out of your firmware. the nozzle basically touching the bed when printing.
Also, is it normal that after a series of calibrations, not all pulleys reach the end stops when performing g28.
I tried to follow and grip as much as possible but i still failed to get meaningful print out of your firmware. the nozzle basically touching the bed when printing.
Also, is it normal that after a series of calibrations, not all pulleys reach the end stops when performing g28.
|
Re: FLSUN from AliExpres April 19, 2016 08:50PM |
Registered: 8 years ago Posts: 165 |
I'll put a guide on my to do list. But for now: you need to calibrate the z-offset to your printer. There are 3 ways to do this: In the firmware in configuration.h; by using the M212 command and in Repetier host you can set a Z-offset as well. I find it easiest to use the M212 command on a test print, and when the first layer sticks well, put that value in configuration.h as default. When homing, the pulleys should reach the end-stops, trigger them and then lower themselves with the amount that was set in the end-stop adjustments.
|
Re: FLSUN from AliExpres April 19, 2016 09:38PM |
Registered: 8 years ago Posts: 13 |
Quote
LVD
I'll put a guide on my to do list. But for now: you need to calibrate the z-offset to your printer. There are 3 ways to do this: In the firmware in configuration.h; by using the M212 command and in Repetier host you can set a Z-offset as well. I find it easiest to use the M212 command on a test print, and when the first layer sticks well, put that value in configuration.h as default. When homing, the pulleys should reach the end-stops, trigger them and then lower themselves with the amount that was set in the end-stop adjustments.
You mention M212 but it looks like you implemented it as M323 in the latest firmware ...
case 323: // M323 set Z
|
Re: FLSUN from AliExpres April 20, 2016 07:26AM |
Registered: 8 years ago Posts: 7 |
Quote
LVD
I'll put a guide on my to do list. But for now: you need to calibrate the z-offset to your printer. There are 3 ways to do this: In the firmware in configuration.h; by using the M212 command and in Repetier host you can set a Z-offset as well. I find it easiest to use the M212 command on a test print, and when the first layer sticks well, put that value in configuration.h as default. When homing, the pulleys should reach the end-stops, trigger them and then lower themselves with the amount that was set in the end-stop adjustments.
for the first time, i i kept using M212 to adjust the offset, of cause it didn't work.
this is the second time, i've been trying to get Z-offset to work for a few hours, got really frustrated after waiting for the bed to heat up again and again and again (i lost count how many times) to test the firmware.
Out of frustration, i went to read your code, I realized, the Z-offset or M323 which you mistakenly think it is M212 only works AFTER you do another G29.
you didn't even mention that.... great..
Edited 3 time(s). Last edit at 04/20/2016 07:29AM by megablue.
|
Re: FLSUN from AliExpres April 20, 2016 09:09AM |
Registered: 8 years ago Posts: 165 |
|
Re: FLSUN from AliExpres April 21, 2016 06:20AM |
Registered: 8 years ago Posts: 165 |
I am having second thoughts about the calibration with M206 D to centre the nozzle; sometimes it gives slightly better results but sometimes it is just the same as using G33 without it. So I'm thinking about removing the command from the firmware; it complicates things without a real added value.
Regarding M212, the variable for it was already defined in the FLSun firmware and I (wrongly) assumed it was doing something but it didn't... I only noticed it was not taking into account the z-height offset while probing so I added it there. Great to have spotted this, I will have to look were to change this so it applies to all moves. BTW the menu item on the LCD about the z-offset is not doing anything either until a G29 is given, and before I changed the probing it was not doing anything at all...
Edited 1 time(s). Last edit at 04/21/2016 06:26AM by LVD.
|
Re: FLSUN from AliExpres April 21, 2016 06:25PM |
Registered: 8 years ago Posts: 8 |
Hi All - like many of you I bought my printer on AliExpress and it has been really fun getting this thing put together. I'm sort of in the last throws of finalizing my build, but I have two issues:
1. I cannot seem to get the curvature adjustment done. No matter what I adjust the DELTA_SMOOTH_ROD_OFFSET code to nothing changes. I'm left with the extremes about 1mm higher than the centre of the bed in my tests.
2. My heatbed seems to only heat up to 110C and doesn't stop at a set temperature (e.g., 65C). Obviously this creates a problem with the print material sticking to the surface.
Any help would be greatly appreciated!
|
Re: FLSUN from AliExpres April 22, 2016 07:35PM |
Registered: 8 years ago Posts: 8 |
Quote
LVD
Here’s the latest version of the FLSun firmware:
G29 now takes some parameters to overrule the default settings in configuration.h:
G29 P(number of grid Points, min 3 max 10) B(bed probable radius)
G33 now probes multiple points as well (upto 12*3 + 6 centre points): use A to run autocalibration, without A is just checks if the calibration is OK. Beware in order to speed up things the iteration starts with lesser points as given with the P-parameter, once the calibration is almost ok it switches to the denser grid defined by P.
G33 P(number of grid Points, min 1max 12) B(bed probable radius) A(auto-calibrate)
M206 has been reworked for deltas. The normal Cartesian M206 has been disabled, but a M206 D now sets the Delta parameters as described in previous posts to compensate for the centre of the frame triangles not being the exact centre.
M206 D(delta mode) H(z-Height - sets Cartesian Z adjustment) X Y Z (measured smooth rod offsets - sets incremental Cartesian XY adjustments) R (Reset Cartesian XY adjustments to zero)
Calibrate the printer with a low number of points e.g. G33 A P3, measure the distance from nozzle to the 3 towers and set the those with M206 D XYZ and recalibrate, iterate a couple of times to get it spot on. Finally calibrate the printer with the maximum points G33 A P12. M503 also prints those incremental smooth rod offsets so you can use them as factory defaults in configuration.h; a M502 will refer to those.
#define DELTA_SMOOTH_ROD_OFFSET_X 150.73
#define DELTA_SMOOTH_ROD_OFFSET_Y 149.25
#define DELTA_SMOOTH_ROD_OFFSET_Z 149.28
M212 sets the Z-offset to the probe
M212 Z(Z-offset probe)
M320 enable auto-level
M321 disable auto-level
M322 reset auto-level
M665 and M66 are the rest of the Delta geometry:
M665 R(delta Radius) D(Diagonal rod) S(Segments per seconds)
M666 X Y Z(end-stops)
Dude, your autocalibration build is amazing!!! I owe you my sanity!
Edited 1 time(s). Last edit at 04/22/2016 07:36PM by junkyjunky.
|
Re: FLSUN from AliExpres April 23, 2016 07:41AM |
Registered: 8 years ago Posts: 165 |
|
Re: FLSUN from AliExpres April 23, 2016 09:00AM |
Registered: 8 years ago Posts: 8 |
Unfortunately not... Still trying to work that out. Does the white two-wire sensor have a polarity to it? The only thing I can think of is that I need to flip that connection on the motherboard.
I only modified the code to change the value of TEMP_SENSOR_BED from 0 to 1. I left everything else unchanged.
I only modified the code to change the value of TEMP_SENSOR_BED from 0 to 1. I left everything else unchanged.
|
Re: FLSUN from AliExpres April 23, 2016 11:19AM |
Registered: 8 years ago Posts: 165 |
|
Re: FLSUN from AliExpres April 23, 2016 11:50AM |
Registered: 8 years ago Posts: 11 |
Quote
LVD
Here’s the latest version of the FLSun firmware:
G29 now takes some parameters to overrule the default settings in configuration.h:
G29 P(number of grid Points, min 3 max 10) B(bed probable radius)
G33 now probes multiple points as well (upto 12*3 + 6 centre points): use A to run autocalibration, without A is just checks if the calibration is OK. Beware in order to speed up things the iteration starts with lesser points as given with the P-parameter, once the calibration is almost ok it switches to the denser grid defined by P.
G33 P(number of grid Points, min 1max 12) B(bed probable radius) A(auto-calibrate)
M206 has been reworked for deltas. The normal Cartesian M206 has been disabled, but a M206 D now sets the Delta parameters as described in previous posts to compensate for the centre of the frame triangles not being the exact centre.
M206 D(delta mode) H(z-Height - sets Cartesian Z adjustment) X Y Z (measured smooth rod offsets - sets incremental Cartesian XY adjustments) R (Reset Cartesian XY adjustments to zero)
Calibrate the printer with a low number of points e.g. G33 A P3, measure the distance from nozzle to the 3 towers and set the those with M206 D XYZ and recalibrate, iterate a couple of times to get it spot on. Finally calibrate the printer with the maximum points G33 A P12. M503 also prints those incremental smooth rod offsets so you can use them as factory defaults in configuration.h; a M502 will refer to those.
#define DELTA_SMOOTH_ROD_OFFSET_X 150.73
#define DELTA_SMOOTH_ROD_OFFSET_Y 149.25
#define DELTA_SMOOTH_ROD_OFFSET_Z 149.28
M212 sets the Z-offset to the probe
M212 Z(Z-offset probe)
M320 enable auto-level
M321 disable auto-level
M322 reset auto-level
M665 and M66 are the rest of the Delta geometry:
M665 R(delta Radius) D(Diagonal rod) S(Segments per seconds)
M666 X Y Z(end-stops)
Autocalibration G33 A works fine. Great job LVD !
I have 4 more questions:
1. The thing is that the overall height is about 0.2 mm too low. I tried the M212 command but no change. How to use the M212 command?
2. Is it possible to remove 1 calibration point? I have an extra fan that hits the display.
3. I changed the temp_bed_sensor to 5, so far it works on the LCD dispay and in Repetier. But no output on the pins towards the MOSFET board. I asume that when the bed heater is switched on in Manual mode, there is 12 volts send to the MOSFET board that I can measure with a multimeter. Is there another parameter to set ?
4. I like the auto fan mode for the cold end. Since this board doesn't have two controllable fan outputs I prefer to use this output for a cooling fan of the printed filament. Is it possible to change that by user ?
Thanks again for all the work you put in this firmware !
Edited 3 time(s). Last edit at 04/23/2016 02:57PM by JanR.
|
Re: FLSUN from AliExpres April 23, 2016 12:16PM |
Registered: 8 years ago Posts: 8 |
Quote
LVD
The sensor does not have a polarity; and since you have a temp reading it is working. What board do you have and where did you connect your heat-bed onto?
MK3 12V Aluminum heat bed, same as this one: [www.aliexpress.com]
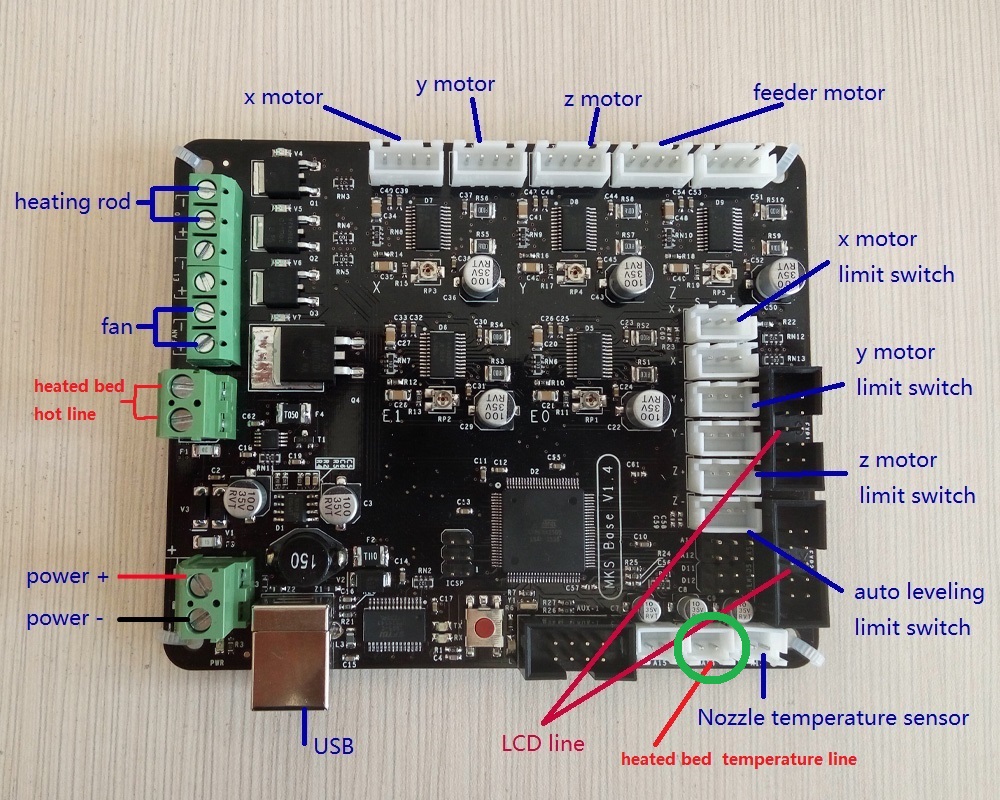
I have it connected in the spot I circled in green (see attached picture), same place the instructions say to connect.
Edited 1 time(s). Last edit at 04/23/2016 02:54PM by junkyjunky.
|
Re: FLSUN from AliExpres April 23, 2016 02:53PM |
Registered: 8 years ago Posts: 165 |
|
Re: FLSUN from AliExpres April 23, 2016 02:56PM |
Registered: 8 years ago Posts: 8 |
Quote
LVD
What motherboard? Which connector did you use?
Sorry, I noticed I didn't include that in my initial response. I edited it with a picture of the motherboard and circled the spot i connected it in green. I used the two pin connector (white cable) to connect to this port. The other two wires (black and red) were obviously power leads and go to my power supply (same as the one in my post).
Now I'm wondering where it says "heated bed hot line" on the mid-left edge of the motherboard. Should I be running something there?
I have the two-pin white wire connected to the motherboard where it says "hotbed temperature line", then the power leads from the hotbed to the power supply. Nothing is connected to the "heated bed hot line" connections. What should be there? My assumption was that was were you'd pull power for the hotbed if you didn't have a separate power supply, but maybe I've misinterpreted that.
Edited 1 time(s). Last edit at 04/23/2016 02:59PM by junkyjunky.
|
Re: FLSUN from AliExpres April 23, 2016 07:32PM |
Registered: 8 years ago Posts: 165 |
|
Re: FLSUN from AliExpres April 24, 2016 12:43PM |
Registered: 8 years ago Posts: 8 |
Quote
LVD
You need to connect the heat-bed power leads (black and red) to the green connector 'heated bed hot line', and the power supply needs to be connected at power + and power -
That did it! Thank-you again!!
Ok, now only a few more non-technical questions:
1. I put my glass plate over top of my aluminum heat bed, but which side do you guys have facing up? The smooth side or the brushed side? I would think the brushed side so the print has something to stick to.
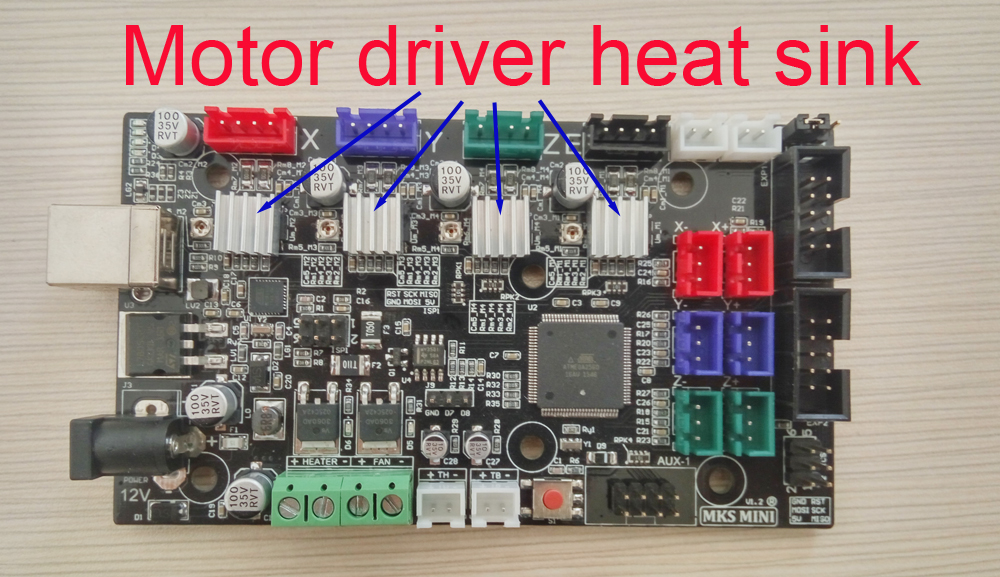
2. My printer also came with three aluminum heat sinks (see picture), but the instructions don't refer to them going anywhere. What are they used for?
3. There's a value on the printers LCD screen Fr (see picture). When I turn the knob this goes up or down from 100%. What does this actually do?
Thanks again for all your help here!
|
Re: FLSUN from AliExpres April 24, 2016 01:30PM |
Registered: 8 years ago Posts: 13 |
Quote
junkyjunky
Quote
LVD
You need to connect the heat-bed power leads (black and red) to the green connector 'heated bed hot line', and the power supply needs to be connected at power + and power -
That did it! Thank-you again!!
Ok, now only a few more non-technical questions:
1. I put my glass plate over top of my aluminum heat bed, but which side do you guys have facing up? The smooth side or the brushed side? I would think the brushed side so the print has something to stick to.
2. My printer also came with three aluminum heat sinks (see picture), but the instructions don't refer to them going anywhere. What are they used for?
3. There's a value on the printers LCD screen Fr (see picture). When I turn the knob this goes up or down from 100%. What does this actually do?
Thanks again for all your help here!
I have read about people printing on frosted side and the plastic sticks so well, the piece takes chunks of glass with it when finally removed
Heatsinks... there's a jpg on the sd card... also attached
FR is feedrate, the speed of the filament extrusion motor... never used the LCD to control this so can't comment on whether is actually works...
|
Re: FLSUN from AliExpres April 24, 2016 01:41PM |
Registered: 8 years ago Posts: 165 |
|
Re: FLSUN from AliExpres April 24, 2016 05:03PM |
Registered: 8 years ago Posts: 8 |
Quote
deltamelter
Quote
junkyjunky
Quote
LVD
You need to connect the heat-bed power leads (black and red) to the green connector 'heated bed hot line', and the power supply needs to be connected at power + and power -
That did it! Thank-you again!!
Ok, now only a few more non-technical questions:
1. I put my glass plate over top of my aluminum heat bed, but which side do you guys have facing up? The smooth side or the brushed side? I would think the brushed side so the print has something to stick to.
2. My printer also came with three aluminum heat sinks (see picture), but the instructions don't refer to them going anywhere. What are they used for?
3. There's a value on the printers LCD screen Fr (see picture). When I turn the knob this goes up or down from 100%. What does this actually do?
Thanks again for all your help here!
I have read about people printing on frosted side and the plastic sticks so well, the piece takes chunks of glass with it when finally removed
Heatsinks... there's a jpg on the sd card... also attached
FR is feedrate, the speed of the filament extrusion motor... never used the LCD to control this so can't comment on whether is actually works...
Quote
LVD
Feedrate is the printing speed (Flowrate is the extruder speed); and yes it works if you want to speed up or slow down the print from the LCD.
Heatsinks: for the SKM Base you require 5 of them
Thanks to both of you!! Now on my way to getting the prints the way I like them.
|
Re: FLSUN from AliExpres April 25, 2016 07:10AM |
Registered: 8 years ago Posts: 165 |
Here’s the latest update of the FLSun firmware (updated 27/4):
G29 seems to be in full working order now and is accessible from the LCD menu as well (there is not sufficient EEPROM memory to store the bed leveling data)
G29 P(number of grid Points, min 3 max 15) B(bed probable radius)
G30 is working as well (probe at current XY location)
M320 enable auto-level and M321 disable auto-level are in the LCD menu tree (M322 reset auto-level is not)
G33 now probes even more points: P1-5 probes centre and towers – P6-10 centre, towers and opposite towers –P11-15 centre, towers, opposites and intermediate. Note: the iteration no longer starts with lesser points, if you want speed up things first calibrate with lesser points. G33 A also added to the LCD menus.
G33 P(number of grid Points, min 1max 15) B(bed probable radius) A(auto-calibrate)
M206 has been disabled completely, it was pretty useless, I limit the calibration to end-stops, z-height and delta radius with G33
M212 has been changed from probing offset to printing offset so it takes effect immediately (no longer G29 or G33 required). You can set it from the LCD menu as well.
z-Height has been relocated to M665
M665 R(delta Radius) D(Diagonal rod) S(Segments per seconds) H(z-Height)
M666 X Y Z(end-stops)
The LCD display has been debugged and no longer displays rubbish with negative values.
Power on/off has been disabled from the LCD menu (there is no power pin on the FLSun boards, so set to -1 in pins.h)
Edited 2 time(s). Last edit at 04/26/2016 08:50PM by LVD.
|
Re: FLSUN from AliExpres April 27, 2016 06:35AM |
Registered: 8 years ago Posts: 165 |
I've changed the firmware download in the previous post to include in a subdirectory a version that also automatically calibrates for tower corrections following the principle of having a slightly different delta radius to each tower. As explained at Escher 3d : "Any adjustment to the 6 possible tower position coordinates is equivalent to adjusting the delta radius and two tower angular positions, plus a translation of the bed origin and a rotation of the bed." I prefer to work with tower offsets instead of angular corrections but since I ensure that the sum of the three applied corrections equals zero at all time, it is giving similar results as calibrating two tower angle corrections but no additional delta radius correction is needed.
Personally it doesn't give me any added precision or improved print quality, so I prefer the faster version that calibrates only for end-stops, z-height and delta radius. I did not intend to release this. But maybe I've build my printer too well(*) and this can be of use for others. So let me know what you think and experience with both versions.
(*) it is more due the poor quality of the traxxas joints, there is some play in them and this influences the probing more close to towers that it does away from the towers. I can see a little tilt of the effector when probing close to the towers that I do not observe in the centre or opposite the towers and this results in a little dip at all three towers. This can not be resolved by tower corrections but needs to be addressed by improving the hardware (I've ordered some springs for that).
PS: after switching versions performe M502 M500 as usual, but you can keep the same configuration.h
Edited 3 time(s). Last edit at 04/27/2016 07:44AM by LVD.
|
Re: FLSUN from AliExpres April 27, 2016 09:10AM |
Registered: 8 years ago Posts: 2 |
Quote
LVD
This can not be resolved by tower corrections but needs to be addressed by improving the hardware (I've ordered some springs for that).
Hello,
3 rubber bands and 3 printed clips just did the job for me

the clips i made : [www.thingiverse.com]
Edited 1 time(s). Last edit at 04/27/2016 10:42AM by schwartzf.
|
Re: FLSUN from AliExpres April 27, 2016 05:13PM |
Registered: 7 years ago Posts: 1 |
Hi guys,
first of all thank you all for contribution in this thread, especially LVD for a great FW!
I received my FLSUN printer few days ago, already assembled it and made some calibration prints using LVD FW and it seems to be working great so far
But, I have few questions:
1) I received the printer with MKS MINI 1.2 board, did some of you receive another one? Im thinking about heatbed upgrade but I would like to have only one power suply so that means either RAMPS with Arduino or e.g. MKS BASE 1.4 board, correct?
2) What should be the correct steps to calibrate printer using LVD FW? So far I was doing it using following commands: G33 A P3 - M206 D XYZ - G33 A P12 - M500...is this all?
3) When I first run the calibration, the rod was scratching the glass as it was trying to go too deep. I modified #define DELTA_HEIGHT from 280 to 273 and now it is ok but...when I run the print, first two layers are just too low and they almost do not print due to rod being too low. How can I adjust this?
Thank you very much for your support and efforts


Sorry, only registered users may post in this forum.