Geeetech Rostock 301 first topic
Posted by raoulito9
|
Re: Geeetech Rostock 301 first topic October 31, 2016 03:56AM |
Registered: 7 years ago Posts: 12 |
hi isuru, no it should start directly, are you sure you are using thé right ext0 board, it's thé one on thé right when you are facing your printer. if it's correctly wired to the stm32 pro, try to invert the board of ext0 with the board of ext1 to see if the issue is from the extruder board.
|
Re: Geeetech Rostock 301 first topic October 31, 2016 05:38AM |
Registered: 7 years ago Posts: 5 |
Hi
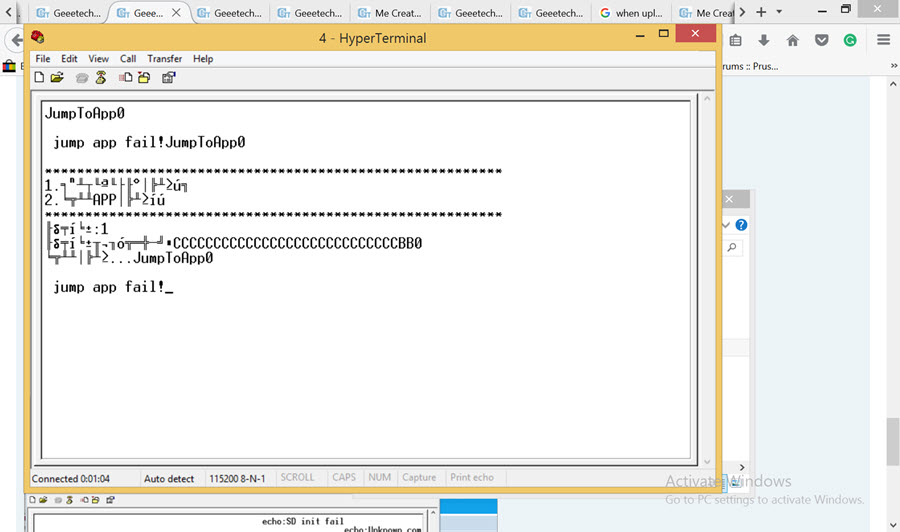
i was trying to upload the new firmware as described in the geetech forum.
it did not work and i received a message at the end stating "jump app fail"
at the end.
now my lcd screen does not work.
lcd screen is blank
restart does not make any change
could somebody please help me to fix this
thank you
|
Re: Geeetech Rostock 301 first topic October 31, 2016 08:50AM |
Registered: 7 years ago Posts: 12 |
|
Re: Geeetech Rostock 301 first topic October 31, 2016 02:47PM |
Registered: 7 years ago Posts: 41 |
Quote
isuru
HI raoulito9
In my rostock 301 when I checked the firmware version it shows 1.1.0 A
Is this a new version or do I need to upgrade
Thanks
Regards
Isuru
Hi Isuru.
Honnestly, i don't Know.
This firmware was given to me 15 days ago, on geeetech forum, uploaded by William Kwock, after i asked him why the official firmware 1.0.0.2 showed me a 1.0.0.1.
This fimware beeps each time i send a command with the knob.
It works well for me.
I'm not sure if it is an upgrade or not for you...
|
Re: Geeetech Rostock 301 first topic October 31, 2016 03:07PM |
Registered: 7 years ago Posts: 41 |
Quote
isuru
Hi
i was trying to upload the new firmware as described in the geetech forum.
it did not work and i received a message at the end stating "jump app fail"
at the end.
now my lcd screen does not work.
lcd screen is blank
restart does not make any change
could somebody please help me to fix this
thank you
Hi again Isuru.
All things flinteewn said is right for me.
Metallic extruders were necessary for me, without them, filament was skidding.
Hot end and sensor must be plugged on extruder 0, wich must be plugged on port for extruder 0 on the STM 32 (verify that again and again...)
Extruder fans are useless. Motors don't even get warm...
Concerning the flash method, everithing from the geetech tuto is correct, and must be strictly respected, except the "push the 1 key" when in hyper terminal (see my first post) that they missed.... So, first the bootloader, then the firmware.
Did you check twice the com port, the speed (115000) and are you sure you did not skip any step ? Did you plug the jumper ? and unplugged it ?
As i was succesfull doing it, i'm sure it morks.
Did you try asking william from geeetech forum ?
|
retract.... November 01, 2016 06:27AM |
Registered: 7 years ago Posts: 41 |
|
Re: retract.... December 01, 2016 10:32AM |
Registered: 7 years ago Posts: 236 |
Hello everyone,
Excuse me, I am unilingual francophone and I use Google translator to translate the texts of the forum in French and to write to you in English. Thank you for your understanding and your indulgence!
Are your problems now resolved?
I purchased a 3D Geeetech Delta Rostock 301 on September 24th, but I have the same problems as raoulito9 and you, and I am the René that he quoted from the Geeetech forum. I am using Linux Kubuntu 16.04 64 bits in French.
I am waiting to receive the following parts:
http://www.banggood.com/fr/3D-Printer-MK8-1_75mm-Remote-Extruder-Metal-Frame-Kit-For-Makerbot-Reprap-p-1070154.html
http://www.banggood.com/fr/200MM-4x6-MM-Diagonal-Push-Rod-L200-With-Magnetic-Ball-Joint-And-Steel-Ball-For-Kossel-3D-Printer-p-1090223.html
http://www.banggood.com/fr/220mm-x-3mm-3D-Printer-Borosilicate-Glass-Build-Plate-For-Heated-Bed-Prusa-Kossel-Rostock-Delta-p-1078559.html
It's easy to understand the improvements I want to make to my 3D printer.
I greatly appreciate your feedback.
Do you have the kindness and generosity to take stock of the current quality of your 3D prints with the Geeetech Delta Rostock 301 with photos or videos.
A big thank you to all !
Here is a link to get an overview of my topics (in French) on the Geeetech forum:
http://www.geeetech.com/forum/search.php?author_id=52717&sr=posts
Cordially,
Friend René
P.-s. : Pour les francophones, je traduis et améliore présentement le guide de l'utilisateur de la 301 et j'ai déjà traduit et amélioré le Guide d'assemblage de Geeetech pour la 301, en voici le lien : https://drive.google.com/open?id=0BwSVFmk-taYLdGRKT0k0eTE2MGs
Un pour tous et tous pour un !
One for all and all for one !
Imprimante 3D : Geeetech Rostock 301 dysfonctionnelle modifiée
Aide pour la configuration d'une delta Geeetech Rostock 301
|
Re: Geeetech Rostock 301 first topic December 01, 2016 07:42PM |
Registered: 7 years ago Posts: 11 |
It has been over a month now while this printer was sitting idle. I did everything I could to make the prints in the firmware and Repitier-Host and could not push enough plastic through the nozzle even cleaning the nozzle did not help. The extruders are not powerful enough. I ordered the metal extruders from bangood, and still they would stall.
I am now printing precice prints everytime. Here is how I did it.
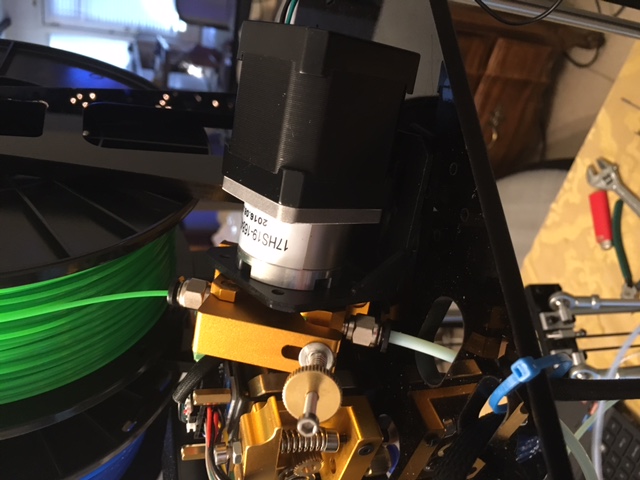
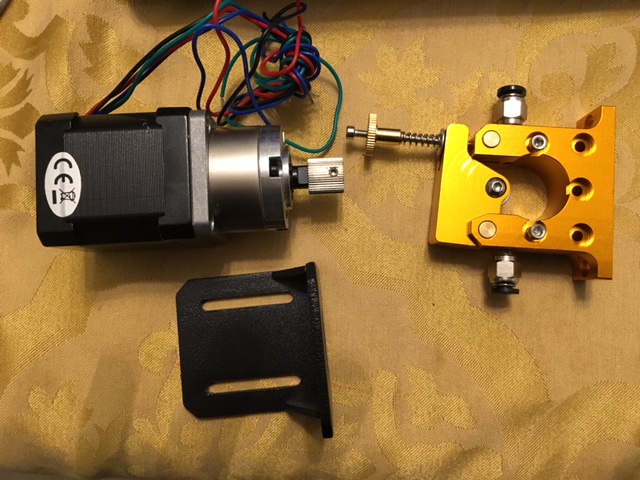
I ordered 1 planetary 5:1 Nema 17 gearmotor. from Stepperonline.com and a metal extruder from banggood that fits a planetary gearmotor and has a 8mm gear. The holes are off so I used a drill and opened them up so they fit.
After I got the printer working I ordered the other 2
so now my $370 dollar printer costs almost $600.00. Shame on Geeetech.
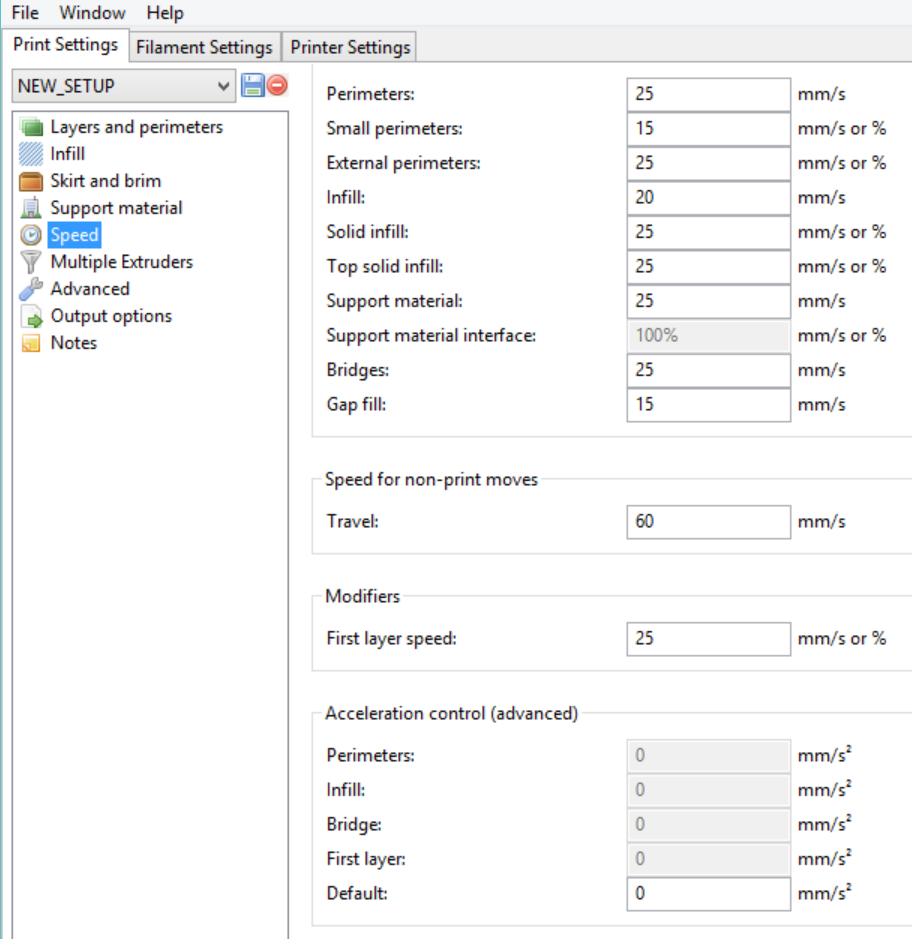
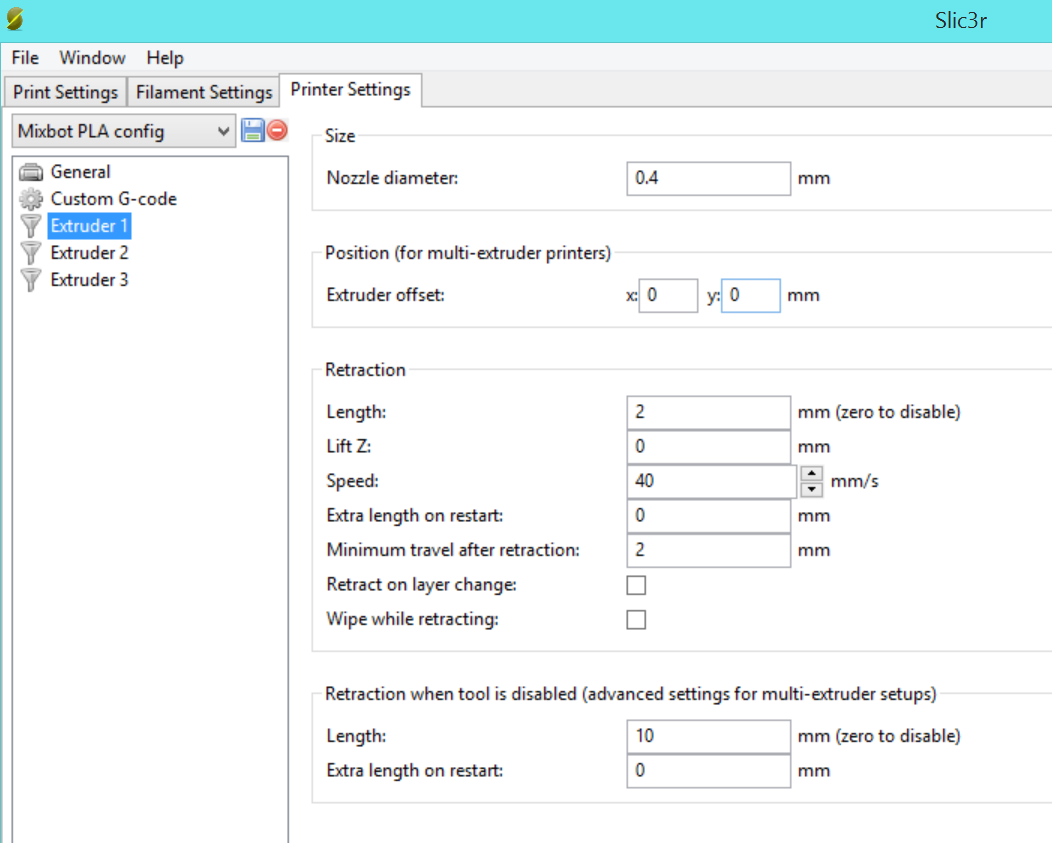
Now I had to calibrate the firmware so it extrudes the right amount of plastic. Using a caliper, I cut a 100mm piece of plastic and click the extrude 100mm button. It's important to not connect the Bowden tubes at this time. Just extrude to open air and measure the length it makes. Adjustments in the firmware are Control>Motion>Esteps/mm. Make your adjustment and Store memory. For some reason the first time you extrude after a firmware change in Repitier-host it is always wrong. So the first time I would only extrude 1mm then cut the line at the output end of the extruder and extrude 100mm and measure it, I ended up with 452 steps/mm and it started printing without stalling. The layers were seperating and that was due to speed. I will attach a pic of the settings and the extruders. I will slowly increase each speed but 30mm/sec was too fast and the printer would miss steps.
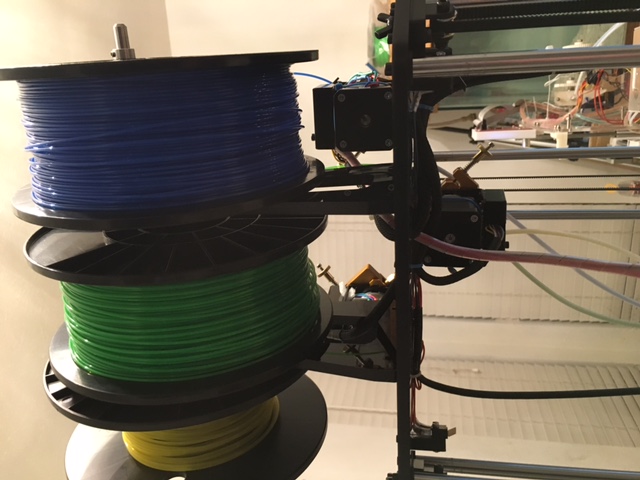
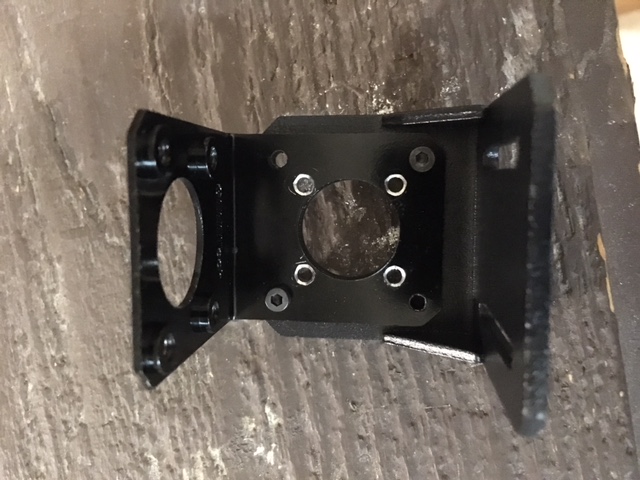
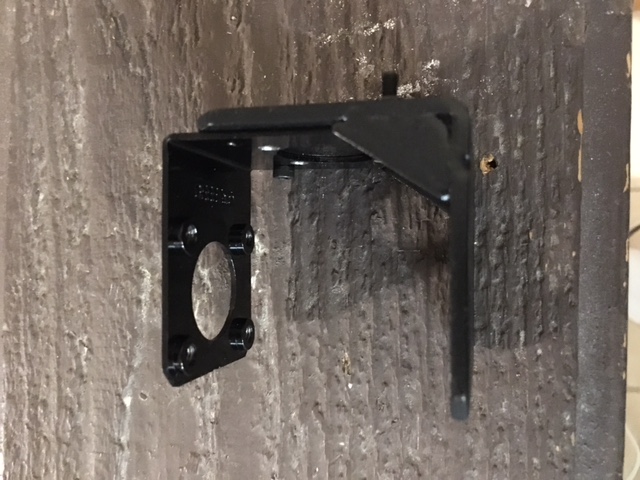
My only problem now is how am I going to mount these? I am attaching pics if anyone has an idea I would like to hear it.
I am now printing precice prints everytime. Here is how I did it.
I ordered 1 planetary 5:1 Nema 17 gearmotor. from Stepperonline.com and a metal extruder from banggood that fits a planetary gearmotor and has a 8mm gear. The holes are off so I used a drill and opened them up so they fit.
After I got the printer working I ordered the other 2
so now my $370 dollar printer costs almost $600.00. Shame on Geeetech.
Now I had to calibrate the firmware so it extrudes the right amount of plastic. Using a caliper, I cut a 100mm piece of plastic and click the extrude 100mm button. It's important to not connect the Bowden tubes at this time. Just extrude to open air and measure the length it makes. Adjustments in the firmware are Control>Motion>Esteps/mm. Make your adjustment and Store memory. For some reason the first time you extrude after a firmware change in Repitier-host it is always wrong. So the first time I would only extrude 1mm then cut the line at the output end of the extruder and extrude 100mm and measure it, I ended up with 452 steps/mm and it started printing without stalling. The layers were seperating and that was due to speed. I will attach a pic of the settings and the extruders. I will slowly increase each speed but 30mm/sec was too fast and the printer would miss steps.
My only problem now is how am I going to mount these? I am attaching pics if anyone has an idea I would like to hear it.
|
Re: Geeetech Rostock 301 first topic December 01, 2016 09:26PM |
Registered: 7 years ago Posts: 236 |
Hello,
Excuse me, I'm unilingual francophone and I use Google translate to translate the texts of the forum in French and to write to you in English. Thank you for your understanding and your complacency!
I hope not to bother you.
As you with metal clamps with pressure and spring adjustment bolt, does the serrated wheel slip on the filament or is the stepping motor jumping steps?
Assuming that:
1) the nozzle is not blocked.
2) the Teflon filament guide tube is not clogged.
3) the guide tube is not longer than between 520 and 550 mm.
4) The guide tube is perfectly round over its entire length.
5) That the guide tube is pressed a minimum distance of 65 mm into the radiator manifold of the heating nozzle and to the bottom of the radiator.
6) That up to the end of the tube guides the filament moves easily without loss of pitch of the motor.
If it is the serrated wheel that slips on the filament, it is because the pressure of the clamp on the filament is too weak and that it is necessary to adjust the clamp for more pressure on the filament. The serrated stepper motor must never slide over the filament, it is important!
If the toothed wheel of the stepper motor never slides over the filament, but the motor jumps, the motor driver's electrical adjustment is too low and must be increased by The tiny potentiometer directly on the driver. The usual value is between 0.6 and 0.7 Volt (refer to the instructions in the printer manual for the voltage adjustment procedure on stepper motor drivers).
I am not sure I understand your pictures and if you have correctly mounted the bolt and the spring on the clamps so that the pressure is sufficient on the filament. Does the adjustment change the advance or not of the filament in the guide tube and the heating nozzle?
Cordially,
Friend René
Un pour tous et tous pour un !
One for all and all for one !
Imprimante 3D : Geeetech Rostock 301 dysfonctionnelle modifiée
Aide pour la configuration d'une delta Geeetech Rostock 301
|
Re: Geeetech Rostock 301 first topic December 02, 2016 01:22AM |
Registered: 7 years ago Posts: 11 |
Hello L'ami Rene I went through all of that. at the end of my troubleshooting with a metal extruder on the original motor it would start printing and stall. Vref's were as high as they will go and there was not enough power to push the filament through the bowden tubes. they are as short as I can make them. I have checked the nozzle several times there is no blockage. You can push the filament with your hands. After I got the geared extruders(planetary) calibrated. The printer works fine and has been running almost non-stop for 2 days. I have printed several things now and they look great. Now I have to figure out how to mount them permanently. The printer works so well now I am starting to print things for fun. There only has been 2 incidents where the prints do not stick to the borcilite glass but I clean it and spray hairspray on it and it works well.
I just wish I could get a refund for my now 3 complete extruders I cannot use. This planetary motor is the way to go.
I just wish I could get a refund for my now 3 complete extruders I cannot use. This planetary motor is the way to go.
|
Re: Geeetech Rostock 301 first topic December 02, 2016 02:45AM |
Registered: 7 years ago Posts: 236 |
Hello Extruder0,
Thank you for feedback, it is very enlightening!
This is unfortunately bad news for all owners of the Geeetech Delta Rostock 301 (M301), that even at maximum power, stepper motors do not have enough power for this three-inlet nozzle!
As for a solution for your new engines, I deduce that the attachment of the old engines are not compatible with the new ones?
You could print an "L" manifold plate with old engine holes and holes for new engines.
If you could, photos and / or videos of your editing steps are examples of print results, both those that do not have a good result and those that finish well would be very useful.
Cordially,
Friend René
Un pour tous et tous pour un !
One for all and all for one !
Imprimante 3D : Geeetech Rostock 301 dysfonctionnelle modifiée
Aide pour la configuration d'une delta Geeetech Rostock 301
|
Re: Geeetech Rostock 301 first topic December 02, 2016 05:33AM |
Registered: 7 years ago Posts: 11 |
Rene,
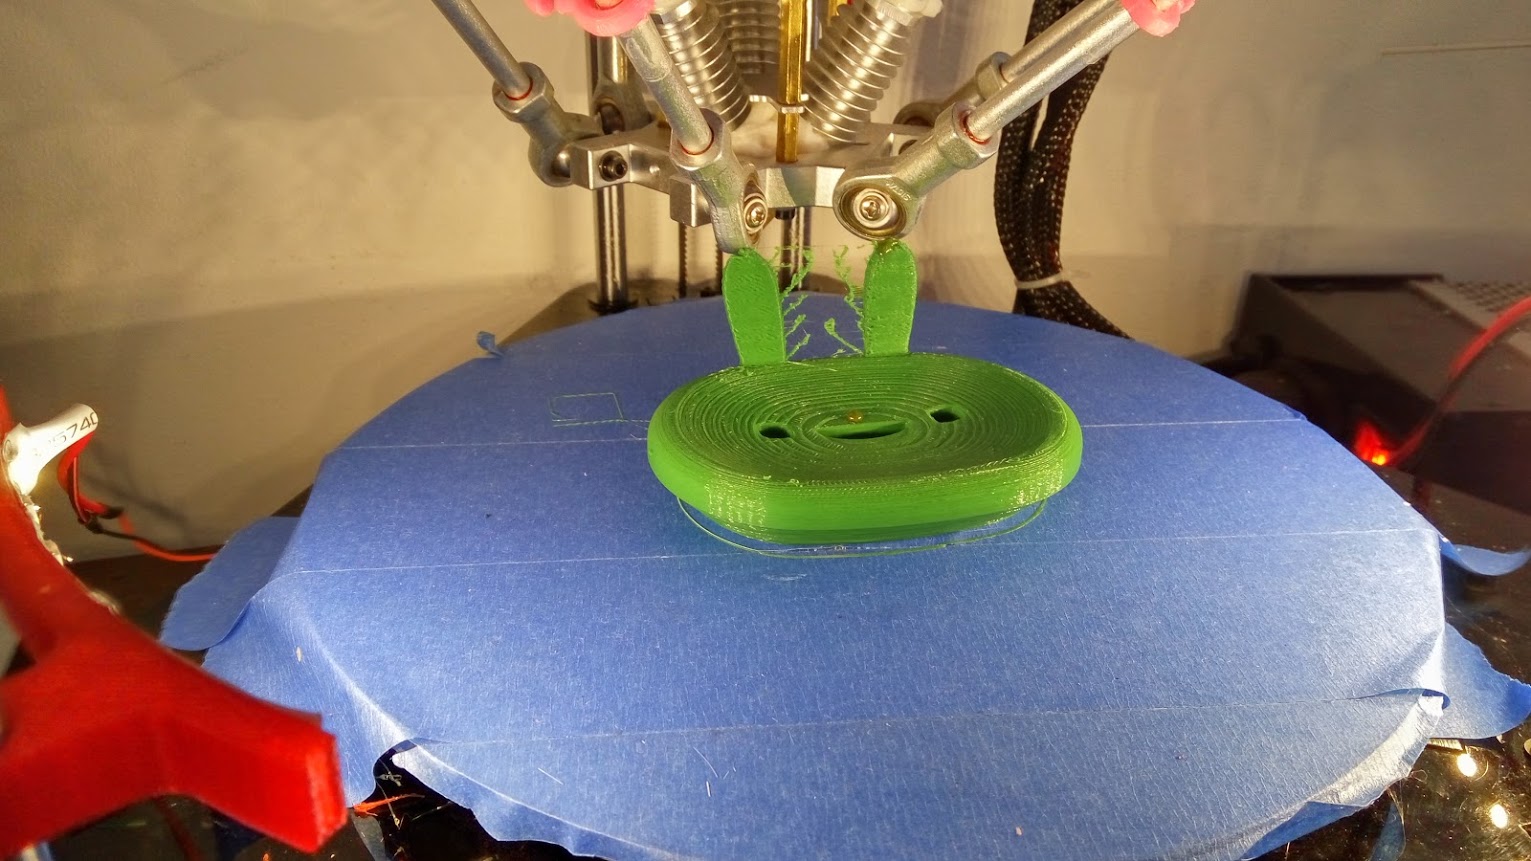
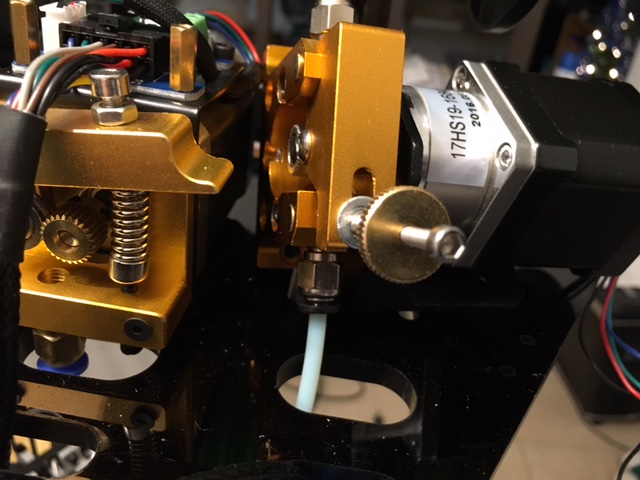
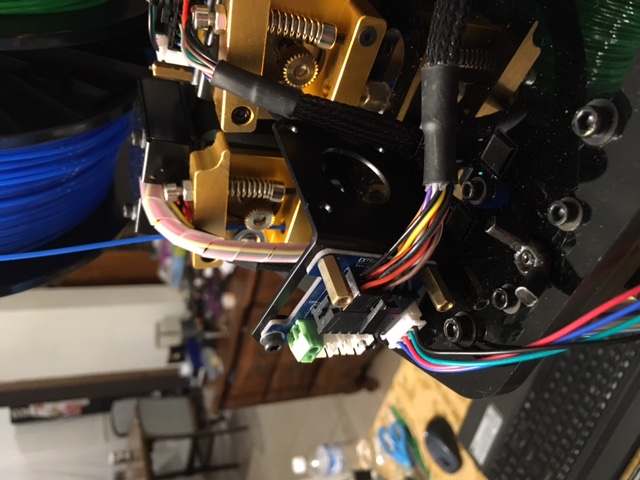
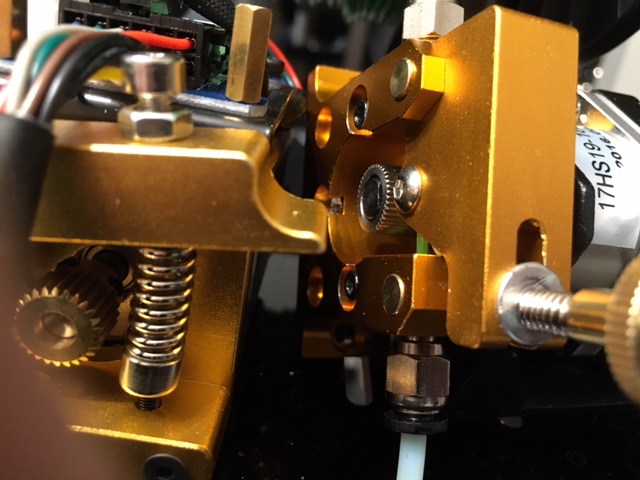
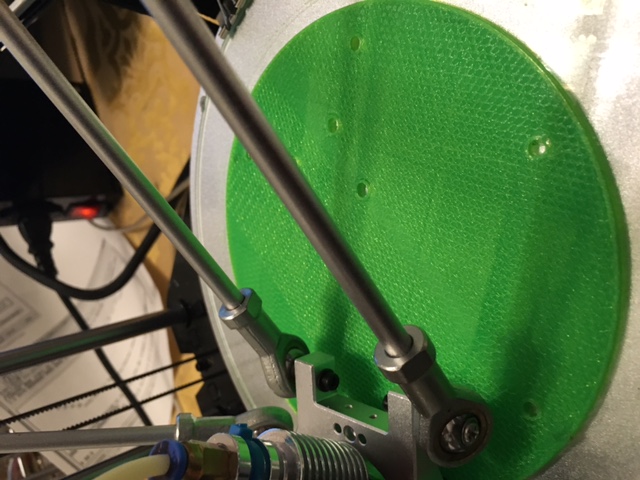
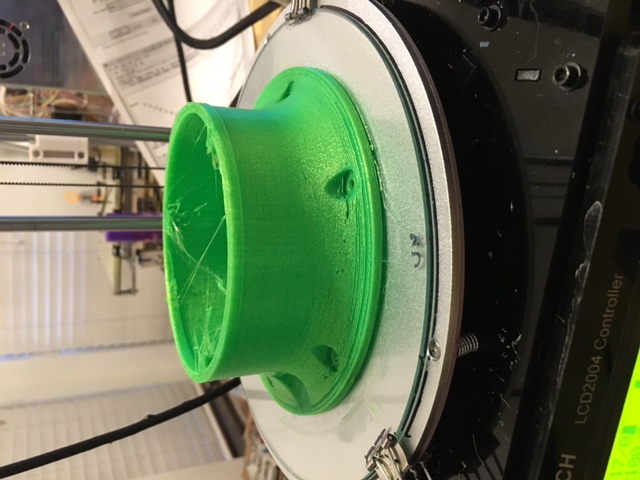
You are right the extruder motors do not have enough power in the direct-drive configuration that they come with to make proper prints they eventually will stall and the prints were terrible I ended up slowing it to 3mm/sec and the feedrate at 25% to get a decent print but that slow the filament would burn and the parts were brittle. It is possible to use a Wades extruder and you will be able to keep the motors just keep in mind that a ratio of 5:1 is probably the limit of the electronics. if you go too high it may start missing steps. I ended up with a planetary gearmotor thinking I would save space and fit them in the same spot. The problem I have is the adjustment bolt(in the first picture) will not allow them to be next to each other. In the second picture you see I just have it laying on the frame. In the third picture the electronics are just laying there too. But it works and works well. I have been printing continuously adjusting one parameter each print to get the speed as fast as I can without layer separation because at 30mm/sec the layers shift. So finally I am just fine tuning the settings after I find the best setting for speed then I will work on retraction(it does drool a bit). but for now the prints are precice, stick to the bed very well, The layers stick together and are very strong(I printed gears and could not break them apart)
If you are intrested I will go find all the part numbers and get links for them. For now I will show you all the pictures you asked for. All the bad prints I threw away but here is an explanation of them and what I did to fix them. I had 3 issues, Layer shifting and when the print finished the motors would shut off and the nozzle would fall onto the part. And the parts would warp off the bed.
For the layer shifting it was printing too fast so I slowed all speeds by half and that went away. I brought the speeds up until it did it again then lowered the speeds until the prints were good.
The warping was just a matter of finding the right bed temperature as I have glass on top of my bed. 65 degree C and Hairspray works well. and the parts come off easily so you do not have to re-level your bed. Sometimes the parts stick too well so I use keyboard spray, turn the can upside down and spray the bottom of the part. Wait a few seconds and the part comes off and leaves a smooth finish.
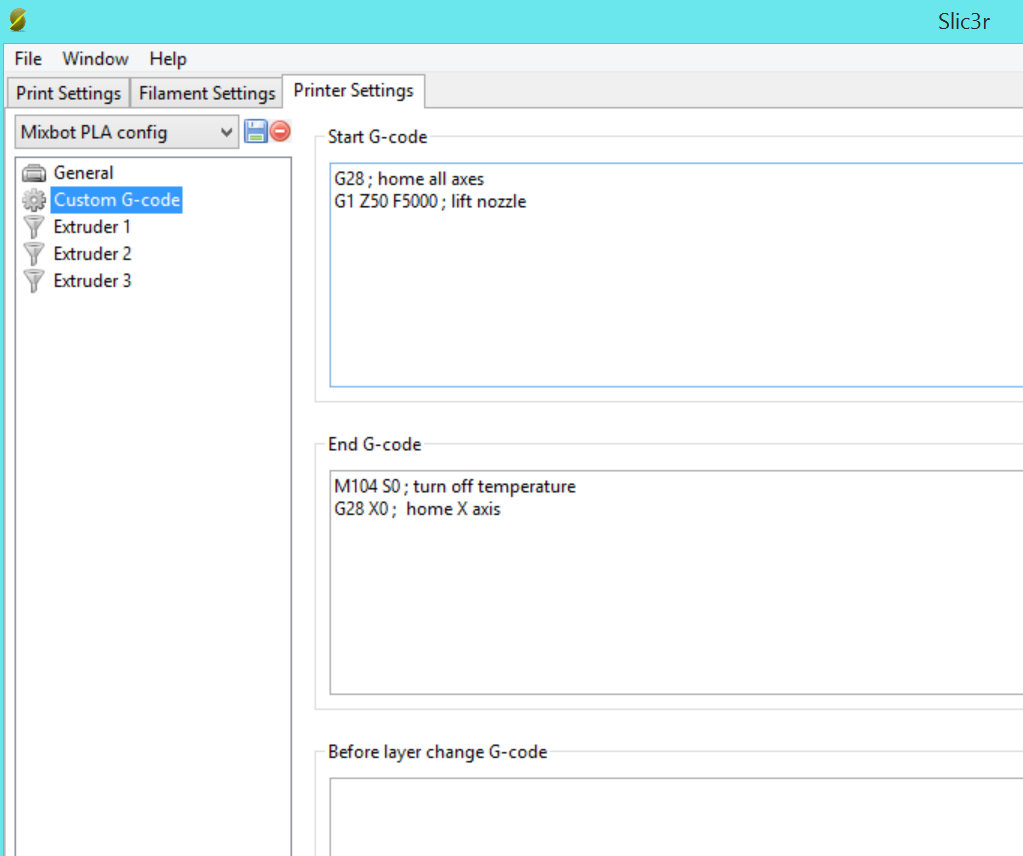
The crashing into the part is still a work in progress. I went into the configuration/printer settings tab/custom g-code and edited end g-code. where it says turn off motors I deleted it and added g28 x0 but sometimes that sends the nozzle into the side of the tower so I will try to send it to g0 z150 f2000 when this print finishes. I have my towers so free that when the motors turn off it always coasts all the way down and that was a problem because it would land onto the part and melt itself into it.
Edited 1 time(s). Last edit at 12/02/2016 05:38AM by Extruder0.
You are right the extruder motors do not have enough power in the direct-drive configuration that they come with to make proper prints they eventually will stall and the prints were terrible I ended up slowing it to 3mm/sec and the feedrate at 25% to get a decent print but that slow the filament would burn and the parts were brittle. It is possible to use a Wades extruder and you will be able to keep the motors just keep in mind that a ratio of 5:1 is probably the limit of the electronics. if you go too high it may start missing steps. I ended up with a planetary gearmotor thinking I would save space and fit them in the same spot. The problem I have is the adjustment bolt(in the first picture) will not allow them to be next to each other. In the second picture you see I just have it laying on the frame. In the third picture the electronics are just laying there too. But it works and works well. I have been printing continuously adjusting one parameter each print to get the speed as fast as I can without layer separation because at 30mm/sec the layers shift. So finally I am just fine tuning the settings after I find the best setting for speed then I will work on retraction(it does drool a bit). but for now the prints are precice, stick to the bed very well, The layers stick together and are very strong(I printed gears and could not break them apart)
If you are intrested I will go find all the part numbers and get links for them. For now I will show you all the pictures you asked for. All the bad prints I threw away but here is an explanation of them and what I did to fix them. I had 3 issues, Layer shifting and when the print finished the motors would shut off and the nozzle would fall onto the part. And the parts would warp off the bed.
For the layer shifting it was printing too fast so I slowed all speeds by half and that went away. I brought the speeds up until it did it again then lowered the speeds until the prints were good.
The warping was just a matter of finding the right bed temperature as I have glass on top of my bed. 65 degree C and Hairspray works well. and the parts come off easily so you do not have to re-level your bed. Sometimes the parts stick too well so I use keyboard spray, turn the can upside down and spray the bottom of the part. Wait a few seconds and the part comes off and leaves a smooth finish.
The crashing into the part is still a work in progress. I went into the configuration/printer settings tab/custom g-code and edited end g-code. where it says turn off motors I deleted it and added g28 x0 but sometimes that sends the nozzle into the side of the tower so I will try to send it to g0 z150 f2000 when this print finishes. I have my towers so free that when the motors turn off it always coasts all the way down and that was a problem because it would land onto the part and melt itself into it.
Edited 1 time(s). Last edit at 12/02/2016 05:38AM by Extruder0.
|
Re: Geeetech Rostock 301 first topic December 02, 2016 05:58AM |
Registered: 7 years ago Posts: 41 |
Hi extruder.
Another good step improving our printer !
Would you be kind enough to share with us :
Thank you again for your contribution.
Another thing :
All diamond heads are not equal. I previouly tried some different things to get my printer to print. One was to by a genuine reprap diamond head, thinking the geetech diamond noozzle was bad quality. The genuine one is 20 g lighter (46 g vs 66g) . But for me, i had better results with geeetech head.
The I tried another geeetech diamond head that banggood finally sent me as spare after i complained about 301 extrusion problems, and this other diamond noozzle did not work at all...
My first noozzle was finally the best one.
With metal extruders, depending on PLA i use, i can reach a maximum print speed of 25 or 30mm/s. Best quality remains bitween 15 and 20 mm/s. Above 30 mm/s, extruders lack of torque to push plastic.
I get with stock motors and metal extruders almost the same quality than what you show on your photos. I'm finally lucky !
Hi encountered the problem of nozzle crashing into the print , even if a G28 command or a G1 Z180 was at the end of endscript in CURA.
I solved it : I Just created another printer profile, identical, with right codes at the end... For some reason, some modifications in slicer setting are not saved and used when slicing, even if when you try to edit you see the right value.
Just now for example, i want to change the default noozzle temp from 210 to 213, i made it both in printer settings and in slicer settings, the printer every time begins to print at 210. If i edit it in parameters, it is already 213...
Last thing.
I see you photos and your prints suffer the same problem as mines : Hairs... this is in my opinion a retract problem. Did you think about it ?
To René, Max vref i was able to reach is 1,04; much more than 0,7. Motors still dont even get warm.
Edited 3 time(s). Last edit at 12/02/2016 08:51AM by raoulito9.
Another good step improving our printer !
Would you be kind enough to share with us :
- .Your slicer settings (slic3r or cura ?)
- .The link for buying your planetary motor
- .The printing speed you can reach with these motors (mm/s)
- .Your printing temperature for PLA
Thank you again for your contribution.
Another thing :
All diamond heads are not equal. I previouly tried some different things to get my printer to print. One was to by a genuine reprap diamond head, thinking the geetech diamond noozzle was bad quality. The genuine one is 20 g lighter (46 g vs 66g) . But for me, i had better results with geeetech head.
The I tried another geeetech diamond head that banggood finally sent me as spare after i complained about 301 extrusion problems, and this other diamond noozzle did not work at all...
My first noozzle was finally the best one.
With metal extruders, depending on PLA i use, i can reach a maximum print speed of 25 or 30mm/s. Best quality remains bitween 15 and 20 mm/s. Above 30 mm/s, extruders lack of torque to push plastic.
I get with stock motors and metal extruders almost the same quality than what you show on your photos. I'm finally lucky !
Hi encountered the problem of nozzle crashing into the print , even if a G28 command or a G1 Z180 was at the end of endscript in CURA.
I solved it : I Just created another printer profile, identical, with right codes at the end... For some reason, some modifications in slicer setting are not saved and used when slicing, even if when you try to edit you see the right value.
Just now for example, i want to change the default noozzle temp from 210 to 213, i made it both in printer settings and in slicer settings, the printer every time begins to print at 210. If i edit it in parameters, it is already 213...
Last thing.
I see you photos and your prints suffer the same problem as mines : Hairs... this is in my opinion a retract problem. Did you think about it ?
To René, Max vref i was able to reach is 1,04; much more than 0,7. Motors still dont even get warm.
Edited 3 time(s). Last edit at 12/02/2016 08:51AM by raoulito9.
|
Re: Geeetech Rostock 301 first topic December 02, 2016 06:40AM |
Registered: 7 years ago Posts: 236 |
Hello Extruder0,
A big thank you for everything, photos, experience, video, etc. !
Am I wrong or your first metal clamp its not very tight, or is it the opposite, they are tight almost to the maximum?
You confirm that the original stepping motors of the extruders with your first metal clamps did not have enough force and jumped with the drivers of the motors set to the maximum voltage for these stepper motors ( To my knowledge the maximum is the turn of 0.7 Volt, but I can be wrong)?
With the above adjustment, did the serrated wheel slide on the filament or not or the motor only jumps off?
Would not you be able to use the attachment of the electronic circuit of the extruders by fixing them from the back of the new stepping motors?
If not, cut the fasteners of the electronic circuit of the extruders to keep only one centimeter that could fix them only with the two bolts of the top of the fixing on the two bolts of the top of the stepping motor? And enlarge the center of the mounting to fit the contour of the stepper motor with a Dremel!
It seems you have a plastic fixture with large grooves for the fixing bolts that is with your new engine (see your image IMG_3139.JPG)?
So you can also cut the attachment of the electronic circuit of the extruders to keep only one centimeter that could fix them on the plastic fitting of the new engine that with the two bolts of the top of the fixing on two holes that you would do On the top of the plastic fixing?
As for the end-of-print script, at my home I only have "M104 S0" and "G28" the print head stays on top until the print is turned off by its switch On/Off. But I have no knowledge of G-Code at the moment.
Cordially,
Friend René
Un pour tous et tous pour un !
One for all and all for one !
Imprimante 3D : Geeetech Rostock 301 dysfonctionnelle modifiée
Aide pour la configuration d'une delta Geeetech Rostock 301
|
Re: Geeetech Rostock 301 first topic December 03, 2016 02:28AM |
Registered: 7 years ago Posts: 11 |
Rene since your post is translated it is hard to understand but I will try.. I have used 3 different types of extruders. The first one is the plastic one( That came with the printer) and it is junk throw it away. The second one was the all metal type the same ones Raoulito9 is using. That solved the problem of the gear slipping and will grip so hard the motor stalls on the highest Vref setting I could get which was 1.127v. I set the tension to where it would not slip but not so tight that it would cause the motor to stall. It would actually print but anything over 10mm/s the motor would stall there is not enough power to push the plastic through the bowden tube. Not in that direct drive system. When it skips the prints were terrible.
I took a gamble ordering the gearmotors but when it worked I ordered the other 2 motors. There is not any plastic on the motors or brackets.
I have an Idea on how to mount them but I have to wait until tomorrow to start( I broke the last drill bit) Here is my idea. I will take the brackets I ordered and the brackets that came with the printer and put temporary bolts in the 4 outer bolt holes and drill the 4 inner holes as the new extruder uses them. I will get longer bolts and mount the brackets the same as the original design, electronics on top, bracket on bottom. There will not be a need for my brackets anymore they will just be a template for drilling the holes. I will remove the second motor and turn extruder 1 and 3 sideways and use the original holes. I checked them they are the same sideways or regular. For the second extruder I will mount it in it's original holes upside down. It may take me a couple of days to do this, I will post pics when I finish.
Raoulito9,
I tried running at 30mm/s with the new extruders and the print quality is great. The problem I ran into was the layers would shift. I forgot which direction but it was x or y and not extruder related. I slowed it to 25mm/s and It prints perfectly. I can turn up the feedrate using the knob on the printer to 225% and it still prints fine but it starts shaking things off the table. I am not sure why it can print that fast but if you turn it to 30mm/s and FR100% it starts missing steps The Vref for x,y,z motors is .8v but for now I am going to turn up the speed( mm/s) each slowly until I find the setting that causes it.
I have encountered the same thing where the settings in slic3r are sometimes overridden but I think it's in the printer configuration in Repitier-host. I haven't tried Cura yet as there are more adjustments in slic3r.
But I will try what you suggest to stop the printer head from crashing into the part.
I know I have a problem with stringing and oosing but I am not going to work on Retraction until all of my extruders are mounted. because I know that modifing the bowden tubes will change the print feeding.
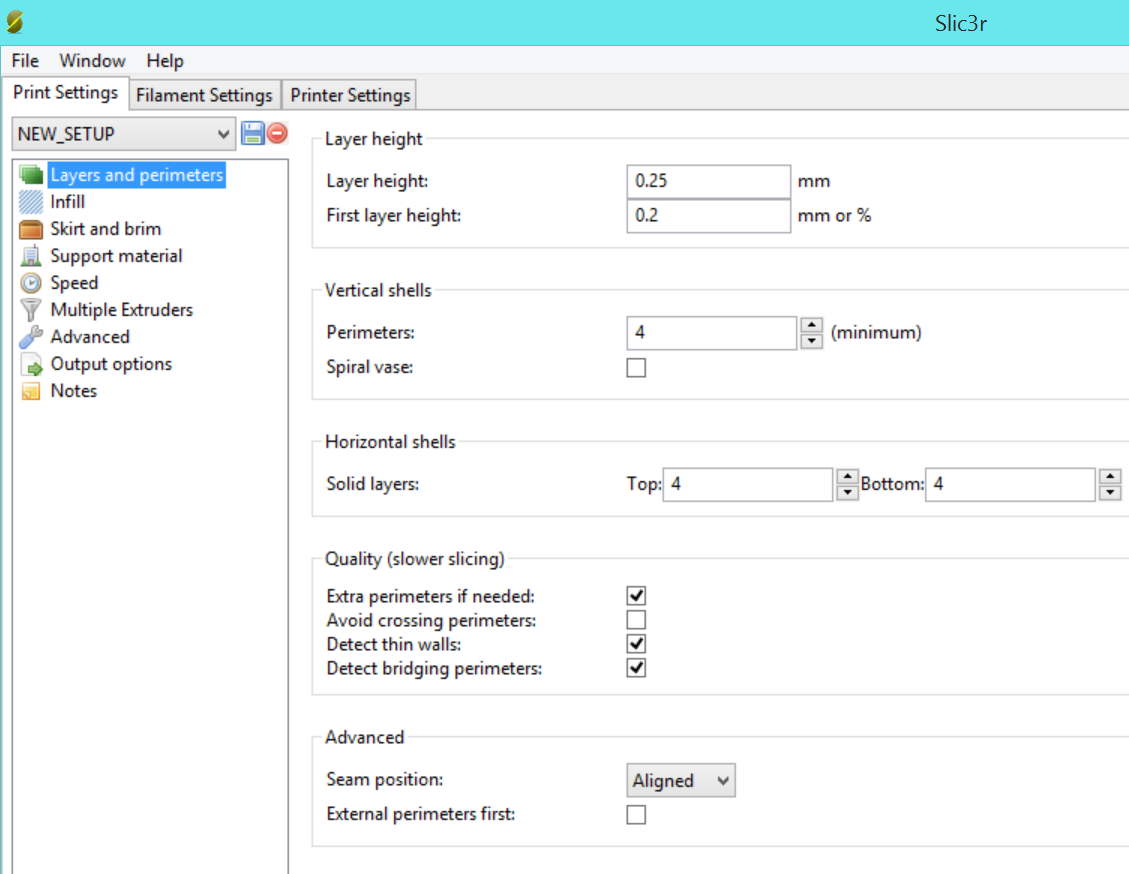
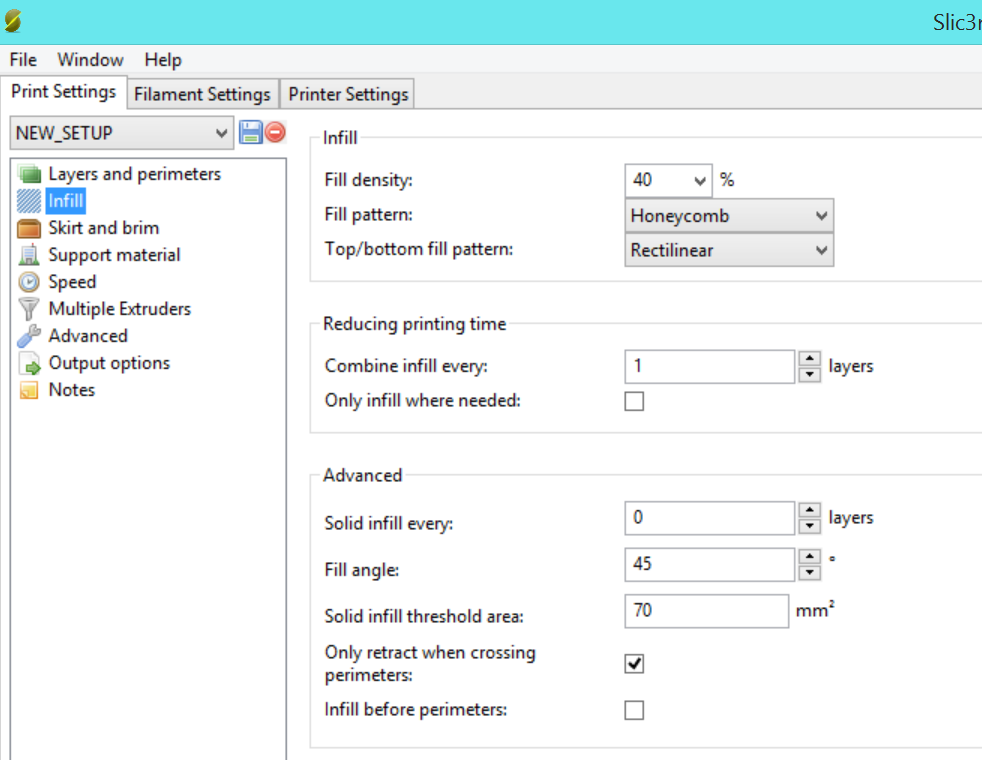
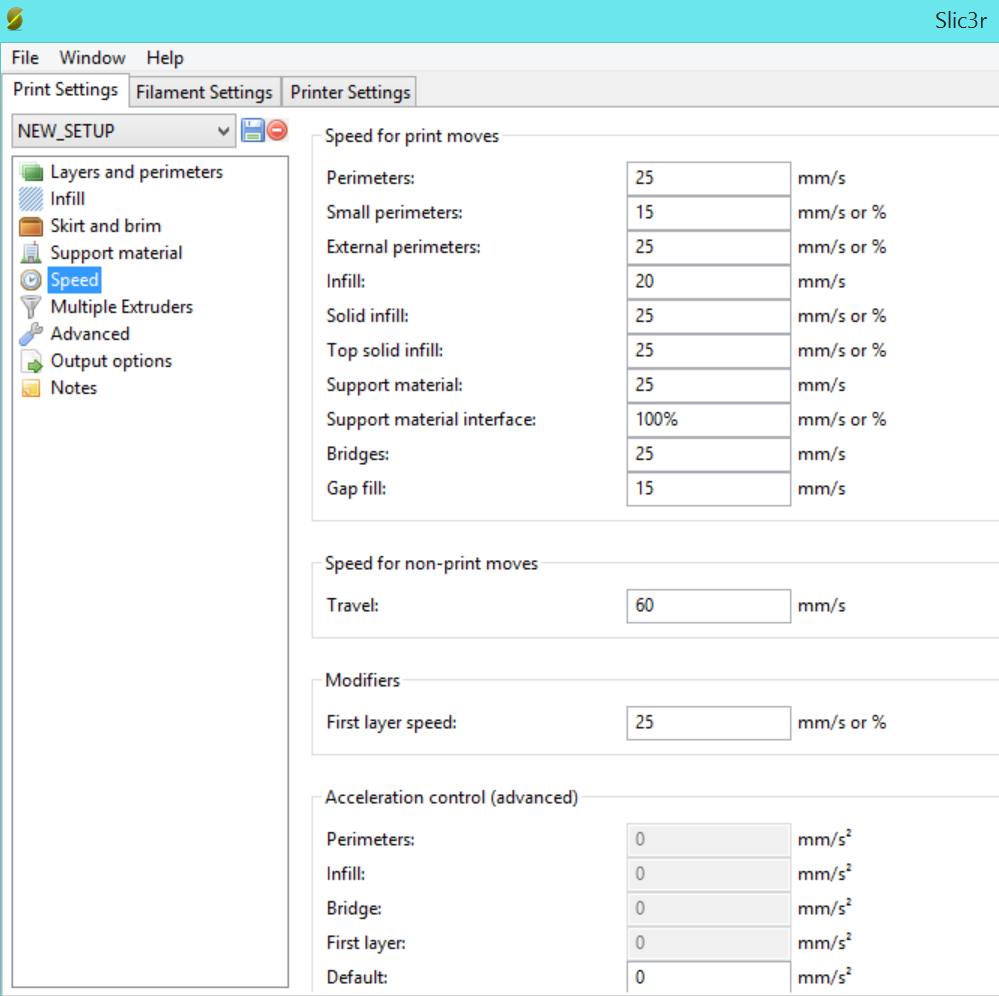
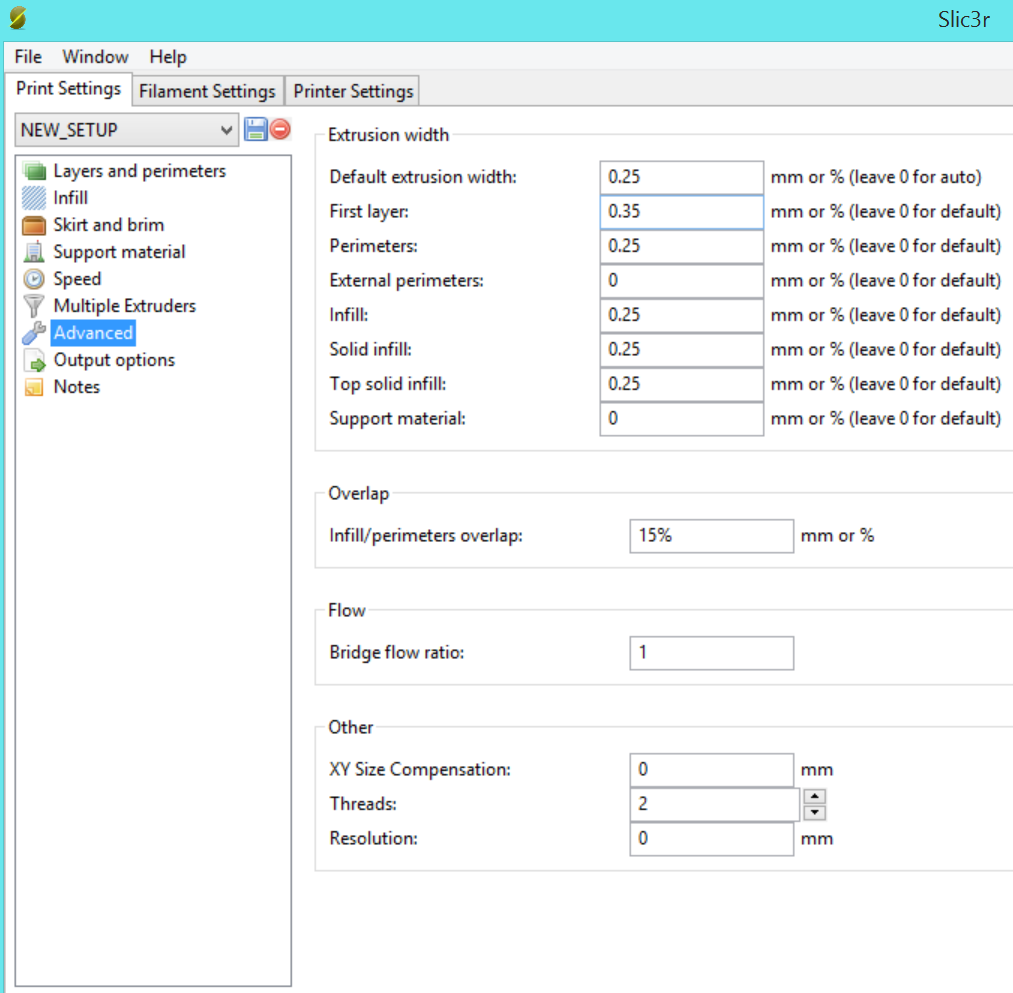
I will post pics of my settings but they are not final I am sure I will heavily modify them once everything is finished.
Raoulito9 can you do the same? Post screenshots of your settings? I know the extruders are limited but I want to try your settings before I remove the last motor.
Here are links for the parts I bought.
[www.omc-stepperonline.com]
[www.banggood.com]
The shaft is 8mm so choose that option.
The extruders do not fit the motors but they can be easily modified by a 3.6mm drill and milling the holes inward 1.5mm. If you have a drill press it may be easier to drill the holes larger but I kept breaking drill bits.
But now that I have this new design I would have done better ordering one right and one left extruder. I may still do that but not until I finish.
I took a gamble ordering the gearmotors but when it worked I ordered the other 2 motors. There is not any plastic on the motors or brackets.
I have an Idea on how to mount them but I have to wait until tomorrow to start( I broke the last drill bit) Here is my idea. I will take the brackets I ordered and the brackets that came with the printer and put temporary bolts in the 4 outer bolt holes and drill the 4 inner holes as the new extruder uses them. I will get longer bolts and mount the brackets the same as the original design, electronics on top, bracket on bottom. There will not be a need for my brackets anymore they will just be a template for drilling the holes. I will remove the second motor and turn extruder 1 and 3 sideways and use the original holes. I checked them they are the same sideways or regular. For the second extruder I will mount it in it's original holes upside down. It may take me a couple of days to do this, I will post pics when I finish.
Raoulito9,
I tried running at 30mm/s with the new extruders and the print quality is great. The problem I ran into was the layers would shift. I forgot which direction but it was x or y and not extruder related. I slowed it to 25mm/s and It prints perfectly. I can turn up the feedrate using the knob on the printer to 225% and it still prints fine but it starts shaking things off the table. I am not sure why it can print that fast but if you turn it to 30mm/s and FR100% it starts missing steps The Vref for x,y,z motors is .8v but for now I am going to turn up the speed( mm/s) each slowly until I find the setting that causes it.
I have encountered the same thing where the settings in slic3r are sometimes overridden but I think it's in the printer configuration in Repitier-host. I haven't tried Cura yet as there are more adjustments in slic3r.
But I will try what you suggest to stop the printer head from crashing into the part.
I know I have a problem with stringing and oosing but I am not going to work on Retraction until all of my extruders are mounted. because I know that modifing the bowden tubes will change the print feeding.
I will post pics of my settings but they are not final I am sure I will heavily modify them once everything is finished.
Raoulito9 can you do the same? Post screenshots of your settings? I know the extruders are limited but I want to try your settings before I remove the last motor.
Here are links for the parts I bought.
[www.omc-stepperonline.com]
[www.banggood.com]
The shaft is 8mm so choose that option.
The extruders do not fit the motors but they can be easily modified by a 3.6mm drill and milling the holes inward 1.5mm. If you have a drill press it may be easier to drill the holes larger but I kept breaking drill bits.
But now that I have this new design I would have done better ordering one right and one left extruder. I may still do that but not until I finish.
Attachments:
open | download - setting1.PNG (119.7 KB)
open | download - Setting2.PNG (107 KB)
open | download - Setting3.PNG (137.2 KB)
open | download - Setting4.PNG (137.9 KB)
open | download - Setting5.PNG (61.8 KB)
open | download - Setting6.PNG (70.7 KB)
open | download - Setting7.PNG (108.7 KB)
open | download - setting1.PNG (119.7 KB)
open | download - Setting2.PNG (107 KB)
open | download - Setting3.PNG (137.2 KB)
open | download - Setting4.PNG (137.9 KB)
open | download - Setting5.PNG (61.8 KB)
open | download - Setting6.PNG (70.7 KB)
open | download - Setting7.PNG (108.7 KB)
|
Re: Geeetech Rostock 301 first topic December 03, 2016 04:19AM |
Registered: 7 years ago Posts: 236 |
Hello Extruder0 and all,
My present answer is in itself a test about automatic translations and the RepRap.org community. For this text, could you please use a translator like Google Translator if you do not read French? Thank you !
Je fais un test, avec ma présente réponse qui sera en français, utilisez Google Transletor pour ce test.
Peut-être que la traduction du français à une autre langue que l'anglais que vous comprenez aidera à me comprendre.
Deplus, ici dans le forum, il y a aussi d'autres personnes qui utilise aussi un traducteur pour leur langue maternelle comme moi ne sont pas anglophone. Car traduire du français à l'anglais et après traduire vers une autre langue, c'est une vraie catastrophe !
Je connais bien les problèmes que causent les traducteurs automatiques. Ils font perdre 50% de la compréhension d'un texte. Cela est causé par les syntaxes inversées de la position des mots dans les phrases et par le fait que souvent, les mots traduits ne correspondent pas au contexte de la phrase.
Comme je suis unilingue francophone, je vis cela tous les jours et c'est pénible.
Voilà pour ce qui touchait à la traduction.
Revenons aux imprimantes 3D.
J'avais déjà bien compris pour les trois forces motrices (les photos ont beaucoup aidé) :
1) Moteur et pince originaux.
2) Moteur original et nouvelle pince en métal.
3) Nouveau moteur et nouvelle autre pince.
Je pense bien comprendre votre nouveau projet avec l'ancienne fixation et une nouvelle fixation et le repositionnement des moteurs. Avec vos futures photos, je saurai si j'ai bien compris.
Pensez à toujours mentionner les paramètres de base comme :
1) Diamètre de la buse que vous utilisez
2) La matière utilisée (PLA, ABS, autre)
3) Couleur de la matière (cela joue sur l'extrusion)
4) Le fabricant de la matière (cela joue sur l'extrusion)
5) Le diamètre de la matière
6) La température de la buse
7) La température de la plaque d'impression
8) La hauteur de première couche
9) La hauteur des autres couches
10) Le nombre de couches des contours de surface
11) Le pourcentage de remplissage
12) La vitesse d'impression
13) La vitesse de déplacement
14) La vitesse d'accélération
15) La vitesse d'extrusion
16) La distance de rétractation du filament
Tous ces paramètres sont déterminants et pourraient nous guider pour trouver les bons réglages
Ne pas avoir ces paramètres nous garde dans le noir et diminue nos moyens pour vous aider et les chances de solutionner le ou les problèmes.
Évidemment, une photo vaut mille mots, alors pour une vidéo c'est...
Ici, il y a surement une autre personne que moi qui pourrait vous donner les bons G-Code pour les scripts de l'imprimante et la configuration de Repetier-Host.
Quelle est la longueur de vos tubes guide Bowden en teflon ?
Quelle est la longueur d'enfoncement de vos tubes guide Bowden dans le collecteur radiateur de la buse d'impression ?
Assurez-vous que vos tubes guide soient bien ronds sur toute leur longueur en incluent la rondeur aux deux extrémités. Beaucoup de gens ne vérifient pas ce point très très important.
C'est une très bonne idée de garder un moteur originale avec une pince en métal pour des tests de comparaisons.
Idéalement, si nous pouvions toujours ajouter en pièces jointes de nos textes ici sur le forum, les deux fichiers de configuration de Repetier-Host, nous progresserions plus rapidement.
Raoulito9 est bilingue (francophone et anglophone) et nous travaillons de concert pour trouver les meilleurs réglages et nous entre-aider. Je suis tout ce qu'il fait.
Un grand merci pour les hyperliens de vos pièces et toutes les images, c'est super !
Cordialement,
L'ami René
P.-s. : Do you want me to do the english translation of this answer?
Un pour tous et tous pour un !
One for all and all for one !
Imprimante 3D : Geeetech Rostock 301 dysfonctionnelle modifiée
Aide pour la configuration d'une delta Geeetech Rostock 301
|
Re: Geeetech Rostock 301 first topic December 03, 2016 05:14AM |
Registered: 7 years ago Posts: 41 |
Hi extruder.
Thank you for your settings.
Try Cura, using the config files attached.
Import them both in printer (rcp) and filament (rcf) tab into Cura settings.
about printing hairs, i'm sure it's about retract. The 3 extruders should retract instead of just one.
As i said im my previous post, i have been luckier than you because my stock nozzle was able to extrude with stock motors (and metallic extruders).... I tried 3 noozzles, including a genuine reprap one and only the first one was ok.
I bought new stepper drivers, hopping to be able to increase more vrefs, but did not try them yet....
I'll tell you.
|
Re: Geeetech Rostock 301 first topic December 07, 2016 09:55PM |
Registered: 7 years ago Posts: 11 |
Well it's been 4 hellatious days but my printer is finally assembled and I am printing a large circle just to see how level my bed is. I am using a new nozzle as my extruders are so powerful it blew that one apart. I was chasing clogs for 2 days and even though I knew my teflon tubes were all the way in, it blew them out. I thought I was printing too close to the bed but even when I backed it off, Plastic would go out the mixing nozzle and into one of the other colors. I found an easy way to clean that type of nozzle because I thought a torch might deform the brass. I put the nozzle in the oven and hit "Clean". It worked for 2 prints then blew a fitting out of the other side in two, destroyed the ptfe tubing as molten plastic pushed through the other 2 tubes. I got a new nozzle and turned Vref to .9volts thinking it will stall instead of doing all of that. And aside from a small leak that I tightened up and days of leveling, my first prints are impressive. The new extruders push out only what is needed and can go to a 225%FR easily. although for the current print I am running it slow.
so to recap...Original extruders gone replaced with gearmotors
nozzle gone...replaced w/ internal PTFE tubing. Bowden lines replaced.
2 quick connect fittings destroyed
bent 2 of the endstop screws and replaced all 3 springs.
But I am printing. And I can finally work on fine tuning it.
so to recap...Original extruders gone replaced with gearmotors
nozzle gone...replaced w/ internal PTFE tubing. Bowden lines replaced.
2 quick connect fittings destroyed
bent 2 of the endstop screws and replaced all 3 springs.
But I am printing. And I can finally work on fine tuning it.
Attachments:
open | download - IMG_3180.MOV (400.9 KB)
open | download - IMG_3168.JPG (96.6 KB)
open | download - IMG_3158.JPG (89.3 KB)
open | download - IMG_3156.JPG (125 KB)
open | download - IMG_3153.MOV (490.6 KB)
open | download - IMG_3149.JPG (111.3 KB)
open | download - IMG_3146.JPG (114.6 KB)
open | download - IMG_3145.JPG (121.1 KB)
open | download - IMG_3182.MOV (499.6 KB)
open | download - IMG_3183.JPG (117.5 KB)
|
Re: Geeetech Rostock 301 first topic December 08, 2016 03:01AM |
Registered: 7 years ago Posts: 236 |
Hello Extruder0,
Bonjour Extruder0,
You can find the original text into English following this original French text.
Vous trouverez le texte original traduit en anglais à la suite du présent texte original en français.
Un grand merci pour le retour d'expérience, les vidéos et les photos, c'est super !
C'est un gros boulot et de grosse modification !
Je fais le souhait que vous nous teniez informés de la progression de vos paramètres de configurations et de la qualité de vos impressions.
Encore merci !
Cordialement,
L'ami René
- - - - - - - - - - - - - - - - - - - - - - - - - - - - - - - - - - - - - - - - - - - - - - - - - - - - - - - - - - - - - - - - - - - - - - -
Hello Extruder0,
Excuse me, I am unilingual francophone and I use Google translator to translate the texts of the forum in French and to write to you in English. Thank you for your understanding and your indulgence for these texts translated mechanically!
A big thank you for feedback, videos and photos is great!
It's a big job and big change!
I wish that you keep us informed of the progress of your parameter settings and quality of your prints.
Thanks again !
Cordially,
Friend René
Un pour tous et tous pour un !
One for all and all for one !
Imprimante 3D : Geeetech Rostock 301 dysfonctionnelle modifiée
Aide pour la configuration d'une delta Geeetech Rostock 301
|
Re: Geeetech Rostock 301 first topic December 08, 2016 02:28PM |
Registered: 7 years ago Posts: 41 |
Quote
Extruder0
Well it's been 4 hellatious days but my printer is finally assembled and I am printing a large circle just to see how level my bed is. I am using a new nozzle as my extruders are so powerful it blew that one apart. I was chasing clogs for 2 days and even though I knew my teflon tubes were all the way in, it blew them out. I thought I was printing too close to the bed but even when I backed it off, Plastic would go out the mixing nozzle and into one of the other colors. I found an easy way to clean that type of nozzle because I thought a torch might deform the brass. I put the nozzle in the oven and hit "Clean". It worked for 2 prints then blew a fitting out of the other side in two, destroyed the ptfe tubing as molten plastic pushed through the other 2 tubes. I got a new nozzle and turned Vref to .9volts thinking it will stall instead of doing all of that. And aside from a small leak that I tightened up and days of leveling, my first prints are impressive. The new extruders push out only what is needed and can go to a 225%FR easily. although for the current print I am running it slow.
so to recap...Original extruders gone replaced with gearmotors
nozzle gone...replaced w/ internal PTFE tubing. Bowden lines replaced.
2 quick connect fittings destroyed
bent 2 of the endstop screws and replaced all 3 springs.
But I am printing. And I can finally work on fine tuning it.
Wow, great job !
This printer is like a boss at the end of a level when playing a video game.
It is not intended to print, but to be tuned !!!
:-)
|
Re: Geeetech Rostock 301 first topic December 12, 2016 05:03AM |
Registered: 7 years ago Posts: 11 |
Raoulito9,
I have been printing small objects perfectly, a 20mm x 20mm x 10mm cube, several similar objects and they measure close to what they should be. I tried a large object and it seemed to print close to perfect (still need to work on retraction) But after 40mm on the z axis, layer 130 of 138. The nozzle started to drag on the print as if z axis was not raising high enough for the next layer until it started to skip steps because it was not raising high enough. I noticed that a perfectly level bed was not possible because the firmware does not allow adjustments in the delta radius in 100th's. ie I needed to adjust it to 90.05 and settled for 90. In the first post you said( and I dont know how to quote things yet)
"2 When configuring printer, after levelling the bed (caliper needed), on printer screen adjust printer rod lengh (200 for me), printer heigh (225 for me) and Z offset (0,2 for me), Rod radius was 93,1 for me."
is my problem z offset? and I see a lot of discussions about SMOOTH_ROD_OFFSET, DELTA_CARRIAGE_OFFSET
Did I skip steps? and If so can you explain them in great detail concerning this printer.
Thanks
|
Re: Geeetech Rostock 301 first topic December 12, 2016 09:48AM |
Registered: 7 years ago Posts: 41 |
Hi extruder.
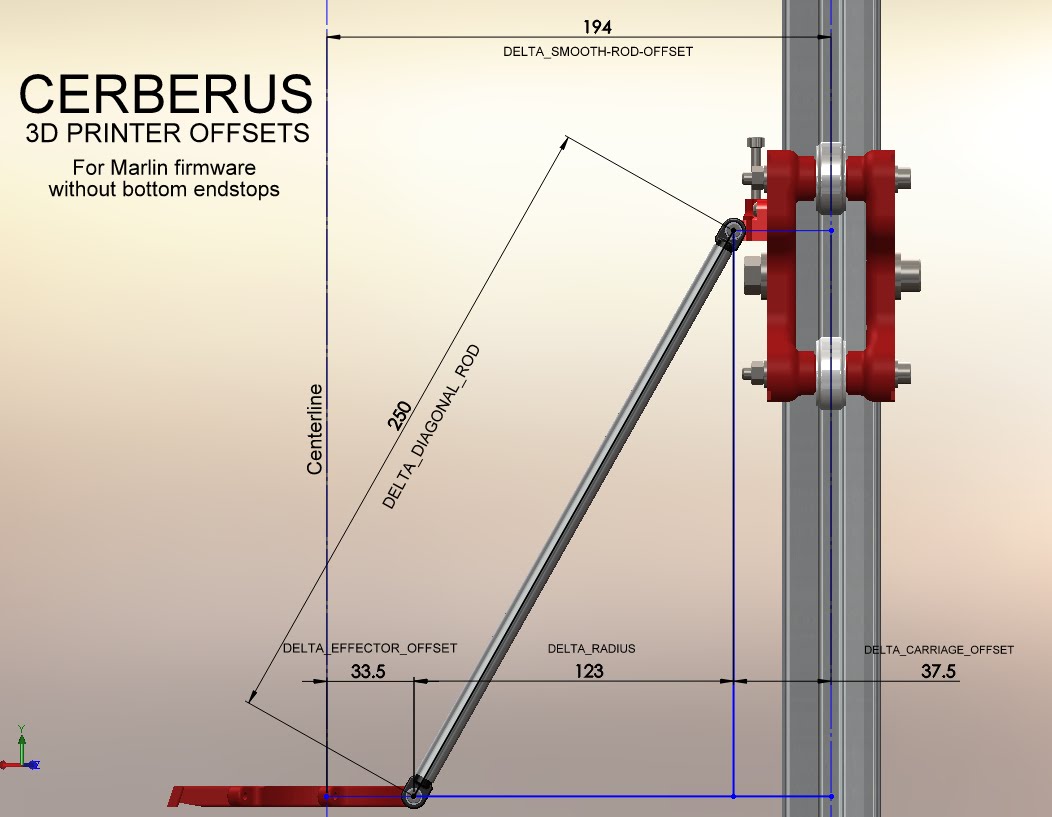
Look the attached picture, it should help you understanding the variables for a Marlin inspired firmware printer... helps me to !
About your difficulties to go above 40 mm, i must admit i've no spécific idea. I've already printed something higher than that, like some 100mm, with no problem.
Which is your firmware version ? If it is lower than 1.0.0.2, then upgrade.
When i asked to geetech the changelog, for the newer firmware, they answered me that sometimes printer was crashing when printing with old version...
Did you try to increase your steppers vrefs ?
Did you use Vhop(or zhop ?... not sure, i've not got my printer with me...) parameter in cura ?
By the way, where do you live ? I'm in Paris ! :-)
Edited 3 time(s). Last edit at 12/12/2016 10:03AM by raoulito9.
|
Re: Geeetech Rostock 301 first topic December 15, 2016 08:12PM |
Registered: 7 years ago Posts: 1 |
Hello everyone (sorry for my English... )
I have my printer 301 recently, it's been more than 2 days using it and I can print, I need to configure a couple of details and that's it.
I worked with the original extruder without problems, I attach my configuration (Slic3r).
regards
I have my printer 301 recently, it's been more than 2 days using it and I can print, I need to configure a couple of details and that's it.
I worked with the original extruder without problems, I attach my configuration (Slic3r).
regards
|
Re: Geeetech Rostock 301 first topic December 16, 2016 02:34PM |
Registered: 7 years ago Posts: 41 |
|
Re: Geeetech Rostock 301 first topic December 26, 2016 04:39PM |
Registered: 7 years ago Posts: 13 |
Hi Raoulito and Extruder,
I'm taking my first steps in 3D printing, was thrilled about the mixing promisses of this printer - and jumped on it.
Your discussions give me courage to go on - and very good links to buy replacement parts...
I used the Marlin picture on delta params and I measure my Rod length as 196 and Effector offset as 36.5. Both params are off factory set to other values for me. (188 and 33)
I will try to level my bed (again) with these updates.
What is the z-offset your talking about?
Do you know what Delta Printer Radius paramer is doing or referring to?
Greetz,
Mikael (Belgium - near Lille)
Topic2 - cutting in the heatsing?
I'm also wondering if I can't reduce the required power to push the filament in the extruder. The filament softens quite a bit in the last +-10mm close to the hotend. This gives more friction with the teflon?
So one thing I wonder about is the heatbreak. There is no clean cut between hotend and heatsink since the latter is exposed for +-10mm between hotend and cooler. (see 6:20 and 9:20 in this movie: [www.youtube.com] - I guess I'm also learning the hard way here.)
I was planning to take my saw and cut off the top of the heatsink, allowing the cooler to be screwed closer to the hotend and keeping more filament strong until the very end. This will most likely require cotton or silicon to be put on top of the hotend and removal of the 'ninjastar' platform breaking the fanflow, maybe even further height adjustment and drilling in the topplate holding the fan (top of coolers will be closer together)
What's your idea on this? Crazy? Did you do it before or have some reference?
Would you advise me to continue that road - or shall I keep it for later in case my extruder motors keep on skipping?
|
Re: Geeetech Rostock 301 first topic January 03, 2017 05:22PM |
Registered: 7 years ago Posts: 13 |
Hi,
would you mind helping me in the right direction concerning bed leveling of my Rostock 301 pls?
I've posted my problem here:
[www.geeetech.com]
It would mean a lot if I can get this right.
Thanks in advance,
Mikael
would you mind helping me in the right direction concerning bed leveling of my Rostock 301 pls?
I've posted my problem here:
[www.geeetech.com]
It would mean a lot if I can get this right.
Thanks in advance,
Mikael
|
Levelling Rostock 301 Bed January 06, 2017 08:54AM |
Registered: 7 years ago Posts: 41 |
Hi Mickael.
My procedure for bed leveling.
1 The bed is attached to the back delta plate with 3 screws with springs. Be sure that it is perfectly level, adjusting the screws, with a caliper or some wedge.
2 Set printer height to 220 on screen printer
3 enter those scripts in repetier (printer config):
script1 G0 X0 Y0 Z5 F2000
script2 G0 X60 Y-40 Z5 F2000
script3 G0 X-60 Y-40 Z10 F2000
script4 G0 X0 Y70 Z5 F2000
4 Home printer and use scrip1, it will drive the head at the center of the bed, close to it, lower Z to 0 with repetier manual control, and measure the remaining distance (in mm)
5 Adjust printer height adding the mm you measured at step 4 (for my printer, 225)
6 Home printer, put a A4 80g sheet of paper on the bed, launch scrip 1, lower head to 0 manually (0.1 by 0.1 steps),
7 The sheet of paper must be barely blocked at 0, and move almost freely at 0,2. If not, adjust Zoffset in printer screen to get that result. Home each time you adjust Z offset.
8 Use script 2 (it will drive the head close to a column) and lower head to 0 manually (0.1 by 0.1 steps). The sheet of paper must be barely blocked at 0, and move freely at 0,2.
9 If not, adjust the screw (with small spring) on the carriage (screw it if head is far from bed at 0, unscrew if head crashed on bed before 0).
10 Home printer and go back to step 8
11 Do the same with each column, using script 3 and script 4 (steps 8 to 10). Do it at least 2 or 3 times. (column X, then Y, then Z, and again, and once again). Lets admit the sheet of paper trick is perfect, close to each column.
12 Home printer, put a A4 80g sheet of paper on the bed, launch scrip 1, lower head to 0 manually (0.1 by 0.1 steps).
13 If you are lucky, then the sheet of paper must be barely blocked at 0, and move almost freely at 0,2.
14 if head is to far from bed, then your bed is "concave"; If bed is concave, then reduce the Control/delta/delta radius value.If it is convexe, then augment it.
15 Go back to 12 till your Z=0 head is perfectly adjusted (paper trick step 13)
16 check one more time the Z=0 close to each column with scripts 2, 3 and 4 (paper trick)
Tadaaaa....
Your bed is levelled !
tell me if my procedure if ok for you, or if you need some more precision.
Serge (from Paris).
Edited 1 time(s). Last edit at 01/07/2017 03:51AM by raoulito9.
|
Re: Levelling Rostock 301 Bed January 12, 2017 04:57PM |
Registered: 7 years ago Posts: 13 |
Hi Serge, all,
I was in hibernation the last week hence the late reply!
Your calibration method is quite the same as the one I used (recommended by Geeetech), except - it's faster because you fix the center point 1 first - great!
My latest experiments and gathering of statistical info tell me that there is something missing in all alignment procedures I've been taking in!
The Delta_Diagonal_Rod parameter is what is causing my diagonal deviations. I shouldn't be using the actual measured value of 197mm despite me measuring and verifying, making jigs to be sure etc... I need to use the value that suits best the printer. It looks like I will end up with a value of 199mm in order to balance out the differences over the diagonals. Can you confirm? Would I be introducing other nasty side-effects with this 'misalignment'?
The description of Geeetech and yourself give me a Delta_Radius of 93.0(93.1)mm.
Still to be proven in the next days, but with those values it looks as if I will have a levelled bed over X and Z tower...
Yeah, it looks as if I have a constant offset of the Ytower diagonal for all measurements I've done so far in comparison with the X and Z tower diagonals... I'm assuming still a mechanical deviation and will post when I can pinpoint it.
Thanks for the explanation and CU!
|
Re: Geeetech Rostock 301 first topic January 13, 2017 10:25AM |
Registered: 7 years ago Posts: 13 |
Quote
flintewn
Quote
raoulito9
What do you think about that ?
I think your idea fits perfectly with your requirement, because you need to switch on and off, as mentionned by geeetech use the M106 g-code command.
For me as discussed before, i'll use an airpump with crystal a crystal soft tubing comming and fixed next to the nozzle.
Hi,
Any success on the cooling? Suggestions or parts that you do recommend? Selfmade or readily available?
I will want to add this to my printer too.
Cheers!
|
Re: Geeetech Rostock 301 first topic January 21, 2017 07:34AM |
Registered: 7 years ago Posts: 1 |


Sorry, only registered users may post in this forum.