Inconsistent Z height on Delta calibration
Posted by siddharta
|
Inconsistent Z height on Delta calibration December 01, 2016 09:56AM |
Registered: 7 years ago Posts: 83 |
I'm calibrating my Delta printer (a Kossel Mini clone by AnyCubic) by adjusting the endstops when moving to the following effector positions (homing inbetween)
G0 F8000 X-68 Y-40 Z0 ; tower A
G0 F8000 X68 Y-40 Z0 ; tower B
G0 F8000 X0 Y80 Z0 ; tower C
or as close as I can manage to the three towers.
Then adjust the Delta radius so the effector is at the same height in position
G0 F8000 X0 Y0 Z0 ; center
So far the theory. In practice I have little to no consistency in nozzle height between movements. It can go from one movement to the next from barely gripping a sheet of paper, then (after homing and returning to the same exact position) to gripping it so hard it cannot be moved. The endstops microswitches are fixed and the adjustments are done with bolts on the tower carriages. Mechanically all seems solid enough, I've retightened all that can be tightened and I don't know where this variability comes from. Could it be a stepper skipping?
edit:I can more or less consistently reproduce the following
- move to tower A => paper is gripped lightly
- home and move to tower B
- home and move back to tower A => paper is gripped very tightly
- home and move again to tower A => paper is gripped lightly again
It seems the variation is introduced when moving from one tower to the next and then back again, which would seem to point at something mechanical, I'm not certain where to look though.
I ran the effector to the same location 10 times and I get varying results, even if not moving to another tower. Still not certain why that is.
Edited 2 time(s). Last edit at 12/01/2016 10:32AM by siddharta.
G0 F8000 X-68 Y-40 Z0 ; tower A
G0 F8000 X68 Y-40 Z0 ; tower B
G0 F8000 X0 Y80 Z0 ; tower C
or as close as I can manage to the three towers.
Then adjust the Delta radius so the effector is at the same height in position
G0 F8000 X0 Y0 Z0 ; center
So far the theory. In practice I have little to no consistency in nozzle height between movements. It can go from one movement to the next from barely gripping a sheet of paper, then (after homing and returning to the same exact position) to gripping it so hard it cannot be moved. The endstops microswitches are fixed and the adjustments are done with bolts on the tower carriages. Mechanically all seems solid enough, I've retightened all that can be tightened and I don't know where this variability comes from. Could it be a stepper skipping?
edit:
- move to tower A => paper is gripped lightly
- home and move to tower B
- home and move back to tower A => paper is gripped very tightly
- home and move again to tower A => paper is gripped lightly again
It seems the variation is introduced when moving from one tower to the next and then back again, which would seem to point at something mechanical, I'm not certain where to look though.
I ran the effector to the same location 10 times and I get varying results, even if not moving to another tower. Still not certain why that is.
Edited 2 time(s). Last edit at 12/01/2016 10:32AM by siddharta.
|
Re: Inconsistent Z height on Delta calibration December 01, 2016 04:28PM |
Registered: 8 years ago Posts: 3,525 |
If it's not play in the mechanics or drive pulleys slipping maybe it is skipping steps. Nudge your motor current up and try the repeatability test at a lower speed, it will be less likely to skip steps moving slowly.
Simon Khoury
Co-founder of [www.precisionpiezo.co.uk] Accurate, repeatable, versatile Z-Probes
Published:Inventions
Simon Khoury
Co-founder of [www.precisionpiezo.co.uk] Accurate, repeatable, versatile Z-Probes
Published:Inventions
|
Re: Inconsistent Z height on Delta calibration December 01, 2016 07:20PM |
Registered: 7 years ago Posts: 83 |
|
Re: Inconsistent Z height on Delta calibration December 02, 2016 04:43AM |
Registered: 7 years ago Posts: 83 |
OK that seemed to have helped, I now have consistent nozzle heights at each of the towers. The Delta radius also appears correct as I'm getting the same nozzle height in the center.
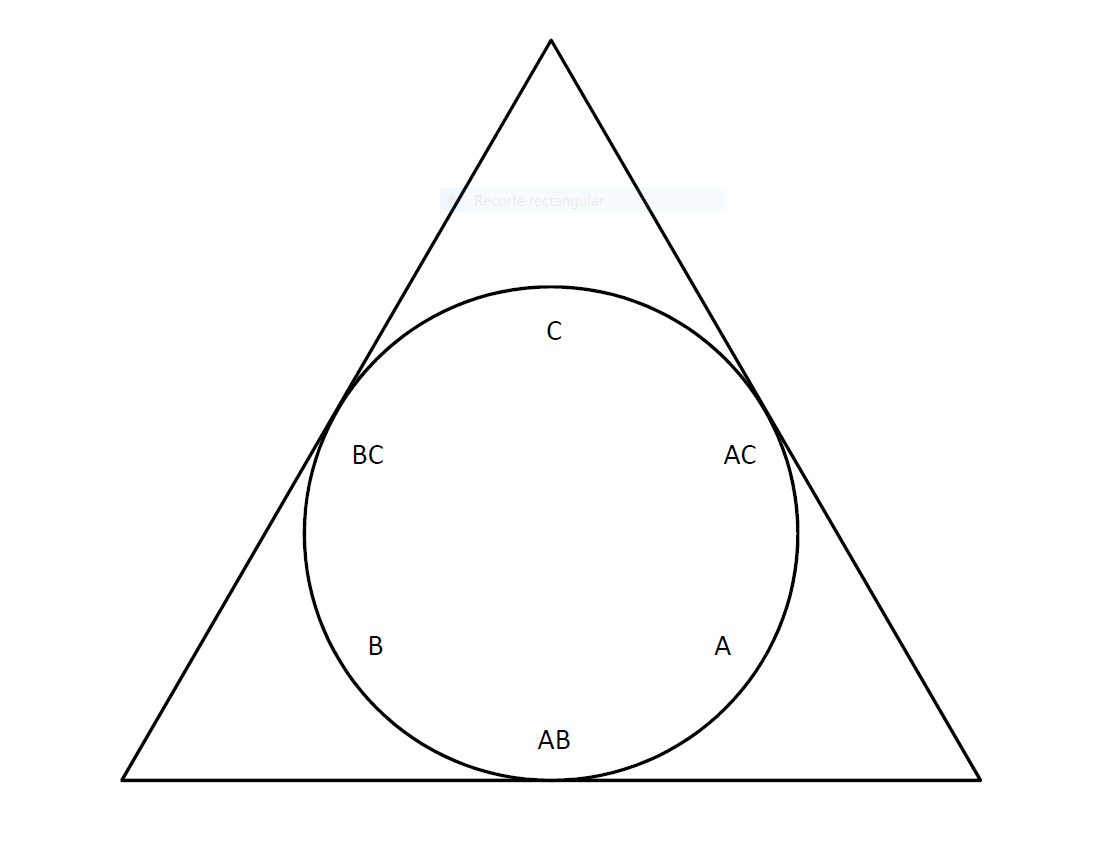
I still did not get perfect first layers and found that when moving the nozzle to positions between the towers the nozzle height is not the same as at the tower or center locations. Referring to the attached sketch, at location AB the nozzle is too low, whereas at AC and BC locations the nozzle is too high. I measured the separation between the towers at top and bottom and within the precision of my ruler they seem to be equidistant. Do I have to look further into that direction or is there something else to check?
edit: attached first layer photo. Anything larger than 40x40 mm does not have a good first layer and it's driving me nuts. I'll add an autolevel probe which may or may not help to compensate for this but I feel I should be able to get it right manually.
edit edit: added the diagram in PNG.
Edited 2 time(s). Last edit at 12/02/2016 08:50AM by siddharta.
|
Re: Inconsistent Z height on Delta calibration December 02, 2016 10:10AM |
Registered: 10 years ago Posts: 732 |
Your tower positions are not precise enough or your diagonal rods do not have the same length. Well your towers can be leaning too.
Leaning towers are typically fixed by having top and bottom parts the same (cut/drilled at once). When the top and bottom part is the same then the towers lean all the same direction or (not probable) twist. Fix leaning with square against the bed. If you cannot fix this precisely it is not that big deal since endstops can compensate for this quite well.
Make sure all your diagonal rods are exactly the same length. Normally this is achieved by making all of them in one and the same jig. Take the rods and try to insert them into the jig. Are all of them equally easy to insert?
The last option is incorrectly positioned towers. Used this or this to fix the tower positions.
|
Re: Inconsistent Z height on Delta calibration December 02, 2016 01:03PM |
Registered: 7 years ago Posts: 83 |
Thanks. It's an assembled kit with injection moulded corners. [link]. It's an inexpensive Chinese kit.
The top triangle has no wiggle room at all (the 2020 profiles are a snug fit), with the bottom one the profiles have about 0.05 mm space to move around, so there's really not that much room for adjustments. I have a framing square but as the (non-adjustable) bed is not fully level (with a precise spirit level) it's not of that much use to level against the bed (I think).
I looked at the diagonal rods (which also came pre-assembled) and it does appear there is are two that are around 0.5 mm shorter than the others. They are close but not exact in length. I also found there is one spherical bearing that does not rotate smoothly, unlike the others.
I removed the belts and there was some residue of the belt rubber between the pulley teeth. I didn't see it grinding anywhere though. Could this be due to a belt too tight?
Something else that strikes me as weird is that the usable print area seems very small. The glass plate has a 180 mm diameter but the largest circle I can print is a _lot_ smaller than that, I would need to print some samples but from printing other parts I would hazard that the printable diameter would be no more than 70 mm. If it moves beyond that area the effector makes some jumps and and it sounds similar to trying to go beyond the end of an axis on a Cartesion printer that has no endstops at that end (I realize this is not a precise description, perhaps I should make a video). I can understand the whole diameter of the build surface not being usable due to the design but that seems very small.
edit: where would one acquire precision corner pieces? I found some alu milled ones on AliExpress but I don't know to which tolerance they are manufactured.
edit edit: and precision assembled arms? Also, would the magnetic arm fixations work better than the spherical bearings?
Edited 2 time(s). Last edit at 12/02/2016 01:26PM by siddharta.
|
Re: Inconsistent Z height on Delta calibration December 02, 2016 02:45PM |
Registered: 8 years ago Posts: 3,525 |
So each pair of arms has to be very close in length ideally exactly the same but 0.1mm or 0.05mm variance would be better.
Can you move the effector by hand with motors powered off to the extremities of the bed or is there any mechanical binding or resistance which you are not getting in the centre?
Belts should produce a low note when plucked like a guitar string and should all be of roughly equal tension, they don't need to be super tight.
Best magnets are made by Haydn Huntley precision made 0.05mm and he writes the exact length on each so you can pair them properly, delrin sockets at the end with magnets embedded and balls for carriage and effector. Very good. Don't order them until the machine is sound and you know how long you want them, they too nicely made to be cut and reglued. $60-80/set. If you want to use ball joints, like Traxxas, buy a load and chose the very best of them and make some new arms with carbon fibre rods, ball joints, a jig and some epoxy resin. The other thing those chinese kits have is the rollers for the carriages are often poor quality invest in some Delrin rollers.
However precise you make a delta it will often not be precise enough....
I find for calibration using this method works extremely well [escher3d.com] put in the values, measure the z height at a bunch of points and it calculates the diagonal rod length, endstop corrections etc.. for you to set in firmware. Do it a few times and the values get closer and closer the calibration gets better and better - if the machine is mechanically sound.
Edited 3 time(s). Last edit at 12/02/2016 03:22PM by DjDemonD.
Simon Khoury
Co-founder of [www.precisionpiezo.co.uk] Accurate, repeatable, versatile Z-Probes
Published:Inventions
|
Re: Inconsistent Z height on Delta calibration December 02, 2016 04:25PM |
Registered: 7 years ago Posts: 83 |
Hi, thanks for your reply (all are so helpful here, really like this community). I disassembled the printer to build it up from the ground again to see if I can get a more precise alignment of the towers, as well as to clean out the pulleys on the stepper motors and check they are properly fastened on the shafts (which they are). I have more than 0.1 mm variance on the arms. I had already ordered 6 more arms a week or so ago because of the two spherical bearings (ball joints I gather is the correct term) that don't rotate smoothly but they are on the slow boat from China.
So I will try to move the effector to the extremities when it's assembled again (which will be more than a week unfortunately due to real life interfering). Thanks for the tip on the belts, I'll tighten them with a guitar tuner at hand and listen for a low E
When reassembled I'll try the escher3d calibration routine, however, reading that I would need to sort out the issue with the limited motion range of the effector to get any useful results.
How long should the arms ideally be? I think I remember reading somewhere that around 80% of the short aluminium profiles of the top and bottom brackets is ideal. This AnyCubic Kossel Mini however has 240 mm long (or short) 2020 profiles and 217 mm arm length so that's somewhat more than that. I would consider to get new quality arms for the second one I ordered (this one was more to get some experience with Deltas and I'm getting that in spades...).
Lastly, this one doesn't use rollers but linear rails. Not the HiWin or IGUS variety but they seem straight enough and don't bind anywhere, they move very smoothly.
|
Re: Inconsistent Z height on Delta calibration December 02, 2016 04:29PM |
Registered: 8 years ago Posts: 3,525 |
Yeah reprap is nice, ask a sensible question and you get a sensible answer. Rails are great, even the Chinese ones are fine well lubricated. As for arm length its a 60:20 rule so 60 degrees when effector is centred and no more than 20 degrees at extremities. However longer is not a problem, shorter is, so go 10-20% longer than you think you'll need. All you lose is a little z-height which on deltas you've got plenty.
Simon Khoury
Co-founder of [www.precisionpiezo.co.uk] Accurate, repeatable, versatile Z-Probes
Published:Inventions
Simon Khoury
Co-founder of [www.precisionpiezo.co.uk] Accurate, repeatable, versatile Z-Probes
Published:Inventions
|
Re: Inconsistent Z height on Delta calibration December 02, 2016 04:33PM |
Registered: 7 years ago Posts: 83 |
|
Re: Inconsistent Z height on Delta calibration December 02, 2016 05:21PM |
Registered: 10 years ago Posts: 14,672 |
Quote
siddharta
When reassembled I'll try the escher3d calibration routine, however, reading that I would need to sort out the issue with the limited motion range of the effector to get any useful results.
The calibration routine I published at escher3d is based on the one I wrote in RepRapFirmware. As you are running on a Duet WiFi, you are running RepRapFirmware. So if you have a Z probe, you can do the calibration automatically.
Large delta printer [miscsolutions.wordpress.com], E3D tool changer, Robotdigg SCARA printer, Crane Quad and Ormerod
Disclosure: I design Duet electronics and work on RepRapFirmware, [duet3d.com].
|
Re: Inconsistent Z height on Delta calibration December 02, 2016 05:40PM |
Registered: 7 years ago Posts: 83 |
Quote
dc42
Quote
siddharta
When reassembled I'll try the escher3d calibration routine, however, reading that I would need to sort out the issue with the limited motion range of the effector to get any useful results.
The calibration routine I published at escher3d is based on the one I wrote in RepRapFirmware. As you are running on a Duet WiFi, you are running RepRapFirmware. So if you have a Z probe, you can do the calibration automatically.
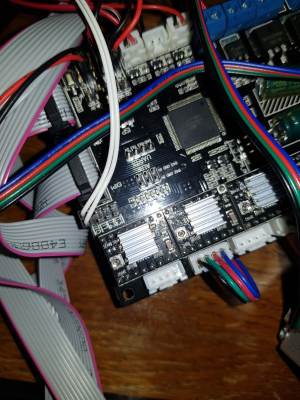
Thanks, I gathered that from the page. I actually have that a quick try this afternoon with an improvised probe (inductive that I had lying around, as in the attachment) but between the probe offset and the limited range of motion I was not able to set a radius in your calculator greater than 50 which ends up probing only a small part of the bed, so it was of limited use. I ordered your IR probe and will install it when it arrives (and I manage to print either a new effector for my E3D V6 or a mount for the probe on the current effector).
Edit: quick question, how are the X and y offsets for the probe defined? Offset to the probe from the nozzl, ie (-45,-35) with the nozzle at (0,0) or from the probe to the nozzle, ie (45,35) with the probe at (0,0)? Didn't have time to confirm it experimentally and probably a dumb question but just thought I'd ask.
Edited 1 time(s). Last edit at 12/02/2016 05:44PM by siddharta.
|
Re: Inconsistent Z height on Delta calibration December 03, 2016 03:25AM |
Registered: 10 years ago Posts: 14,672 |
The probe offset is measured from the tool reference point to the probe. On a single nozzle machine, the tool reference point is normally the nozzle.
Large delta printer [miscsolutions.wordpress.com], E3D tool changer, Robotdigg SCARA printer, Crane Quad and Ormerod
Disclosure: I design Duet electronics and work on RepRapFirmware, [duet3d.com].
Large delta printer [miscsolutions.wordpress.com], E3D tool changer, Robotdigg SCARA printer, Crane Quad and Ormerod
Disclosure: I design Duet electronics and work on RepRapFirmware, [duet3d.com].
|
Re: Inconsistent Z height on Delta calibration September 26, 2019 06:18PM |
Registered: 4 years ago Posts: 6 |
I know this is an old thread but I've just had the same issue with inconsistency of the Z height on repeated returns to the same "spot". I'm a complete newbie on my first build but I'm learning fast. I took one of the suggestions above and tightened the belts: that improved the consistency to within 0.15mm.
Funny enough is the same model of printer as the original poster has (or had). I've decided to put it to use after 2.5 years of it waiting for me to have some spare time ...
I have the original electronics and no idea if i could tune the current. I also suspect that the bed supports are not at the same level allowing the bed glass to have a slight rocking move. With the level of consistency i achieved now i will try to print better supports first ...
|
Re: Inconsistent Z height on Delta calibration September 27, 2019 02:23PM |
Registered: 10 years ago Posts: 732 |
Upping current helps if you are skipping steps and the drivers are not overheating yet. Such a skipped step is often audible. Home your printer (do not switch off motors) and force one carriage a bit down slowly. You will hear how loud skipped steps are on your printer. I have currents quite high and a skipped step can be heard easily.
|
Re: Inconsistent Z height on Delta calibration September 30, 2019 06:04AM |
Registered: 4 years ago Posts: 6 |
I measured the Vref on the drivers and they are already set at the maximum current of the drivers: I found Vref values of 0.8252 / 0.8386 / 0.8127 V on the 3 towers. This translates in 2A on each stepper, practically the upper limit of the driver (A4988) if i read the docs correctly. The motors are not marked in any way but it is a good probability (from the anycubic p/n found online) that they are 1.5A max steppers
I was not able to force carriage down by hand....
I was not able to force carriage down by hand....
|
Re: Inconsistent Z height on Delta calibration September 30, 2019 07:06AM |
Registered: 10 years ago Posts: 732 |
|
Re: Inconsistent Z height on Delta calibration September 30, 2019 11:11AM |
Registered: 4 years ago Posts: 6 |
As i learn more about the subject I have more questions than answers 
The drivers seem to use 0.1 ohm resistors, so the Vref values I measure would translate to roughly 1A max. I have the small heatsinks installed, no active cooling though. Shall I try to raise Vref to 1.2V (1.5A) and test repeatability of z positioning again ?
The drivers seem to use 0.1 ohm resistors, so the Vref values I measure would translate to roughly 1A max. I have the small heatsinks installed, no active cooling though. Shall I try to raise Vref to 1.2V (1.5A) and test repeatability of z positioning again ?
|
Re: Inconsistent Z height on Delta calibration September 30, 2019 12:50PM |
Registered: 10 years ago Posts: 732 |
Sorry, only registered users may post in this forum.