Removing vertical lines on prints
Posted by nebbian
|
Removing vertical lines on prints April 23, 2017 08:48AM |
Registered: 8 years ago Posts: 916 |
Removing vertical lines from prints
or "How I learned to stop worrying about segments"
So you’ve got a delta printer that puts some lines on your prints like this, and you’d like to get rid of those lines? Read on.
Before you do anything else, I want you to try the following experiment. It’s worth it, trust me. Take this STL file, and slice it with the following settings:
Spiral vase mode
No top or bottom layers
50x50x50.stl
Slice one cube at 0.161mm layer height, and then slice another one at 0.202 layer height. Print both cubes.
Ok you’ve done that? You haven’t? You’re just reading along?
Go on, go off and do it. They don’t take long to print. I’ll wait, I promise. Don’t read any more until you’ve actually done it.
OK, now that you’ve done it (or at least you’re pretending to have done it), it’s time to look at what’s going on.
Chances are that you’ve created two cubes that look similar to this:
Surprising isn’t it? How does layer height make such a dramatic difference to these prints? That makes no sense. At least, it didn’t to me. It does, though, and I’ll explain it in a moment. First, please stop pretending and actually go off and print those parts on your printer. You will after reading this post anyway, and it will make more sense if you have the parts in your hand while you read this.
I’ll get to the whys, wherefores, and how to make your prints better in a moment. First let’s look at how delta printers work.
Edited 1 time(s). Last edit at 04/23/2017 08:51AM by nebbian.
|
Re: Removing vertical lines on prints April 23, 2017 08:48AM |
Registered: 8 years ago Posts: 916 |
How deltas work, and why they are different to cartesian printers
You already know that deltas have three towers, and you move the carriages around in very specific ways to move the effector to where it should go. No surprises there.
But there is a hidden issue that only applies to deltas, and that relates to how the Z height, and X/Y planes interact. If you watch the Z carriage as your printer is printing the front face of the cube, the Z carriage starts by moving upwards, it slows down to nothing as the head gets to the middle of the face, and then the Z carriage reverses direction and starts moving down as the effector gets towards the corner of the front face. Then, to jump up a layer, that same tower moves up by a small amount, and the process repeats.
Try this thought experiment:
* Start printing the cube.
* While printing the front face of the first layer of the cube, mark the tower at the point that the carriage is, while printing the middle of the front face.
* Now note the position of the effector when the carriages passes that point while printing subsequent layers.
You’ll find that the position of the effector describes a U shape on the front face.
You might have to re-read this a couple of times before it starts to make sense. Look at the front face of your cubes, one of which will show you in a general sense what that U shape looks like.
Edited 1 time(s). Last edit at 04/23/2017 08:52AM by nebbian.
|
Re: Removing vertical lines on prints April 23, 2017 08:49AM |
Registered: 8 years ago Posts: 916 |
Microstepping
OK, so now we know why that U shape might be happening, let’s change the shape by changing the microstepping on our drivers. After all, if we double the number of steps per mm, we should get more of those U shapes if we double the microstepping, right?
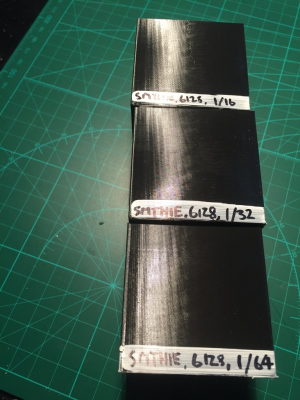
Three cubes, printed using smoothie, at varying levels of microstepping
It turns out that there isn’t any real visible difference between the cubes, all printed with the same settings, apart from the number of microsteps.
If the actual results don’t agree with our theory, then it must be our theory that is wrong. Clearly, there is something else going on. So it’s not microsteps that are causing the U shape, but it must be something to do with the drivers.
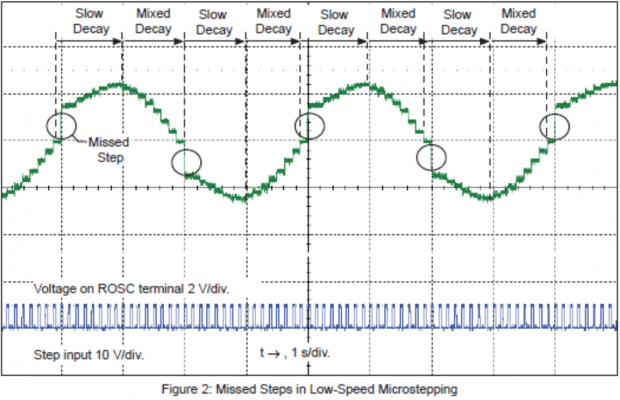
It turns out, that it is. Check out this graph:
The problem is that when the motor passes a full step, there is a discontinuity in current. You can see it in the graph above, taken from the 4988 data sheet.
As it only happens when the motor passes a full step, then changing the microstepping won’t have an effect. Which fits in nicely with what we’ve seen.
So what to do about it? Well, others have noticed this problem already, and have written up instrucitons on how to change the decay modes of drivers:
[www.engineerination.com]
[www.morgan3dp.com]
These are for the 8825 driver chip, but it is applicable to other driver chips as well.
So let’s try it, with the drivers I have at hand.
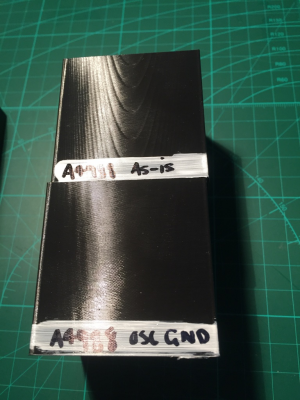
Effect of changing decay mode on A4988 drivers.
This is achieved by grounding ROSC.
Effect of changing decay mode in DRV8825 drivers.
This is achieved by connecting the decay pin to 5V.
Effect of changing decay mode in SD6128 drivers.
This is achieved by connecting two pads on the underside, marked “Fast”.
Note that these cubes were sliced at a slightly different layer height, that made the stepper problem show up as vertical lines, not U shapes.
So clearly the decay mode has a lot to do with those lines we saw earlier. It’s a mod that’s worth doing.
Edited 2 time(s). Last edit at 04/23/2017 09:17AM by nebbian.
|
Re: Removing vertical lines on prints April 23, 2017 08:49AM |
Registered: 8 years ago Posts: 916 |
So what’s this got to do with layer height then?
Remember back to when we discussed how deltas are different to cartesians, in that the Z height of a particular tower also affected the X/Y plane? Well, let’s go into this in a bit more depth, now that we know that it was full steps (not microsteps) that we’re interested in.
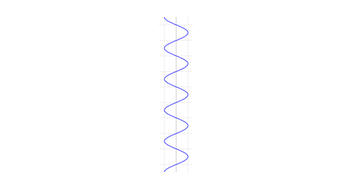
Imagine that we put the effector right in the middle of the front face of the cube we printed earlier, and then move the effector slowly upwards. As we move it upwards, the Z tower motor will slowly rotate, microstep by microstep, until it has completed a full step. If we let it keep going, it will rotate around, doing more and more steps until we stop it. I’ve graphed this below, where one period of the sine wave represents one full step of the motor.
What’s the period of this in mm? Well, it depends on what size pulleys you’ve got on your motors, as well as whether you’re running 1.8 degree steppers, or 0.9 degree steppers.
In my case, I’m using 0.9 degree steppers, with 20 tooth pulleys, so this means:
One full rotation = 20 tooth x 2mm
= 40 mm
One step = 40 mm / 400 step motors
= 0.1mm.
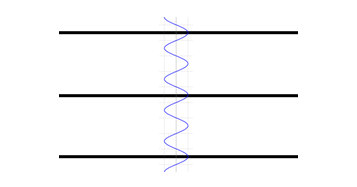
Now we’re getting somewhere. Let’s put the printed layers onto my graph, if I’m printing at 0.2mm layer height.
The layers will line up exactly with the full steps on my motor, as more layers are printed. It’s important to note that no matter where the effector is on the plate, if you move upwards by a multiple of 0.1mm, the motors will be at the same point in their cycle.
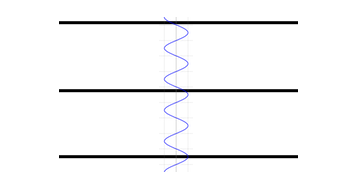
Ok, now let’s try adjusting the layer height to something that’s slightly higher:
You can see that the layers now no longer line up with the full steps on the motor. This means that artefacts caused by the stepper driver, won’t line up with the layer above. If you choose a layer height value that’s sufficiently far away from a full step, then you can get effectively a “random” distribution of steps in your layers. How do we choose a layer height that will do this? The answer has been around in nature for much longer than we have, and you can see it in the face of a sunflower.
Edited 1 time(s). Last edit at 04/23/2017 09:01AM by nebbian.
|
Re: Removing vertical lines on prints April 23, 2017 08:50AM |
Registered: 8 years ago Posts: 916 |
The golden ratio
To evenly distribute our artefacts, we can choose a layer height that is our step period, times the golden ratio. In my case, this is a layer height of 0.1618 mm.
Let’s try it, with three cubes. I’ve chosen stepper drivers that accentuate the steps, to make it more obvious what’s going on.
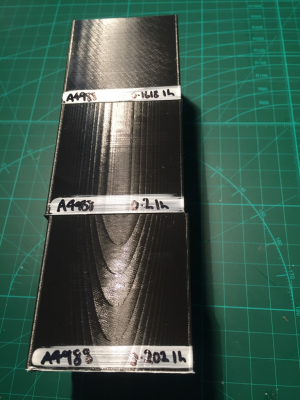
Here we have three cubes, printed (top to bottom) at:
0.1618 layer height (the golden ratio for my steppers)
0.200 layer height (an exact multiple of the stepper motor period)
0.202 layer height (slightly higher than a multiple of the stepper motor period)
You can see that the top cube is a lot flatter than the other two cubes, and you can now start to see other artefacts showing up which are to do with belt teeth. These artefacts were swamped by the stepper artefacts in the other cubes. In real life, the top cube appears a lot flatter than the other two.
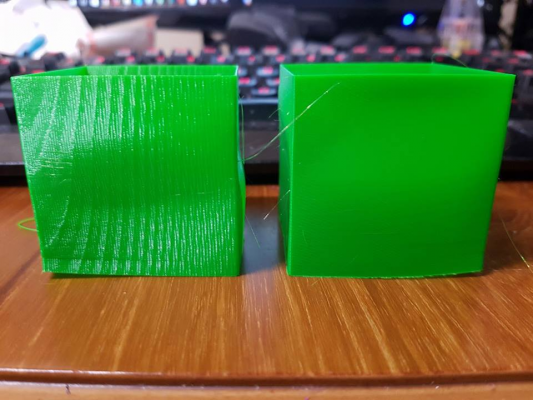
Other people have tried this as well, here’s an example:
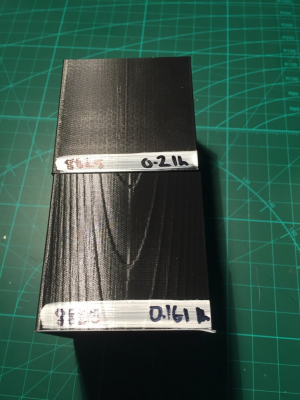
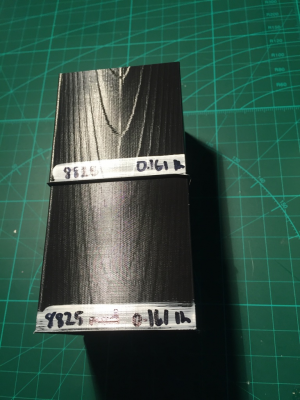
The two cubes here were printed at 0.161 layer height, and 0.202 layer height, by someone who was interested in seeing what was going on with their printer.
Of course, you can now compare these pictures with your own cubes.
I chose these two values (0.161 and 0.202) carefully, because they will work for pretty much any delta printer. If you have 20 tooth pulleys, then the 0.161 cube will show the U shaped lines. If you have 16 tooth pulleys, then the 0.202 cube will show the U shaped lines.
Edited 1 time(s). Last edit at 04/23/2017 09:06AM by nebbian.
|
Re: Removing vertical lines on prints April 23, 2017 08:50AM |
Registered: 8 years ago Posts: 916 |
What’s all this got to do with segments then?
In fact… not much.
I started this investigation thinking that the vertical lines were to do with segments. It turns out that segments are surprisingly difficult to isolate. The only way I could get segments to show up was to use:
RAMPS board running Repetier
TMC2100 drivers running at 16 usteps interpolated to 256 microsteps
You might think that segments are a really bad idea, and vertical lines must be caused by segments. After all, the software is jumping through hoops to try to eke the last bit of performance out of that tiny ATMega processor, and to do so it has to cut lines into segments, and only calculate movements on the segment boundaries.
After all my tests, it turns out that the effects of segments are miniscule compared to the effects of driver decay mode.
Here is a picture showing what segments look like:
They are tiny. Hardly noticeable. You won’t see them with Smoothie, even though they are present, because boards that run SmoothieWare are 32 bit, and don’t need to approximate the segment boundary to a whole number of microsteps.
Trust me, I’ve tried. They’re not visible.
You also won’t see them with A4988’s or DRV8825’s, because the effect of decay mode will be greater than the effect of segments.
What surprised me was that lowering the number of segments per second actually flattened out the face of the cube. I wasn’t expecting that.
Edited 1 time(s). Last edit at 04/23/2017 09:08AM by nebbian.
|
Re: Removing vertical lines on prints April 23, 2017 08:50AM |
Registered: 8 years ago Posts: 916 |
In conclusion:
If you have lines on your prints, the easiest thing to do is to adjust your layer height. Use the following table:
If your steps/mm is a multiple (or very close to):
80 / 160 : Use layer heights of 0.0809, 0.1618, or 0.3236
100/200 : Use layer heights of 0.1294, 0.2589, 0.3883
The next thing to do is to mod your drivers to go into the one decay mode at all times. Switching decay modes is what causes ripples in the print.
Finally, if you’ve done all that, and you are convinced that what you’re seeing are segments, lower your segments per second value and see if that helps. If not, then upgrade to a 32 bit controller board like a Smoothie or Duet.
If you've got this far, then well done! I'd love to see some pictures of your cubes, with details of the stepper drivers you have, as well as the control board you're running.
Edited 2 time(s). Last edit at 04/23/2017 09:21AM by nebbian.
|
Re: Removing vertical lines on prints April 24, 2017 09:05AM |
Registered: 8 years ago Posts: 3,525 |
Superb work and a fascinating read. I need to find out how to mod the LV8729 drivers as they are in all respects very good, but slightly stutter even on 32bit board during long straight lines. I'll have a go at some of your cubes and see if it is the decay mode thats causing the stuttering.
Edited 2 time(s). Last edit at 04/24/2017 01:16PM by DjDemonD.
Simon Khoury
Co-founder of [www.precisionpiezo.co.uk] Accurate, repeatable, versatile Z-Probes
Published:Inventions
Edited 2 time(s). Last edit at 04/24/2017 01:16PM by DjDemonD.
Simon Khoury
Co-founder of [www.precisionpiezo.co.uk] Accurate, repeatable, versatile Z-Probes
Published:Inventions
|
Re: Removing vertical lines on prints April 25, 2017 07:40AM |
Registered: 8 years ago Posts: 29 |
|
Re: Removing vertical lines on prints April 25, 2017 10:50AM |
Registered: 8 years ago Posts: 916 |
Quote
paboman
very interesting, will try that numbers on my smoothie.
did you noticed any improvement using anything beyond a4988 ?
Yep, the print quality I found, in order from worst to best:
Stock DRV8825 - worst
Stock A4988
Modded DRV8825
Stock SD6128
Modded A4988
Modded SD6128
Stock TMC2100 - best, although it has issues with torque
|
Re: Removing vertical lines on prints April 26, 2017 12:18PM |
Registered: 8 years ago Posts: 3,525 |
I'll try to get few cubes printed on the micro delta now its back together after failed attempt to use tmc2100s, now back using A4988s so testing the rosc mod should be quite doable. It's still running off good old ramps.
Edited 1 time(s). Last edit at 04/26/2017 12:18PM by DjDemonD.
Simon Khoury
Co-founder of [www.precisionpiezo.co.uk] Accurate, repeatable, versatile Z-Probes
Published:Inventions
Edited 1 time(s). Last edit at 04/26/2017 12:18PM by DjDemonD.
Simon Khoury
Co-founder of [www.precisionpiezo.co.uk] Accurate, repeatable, versatile Z-Probes
Published:Inventions
|
Re: Removing vertical lines on prints April 26, 2017 08:46PM |
Registered: 8 years ago Posts: 916 |
Quote
DjDemonD
I'll try to get few cubes printed on the micro delta now its back together after failed attempt to use tmc2100s, now back using A4988s so testing the rosc mod should be quite doable. It's still running off good old ramps.
Good stuff DJ, looking forward to seeing them.
I'd also really like to see two cubes from a delta that runs on a duet wifi/ethernet, if anyone has one going. If the drivers are anything like the TMC2100 then they should be really nice, with no evidence of tree rings.
|
Re: Removing vertical lines on prints April 27, 2017 09:51AM |
Registered: 10 years ago Posts: 154 |
I have drv8825 drivers modded to fast decay. They are set at 1/32 microstepping. 16 tooth pulleys. 1.8* motors.
Using your calculations, what is the step period? 0.16?
I've been printing at 0.2mm and haven't really had any issues. I'm just wondering if i should change my layer heights for even better quality.
Using your calculations, what is the step period? 0.16?
I've been printing at 0.2mm and haven't really had any issues. I'm just wondering if i should change my layer heights for even better quality.
|
Re: Removing vertical lines on prints April 27, 2017 10:23AM |
Registered: 10 years ago Posts: 732 |
|
Re: Removing vertical lines on prints April 27, 2017 12:58PM |
Registered: 10 years ago Posts: 154 |
|
Re: Removing vertical lines on prints April 27, 2017 02:13PM |
Registered: 10 years ago Posts: 732 |
OK, so your microstep length is 0.005 mm and your full step length is 0.16 mm. Though the patterns you can see may depend on half step length and not full step length because the error happens at half step intervals but it changes direction. But simple error direction change may not be distinguishable in the pattern. Anyways full step period is a sure thing. It just may be two time bigger than what will be visible. Use e.g. these layer heights:
- 0.16 mm (= 1 * 0.16), for straight horizontal lines
- 0.1732 mm (= 0.16 + 0.16 / (8/0.16)), to get tree ring tips 8 mm apart (or 4 mm if error direction is not distinguishable)
- 0.22627417 mm (= 0.16 * √2), to get something spread out over the surface (i.e. without well visible lines)
|
Re: Removing vertical lines on prints April 27, 2017 07:50PM |
Registered: 8 years ago Posts: 3,525 |
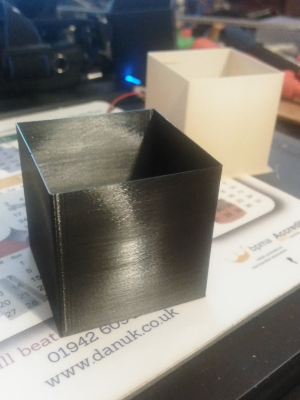
Microdelta, Ramps, Rich Cattels Marlin, unmodded a4988s, 0.202 layer height, with 16t pulleys, using wood filament as thats what I had loaded hoping to see tree rings but can't see them, I'll try the black pla next.
Kossel XL, Duetwifi, RRF, 0.202 layer height 16t pulleys. TMC 2660
Lastly for comparison my corexy, re-arm, smoothie, LV8729's unmodded (mixed decay), 0.202 layer height.
I changed speeds from 50mm/s at roughly 10mm intervals to 125%, 150%, 200% and 300% definitely struggling to get around the corners at 300%
Edited 1 time(s). Last edit at 04/27/2017 08:06PM by DjDemonD.
Simon Khoury
Co-founder of [www.precisionpiezo.co.uk] Accurate, repeatable, versatile Z-Probes
Published:Inventions
|
Re: Removing vertical lines on prints April 27, 2017 09:38PM |
Registered: 8 years ago Posts: 916 |
Thanks for those cubes DJ. You won't see any tree rings if you use 16 tooth pulleys and 0.202 layer height.
Try a cube at 0.161 layer height on your microdelta, I'm betting that you'll see some tree rings.
Also, the one result I'm really interested in is seeing a cube from your XL at 0.161 layer height. It would be best if you set the drivers to 16 uSteps, no interpolation for this test.
Try a cube at 0.161 layer height on your microdelta, I'm betting that you'll see some tree rings.
Also, the one result I'm really interested in is seeing a cube from your XL at 0.161 layer height. It would be best if you set the drivers to 16 uSteps, no interpolation for this test.
|
Re: Removing vertical lines on prints April 28, 2017 09:26AM |
Registered: 8 years ago Posts: 3,525 |
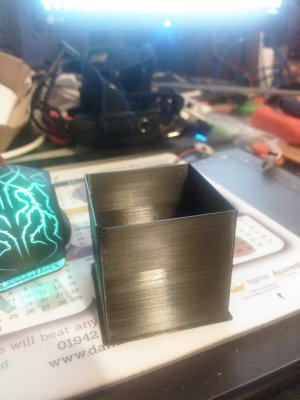
So this cube was microdelta, Ramps, Rich Cattels Marlin, unmodded a4988s, 0.161 layer height, with 16t pulleys
Had a bit of a filament feed issue probably due to the low flow rate at this layer height, and being near the end of a roll of PLA but the tree rings are there.
This one is large kossel, using 1/16 no interpolation (I can see why we use it as the noise it makes without interpolation sounds like the whole police department are parked outside with their sirens on recording615275248.3gpp), 0.161 layers.
There is a feint diagonal pattern almost like concentric rings but with a diameter of 300mm rather than the tree rings, there should be no belt tooth artefacts as I've twisted my belts over the top pulleys so they run smooth side to the pulley.
Simon Khoury
Co-founder of [www.precisionpiezo.co.uk] Accurate, repeatable, versatile Z-Probes
Published:Inventions
|
Re: Removing vertical lines on prints April 28, 2017 11:35AM |
Registered: 8 years ago Posts: 916 |
|
Re: Removing vertical lines on prints April 29, 2017 09:16AM |
Registered: 8 years ago Posts: 3,525 |
No problems, what is your analysis of them?
Simon Khoury
Co-founder of [www.precisionpiezo.co.uk] Accurate, repeatable, versatile Z-Probes
Published:Inventions
Simon Khoury
Co-founder of [www.precisionpiezo.co.uk] Accurate, repeatable, versatile Z-Probes
Published:Inventions
|
Re: Removing vertical lines on prints April 29, 2017 09:47AM |
Registered: 8 years ago Posts: 916 |
Quote
DjDemonD
No problems, what is your analysis of them?
The microdelta shows your classic non-modded-driver tree ring pattern. Mod them and it will be vastly reduced. Of course, it's only a problem if you decide to print close to multiples of 0.16mm layer height, and really, why would you?
One thing I'm starting to realise is that 16 tooth motor pulleys are superior to 20 tooth pulleys on deltas, due to the fact that artefacts are more noticeable with 20 tooth pulleys, based purely on the layer heights that most people choose to print at (0.1, 0.2 and 0.3mm). 16 tooth pulleys don't show artefacts at those line heights. You've got to work hard if you've got 20 tooth pulleys, for those line heights not to show anything. It's a shame that the robotdigg carriages are sized for 20 tooth pulleys (16 tooth pulleys make the teeth rub against the inside of the carriage slot, at least in my experiments). Perhaps I could dremel them out or something, but I've spent ages getting those carriages level in two dimensions, and I REALLY don't want to pull them off again.
Just for giggles, what would a 16.1803399 tooth pulley look like? Ha ha.
Now as for the Duet Cubes:
1) I'm surprised to see vertical banding on the one printed at 0.161 layer height. If I didn't know any better I'd say that they are due to segments. Of course they're not, RRF docs explicitly say that it doesn't use segments. What are they caused by? Whole motor steps? But that doesn't make sense. Could they be caused more squish due to the Z height changing? But that doesn't make sense either, as subsequent layers would dip down as well, leaving a perfectly flat face. Perhaps DC42 can chime in?
2) I can see the concentric pattern you are talking about, and that only really makes sense to me if you've posted the face that faces east/west, rather than the face that looks at you (north/south) as the printer prints it. I'm imagining that it's something to do with the X and Y diagonal rods, not really sure what's causing it.
In the end, and after printing many dozens of cubes, it's clear to me that we can pick holes in the output of any printer currently on the market. I guess what really matters is if you're happy with the output. If you're happy, then it's good enough.
|
Re: Removing vertical lines on prints April 29, 2017 10:35AM |
Registered: 8 years ago Posts: 3,525 |
RRF does segment when grid levelling is used, it segments lines crossing a grid square boundary. I'd print another with it turned off but I think I'm all cubed out.
Also I'd be surprised to see the vertical lines with the interpolation on, I don't normally see them, but then we are looking harder now than before, if I regain my enthusiasm, I'll try with it on.
Edited 1 time(s). Last edit at 04/29/2017 04:19PM by DjDemonD.
Simon Khoury
Co-founder of [www.precisionpiezo.co.uk] Accurate, repeatable, versatile Z-Probes
Published:Inventions
|
Re: Removing vertical lines on prints May 01, 2017 02:38AM |
Registered: 8 years ago Posts: 5,232 |
|
Re: Removing vertical lines on prints May 01, 2017 06:12AM |
Registered: 8 years ago Posts: 3,525 |
Quote Nebbian "Just for giggles, what would a 16.1803399 tooth pulley look like? Ha ha."
Print one? I presume it would be a 16t pulley with 2.01127124375 mm spacing.
Olampe - I'd love to think this might help its appealing in a mathematical way, but wasn't its use in cars to just to prevent a wear pattern developing in the geartrain? If we changed to a 17t pulley we would just have to multiply our steps/mm by 16/17?
Simon Khoury
Co-founder of [www.precisionpiezo.co.uk] Accurate, repeatable, versatile Z-Probes
Published:Inventions
|
Re: Removing vertical lines on prints May 01, 2017 06:21AM |
Registered: 10 years ago Posts: 732 |
Prime numbers do not really matter. The only thing which matters is whether your layer height is precise(1) multiply of step length or whether it differs only slightly(2) or a lot(3) from the precise (whole number) multiply of step length.
(1) By precise I mean precise to about 5 decimal places. It does not need to be absolutely precise. This is the straight lines pattern.
(2) By slightly I mean that the layer height is the range of about 2-5% error from the precise multiply of step length. This is the tree ring pattern.
(3) By a lot I mean that the layer height is about half step bigger than multiply of the step length. This is the case when the error will be spread around the whole surface and not that well visible. You may prefer to use some irrational number (like e.g. golden ratio) to spread the error more irregularly so that there is less change that you will be able to see some kind of diagonal moire under the right lighting conditions. Well you will probably always be able to lit it well enough to see some kind of diagonal moire but with irrational number it will be less regular/straight and therefore harder to notice.
|
Re: Removing vertical lines on prints May 01, 2017 09:45AM |
Registered: 8 years ago Posts: 916 |
|
Re: Removing vertical lines on prints May 01, 2017 10:15AM |
Registered: 8 years ago Posts: 3,525 |
Lol @ devious/clever it just seemed logical. Do the belts have to stretch much it's only 0.55%? There must be a customiser to print pulleys that can churn one out at this size presuming they use enough decimal places or maybe even just scale up a pulley by 0.55% that ought to do it presuming you can print that accurately, in fact just print a few pulleys and pick the one that's 0.55% too big.
Corrected 1.1% to 0.55%.
But also whilst this probably means you can print at common layer heights, printing at the suggested layer heights to avoid the artefacts is no big deal.
Edited 2 time(s). Last edit at 05/01/2017 10:26AM by DjDemonD.
Simon Khoury
Co-founder of [www.precisionpiezo.co.uk] Accurate, repeatable, versatile Z-Probes
Published:Inventions
|
Re: Removing vertical lines on prints May 02, 2017 03:32AM |
Registered: 8 years ago Posts: 5,232 |
The 17 tooth pulley might help against belt teeth pattern.
A 20 tooth pulley takes exactly 10 full steps with a 200 steps/rev motor, while 17 teeth will never match stepper torque peeks.
This of course is just academic, since beltstretch caused by stepper torque variation is neglectable.
Edited 1 time(s). Last edit at 05/02/2017 03:45AM by o_lampe.
A 20 tooth pulley takes exactly 10 full steps with a 200 steps/rev motor, while 17 teeth will never match stepper torque peeks.
This of course is just academic, since beltstretch caused by stepper torque variation is neglectable.
Edited 1 time(s). Last edit at 05/02/2017 03:45AM by o_lampe.
|
Re: Removing vertical lines on prints May 02, 2017 03:43AM |
Registered: 8 years ago Posts: 5,232 |
I wonder, if we can stretch the discussion to investigate extruder drive gear diameter and it's teeth count. At least in my imagination the extrusion quality has an impact in surface quality as well. But you can't change it, just by changing layer height. I see an ( again academic ) difference between a classic 40 tooth MK8 drive gear and a similar 41 teeth gear. ( again prime number vs. stepper torque curve philosophy )
Edited 1 time(s). Last edit at 05/02/2017 03:44AM by o_lampe.
Edited 1 time(s). Last edit at 05/02/2017 03:44AM by o_lampe.
Sorry, only registered users may post in this forum.

