Bringing my DreamMaker Overlord Pro back to life; rebuild...
Posted by Gadgetman
|
Bringing my DreamMaker Overlord Pro back to life; rebuild... August 26, 2019 05:33PM |
Registered: 4 years ago Posts: 16 |
Hi folks!
Quick notice about background;
I'm an IT professional(User support, server and networking, even printers... ) and have been into 3D work since 2011 or so...
First printer was a Prusa Mendel that never really worked as it should.
(I built a lot of it myself. Even soldered the RAMPS card myself. Never again... )
My second printer was the DreamMaker Overlord Pro(Black Kickstarter edition)
his one worked faithfully for a long time, but eventually a stepper driver died. I put it aside because back then I really didn't have the time to fix it.
Now I have a WanHao i3 and a Kudo3D Bean, but I sometimes want to print higher than the i3 can do, so it's time to repair the Overlord.
(I have also built and modified a ShapeOKO CNC router so I'm used to tinkering)
Since the original drivers can't be bought any more, I decided to do a bit of an upgrade...
Original controller is an Arduino MEGA2560 clone with a SD-card reader and an OLED display.
It has 2 x thermistors in the head.
(Actually, that was a big issue back then since one would often fail, and you got a temperature mismatch error that would stop it from printing)
It also came with a 3.7V Li-Ion battery pack for backup power which allowed you to continue a print after a power outage.
I have a proper online UPS capable of keeping a printer running, so the battery pack is no longer needed. Besides it has swollen and needs to be disposed of...
So I picked the Azteeg X5 GT with 4x SD6128 drivers and an ethernet inerface.
That gives me 1/128 microsteps instead of 1/16 and a LAN hookup with web interface instead of messing with SD cards.
So no need for the SD-card reader or the OLED.
I have received the Azteeg card and started configuring it, and have the network and web interface up and running, and are now beginning to hook up the internals of the printer.
My endstops are NO(Normally Open)mechanical with 2 leads. These sit at the top of the columns, of course.
(NO verified with multimeter)
But the Azteeg(and as I understand, the Smoothieboard also) have both X/Y/Z 'Max' and 'Mini' connectors, and they're 3pin...
Which ones should I use?
Edit:
And is A=0 at the top of the Alpha-column?
I'm rather nervous about getting this wrong and letting out the blue, magic smoke on $150 worth of electronics.
Edited 1 time(s). Last edit at 08/27/2019 02:28AM by Gadgetman.
|
Re: Bringing my DreamMaker Overlord Pro back to life; rebuild... August 27, 2019 02:47AM |
Registered: 4 years ago Posts: 16 |
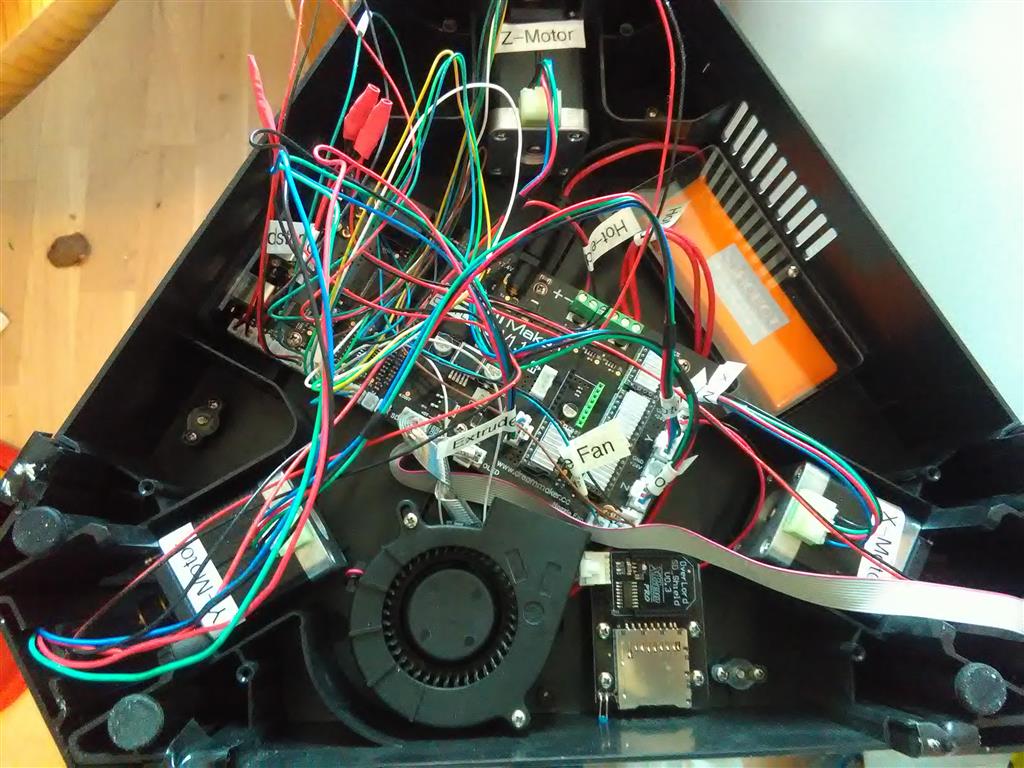
The picture show the base of my Overlord.
All the wiring has been tagged.
After the picture was taken I removed the battery and SD-card reader, unplugged the controller card and removed it, and cut the plugs off the ends of the motor wiring and crimped on ferrules.
I still need to cut off the connectors for the sensor wiring and replace them with Dupont plugs.
And I need to fab some mounts forthe Azteeg because it doesn't fit the old screw holes.
|
Re: Bringing my DreamMaker Overlord Pro back to life; rebuild... August 27, 2019 04:50AM |
Registered: 10 years ago Posts: 732 |
I do not use Azteeg.
Typically the max connectors are only used with delta printers. But you can use also the min connectors but make sure configuration and possibly also the pin files are modified acordingly.
The 3 pins are typically GND, Signal, Vcc. You use GND and Signal with micro-switches.The Signal should have an internal pull up. If it is not there they you would need to add with using the Vcc ping and a resistor.
I do not know what you mean by A=0.
|
Re: Bringing my DreamMaker Overlord Pro back to life; rebuild... August 27, 2019 05:06AM |
Registered: 4 years ago Posts: 16 |
Thanks.
The columns are labelled Alpha, Beta, Gamma in Smoothieware, A,B,C in some other firmwares, and X,Y,Z in yet others.
(Naming the columns Z,Y,Z is wrong if you ask me, as that's the coordinates we want the head to move by, and where usually X=0/Y=0/Z=0 is at the lower lefthand front corner of a print bed. Moving to Z=2 on a cartesian printer just means stepping the motor on the Z-axis, but on a Delta it means stepping all 3. )
I may run the board with a Cartesian setup initially, just to be able to directly command a single stepper at a time to verify operation.
Then it would also be useful to know if '0' of that axis should be on top or at the bottom.
|
Re: Bringing my DreamMaker Overlord Pro back to life; rebuild... August 27, 2019 05:44AM |
Registered: 10 years ago Posts: 732 |
|
Re: Bringing my DreamMaker Overlord Pro back to life; rebuild... August 27, 2019 06:07AM |
Registered: 4 years ago Posts: 16 |
Quote
hercek
Ok, if by A=0 you meant where is zero position on delta coordinate A, then it is at the heat bed level. Delta coordinates have 0 at the bed level and maximum (printer height) at the max endstop level; i.e. delta coordinates have maximum values after homing.
Thanks!
For one reason or other that kind of info is very, very hard to find anywhere.
|
Re: Bringing my DreamMaker Overlord Pro back to life; rebuild... September 01, 2019 01:21PM |
Registered: 4 years ago Posts: 16 |
The Azteeg board is mounted.
I grabbed some nylon standoffs(male/female version; nut in one end, bolt in the other.) and use short ones as bolts to secure longer ones on the underside of the board, dipped the ends in 'Machinists blue'(pretty close to the ink in a regular Bic or other ball-ppoint pen) and carefully set it down where I wanted it. Removed it, then drilled and tapped holes where the blue dots were.
I got the endstops hooked up and it seems, working.
The steppers are also connected, and one of them has been tested(the others have been connected in the same way, so should also work) I hope I got the power settings right...
Thermistors are also hooked up, but I still need to set them up correctly in the config.
I haven't removed the OLED or the cabling that goes to it, but I don't expect to hook it up.
Fans have not been hooked up, yet.
There's 3,
a huge one to cool the controller board,
and a pair of 40mm fanst on the hot end assembly, one to keep the uppoer part of the hot-end cool, and one to cool the extruded plastic.
One issue there is that it seems there's 3 wires to run the 2 fans on the hot-end. (common GND)
As they're terminated on a small PCB on top of the hot-end, and the fans plugs into connectors there, instead of direct wires, I'll need to trace the wires.
(My multimeter is out of comission until I can get a new 9V battery.)
As I understand it, only the last one needs computer control, and the others can be always on.
A great many zip-ties gave their life in order to creates some sort of order to the mess...
I need to fab some sort of holder for the LAN adapter. Just plugging it into the controller board is not an option as not only isn't it secure, but the end isn't even close to the edge of the board,
(And besides, I haven't placed the board next to a side of the printer anyway)
For now I used a bunch of male/female dupont wires to move the adapter off the azteeg board.
Time to fire up OpenSCAD...
|
Re: Bringing my DreamMaker Overlord Pro back to life; rebuild... September 01, 2019 05:39PM |
Registered: 10 years ago Posts: 732 |
|
Re: Bringing my DreamMaker Overlord Pro back to life; rebuild... September 01, 2019 05:59PM |
Registered: 4 years ago Posts: 16 |
Quote
hercek
If one fan is cooling heat-break on the hotend then that is the one which should run at full throttle all the time.
The fan which is supposed to cool the printed part is the one which speed can be controlled from the firmware/gcode.
Yes, I already figured that out.
The issue now is to find out which wires are what.
Oh, and figure out if the 12V output on the Azteeg is capable of powering all the fans.
(I have a 24-to-12V converter on order already, so worst case is just a little delay.)
I'm also not all that impressed with the 'coal chute' air duct that's supposed to guide the air around the tip to cool the extruded filament.
It needs a ring-shaped duct like the one I installed on my WanHao i3.
(I think I have a spare fan of the type used for that, too. That, and PID calibration pushed it to bridge over 20mm)
|
Re: Bringing my DreamMaker Overlord Pro back to life; rebuild... September 02, 2019 02:14PM |
Registered: 4 years ago Posts: 16 |
|
Re: Bringing my DreamMaker Overlord Pro back to life; rebuild... September 08, 2019 10:16AM |
Registered: 4 years ago Posts: 16 |
Just about everything is hooked up now, except the hot-end thermistor.
But the heater cartridge is caput, so I can't test that, yet.
Incidentally, the original heater cartridge wires have 2mm banana plugs soldered on, so I'm saving those.
I actually think I'll track down a few of those to prep the spare cartridge with. And if I can find some female connectors also, I'll do the same on my WanHao i3.
I ordered a new heater for the print bed, also, one of those 3mm aluminium ones. Unfortunately, it has a slightly higher resistance than the one I already have, so a bit of a waste of money.
I wanted to use the 12V output of th Azteeg to power heat-break fan and the controller cooling fan, so I checked how much I could pull; 800mA.
Not much, so I decided to check the rating on the big controller fan.
It was a 24V fan...
The controller fan pulls in air from the underside, but the gap between the side and the bottom isn't very high, so I suspect that it recycles some of the hot air tht escapes around the steppers. I'll be putting together a shroud so that it only raws from the outside.
I'm going to add a couple of layers of capton tape to the underside and the edge of the print bed,
|
Re: Bringing my DreamMaker Overlord Pro back to life; rebuild... September 08, 2019 12:32PM |
Registered: 10 years ago Posts: 732 |
24 V power supply makes sense for a delta to achieve high speeds. And stepper power rail is often shared with fans and heaters. So it makes sense to use 24 V fans. Or if you have 12 V fans then you may need to step the voltage down (e.g. with a zener diode).
Pulling air form underside may not be an issue. The first thing to overheat will be stepper drivers and they typically have thermal protection/shutdown. You can just try it and when it will be missing steps then you can think about improving the cooling.
Pulling air form underside may not be an issue. The first thing to overheat will be stepper drivers and they typically have thermal protection/shutdown. You can just try it and when it will be missing steps then you can think about improving the cooling.
|
Re: Bringing my DreamMaker Overlord Pro back to life; rebuild... September 08, 2019 03:02PM |
Registered: 4 years ago Posts: 16 |
The gap under the edges is about 10mm, and from the edge and up to the bottom plate there's another 20mm.
And there's cutouts in the bottom plate.
I don't want to ever experience that it misses steps because of thermal issues.
Before that becomes an issue it will have to run hard, for a long time.
That means a massive, tall print, and a lot of wasted filament.
(The Overlord Pro can print 260mm high. I have done print using 350gram filament on it, but now that I'm trying to supercharge it... )
Did a bit of calculation.
The old Heated bed is actually a 150W model, which isn't bad, really.
The aluminium (200mm diameter) seems to be 120W.
I wish more resellers could bother adding that kind of data.
I have a DC-DC step-down converter winging its way to me(ordered on a 'just in case' basis) that I may use if I need to run a lot of 12V fans.
|
Re: Bringing my DreamMaker Overlord Pro back to life; rebuild... September 10, 2019 02:39PM |
Registered: 4 years ago Posts: 16 |
I got the heater cartridges today.
Rmoved the old one, and cut the wires of the new and soldered on the banana plugs.
(There's a molex 2pin plug on the new cartridge, at almost exactly the spot I wanted to cut the wires, so I cut above that, and installed the plugs. Keeping the molex means I don't have to do anything to the spare cartridge)
Getting years old thrmal paste off of the heater block is a pain in the seating pad...
Sorry, only registered users may post in this forum.