FLsun Kossel Calibration Second Thread
Posted by NAP1947
|
FLsun Kossel Calibration Second Thread December 18, 2019 11:12AM |
Registered: 5 years ago Posts: 42 |
I started a new post as I have moved on quite a bit from the previous attempt to calibrate using the manual process.
Where I am, FLsun Kossel Mini,
Bed is 1/4" aluminum plate checked for flatness in a proper machinist lathe, Delta Rods are all 222mm the ends are Traxis type and tight with no play in the connections.
The effector plate has been changed to an injection molded type, the print is cooled by an aquarium air pump to save weight and simplify installation.
The Delta Height is 278mm after levelling, the tower endstops are all manually set to paper test clearance,
I have returned to a micro switch on the effector to be able to use the auto level feature.
The bed measures flat with a straight edge and is at 90 degrees to each tower. Towers are equal distance apart at both top and bottom.
The distance from each effector joint to the tower joint is 100mm for all.
I have added a 1/4' lexan plate to the top of the upper bracket to add structure stiffness.
Running G33 tests give the following standard deviation, P2=0.015, P5=0.016, P10=0.039.
Z-Offset from GitHub calculation process is 0.6.
When I print a 100mm X 20mm test rectangle in the middle of the bed neither of the Y edges print as the head appears too close to the bed.
Most of the X edges are OK with thins issues as the nozzle gets closer to the bed at the Y ends.
Changing the Z Offset to 0.5 seems to have the same issue.
I cannot figure out what I am doing wrong, I have run the calibration tests so many times I know them by heart.
|
Re: FLsun Kossel Calibration Second Thread December 18, 2019 03:32PM |
Admin Registered: 11 years ago Posts: 3,096 |
I have the same issue with my homebuild delta. All of a sudden the center z-height is fine but the further it goes outside, the closer the print head moves down to the bed. I tried both using a Force Sense Resistor and an inductive sensor.
Also, suddenly the printed parts come out too small. In the beginning it was perfect. I tried calibrating the arm lengths and they are all perfectly in equal size.
Maybe I should do a manual bed level instead of using a sensor.. I just can't get my head around how G29 works. Somehow it doesn't load the meshes or at least doesn't indicate clearly it has loaded the mesh and seems to only use the G33 settings.
Edited 1 time(s). Last edit at 12/19/2019 05:16AM by Ohmarinus.
http://www.marinusdebeer.nl/
|
Re: FLsun Kossel Calibration Second Thread December 18, 2019 04:45PM |
Registered: 5 years ago Posts: 42 |
|
Re: FLsun Kossel Calibration Second Thread December 20, 2019 02:58PM |
Registered: 7 years ago Posts: 619 |
I gave up on the fancy bed-leveling things for my Deltas. I spent a couple of hours manually adjusting DELTA_RADIUS to "flatten" the bed and then manually leveled it. Now I do not worry about those blasted finicky bed leveling probes or any of the firmware leveling nonsense. My beds are flat, my prints go fine.
IMO,
DLC
Kits: Folgertech Kossel 2020 upgraded E3Dv6, Anet A8 upgraded E3Dv6, Tevo Tarantula enhanced parts and dual-head, TronXY X5SA Pro(E3DHemera).
Scratch: Large bed Cartesian, exchangeable heads, Linear slide Delta, Maker-Beam XL Micro Delta, 220x220CoreXY.
IMO,
DLC
Kits: Folgertech Kossel 2020 upgraded E3Dv6, Anet A8 upgraded E3Dv6, Tevo Tarantula enhanced parts and dual-head, TronXY X5SA Pro(E3DHemera).
Scratch: Large bed Cartesian, exchangeable heads, Linear slide Delta, Maker-Beam XL Micro Delta, 220x220CoreXY.
|
Re: FLsun Kossel Calibration Second Thread December 20, 2019 07:49PM |
Registered: 5 years ago Posts: 42 |
DLC60, you gave me help with my original thread “ FLSUN Delta (not mini) Setup” when I was trying to make the manual level process work but I was never able to figure it all out and after Mac problems and then somehow managing to destroy the original MKS Gen 1.0 board and replacing with another 8bit MKS Base board I went back to a micro switch to detect nozzle calibration.
So at present I am using manual process to set the Delat Height and Tower Heights. I have as follows Delta Height 276.94mm, Alpha=0.01 Beta=0.03, Gamma=0.05.
I then run the G33 auto level command and then establish 0 Offset using the paper test, that is currently 0.0.
I still have a problem with my initial level being too far from the print bed so the filament does not stick.
I have tried to adjust this using Z offset and Delta Radius without success.
I do not properly understand the relationship of Z Offset to Delta Radius. If Z Offset is correct how to I adjust Delta Radius to lower the print head?
DO I add or subtract from the current Delta Radius to lower the head and what increment should I use.
|
Re: FLsun Kossel Calibration Second Thread December 21, 2019 05:53PM |
Registered: 10 years ago Posts: 732 |
@ NAP1947:
You are so confused that I decided to respond.
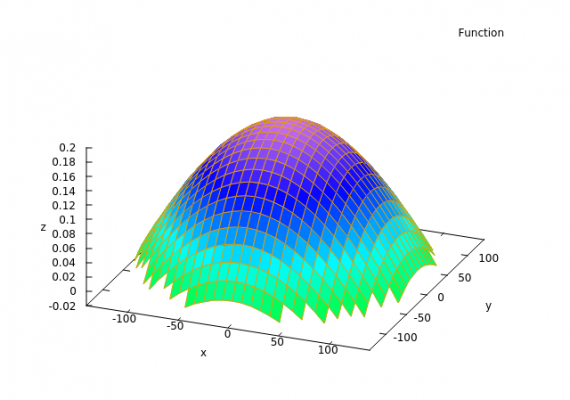
Changing delta radius does not really change z-height. Here is a sample where delta radius was increased by 0.37mm. Notice that it did not really change z-height around the edges. But it decreased z-height in the centre (the head is about 0.2 mm above bed; z-height decreased). The plane on the graph shows surface in which head tip is moving.
By changing delta radius you are primarily forcing your head to move in over a "bowl surface". Z-height change is only a side effect and only in the middle of the bed!
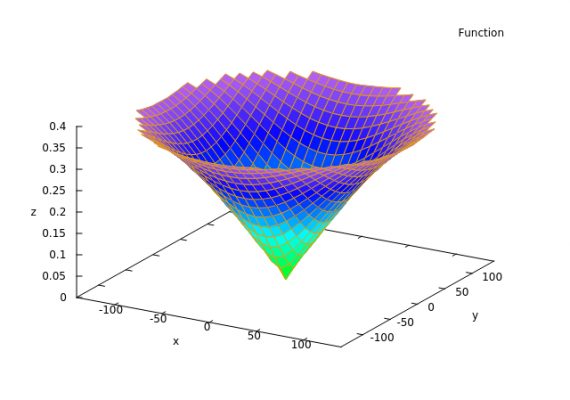
Of course, bad delta radius also means bad XY dimension. Here is a chart showing how the above change influences XY dimension error. The consequences there are big (around 0.4 mm).
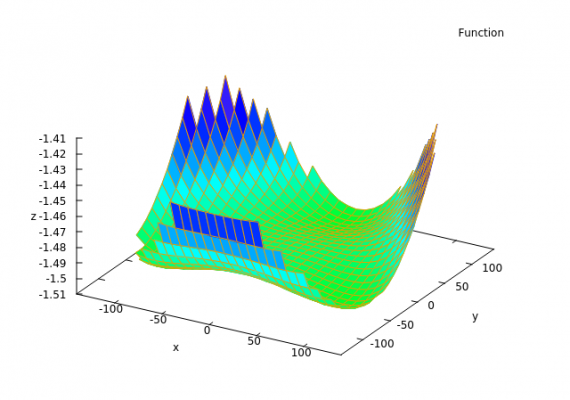
Now, of course, changing delta radius helps to some people. Well, because they already have wrong diagonal rod length. So instead of fixing the diagonal rod length they compensate with delta radius change. These errors compensate each other a bit. E.g. the previous error in delta radius of 0.37 can be compensated with 1.5 mm change of diagonal rod length (and increasing the Z-length by about 1.5 mm). The resulting Z-error is very small - around 0.08 mm around the whole bed and more over only about 0.02 mm in the centre part of the bed.
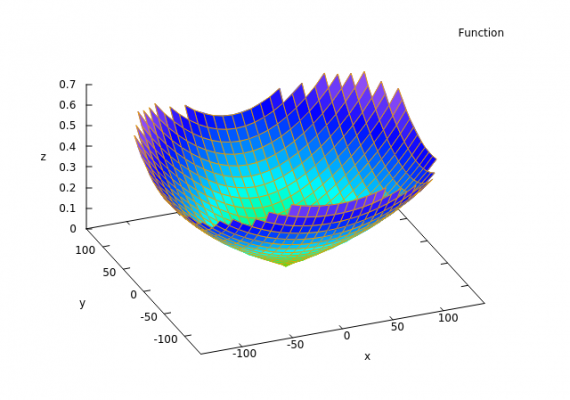
That is the beauty and the curse of using long arms. They decrease the sensitivity of the printer to errors in diagonal rod length and delta radius. But they also hide these errors - making it harder to identify them. Also notice that this compensation does not work well in the XY direction. It increases the error there - it changes to whooping 0.7 mm!
I guess many simple delta calibration tutorials make more bad than good. The problem is not simple. It cannot be simplified to a simple tutorial especially when you want to consider bad tower locations, tilted towers, or god forbid rotaed towers or carriages or in-equal diagonal rods. If you want to understand it more then study this: [github.com]
If it is too complicated for you than I cannot really help you. Good luck.
|
Re: FLsun Kossel Calibration Second Thread December 21, 2019 07:11PM |
Registered: 5 years ago Posts: 42 |
Hercek, you are right I am confused.
However your explanation has helped and I will try and get my head around the Github article over the holidays.
The big point I get from your explanation is the rods not only need to equal in length but not overly long.
The FLsun spec calls for 218mm rods, mine are 222mm. So if I shorten the rods to 218MM it may reduce some of my error, I will try that after I understand the Github stuff.
I was also found today that one of the rod connections on the effector has slipped and was wider than it should be so I will fix that as well.
I might have been better with a higher quality printer but that was all the budget could manage at the time and until I can get this to work and produce some items I won't know if I want to continue.
Thanks for your help.
|
Re: FLsun Kossel Calibration Second Thread December 22, 2019 01:18AM |
Registered: 10 years ago Posts: 732 |
Don't bother! Difference of only 1.8 % in diagonal rod length does not matter at all provided you have the correct rod length filled in in your printer configuration in firmware. When I talked about errors in my previous post, I talked about errors in the printer dimensional specification in the firmware with respect to the mechanical reality. I did not talk about errors against what FLsun mechanical drawings specify.Quote
NAP1947
The big point I get from your explanation is the rods not only need to equal in length but not overly long.
The FLsun spec calls for 218mm rods, mine are 222mm. So if I shorten the rods to 218MM it may reduce some of my error
This is a big problem! In-equal distance between rod ends on platform and the corresponding carriage leads to platform rotation during its horizontal movements. This will not have a big impact on Z-error but it will screw up your XY-error big time. And if such a mechanical "slip" results in an increase of unwanted play (e.g. a possibility of slight movement of a ball in respect to the platform it is mounted on) then you are completely screwed up. Do not even bother to start calibrating your printer if some unwanted mechanical play is not fixed first!Quote
NAP1947
I was also found today that one of the rod connections on the effector has slipped and was wider than it should be so I will fix that as well.
Well, there is a good side of it as well. If you enjoy a bit of simple math and playing with your printer mechanics then you will get a lot of fun calibrating it. And it will work really well in the end. 8bit electronics can drive a delta printer easily. The only real problem with it is that there is no good automatic calibration for it in the firmware. linDeltaCalib project will help you calibrate it even better than what is possible with RepRap firmware and 32 bit Duet electronics ... if you can handle the math. That is because it is not all implemented in some pretty PC application which would lead users step by step and automate whatever is possible to automate. The calibration can be implemented at the same level as RepRap/Duet firmware does it. The problem is that nobody bothered to do it for 8-bit MCUs.Quote
NAP1947
I might have been better with a higher quality printer but that was all the budget could manage at the time
Edited 1 time(s). Last edit at 12/22/2019 04:14AM by hercek.
|
Re: FLsun Kossel Calibration Second Thread December 22, 2019 05:53AM |
Admin Registered: 11 years ago Posts: 3,096 |
Right now I'm converting my Delta to ball joints, added longer arms (219.75 > 267.50) because I realized the shorter arms were causing problems on their own. The first thing I notice the effector being more stable near the edges of the build platform. Also I reduced the size of the effector and removed any additional weight. The arms are EXACTLY the same length and the bolts used to attach the rods were covered with a thin plastic drinking straw so the ball joints are tightly fixed to the bolts without play.
Suddenly now that I'm building the ball joints, I realize all the measuring mistakes that I made with the magnetic system probably being the cause that it had issues in the first place. Anyway, the longer rods will help smooth out the problems, not because of bad math/measurements, but because the previous arms really were just too short.
I already have 300mm long carbon rods waiting for the time when I upgrade the machine again with a wider frame. Eventually I will lengthen all 9 horizontal extrusions to increase the build plate volume.
The only drawback I am seeing is that Cura for example doesn't seem to realize a Delta doesn't print the full volume all the way up but that it's cone-shaped towards the top.
http://www.marinusdebeer.nl/
|
Re: FLsun Kossel Calibration Second Thread December 22, 2019 08:23AM |
Registered: 10 years ago Posts: 732 |
I do not advocate going with way too long arms. The fact that they make printer less sensitive to some calibration errors is the only good consequence. It is a good cherry on the top of a cake which rotten otherwise. There are many significant disadvantages of long arms:
- they mitigate calibration errors when z-probing bed => if you look at the shape of the z-probe error over the bed then it is harder to guess manually (or compute automatically) what is incorrectly calibrated
- the waste useful build height of your delta
- although they make it easier to get the first layer sticking they do not do anything at all to get get precise XY dimensions; actually, they make it worse in this area
- they are heavier
|
Re: FLsun Kossel Calibration Second Thread December 23, 2019 02:38AM |
Admin Registered: 11 years ago Posts: 3,096 |
Like I said, the previous arms were too short so the current new rods are actually a more realistic length  thanks for your very extended information. I'll let you know how the new setup works after calibrating!
http://www.marinusdebeer.nl/
 thanks for your very extended information. I'll let you know how the new setup works after calibrating!
http://www.marinusdebeer.nl/
|
Re: FLsun Kossel Calibration Second Thread January 03, 2020 02:43PM |
Registered: 5 years ago Posts: 42 |
Thank you to everyone that contributed, I have the printer setup and configured.
I went through all the mechanicals and found a few things that had worked loosed which I tightened.
I also found a discrepancy between the rods ends at the tower and the ones at the effector, these have been adjusted do all are equal.
Now I have the printer working the Mosfet for the Hotend has gone bad and will not heat.
I am looking into this and trying to find out if the new board has any warranty.
|
Re: FLsun Kossel Calibration Second Thread January 14, 2020 04:37PM |
Registered: 5 years ago Posts: 42 |
Long story short, the operator made a mistake, I replaced the hot end nozzle and did not get it installed properly hence the hot end error that I thought was the mosfet, adjusted hot end and all is working.
I still have a very minor convex bed issue, it only affects squares larger than 90mm and only in 3 of the 4 corners.
Once past the first layer it prints fine, I estimate I am about .05mm above the print bed in those spots.
May not be worth trying to adjust further.
I appreciate all the time and effort everyone put into helping me through this.
Sorry, only registered users may post in this forum.


