Fabbing overhangs ...
Posted by VDX
|
Fabbing overhangs ... August 10, 2008 03:26PM |
Admin Registered: 16 years ago Posts: 13,884 |
Hi all,
... i had some ideas with embedding spacer-parts in the fabbing, so you could fab complex objects with overhangs without the 'teardrop-shape' in vertical bores and such ...
It's the same idea as embedding sticks, rod, threads ant nuts in a mould, but here included in the fabbing process itself.
When you want to build with the same material, then you can prefab the parts to embed in a previous run an insert them while fabbing - for example you can reprap vertical half-pipes and use them as upper halfs of a throughole, so you can avoid 'tear-drops' ...
One problem here is the flat nose of the common extruder - here a dispenser-needle would be much better or you can't extrude near to elevated parts.
***
Then, while thinking around, i found a perfect killer-application for the reprap, what could push the 'usability'-argument some clicks forward and power some micro-startups: individual picture-frames!
Imagine fixing the backside on the bed, the image or photo in the center, a glass-plate on top and then simply reprap the frame around!
When using coloured plastic (or maybe two or more extruders with different colours) you can fab any shape and coloured frame you want - simple straight shapes or artistic ones, it's your design ...
Viktor
|
Re: Fabbing overhangs ... August 10, 2008 06:47PM |
Registered: 17 years ago Posts: 550 |
positioning of prefabbed pieces...
wouldn't that be something you could use a pick'n'place toolhead for?
Surely not one for smd electronic parts, but maybe something more sophisticated for this job (no vac pump, but a tweezer for example)
That way one could re-use the prefabbed parts for the next object too
just a thought
'sid
wouldn't that be something you could use a pick'n'place toolhead for?
Surely not one for smd electronic parts, but maybe something more sophisticated for this job (no vac pump, but a tweezer for example)
That way one could re-use the prefabbed parts for the next object too
just a thought
'sid
|
Re: Fabbing overhangs ... August 11, 2008 12:09AM |
Registered: 16 years ago Posts: 174 |
I think you are refering to shape deposition manufacturing. Placing a nut or linear bearing actually seems like a pretty good idea.
You can do a whole bunch of cool things with SDM:
[biorobotics.harvard.edu]
You can do a whole bunch of cool things with SDM:
[biorobotics.harvard.edu]
|
Re: Fabbing overhangs ... August 11, 2008 03:40AM |
Admin Registered: 16 years ago Posts: 13,884 |
... there's a lot of possibilities with embedding prefabbed parts and/or changing materials 'on the fly' while fabbing the body/housing.
When at home again, i'll post some photos of tweezers and vacuum-grippers, i designed for microassembly - with milling i can make any shape or type of pick-n-place toolheads or specialized tweezer-inserts.
As mentioned before the only actual problem i see is the flat nose of the actual extruder.
But with my 'room-temp-paste'-approach i have dispenser-needles with some millimetres to centimeters length, so this isn't a problem with low-temp-materials.
And with heated needles this could be made for the plastic-extruder too ...
Viktor
|
Re: Fabbing overhangs ... August 11, 2008 03:19PM |
Admin Registered: 16 years ago Posts: 13,884 |
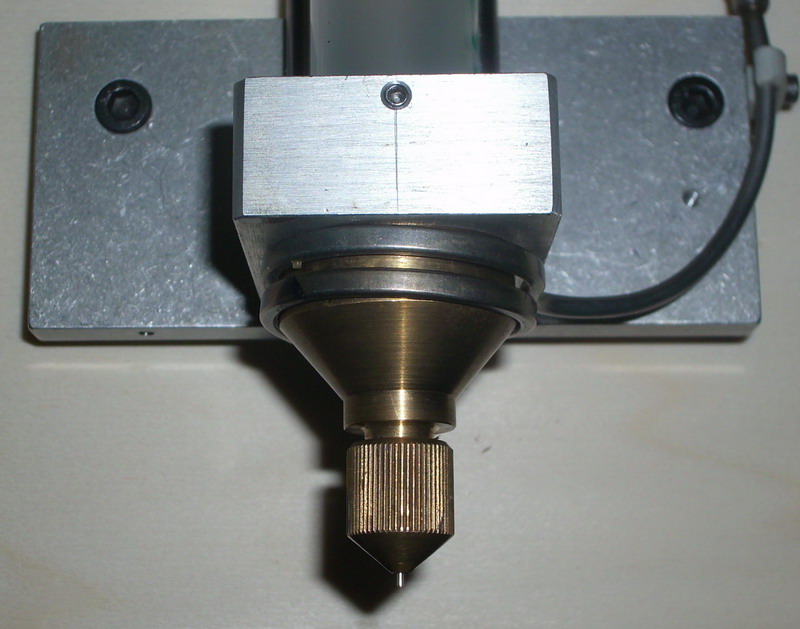
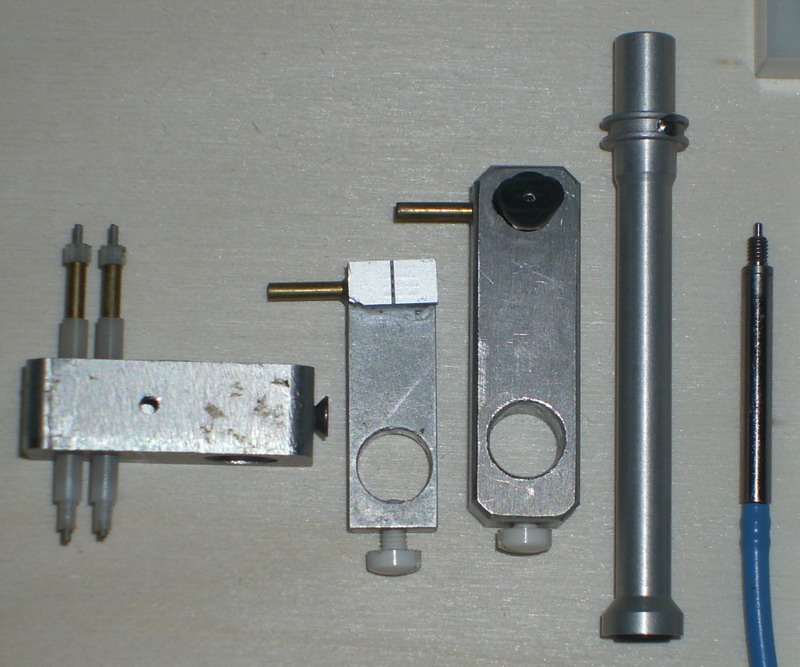
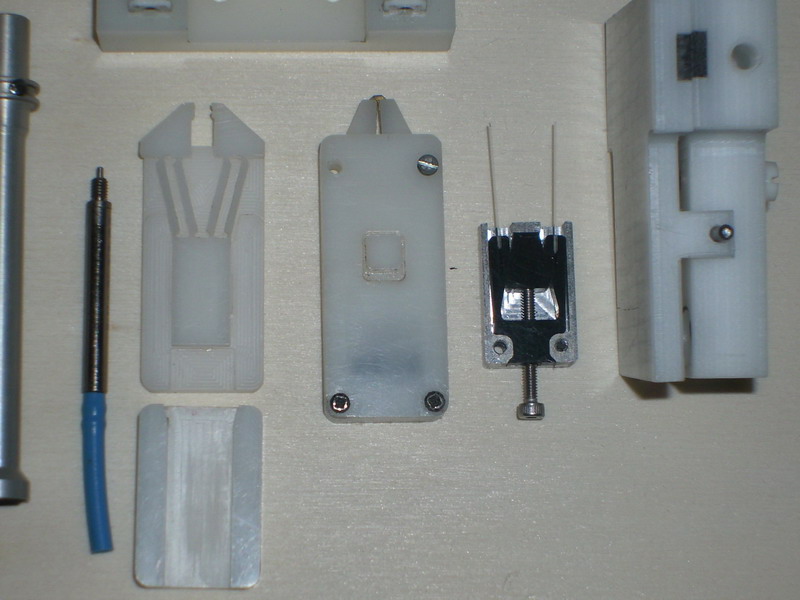
... here the promised images (some more detailed at the bottom)
Two pneumatic paste-dispensers (the big one with a heater):
Some tools for pick-n-place and micro-handling:
Viktor
Two pneumatic paste-dispensers (the big one with a heater):

Some tools for pick-n-place and micro-handling:

Viktor
|
Re: Fabbing overhangs ... August 12, 2008 06:30AM |
Registered: 16 years ago Posts: 622 |

|
Re: Fabbing overhangs ... August 12, 2008 06:37AM |
Admin Registered: 16 years ago Posts: 13,884 |

|
Re: Fabbing overhangs ... August 12, 2008 09:11AM |
Registered: 17 years ago Posts: 31 |
> I think you are refering to shape deposition
> manufacturing.
I don't think he is; it looks more like a hybrid of assembly and fabrication (which is a very good idea; pick and place of mechanical components into parts would be helpful.)
Contrary to what the name seems to imply, shape deposition manufacturing doesn't actually involve putting preformed shapes into a part. It's called shape deposition because by alternating between a rough fused deposition style technique and a conventional 5-axis mill they can shape the sides of each layer - so it's a shape being deposited, not just a square-sided layer.
It's actually a very impressive process - it can produce good machined surface finishes, but the toolpaths can be easily generted by a computer - you never have to worry about the milling head running into the part above where you are milling because it isn't there yet, and you can avoid milling overhangs entirely by milling the support material and depositing overtop of it (overhangs would put the edge of the tool opposite the one you're intentionally cutting with into the layer below, with potentially unpleasant resuls). It also lets them get away with tens of layers for even complicated parts - they only really need to do a layer boundary when the curve of the surface passes vertical and they need to swap which side they're milling, although there are considerations with stress relief as well.
Now, having a RepRap rigid enough to do some light SDM would also be very, very shiny
|
Re: Fabbing overhangs ... August 12, 2008 10:16AM |
Registered: 16 years ago Posts: 361 |
 )
)|
Re: Fabbing overhangs ... August 12, 2008 10:47AM |
Registered: 17 years ago Posts: 31 |
SDM requires five axes to do shapes more complex than are easily doable on a plain five axis machine without burning days with a half-sphere end mill getting the finish just right, but you'd still be able to do much better for many surfaces with just the three axes we already need for a reprap - they just need to be sturdier. All that's there on a fundamental level is alternating between some amount of milling and some deposition; it's just that the SDM process is typically done with a shop-sized setup with a deposition head on an industrial arm, a shot peening setup, and a big mill, with stuff to move parts between all three... it's more focused on the "I lob this model file at the factory server and in a day or two have a steel micro-scale gas turbine engine on my desk" than cheap hardware costs... doesn't mean the ideas don't apply.
|
Re: Fabbing overhangs ... August 12, 2008 11:38AM |
Admin Registered: 17 years ago Posts: 1,915 |

|
Re: Fabbing overhangs ... August 12, 2008 02:16PM |
Registered: 15 years ago Posts: 21 |
About filling the voids for making overhangs:
it would be quite easy to hang a fab@home head next to the RepRap head. Fill the fab head with sugar coating and build layer by layer, as usual. Fill the gaps with the sugar. They will harden and you can build ABS right on top of it.
When you are done, hold the model under water. The sugar will dissolve (if the ABS dissolves as well, you are in trouble ;-)
Matt
|
Re: Fabbing overhangs ... August 12, 2008 02:22PM |
Registered: 16 years ago Posts: 622 |
|
Re: Fabbing overhangs ... August 12, 2008 03:01PM |
Admin Registered: 16 years ago Posts: 13,884 |
... hummm ... here in Germany would be fine 
One of the points for developing interests in micro- and nanotech was the hope, that all my tools, equipment and hardware-archives sometime would fit in a fly-case
But in the meantime i have to deal with the remnants of the enroute ...
***Edit: @matt - you have to select the supporting materials carefully or your extruded trays wouldn't stick and curl away.
For this the two-staged way would be optimal - first fab only your 'overhang-bits' upside-down, then in the fabbing process insert them in your object and embedd them with the same material.
Viktor
Edited 1 time(s). Last edit at 08/12/2008 03:06PM by Viktor.
|
Re: Fabbing overhangs ... August 12, 2008 03:17PM |
Registered: 16 years ago Posts: 361 |
Quote
it would be quite easy to hang a fab@home head next to the RepRap head. Fill the fab head with sugar coating and build layer by layer, as usual.
I'm wondering if we need a 'Frequently Offered Suggestions' page on the wiki.
SUffice to say, support material is never easy easy as it initially seems. Finding a material that extruded filaments actually *stick* to is a non-trivial task. You could conceivably use something like sugar as as a support for long bridges (where the filament is straight, and starts and ends on plastic from the previous layer), though.
|
Re: Fabbing overhangs ... August 13, 2008 06:32AM |
Registered: 15 years ago Posts: 21 |
|
Re: Fabbing overhangs ... August 13, 2008 09:57AM |
Registered: 16 years ago Posts: 361 |
Quote
Ru: sorry, I thought it had been mentioned before, but I really don't have the entire mailing list in my head. ;-)
Yeah, hence my suggestion for a page
I'm not getting at you personally, or any of the other people who have come in with ideas that have already been considered.It was a serious suggestion, not a poorly veiled insult, honest!
|
Re: Fabbing overhangs ... August 14, 2008 06:23AM |
Registered: 15 years ago Posts: 21 |
|
Re: Fabbing overhangs ... August 15, 2008 05:44AM |
just a thought, instead of worrying about placing a piece higher than the build layer, just make the piece to fit in a negative void then when the layer over the inserted piece gets put on it fuses the pieces together.
+------------\           /------------+
|             \         /             |
|              \       /              |
|               \     /               |
|                -----                |
+-------------------------------------+


+-------------+
 \           /
  \         /
   \       /
    \-----/
what ya think?
+------------\ /------------+
| \ / |
| \ / |
| \ / |
| ----- |
+-------------------------------------+
+-------------+
\ /
\ /
\ /
\-----/
what ya think?
|
Re: Fabbing overhangs ... August 15, 2008 05:54AM |
Registered: 15 years ago Posts: 96 |
|
Re: Fabbing overhangs ... August 15, 2008 02:22PM |
Registered: 15 years ago Posts: 199 |
Adding the tags for code ('code' and '/code' in square brackets):
That looks like viable solution. Since the "plug" will be shorter than the hole it goes into you can extrude them side by side and then have a pause in the build process for the human to pry the plug off the table and cram it in the hole. Perhaps a little glue would make it more solid.
+------------\ /------------+
| \ / |
| \ / |
| \ / |
| ----- |
+-------------------------------------+
+-------------+
\ /
\ /
\ /
\-----/
That looks like viable solution. Since the "plug" will be shorter than the hole it goes into you can extrude them side by side and then have a pause in the build process for the human to pry the plug off the table and cram it in the hole. Perhaps a little glue would make it more solid.
Sorry, only registered users may post in this forum.