Replace Gen6 board by Arduino/Ramps
Posted by Replace
|
Replace Gen6 board by Arduino/Ramps August 10, 2014 12:58PM |
Registered: 13 years ago Posts: 861 |
Can this be done ?
I seem to have fried my Gen6 board (2012) on my Orca v04x
As it is pretty expensive I consider to replace the hardware with Ramps on Arduino.
Any considerations not to ?
Thomas
www.3daybreaker.blogspot.com
Orca V4.4 rebuild to Ramps with Mk8 and E3D, as well as a Rostock Delta Mini and an OLO in backorder :-)
|
Re: Replace Gen6 board by Arduino/Ramps September 16, 2014 10:17AM |
Registered: 13 years ago Posts: 861 |
So,
I ordered an arduiono + Ramps set.
I rewired the opto's to use only 3 wires in stead of 4
I played with a marlin deck and loaded it into the Arduino
I connected 4 steppers and 3 end stops
I powered it up
I heared a scatter, there was smoke and bad smell
Ramps seems dead, Arduini will respond to programming....
So, maybe the original cause of killing my Gen6 was not the Gen6 ?
Thomas, back to start
www.3daybreaker.blogspot.com
Orca V4.4 rebuild to Ramps with Mk8 and E3D, as well as a Rostock Delta Mini and an OLO in backorder :-)
|
Re: Replace Gen6 board by Arduino/Ramps September 17, 2014 02:57AM |
Admin Registered: 13 years ago Posts: 6,998 |
|
Re: Replace Gen6 board by Arduino/Ramps September 23, 2014 09:58AM |
Registered: 13 years ago Posts: 861 |
Yes, Bad Luck. I can not see on the Ramps what might be fried, but it is dead.
I have 2 more ramps to blow-up :-)
I now take it component by component.
This is the status now:
I Switched from marlin to Repetier and from Pronterface to Repetier host
I reconfigured the repetier, to represent most of previous Marlin values, but considering Arduino and Ramps.
The X-motor will move. Obviously not enough movement for real life, but very smooth. This will only require steps per mm adjustent (I think)
The Z-motor will move (On the X- or Y stepper. I have to switch connectors as they do not fit on the double Z- of the Ramps). Obviously not enough movement for real life, but very smooth. This will only require steps per mm adjustent (I think)
The Y-motor will try to move both directions at the same time (well it looks like that), until the # of required steps has been executed, so a lot of noise and tremble, but no displacement. No idea what is wrong. This happens on the X-stepper as well.
The Extruder motor will do nothing, regardless minimum temp setting or cold print button. Not on the extruder driver, not on the X- or Z- drivers.
The re-wired Orca Opto's (in which I fused both leads together to get Lead, Ground and Signal) will not go HIGH while putting the indicator in the stop. They report Low on all attempts for M119.
I have not wired the sensors or heaters yet.
Edited 1 time(s). Last edit at 09/23/2014 10:00AM by Replace.
www.3daybreaker.blogspot.com
Orca V4.4 rebuild to Ramps with Mk8 and E3D, as well as a Rostock Delta Mini and an OLO in backorder :-)
|
Re: Replace Gen6 board by Arduino/Ramps October 06, 2014 01:49AM |
Registered: 13 years ago Posts: 861 |
I am making progress now.
I replaced the opto's with new ones that only have 3 wires. They work good.
My X and Y will home perfectly and move as expected. Only need to fine tune the steps per mm.
My Z will stall while accelerating. I even set max acceleration to 1 (it was 3000) and still it will stall after almost a cm of accelerating movement while homing.
Must be something different than just moving, as that will work fine in portions of 10 mm in Repetier host.
Any tips on this ?
I got my extruder running also, due to the correct temp sensor conection now. Must be tuned for steps per mm also.
So when Z-motor is fine, only the calibrating and the heaters....
I think It will work eventually :-)
Edited 1 time(s). Last edit at 10/07/2014 12:07PM by Replace.
www.3daybreaker.blogspot.com
Orca V4.4 rebuild to Ramps with Mk8 and E3D, as well as a Rostock Delta Mini and an OLO in backorder :-)
|
Re: Replace Gen6 board by Arduino/Ramps October 07, 2014 12:13AM |
Registered: 12 years ago Posts: 799 |
Hy
Good to hear, maybe vmax at Z is set too high ? post your settings so we can tell
Chri
Edited 1 time(s). Last edit at 10/07/2014 12:14AM by Chri.
[chrisu02.wordpress.com] Quadmax Intel Delid Tools
Good to hear, maybe vmax at Z is set too high ? post your settings so we can tell
Chri
Edited 1 time(s). Last edit at 10/07/2014 12:14AM by Chri.
[chrisu02.wordpress.com] Quadmax Intel Delid Tools
|
Re: Replace Gen6 board by Arduino/Ramps October 09, 2014 10:35AM |
Registered: 13 years ago Posts: 861 |
So, I crashed my repeater deck. It would not compile any more.
Maybe some comments deleted to much or ... anyway, after 2 hours of trying, I started all over again.
This time with the repeater configuration help, this is a fine utility.
Finally all went well, except steps per mm, which I fine tuned with a ruler for all axis and the extruder.
Time for a test print.
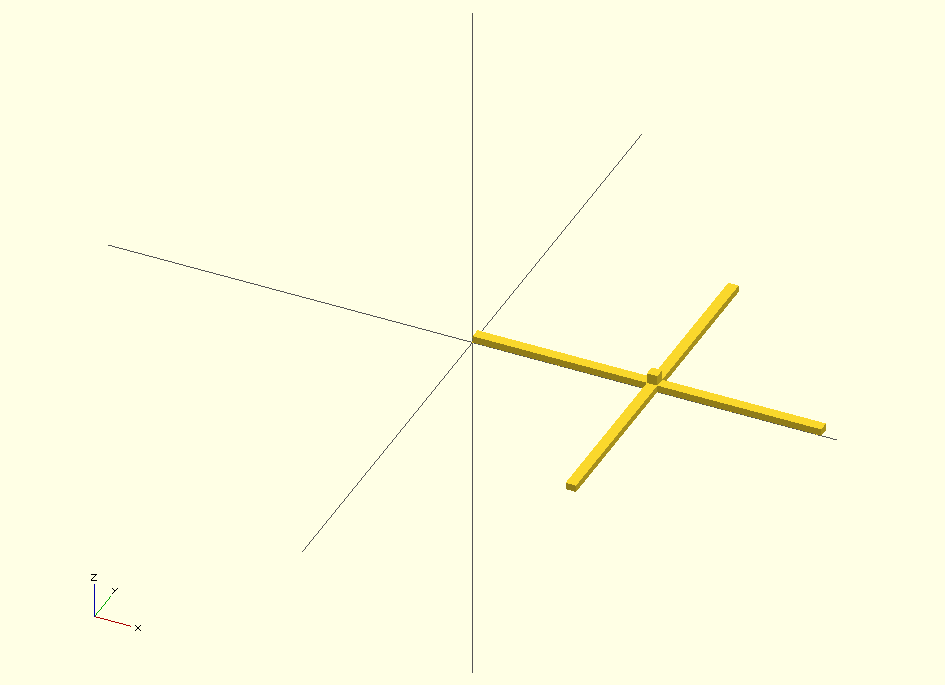
I made a cross of 100mm and started the print.
To my surprise, the hot end will not get hotter than 229 degrees, despite setting it higher. I can not imagine why.
Note: I did solder some extension to the original wires, as the Ramps is further away than the gen6 was. Can this be of influence ?
Next: The first layer looks amazingly good. Nice flow of plastic, nice bonding, but than it starts behaving funny.
All next layers are shifted off centre. Even within a layer, a travel move will render the object to print out of sync with the previous layer.
Most of it in Y direction but also a bit in X
Images of testset and prints are attached.
Already, after the skirt, the start of the print is off centre.
Any Idea's ?
Thomas
www.3daybreaker.blogspot.com
Orca V4.4 rebuild to Ramps with Mk8 and E3D, as well as a Rostock Delta Mini and an OLO in backorder :-)
Maybe some comments deleted to much or ... anyway, after 2 hours of trying, I started all over again.
This time with the repeater configuration help, this is a fine utility.
Finally all went well, except steps per mm, which I fine tuned with a ruler for all axis and the extruder.
Time for a test print.
I made a cross of 100mm and started the print.
To my surprise, the hot end will not get hotter than 229 degrees, despite setting it higher. I can not imagine why.
Note: I did solder some extension to the original wires, as the Ramps is further away than the gen6 was. Can this be of influence ?
Next: The first layer looks amazingly good. Nice flow of plastic, nice bonding, but than it starts behaving funny.
All next layers are shifted off centre. Even within a layer, a travel move will render the object to print out of sync with the previous layer.
Most of it in Y direction but also a bit in X
Images of testset and prints are attached.
Already, after the skirt, the start of the print is off centre.
Any Idea's ?
Thomas
www.3daybreaker.blogspot.com
Orca V4.4 rebuild to Ramps with Mk8 and E3D, as well as a Rostock Delta Mini and an OLO in backorder :-)
|
Re: Replace Gen6 board by Arduino/Ramps October 09, 2014 01:15PM |
Registered: 12 years ago Posts: 799 |
Seems to loose steps ?, what are your travel, Acceleration any Yerk values ?
have you set the vref (to about 0,4v) ?
chri
[chrisu02.wordpress.com] Quadmax Intel Delid Tools
have you set the vref (to about 0,4v) ?
chri
[chrisu02.wordpress.com] Quadmax Intel Delid Tools
|
Re: Replace Gen6 board by Arduino/Ramps October 09, 2014 05:43PM |
Registered: 13 years ago Posts: 861 |
I have attached the new repeater deck that I generated by configuration utility and changed for some parameters based on experimental measures of steps per mm travel.
Can steps be lost by to high speeds or accelerations ? I have never lost steps previously tat were not based on slipping belts. Belts are fine now, as the were before on the Gen6.
Edited 1 time(s). Last edit at 10/09/2014 05:44PM by Replace.
www.3daybreaker.blogspot.com
Orca V4.4 rebuild to Ramps with Mk8 and E3D, as well as a Rostock Delta Mini and an OLO in backorder :-)
|
Re: Replace Gen6 board by Arduino/Ramps October 10, 2014 12:15AM |
Registered: 12 years ago Posts: 799 |
Depending on your printspeed 3000 Acc can be a little bit high for the heavy bed to move, try to reduce acc to 2000 and Yerk to 15 , or raise your vRef a little bit.
For what i know camiel even was going down to 1000 acc at the orca`s where he was printing the parts, but that may be a little bit to slow when printing faster causing blobs at corners.
Chri
[chrisu02.wordpress.com] Quadmax Intel Delid Tools
For what i know camiel even was going down to 1000 acc at the orca`s where he was printing the parts, but that may be a little bit to slow when printing faster causing blobs at corners.
Chri
[chrisu02.wordpress.com] Quadmax Intel Delid Tools
|
Re: Replace Gen6 board by Arduino/Ramps October 10, 2014 05:37AM |
Registered: 13 years ago Posts: 861 |
Thanks I will try that, despite the fact that on Marlin I did not face these problems on 3000
btw.. what does Yerk actually do or prevent ? I did not get that clear in the comments....
www.3daybreaker.blogspot.com
Orca V4.4 rebuild to Ramps with Mk8 and E3D, as well as a Rostock Delta Mini and an OLO in backorder :-)
btw.. what does Yerk actually do or prevent ? I did not get that clear in the comments....
www.3daybreaker.blogspot.com
Orca V4.4 rebuild to Ramps with Mk8 and E3D, as well as a Rostock Delta Mini and an OLO in backorder :-)
|
Re: Replace Gen6 board by Arduino/Ramps October 10, 2014 07:58AM |
Registered: 12 years ago Posts: 799 |
yerk defines the maximal speed with which a direction change can be made.
for example if you move with 50mm/s at x to a 90° corner the axis will slow down to 20mm/s and will imediatly start to move to Y back to 50mm/s
when you set Yerk to 15mm/s it will slow down to 15mm/s when changing the direction.
A higher value results in less blobs on the corner change when printing at higher speeds but results in a optical wave at the surface of the opposite direction because of a harder start, but may result in loosing steps.
So the challange is to find the best value between speed and quality.
Chri
[chrisu02.wordpress.com] Quadmax Intel Delid Tools
|
Re: Replace Gen6 board by Arduino/Ramps October 10, 2014 10:41AM |
Registered: 13 years ago Posts: 861 |
Yo Chri,
your suggestions were just what I needed.
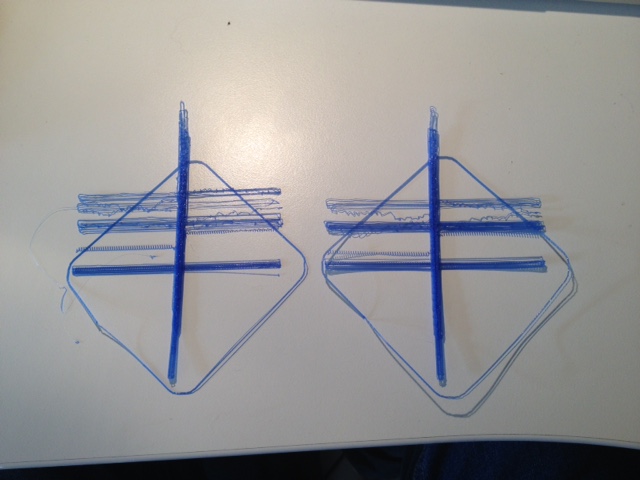
See the progress in the attachment.
The messy one was with my code,
the middle one with 1000 acceleration, 3000 travel and 20 yerk
The last one (top) with 1000 acceleration, 1000 travel and 10 yerk.
i think that covers for the missing steps.
Also my cross measures 100x100 mm in Openscad and 100.01 and 100.4 after cooling down, so i am almost there too.
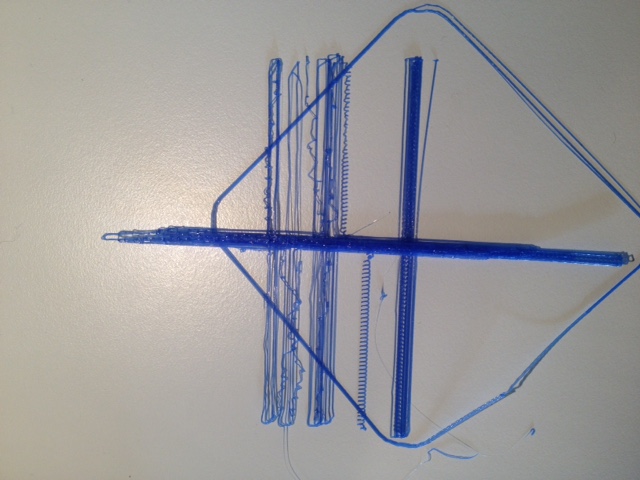
One thing puzzles me though: first layer bonding is not ok. filaments lie loose from each other, except for te infill. So infill does not bond nor attaches to perimeters.
Maybe because I have not wired-up the heated bed.... I will do that next to see the difference,
but thanks again for the code review :-)
Thomas
Edited 1 time(s). Last edit at 10/10/2014 10:41AM by Replace.
www.3daybreaker.blogspot.com
Orca V4.4 rebuild to Ramps with Mk8 and E3D, as well as a Rostock Delta Mini and an OLO in backorder :-)
your suggestions were just what I needed.
See the progress in the attachment.
The messy one was with my code,
the middle one with 1000 acceleration, 3000 travel and 20 yerk
The last one (top) with 1000 acceleration, 1000 travel and 10 yerk.
i think that covers for the missing steps.
Also my cross measures 100x100 mm in Openscad and 100.01 and 100.4 after cooling down, so i am almost there too.
One thing puzzles me though: first layer bonding is not ok. filaments lie loose from each other, except for te infill. So infill does not bond nor attaches to perimeters.
Maybe because I have not wired-up the heated bed.... I will do that next to see the difference,
but thanks again for the code review :-)
Thomas
Edited 1 time(s). Last edit at 10/10/2014 10:41AM by Replace.
www.3daybreaker.blogspot.com
Orca V4.4 rebuild to Ramps with Mk8 and E3D, as well as a Rostock Delta Mini and an OLO in backorder :-)
|
Re: Replace Gen6 board by Arduino/Ramps October 10, 2014 02:16PM |
Registered: 12 years ago Posts: 799 |
Good to hear 
with what do you create the gcode ? settings ?
Do o move Z by hand at the first layer (as normally done on orca`s) or do you calibrated Z value.
Can you upload the gcode, so i can try it out to see what happens ?
Chri
[chrisu02.wordpress.com] Quadmax Intel Delid Tools
with what do you create the gcode ? settings ?
Do o move Z by hand at the first layer (as normally done on orca`s) or do you calibrated Z value.
Can you upload the gcode, so i can try it out to see what happens ?
Chri
[chrisu02.wordpress.com] Quadmax Intel Delid Tools
|
Re: Replace Gen6 board by Arduino/Ramps October 10, 2014 04:38PM |
Registered: 13 years ago Posts: 861 |
I calibrated the Z home by usage of the end-stop, to stop at a paper sheet getting drag.
That worked for the last 2 years on the Marlin front, so I think that must work for Repetier.
Be aware that I normally have the heated bed on approx 90 degrees, which gives nite bonding and a flat surface on glass. Currently that glass is not heated yet. Still have to wire that.
I slice with Slic3r, with a 0.25 layer on 0.35 mm nozzle.
My infill currently is 20% And I tried to multiply the extrusion by 1.1 but that did not help the first layer bonding.
In the attachments, a version with extruder multiplier 1 and one with 1.1
Not sure what you want to see in the code. I am not a good code reader :-(
rgrds Thomas
www.3daybreaker.blogspot.com
Orca V4.4 rebuild to Ramps with Mk8 and E3D, as well as a Rostock Delta Mini and an OLO in backorder :-)
|
Re: Replace Gen6 board by Arduino/Ramps October 10, 2014 05:04PM |
Registered: 13 years ago Posts: 861 |
BTW,
here you can see the first layer problem: test print
Thomas
www.3daybreaker.blogspot.com
Orca V4.4 rebuild to Ramps with Mk8 and E3D, as well as a Rostock Delta Mini and an OLO in backorder :-)
here you can see the first layer problem: test print
Thomas
www.3daybreaker.blogspot.com
Orca V4.4 rebuild to Ramps with Mk8 and E3D, as well as a Rostock Delta Mini and an OLO in backorder :-)
|
Re: Replace Gen6 board by Arduino/Ramps October 10, 2014 05:51PM |
Registered: 12 years ago Posts: 799 |
I Just checked the code.
Some tips,
* print the external perimeters first, this also gives better scale as the first printed layers are always pushing the next layer a little bit sideways, you can measure the difference when printing the same part the other way
* the Skirt is very far away from the part, 5mm should be enough, skirt is only to fill the nozzle, so 1 circle is normally enough
* activate brim, two brim lines normally do the job, so your nozzle is 0,35? then make a 0.7mm brim.
* your layerheight of 0.25 is way too much for a 0,35 nozzle, normally the rule is don`t go over 1,6:1 from the nozzle diameter so the maximum should be 0,21875 , go fo 0,2 and you get much better parts.
* on such cross parts its better to make a 90° infill instead of 45°.
me and my friends have Z always set too high and adjust the height when the printer starts with skirt/brim and the first layer, this way we have always a good sticking 1st layer, after short time you get used to it how you have to set Z.
Best thing is to make a small part (20x20 or 30x30) with 100% infill and check if the extrusion is too muchs, so therfore always go from too much extrusion to less, not the other way.
90°C is no problem for me, i`m normally printing at 100-105°C on the Bed when printing ABS (large parts up to 115°C)
*also reduce the speed of external perimeters, i saw for example on the top layer your perimeter speed is 50mm/s, but the top infill is 30mm/s, on a stock orca i think the external perimeter`s shouldn`t be over 40mm/s, the internal and infill can be over 60 or even more
* activate the cool feature so the upper part of the small cube`s won`t melt because of a too short layer time.
i`m not at home tomorrow, maybe i can make a Testprint on sunday.
Chri
Edited 1 time(s). Last edit at 10/11/2014 02:46AM by Chri.
[chrisu02.wordpress.com] Quadmax Intel Delid Tools
|
Re: Replace Gen6 board by Arduino/Ramps October 10, 2014 06:07PM |
Registered: 13 years ago Posts: 861 |
|
Re: Replace Gen6 board by Arduino/Ramps October 18, 2014 03:28PM |
Registered: 13 years ago Posts: 861 |
Hi Chri,
I have got it working now, but I had to lower speed and acceleration very much, down to 200, before steps were not missing any more.
So it is a bit slow now.
But, I can't get the temp higher than 226 - 228 degrees.
It heats up at 100% than at 226 it goes to zero, shoots to 228 after which it drops to 226 after which power comes on at 90%
Than it shift between 226 and 228.
But my Host says 240....... and my max temp in the deck says 260, so what parameter s still faulty ? Any idea ?
Thomas
www.3daybreaker.blogspot.com
Orca V4.4 rebuild to Ramps with Mk8 and E3D, as well as a Rostock Delta Mini and an OLO in backorder :-)
|
Re: Replace Gen6 board by Arduino/Ramps October 20, 2014 03:15AM |
Registered: 12 years ago Posts: 799 |
Hmm,
i never used repetier, have you made the PID tuning for the Hotend (for example M303 E-0 S230 C5 , to make the tune to 230°C and 5 cyles)?
For example your PID is at the Moment 7,2,40 , my PID on marlin is 51,3.2,199 for the V10 Hotend.
deactivate babystepping and quadstepping, i read some people have problems with this on repetier.
Chri
[chrisu02.wordpress.com] Quadmax Intel Delid Tools
|
Re: Replace Gen6 board by Arduino/Ramps October 20, 2014 03:19AM |
Registered: 13 years ago Posts: 861 |
I am afraid I don't understand the PID parameters.
I have not messed with them after I made the config with the urility.
i only messed with the speed stuff.
I see meny PID parameters :-(
Also, where do babystepping, quadstepping and microstepping come together ?
With current config.h, my printer is slow, but sooooo smooth :-) And I can hardly hear it running. Much quieter that the Gen6 history :-) But a bit faster would be nice.
www.3daybreaker.blogspot.com
Orca V4.4 rebuild to Ramps with Mk8 and E3D, as well as a Rostock Delta Mini and an OLO in backorder :-)
|
Re: Replace Gen6 board by Arduino/Ramps October 20, 2014 05:30AM |
Registered: 12 years ago Posts: 799 |
Heatup your Hotend to about 100°C
then enter "M303 E-0 S230 C5" in the console (maybe "M303 E0 S230 C5" don`t know exactly)
This may take up to 10 minutes
At the end the firmware should give you a feedback in the console with three Values the P the I and the D
Then go to your configuration.h beginning from line 89
This are your actual values
#define EXT0_PID_P 7
#define EXT0_PID_I 2
#define EXT0_PID_D 40
exchange them with the new one`s
At line 213 you can find babystepping "#define FEATURE_BABYSTEPPING 1" change it to 0
do the same with quadstepping at line 241
Microstepping is defined with the jumpers of your ramps board, so the value at the firmware don`t do anything afaik.
Chri
[chrisu02.wordpress.com] Quadmax Intel Delid Tools
|
Re: Replace Gen6 board by Arduino/Ramps October 21, 2014 02:35AM |
Registered: 13 years ago Posts: 861 |
Ok, this is clear. Thanks
I will do the test like you specified.
What function do I disable with baby and quad stepping is shut off?
And yes, I have all stepper jumpers on the ramps :-)
Edited 1 time(s). Last edit at 10/21/2014 02:36AM by Replace.
www.3daybreaker.blogspot.com
Orca V4.4 rebuild to Ramps with Mk8 and E3D, as well as a Rostock Delta Mini and an OLO in backorder :-)
|
Re: Replace Gen6 board by Arduino/Ramps October 21, 2014 04:31AM |
Registered: 13 years ago Posts: 861 |
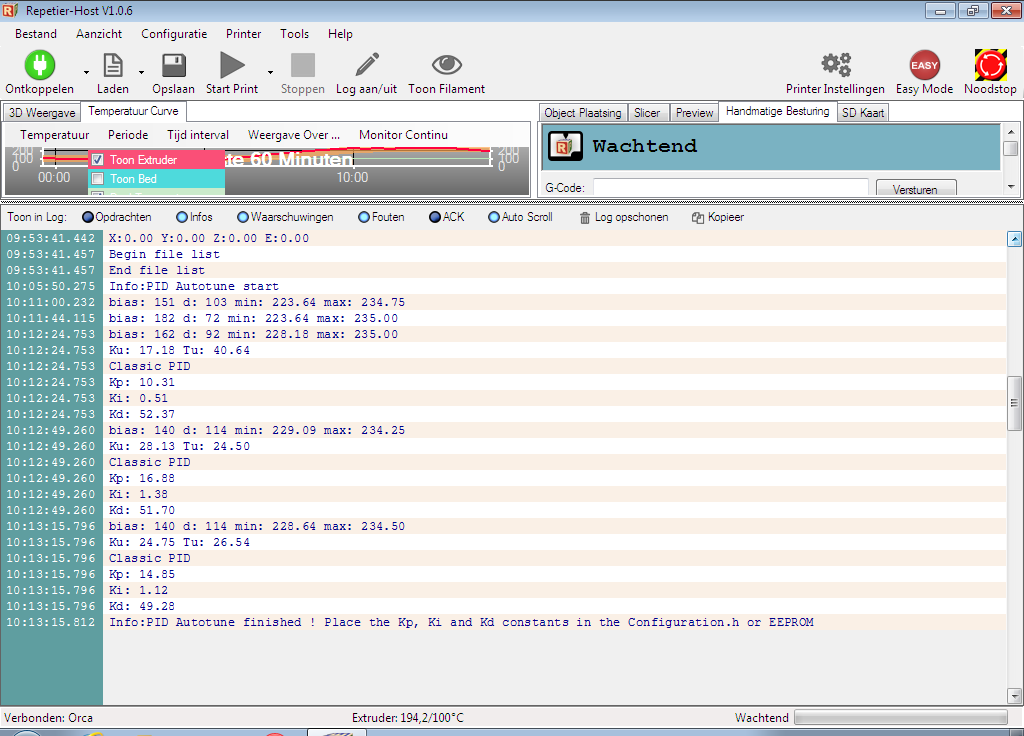
I have attached the PID autotune log
TYhe process gives a sequence of PID values.
Which one should I use in the code ?
Funny: I set temp to 100 than issued the command
the extruder heated up to 230+ during this process.
However, when it started cooling down, I set the ruler at 230 and submitted a print.
From that time heating failed at 225 again.
(No pid's changed yet. So dies the M303 overrule pid values by itself ?)
www.3daybreaker.blogspot.com
Orca V4.4 rebuild to Ramps with Mk8 and E3D, as well as a Rostock Delta Mini and an OLO in backorder :-)
|
Re: Replace Gen6 board by Arduino/Ramps October 21, 2014 04:40AM |
Registered: 12 years ago Posts: 799 |
To explaint the command: M303 E0 S230 C5
M303: the command itself
E0 : user Extruder 0 (the first one)
S230 : Target temperature 230°C , thats why it heats up
C5 : 5 Cycles of Test to get a good average value
And Yes, with this command the original PID Values are ignored to determine the new one
You may also make the PID Tuning when the hotend is still cold and not 100° but that just may take longer.
Use the last three values:
#define EXT0_PID_P 14.85
#define EXT0_PID_I 1.12
#define EXT0_PID_D 49.28
altough the values are a very different compaired to mine
Chri
[chrisu02.wordpress.com] Quadmax Intel Delid Tools
|
Re: Replace Gen6 board by Arduino/Ramps October 21, 2014 08:44AM |
Registered: 13 years ago Posts: 861 |
|
Re: Replace Gen6 board by Arduino/Ramps October 21, 2014 10:18AM |
Registered: 12 years ago Posts: 799 |
Quote
Replace
Thanks,
I also see the PID_Integral_drive max = 230
Should I increase that to 240 ? If I want to reach 240 ?
hmm, didn`t knew this value before, i looked for it.
this value is not a temperature, this is the maximum power that is delivered to the hotend when the PID algorithm is active., 255 would be full power.
Chri
[chrisu02.wordpress.com] Quadmax Intel Delid Tools
|
Re: Replace Gen6 board by Arduino/Ramps October 25, 2014 05:22AM |
Registered: 13 years ago Posts: 861 |
Sorry, only registered users may post in this forum.