Building my first Morgan
Posted by RobertKuhlmann
|
Building my first Morgan June 28, 2013 07:55AM |
Registered: 10 years ago Posts: 78 |
Hello,
my first 3D-printer project will be a RepRap Morgan.
By the way: Thanks to anyone who offered to print the parts for me.
I will document the building progress with all heights and lows. Maybe this will become a basis for a complete montage-documentation, that I'd like to contribute to the Morgan project.
Outside the RepRap-principle
Having a functional printer in mind, I will not follow all the RepRap-principles in my first attempt, e.g. building the electronics myself. I will also use more newly bought parts than would absolutely be necessary, but at least the second build will use more recycled parts, I promise. And I will share the German sources for parts I've found (not the usual ones, I guess; add. tips are alway welcome, though).
What I've done so far
I've downloaded the BOM from Quentin's project homepage (RepRap Morgan - Homepage) and work on a German translation (in progress): BOM-german.ods
Some parts are missing or hard to determine (is it a bolt or a spacing bolt?). I think there will be a fixed list available soon. It should be no problem to find the parts needed, though.
There are parts for 15mm rods (instead of 8mm), that seems to make sense for higher build volumes. But it should be no problem to upgrade later.
I've fixed some issues in some of the STL-files and will contribute them to the project, as soon as they have been proofed successfully in praxis.
That's all for now.
To be continued
------------
(deutschsprachige Version)
Hallo zusammen,
mein erstes 3D-Drucker-Projekt soll ein RepRap Morgan sein.
Danke übrigens an alle, die sich sofort zum Durck der Teile bereit erklärt haben.
Hier möchte ich den Baufortschritt mit allen seinen Höhen und Tiefen dokumentieren. Das soll vielleicht auch als Basis für eine Montageanweisung dienen, die ich dem RepRap Morgan-Projetk zukommen lassen möchte.
Abweichungen vom RepRap-Prinzip
Man verzeihe mir, wenn ich bei meinem ersten Projekt nicht gleich "in die Vollen" gehe und auch noch die Elektronik vollständig selbst baue. Ziel ist natürlich erst einmal ein funktionsfähiger Drucker, damit ich eine Produktinsstätte für Nachfolgemodelle und Verbesserungen habe. Es wird schon so schwer genug werden.
Ich möchte hier auch Bezugsquellen für Teile austauschen, die man nicht selbst fertigen kann. Jeder hat ja mit der Zeit so seine "Quellen" ausgemacht.
Ich bin mir sicher, dass ich auf unserem Recycling-Hof viele Teile finden würde, die ich mir für meinen ersten Drucker bereits als Neuteile bestellt habe. Aber spätestens beim Bau des Nachfolgers wird die Recycling-Quote deutlich erhöht werden - versprochen.
Was ich bisher gemacht habe
Ich habe mir die Materialliste von der Morgan-Projektseite heruntergeladen (RepRap Morgan - Homepage) und sie ins Deutsche übersetzt (ist weiterhin in Arbeit): BOM-german.ods
Einige Teile fehlen noch oder sind missverständlich aufgeführt (ist eine Schraube gemeint, oder ein Abstandsbolzen?). Es wird bestimmt bald eine korrigierte Liste geben.
Die fehlenden Teile zu finden dürfte aber kein großes Problem sein.
In den verfügbaren 3D-Dateien sind auch Teile für eine Version mit 15mm-Achsen (statt 8mm) vorhanden. Klingt stabiler, besonders für höhere Bauräume. Aber man kann das natürlich auch später immer noch umrüsten.
Ich habe ein paar der STL-Dateien korrigiert. Sobald diese Teile in der Praxis funktioniert haben, werde ich sie im Projekt veröffentlichen.
So viel fürs Erste.
Fortsetzung folgt
my first 3D-printer project will be a RepRap Morgan.
By the way: Thanks to anyone who offered to print the parts for me.
I will document the building progress with all heights and lows. Maybe this will become a basis for a complete montage-documentation, that I'd like to contribute to the Morgan project.
Outside the RepRap-principle
Having a functional printer in mind, I will not follow all the RepRap-principles in my first attempt, e.g. building the electronics myself. I will also use more newly bought parts than would absolutely be necessary, but at least the second build will use more recycled parts, I promise. And I will share the German sources for parts I've found (not the usual ones, I guess; add. tips are alway welcome, though).
What I've done so far
I've downloaded the BOM from Quentin's project homepage (RepRap Morgan - Homepage) and work on a German translation (in progress): BOM-german.ods
Some parts are missing or hard to determine (is it a bolt or a spacing bolt?). I think there will be a fixed list available soon. It should be no problem to find the parts needed, though.

There are parts for 15mm rods (instead of 8mm), that seems to make sense for higher build volumes. But it should be no problem to upgrade later.
I've fixed some issues in some of the STL-files and will contribute them to the project, as soon as they have been proofed successfully in praxis.
That's all for now.
To be continued
------------
(deutschsprachige Version)
Hallo zusammen,
mein erstes 3D-Drucker-Projekt soll ein RepRap Morgan sein.
Danke übrigens an alle, die sich sofort zum Durck der Teile bereit erklärt haben.
Hier möchte ich den Baufortschritt mit allen seinen Höhen und Tiefen dokumentieren. Das soll vielleicht auch als Basis für eine Montageanweisung dienen, die ich dem RepRap Morgan-Projetk zukommen lassen möchte.
Abweichungen vom RepRap-Prinzip
Man verzeihe mir, wenn ich bei meinem ersten Projekt nicht gleich "in die Vollen" gehe und auch noch die Elektronik vollständig selbst baue. Ziel ist natürlich erst einmal ein funktionsfähiger Drucker, damit ich eine Produktinsstätte für Nachfolgemodelle und Verbesserungen habe. Es wird schon so schwer genug werden.
Ich möchte hier auch Bezugsquellen für Teile austauschen, die man nicht selbst fertigen kann. Jeder hat ja mit der Zeit so seine "Quellen" ausgemacht.
Ich bin mir sicher, dass ich auf unserem Recycling-Hof viele Teile finden würde, die ich mir für meinen ersten Drucker bereits als Neuteile bestellt habe. Aber spätestens beim Bau des Nachfolgers wird die Recycling-Quote deutlich erhöht werden - versprochen.
Was ich bisher gemacht habe
Ich habe mir die Materialliste von der Morgan-Projektseite heruntergeladen (RepRap Morgan - Homepage) und sie ins Deutsche übersetzt (ist weiterhin in Arbeit): BOM-german.ods
Einige Teile fehlen noch oder sind missverständlich aufgeführt (ist eine Schraube gemeint, oder ein Abstandsbolzen?). Es wird bestimmt bald eine korrigierte Liste geben.
Die fehlenden Teile zu finden dürfte aber kein großes Problem sein.
In den verfügbaren 3D-Dateien sind auch Teile für eine Version mit 15mm-Achsen (statt 8mm) vorhanden. Klingt stabiler, besonders für höhere Bauräume. Aber man kann das natürlich auch später immer noch umrüsten.
Ich habe ein paar der STL-Dateien korrigiert. Sobald diese Teile in der Praxis funktioniert haben, werde ich sie im Projekt veröffentlichen.
So viel fürs Erste.
Fortsetzung folgt
|
Re: Building my first Morgan June 30, 2013 08:23AM |
Registered: 10 years ago Posts: 78 |
This weekend I worked on the heatbed. I want to etch it myself, using the toner transfer method.
I've modified the MK2a-layout, so that I can use my DIN A4 laser printer.
My first approach wasn't successful, because I didn't iron enough. See the full story in my user space:
User:RobertKuhlmann/Heatbed construction
I've modified the MK2a-layout, so that I can use my DIN A4 laser printer.
My first approach wasn't successful, because I didn't iron enough. See the full story in my user space:
User:RobertKuhlmann/Heatbed construction
|
Re: Building my first Morgan June 30, 2013 09:10AM |
Registered: 10 years ago Posts: 78 |
I've cleaned my etching accessories that I'll use for the heatbed-etching:
User:RobertKuhlmann/Etching_tools
User:RobertKuhlmann/Etching_tools
|
Re: Building my first Morgan June 30, 2013 05:46PM |
Registered: 10 years ago Posts: 78 |
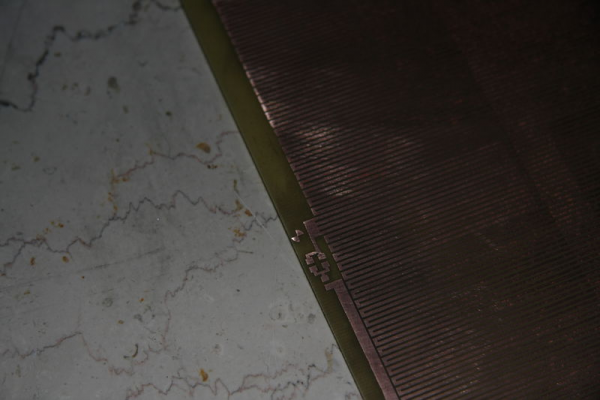
Now the heatbed is etched.
Using the toner transfer method was successful and the board has 2.1Ohm:
The printer parts are in production.
Using the toner transfer method was successful and the board has 2.1Ohm:
The printer parts are in production.
|
Re: Building my first Morgan June 30, 2013 06:02PM |
Registered: 10 years ago Posts: 78 |
I've redesigned the PVC-pipe-supports, so I can easily print supports for different diameters, by just changing two parameters.
|
Re: Building my first Morgan July 01, 2013 06:32PM |
Registered: 10 years ago Posts: 1 |
|
Re: Building my first Morgan July 03, 2013 10:22AM |
Registered: 12 years ago Posts: 23 |
|
Re: Building my first Morgan July 03, 2013 11:49AM |
Registered: 10 years ago Posts: 78 |
Hello Quentin,
nice to meet you in this thread.
I'm waiting for the parts to be printed right now and should get them in a few days.
Many other parts are on their way to me (axes, motors) or here already (electronics, aluminum-plate, bearings). I didn't select a hotend though. On one hand I'd like to start printing, as soon as possible, of course. On the other hand I'd be very interested in building a hotend out of glass (I think a measuring pipette could be perfect). Maybe I'll give it a start with a standard hotend and start to experiment then, because I'll need to print modified parts, as soon as I start to experiment.
As you can see above, I've etched my heated bed already, didn't test it though.
I'm still impressed by your idea and the concept is far more sophisticated, than some have noticed already. Some of your decisions in the construction allow a very accurate while fast print. While the concept of a Morgan is open to many interesting enhancements.
I'll surely build several Morgans, because I've got so many ideas that are waiting to be realized, that one Morgan will have to do the printing for the experimental Morgans.
|
Re: Building my first Morgan July 03, 2013 12:21PM |
Registered: 10 years ago Posts: 979 |
I am sure Quentin will agree but it is agonizing to publish a design. IMO, a true innovator is never satisfied. There is always something that can be done better. At some point, you have to say good enough and send it out into the world so others can start working on it like you.
Best of luck!
Best of luck!
|
Following your progress. July 03, 2013 07:37PM |
|
Re: Building my first Morgan July 04, 2013 08:18AM |
Registered: 10 years ago Posts: 78 |
The actual link to my heated bed etching in the wiki is here: RepRap-Wiki:Etched heatbed construction
|
Re: Building my first Morgan July 07, 2013 05:08PM |
Registered: 10 years ago Posts: 78 |
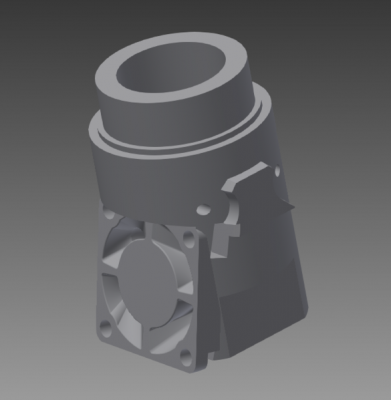
Now the printed parts are almost done. I'm finally working on a tool head for this bowden-hotend:
V3 bowden extruder
It's quite expensive, but I like the design. It seems lightweight, and Morgan should benefit from that.
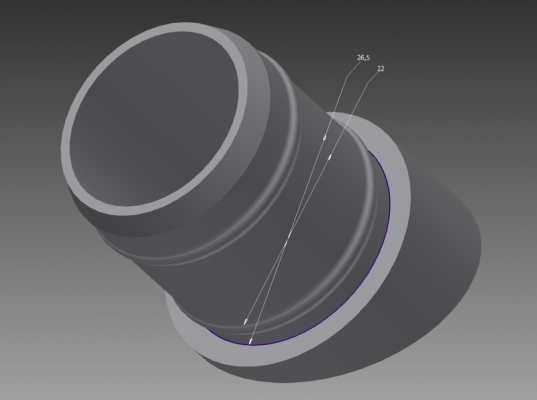
While drawing the tool head, I wonder about the gap between the tool head's radius (12,5mm and 15mm) and its fitting in the Morgan-arm-Theta-b (18mm). Is that, what the "155 pipe holders" are for, that are listed in the BOM as "to be done"?
We'll see.
|
Re: Building my first Morgan July 08, 2013 08:18AM |
Registered: 10 years ago Posts: 78 |
The first version of the Morgan tool head for the RepRap-fab V3 bowden extruder is ready for print:
The exact dimensions are shown here: V3_Bowden_Mount_Morgan-1.pdf
The STL-file is here:http://V3_Bowden_Mount_Morgan.stl
And if someone has Inventor: V3_Bowden_Mount_Morgan.ipt
Edited 1 time(s). Last edit at 07/08/2013 08:31AM by RobertKuhlmann.
The exact dimensions are shown here: V3_Bowden_Mount_Morgan-1.pdf
The STL-file is here:http://V3_Bowden_Mount_Morgan.stl
And if someone has Inventor: V3_Bowden_Mount_Morgan.ipt
Edited 1 time(s). Last edit at 07/08/2013 08:31AM by RobertKuhlmann.
|
Re: Building my first Morgan August 30, 2013 11:39AM |
Registered: 10 years ago Posts: 2 |
|
Re: Building my first Morgan August 30, 2013 11:49AM |
Registered: 10 years ago Posts: 78 |
|
Re: Building my first Morgan August 30, 2013 11:57AM |
Registered: 10 years ago Posts: 2 |
|
Re: Building my first Morgan August 30, 2013 12:06PM |
Registered: 10 years ago Posts: 78 |
|
Re: Building my first Morgan July 27, 2014 05:05PM |
Registered: 10 years ago Posts: 78 |
I almost forgot to post that my Morgan is finished and working meanwhile. You can see it working over here: My Morgan on youtube
|
Re: Building my first Morgan July 28, 2014 06:41AM |
Registered: 13 years ago Posts: 7,616 |
|
Re: Building my first Morgan November 30, 2014 10:20PM |
Registered: 11 years ago Posts: 364 |
|
Re: Building my first Morgan December 01, 2014 03:00PM |
Registered: 10 years ago Posts: 78 |
|
Re: Building my first Morgan December 01, 2014 10:20PM |
Registered: 11 years ago Posts: 364 |
|
Re: Building my first Morgan December 02, 2014 01:14PM |
Registered: 10 years ago Posts: 78 |
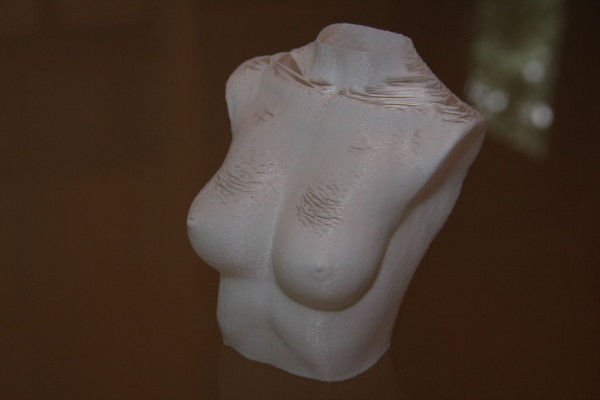
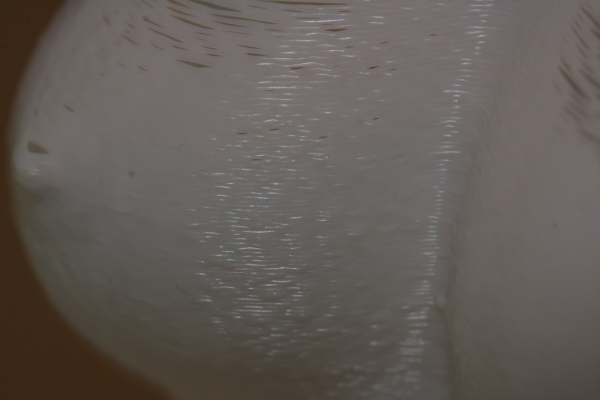
I don't have photos of straight wall prints at hand right now. I can tell you so far, that the layer-to-layer precision is excellent (no visible fault). But I'm a bit worried about horizontal "waves" at specific parts of the print that come from certain instabilities of the frame (maybe I wasn't accurate enough in building it) and in my latest prints I had problems with the internal bearing of the Y-axis-stepper, resulting in some light "sawtooth" patterns in lines along a specific direction.
I'll stabilize my frame and fix the stepper-problem and should get an even better quality.
However, the photos of the torso show the accuracy of the positioning between layers quite good, because the print is made in spiral-mode (only one layer wall thickness).
I'll stabilize my frame and fix the stepper-problem and should get an even better quality.
However, the photos of the torso show the accuracy of the positioning between layers quite good, because the print is made in spiral-mode (only one layer wall thickness).
|
Re: Building my first Morgan December 02, 2014 09:23PM |
Registered: 11 years ago Posts: 364 |
great prints though... I was contemplating on making one but it looks like it is hard to get the frame aligned perfectly ... Maybe a better solution would be to have a flat plate frame like a prusa i3 ... I dont know how much would that twist but that would be much easier to get the alignments right but won't look that cool though 

|
Re: Building my first Morgan December 03, 2014 08:27AM |
Registered: 10 years ago Posts: 78 |
Quentin's way of using twisted tubes as a frame is ingenius, because this gives a very good stability to the frame with only a few inexpensive parts.I can lift up my Morgan with one hand by just grabbing one of the PVC-tubes.
The construction principle may not be the source of problems, but the way I've realized it in my build.
The construction principle may not be the source of problems, but the way I've realized it in my build.
Sorry, only registered users may post in this forum.
