Peachy Printer ideas
Posted by koopa
|
Re: Peachy Printer ideas November 20, 2013 01:32PM |
Registered: 10 years ago Posts: 2 |
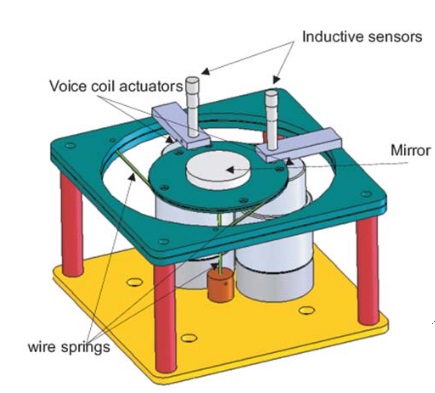
Seeing the galvanometer picture, I remembered a shool projeced I worked on some time ago. we had to build a controller and determine system parameters with bodeplots. nice project 
here is a picture:
It uses also small wire springs like your ideas. But instead of twisting torsion springs, these works by the fact that wire springs are springy in sideway motion and very stiff in the axial direction.
The result is a mirror plate which is fully constrained except for pitch and roll. The advantage of bending wire over twisting is the greater range of motion before breaking. In our project we used thin steel plate for the 3 top springs and clamped them between aluminum. However one single piece of laser cut plastic could also work I think. the bottom spring is a bit trickier. Maybe a pointy screw drilled from the bottom works
The plate was pid controlled with expencive sensors$, ADC's$ and amplifiers$. not a option for this project. I propose to use external usb soundcards(very cheap) where the speaker is connected to the vcm's and the line-in to a linear hall-effect sensor. this is proven to work in levitrons: [www.youtube.com]
the advantage of PID over open loop control is that PID can suppress system parameter variations. like spring memory mentioned in post before.
To prevent ringing in the system, a third order reference signal or scewsine should be used. Step and block wave signals countain all frequencies and so excite the eigenfrequencies of the system, which causes vibration. when smooth signals are used this is not the case.
I hope these ideas can help. let me know.
Edited 1 time(s). Last edit at 11/20/2013 03:56PM by paddy92.
|
Re: Peachy Printer ideas November 29, 2013 05:58AM |
Registered: 10 years ago Posts: 26 |
Wow rather sorry I only Just found this Thread now !
Of course ive been really really busy and on the peachy, so have many of you!!!
Ok so ill try to catch up and reply to a bunch of these Great posts. I haven't read this hole Tread yet but I can tell there are alot of ideas here that im also working on and probably a hole bunch of new ones not yet
conceived of at peachy
and a huge thumbs up for exercising your freedoms everyone, its wonderful to see people building there own peachy printers before I even shipped one!!!
Ps
Coders
here is a little something ive been working on
[blenderartists.org]
Of course ive been really really busy and on the peachy, so have many of you!!!
Ok so ill try to catch up and reply to a bunch of these Great posts. I haven't read this hole Tread yet but I can tell there are alot of ideas here that im also working on and probably a hole bunch of new ones not yet
conceived of at peachy

and a huge thumbs up for exercising your freedoms everyone, its wonderful to see people building there own peachy printers before I even shipped one!!!
Ps
Coders
here is a little something ive been working on
[blenderartists.org]
|
Re: Peachy Printer ideas November 29, 2013 06:17AM |
Registered: 10 years ago Posts: 26 |
Quote
koopa
Hey guys,
Like many of you, I was fascinated and enamoured with the $100 photo-setting resin printer made in a very Macgyver fashion on Kickstarter. In the spirit of collaborative work, I sent some ideas to the creator to further refine/innovate the design on low-budget, which he appreciated and told me to post here. Feel free to build/add/utilise anything here, chuck in an idea or two yourself, or let us know how to refine these ideas further:
1) Since you are already using the microphone input to sense the impedance change as drips go past, you could also run two wires up the sides of the printing flask, and use the reduction in impedance (as more salt water bridges the gap) to help work out water level. You could make it somewhat digital by only having some very small points up insulated wire be conductive, and you could increase the delineation of the points by having the wires far apart at the bottom, and close at the top.
2) It seems as though you sometimes need time to move the laser. I would take a leaf out of old-school camera technology, and have a rotating shutter. It basically could just be a spinning disk with a section (perhaps even a movable section) letting the laser through, and a small part to block it out. A $0.20 CCD could tell you if the laser was 'reflecting back' (ie not currently passing through to the fluid), and it could have a fixed high frequency sent through it (very easy to generate), so that it would only pass this high frequency through when illuminated (very easy to differentiate from the drip signal and/or water impedance.
3) To account for various issues in choosing a flask that is not perfectly rectilinear, you could allow a 'calibration routine' where effectively it prints out a 3D ruler, and you just put against an ordinary ruler and answer some questions about the X,Y,Z axis discrepancies . To save resin, you could even provide a Blender function where easy-to-file-off millimeter markings get added to certain straight axes, and then you can use even your first prototype to calibrate the machine (I've assumed that varying level-outputs are going to cause big size differences in the printed output).
Reply:
1.) this is a great idea ... i gave it a try, but so far havent found something that is both corrosion resistant and with a high enough electrical resistance to vary over the hight of the water while also being hydroscopic to the resin but not to water.
Id be curious to know how we can measure the capacitance of the container instead.
3.) YES this is planed (we will also just let you modle the container in blender) and further more we are also planing on doing a funnel or cone shaped object starting small at the bottom and getting bigger at the top.
We will take the same amount of time to draw the small circles at the bottom of the print, as the big ones at the top. This will create an over cured bottom, a soft under cured top, and a sweet spot somewhere inbetween.
You can then tell the software at what hight the printer did the right amount of curing The printer will correlate the given height to the corresponding layer then calibrate to alwase cure at the rate that worked best in your test print.
Great Stuff!
|
Re: Peachy Printer ideas November 29, 2013 06:25AM |
Registered: 10 years ago Posts: 26 |
Quote
CharlesNeville
Turning the laser on and off with a minimum of cost.
There are many bands of audio in the speaker output that aren't useful for controlling the mirrors. They can be used for other control signals.
To turn the laser on and off, you could inject a low amplitude, high frequency signal; eg 18kHz, -20db into the output of both L & R outputs. This could be filtered out with a very simple notch filter on the line controlling the mirrors but chances are you wouldn't actually need to.
Using another pair of notch pass filters, you could detect with high speed and accuracy whether the signals were in or out of phase. The electronics to do this would be very simple. The binary output from this detector could be used to turn the laser on and off.
Turn the laser on and off with the existing interface, two lines of code and a dozen analog components in the printer.
This is very close to what we are doing with the circuit now... basically we have chose to go with am modulation to get around the AC coupled sound card problem.
and then we turn the laser on and of with a hi pass RC filter, which only turns the laser on when the carrier of the am signal is 11 kHz , but not when the software makes the carirer 3 kHz.
The nice part about doing it this way is we can position the mirrors with the low carrier and then turn the laser on.
|
Re: Peachy Printer ideas November 29, 2013 06:36AM |
Registered: 10 years ago Posts: 26 |
Quote
Spelljammer
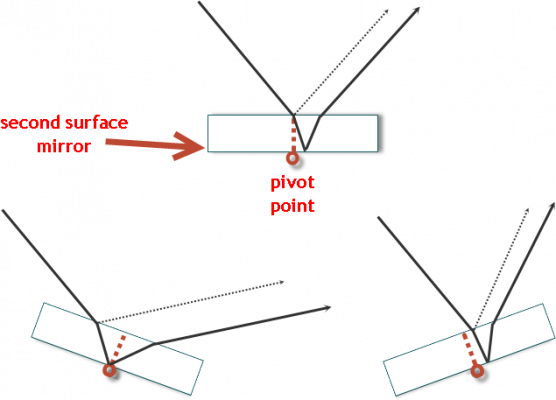
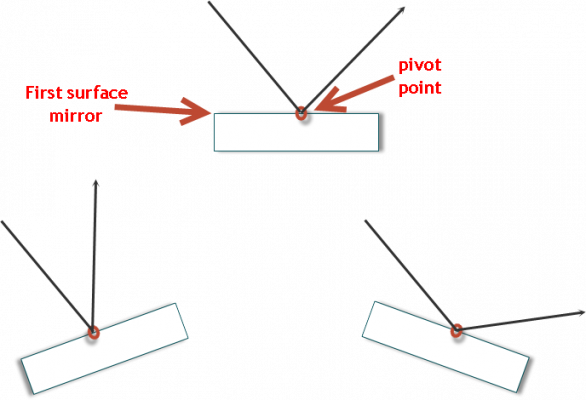
I wanted to mention the mirrors and their odd warping of edges on a a straight line. The mirrors are a second surface type which will eat up about 10% of the laser power going in and another 10% coming out and even more at more severe angles. So, two mirrors eat up about 40 to 60% of the laser's power. They also have a ghosted reflection artifact because some of the light bounces off the surface. And, the laser changes angle when it enters the glass or plexi material, like a flashlight beam does when it enters water. The difference of densities between air and the glass cause this. Also, aiming the laser at the center of the mirror doesn't work well with the pivot point on the back side of the mirror. If the pivot is moved to the front and a first surface mirror is used, then all those complex trig problems go away.
I made a couple of pictures to show the difference between first and second surface mirrors
Yes this would be a huge problem but we are not and never really have used anything but first surface mirror... second surface simply doset work well at all.
Originally my first source of first surface mirror was a dual layer dvd that i split in two exposing the foil normally covered by plastic, if only there was NO track following data pre written to even un burned disks this would be a great source of first surface mirror, but allass you still get gosting from the tracking data on all disks.
Thanks for posting this great explanation, Im sure you will save many people headaches in there peachy from scratch making in devours.
|
Re: Peachy Printer ideas November 29, 2013 06:47AM |
Registered: 10 years ago Posts: 26 |
Quote
PaulP
@Spelljammer
This is along the lines of what I was thinking for potential causes of the warping. I think the pivot point comment is particularly on the mark.
It's hard to tell without seeing the designs; but I think part of the problem is that the position of the center point is in the middle of the thread - not actually at the mirror (front or back). This would change the distance from the laser to the mirror (and mirror to mirror) based on how far it's rotated; changing where the laser hits on the next object in the chain.
I can't draw anything up at the moment; but a rough (albeit extreme) approximation would be putting a baseball card on a wheel.
Ok in my last post I didnt comment on the pivot part.
Yes we also expected this to be a problem, ideally the center of the thread would lie on the same plane as the first surface mirror .. and so far it dose not....
We have yet to actually see this cause an artifact. Were hoping to have mirrors that are only about .2 mm thick so the effect may just end up being negligible for most users.
Id love to see more work done on this but for now its a problem thats so small I cant really detect it, so solving it (evan in the software calibration script) is on the back burner.
If any one know s the math to account for it let me know!
Thanks for posting about this its been a subject that's been drawn out on the white boards at our hacker space many many times.
|
Re: Peachy Printer ideas November 29, 2013 06:52AM |
Registered: 10 years ago Posts: 26 |
Quote
JamesCooper
These are very good points, both of which we were aware of. Rylan's early prototypes used a second surface mirror (he once used old CDs), but I believe he is using first surface mirror for the recent prototypes and will definitely be using that in the final version. As for the pivot point, it gets a bit tricky. To make this simple to build as a kit, we are currently using a tensioned thread as the pivot for the mirrors. Keep in mind, this is something we are actively iterating on, so that may not be the final design, but it's simple and works fairly well right now. The problem is that we need a continuous piece of thread in order to easily attach it, so it's on the back of the mirror. I have considered building mounts for the ends of the mirror that would hold the center of the front face in the axis of rotation, but that would require a different way to mount the pivots for the mirrors. We'll see what options we can come up with that are cheap, easy to assemble, and have the physical properties that we desire. However, I have modeled the effects of this in Blender and it doesn't seem to cause a major problem. I can still draw a circle and a square without any unexpected warping.
As for the warping, I've actually narrowed it down to be caused by the orientation of the laser to the mirrors. Because the laser isn't orthogonal to the first mirror, the rotation of the mirror actually causes the light to follow an arc rather than a straight path. It's hard to describe it in words. Imagine a ray of light leaving the mirror at a shallow angle from the axis. When you turn the mirror, the start of the ray stays on the axis, but the direction of the ray rotates around the axis of rotation of the mirror. When it strikes the second mirror, it doesn't always land on the axis of the mirror. This is easily fixed by making the mirrors and laser all orthogonal, as is done in commercial 2D laser scanners. When everything is orthogonal, the light still follows a curve, but the curve runs along this axis, so it doesn't affect the apparent angle of the second mirror. Again, it's easier to draw than to explain, but hopefully that helps to understand. There is still the ever-present problem that we are controlling the angle, but drawing against a flat surface (a spherical projection on a Cartesian space), but that's easily accounted for with trig.
Ahh James Very Glad to see you have been here... I only just saw this thread tonight!
Edited 1 time(s). Last edit at 11/29/2013 06:53AM by rylangrayston.
|
Re: Peachy Printer ideas November 29, 2013 07:31AM |
Registered: 10 years ago Posts: 26 |
Quote
Spelljammer
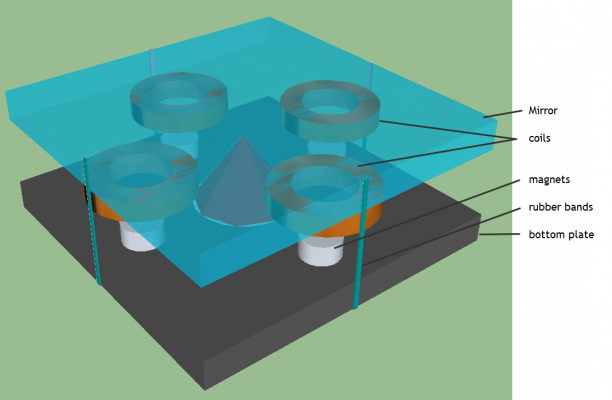
I too have been working on a single mirror design. This is just a mirror held balanced on a center fulcrum by 4 small rubber bands. There are 4 coils and 4 magnets. Each opposite coil and magnet work together. For instance, to move left, the X coil 1 and coil 2 energize, the magnets under each is set to the opposite polarity, the right one could be North pointing up and the left one pointing down. So, one coil pushes and the other pulls for one direction, and the opposite for the other direction. I could have used just 2 coils, but I thought it would be more balanced with 4. I'll have to make a prototype.
Ahh yes I had an almost identical design on the white board here Just 2 weeks ago ... Iv yet to actually build and try this one yet ... one thing its missing is dampening, perhaps oil between the coils and the magnets would work for that... I may try this one yet.
There are a few problems that may have easy solutions
1 the mirror bending from the force of the elastics, or the mirror mass being high simply to avoid this [ thickness == rigidity
 == mass
  ]
]2. where do we get dampening into the system, because this is open loop we need it!
3 Cross talk between the coils
4 and as alwase how can it be made very adjustable and easy to build?
Iv also been working on another couple of single mirror designs that suspends the mirror on a diaphragm instead of pulling it onto a pivot, it worked well and did some great prints, will probably be in an update soon!
Let me know if you build this, I think it has ALOT of potential ! as the coils are very strong in this con-fig.
Great thinking I really want to try this one!
|
Re: Peachy Printer ideas November 29, 2013 07:46AM |
Registered: 10 years ago Posts: 26 |
Quote
Dino
@tag16c
thanks a lot !!! I have understand your circuit .You can move the mirrors 20,000 times per second ( if the galvos/hardware can handle it) thats right?
And JamesCooper and the peachy team are do'nt working with 20kHz audio out, instead they are using a lower frequency sine wave and handle the amplitude peak with cap and diode. thats right ? For the printer they don't need that fast mirrors, for now. They are charging the peak voltage from the amplitude into the cap and lead it to the coil of the mirror, then discharging the cap, charging the next peak of the amplitude and so on, thats right ??? ( it's saying with easy words)
@ JamesCooper
you convert the 3d Modell into g-code and the g-code into audio signals. what max. frequence you use for the audio?
BTW: when it was planed to make the code of the peachy public? After the rewards for the backers are delieverd ? Or when the beta-tester received his peachy?
We definitely want to make most things public at the same time that people receive there beta Kits. Currently that the plan.
That way all you wonderful people are able to exersize your freedoms and help everything advance even faster.
|
Re: Peachy Printer ideas November 29, 2013 08:08AM |
Registered: 10 years ago Posts: 26 |
Quote
timogiles
I've been working on a single mirror galvanometer design also. I just put my design up on thingiverse and I figured I'd share with you guys. http://www.thingiverse.com/thing:179041. It's a work in progress but I'm making pretty good headway on it. I've ditched driving it straight from a headphone jack, if I'm going to build a printer based on this method i'd rather have it dedicated to a microcontroller. Right now I'm using an arduino and 4 FDS8858 to drive the coils.
Tim
Hey GREAT WORK !
Id love to see what happens when it draws a square at some faster speeds.. say 3 = 20 times per second
esp if you do a version with springs cut out from the plastic all in on piece, this is more like a mems chip and I think that
when the price is right this mems chips will a big part of the future of 3d printers.
Check it out!
[www.youtube.com]
|
Re: Peachy Printer ideas November 29, 2013 08:20AM |
Registered: 10 years ago Posts: 26 |
Well hope no one minds me flooding this thread with reply's..
I kind of have to do it in bursts these days, esp since I get so behind...
Any ways my 7am alarm just went off .... and i havent been to bed yet so im out.
Tomorrow is a big day to because were moving our hacker space to a bigger location, been planing that for 6 months and now the day is here!
Thanks for all the great input everyone, its absolutely wonderful to see all the community effort growing around the Peachy Printer!
Rylan Grayston
|
Re: Peachy Printer ideas November 29, 2013 02:03PM |
Registered: 10 years ago Posts: 14 |
|
Re: Peachy Printer ideas June 21, 2014 10:49PM |
Registered: 9 years ago Posts: 1 |
One of the things that many photoresin printers do as part of the print cycle is to back off the level to allow reflow under a focus plate. A similar approach could be used here, using a mechanical plunger to momentarily increase the level to provide a fresh coat of resin. Just a thought. Then a floating plate could be used to improve focus.

|
Re: Peachy Printer ideas July 02, 2014 10:16AM |
Registered: 9 years ago Posts: 135 |
So from the Kickstarter updates, the main challenges still facing the Peachy are:
I for one am excited to see what they come up with for the damping system. If it works as well as hoped, then it might end up being somewhat revolutionary.Quote
Peachy Printer KS Update
Below is a list of areas that need further testing and issues that we are still working to solve in order to reach first viable product:
- Memory caused by the dampening system (we’re working on a new magnetic damping system that may have very little memory)
- Resin Shrinkage
- Software usability
- Large prints
- Adding calibration processes for things like laser spot size at wide deletions, refraction, reflection, various non linearities, and offsets.
|
Re: Peachy Printer ideas October 22, 2014 01:13PM |
Registered: 9 years ago Posts: 135 |
Sorry to resurrect an old post, but I figured it would interest you guys to see what the Peachy team came up with for damping the mirrors.
Here's a little Youtube video demonstrating it.
I didn't make this video, though after finding it, I just had to try it myself. It seems like this could be very useful in other 3D printing situations, but I'm drawing a blank as to what exactly.
Also, they've basically declared the Beta Test portion finished and have opened preordering of the Peachy kits to the public (and it has almost as many preorders now from the website as the Kickstarter got during the campaign) with a predicted ship date in July 2015.
Sorry, only registered users may post in this forum.
