Home
>
Developers
>
Topic
My DLP design: Reprep Petri
Posted by bitflusher
|
My DLP design: Reprep Petri May 11, 2014 04:58PM |
Registered: 11 years ago Posts: 28 |
About two weeks ago I found a local source of UV curable resin dor DLP 3d printing. Looking at the designs for this type of printer I realized none were ready to print and assemble, many projects are one offs and are in the category “research into DLP printing technique”. Many are wooden or aluframes with little printed parts. This is when I decided to build my own one off.. It had to have a little more printed parts. After sleeping on it for a few nights I decided the type of frame and started fumbeling in openSCAD.
After 1,5 week I am starting to realize things are getting out of hand for just a oneoff. Perhaps these designs could make it into a real community reprap model.
The design features:
- Mendel like printed/treaded rod style
- Fully paramatic to be able to accommodate vat sourced at a random local place
- Be more “reprapy” and be able to print it’s own parts
- Using an unmodified, not permanently attached beamer (I do not own a beamer at this point)
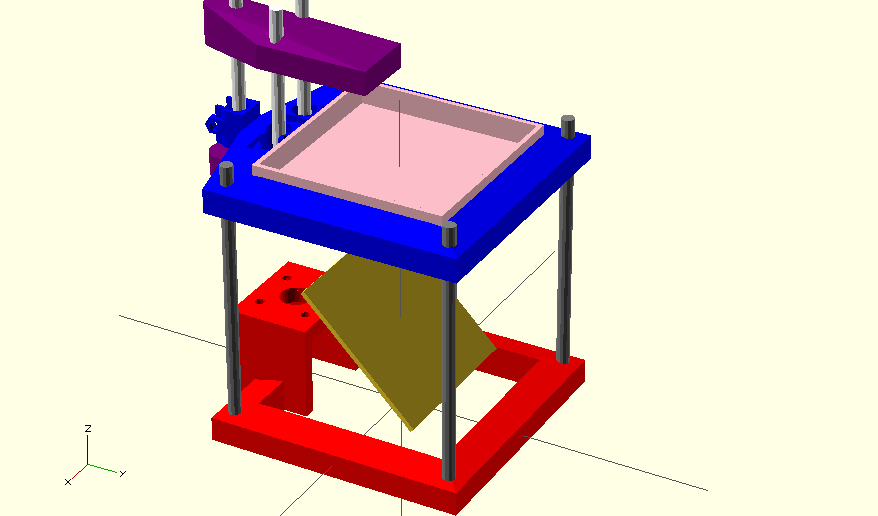
Right now my OpenSCAD code starts to near feature completeness but still at alpha stage. It needs driveshaft bits and pieces and a mirror mount. Below is a link to a quick OpenScad render
[youtu.be]
For the vat I am trying to get square petri dishes. As petri (inventor of the petri dishes is related to biology and the prints are growing in the vat/petridish I decided to name my design Reprap Petri.
I hope to have the last bits coded this week so a small scale version can be printed next weekend (one of the advantages of making it parametric from the start). If you see some mistakes in the design please tell me, this will save me time/plastic/frustration.
After 1,5 week I am starting to realize things are getting out of hand for just a oneoff. Perhaps these designs could make it into a real community reprap model.
The design features:
- Mendel like printed/treaded rod style
- Fully paramatic to be able to accommodate vat sourced at a random local place
- Be more “reprapy” and be able to print it’s own parts
- Using an unmodified, not permanently attached beamer (I do not own a beamer at this point)
Right now my OpenSCAD code starts to near feature completeness but still at alpha stage. It needs driveshaft bits and pieces and a mirror mount. Below is a link to a quick OpenScad render
[youtu.be]
For the vat I am trying to get square petri dishes. As petri (inventor of the petri dishes is related to biology and the prints are growing in the vat/petridish I decided to name my design Reprap Petri.
I hope to have the last bits coded this week so a small scale version can be printed next weekend (one of the advantages of making it parametric from the start). If you see some mistakes in the design please tell me, this will save me time/plastic/frustration.
|
Re: My DLP design: Reprep Petri May 12, 2014 04:56AM |
Registered: 10 years ago Posts: 1,381 |
|
Re: My DLP design: Reprep Petri May 12, 2014 06:19AM |
Registered: 11 years ago Posts: 28 |
Thank you for your feedback.
[/quote]To reduce the chance of binding, and wear, locate the lead screw between the two guides.[/quote]
Guiding the lead screw, are you suggesting placing it on barings? This one is one of the design desisions that bothered me. Most mendel variations (including my prusa i2) do not use them. I have seen discussions on how nesecary with "evidence" supporting both options are better. I hope to make it optional and do my own tests to find my favorite. In the first version this will not be included. the most simple is already more complicated than I originally thought it would be.
.
This is a really good suggestion, this is where I was blinded by my own mental image.Quote
Make it an option to locate the mirror to the side.
This is where I know there is more research for me. My initial design will not feature a tilt bed. Future versions might include active or passive tilt beds. I hope to come up with a design that will make it optional and will only require to replace the middle section of the frame (the holding the vat part)Quote
Include an option for a tilt bed..
This is already featured. Vat length/width are parameters in the code as well as frame height. This will accomodate different vat/resolutinos. I have already thought of an extremely small vat and a pico projector.Quote
Design the vat size to accommodate different projector resolutions.
|
Re: My DLP design: Reprep Petri May 14, 2014 06:12PM |
Registered: 11 years ago Posts: 28 |
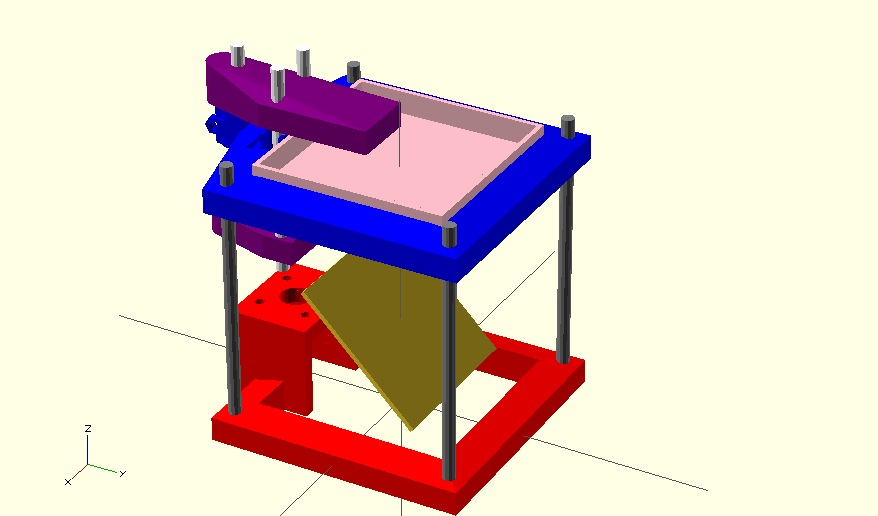
A little more progress on the design. I think it is time for a small scale print of the printer.
here is a render: [youtu.be]
The mirror mount is currently least mature. I have not figured out how I can het something that is easy to mount/print and switch from front to side projecting. Right now it is a simple loose stand.
Really curious how it looks in real life!
here is a render: [youtu.be]
The mirror mount is currently least mature. I have not figured out how I can het something that is easy to mount/print and switch from front to side projecting. Right now it is a simple loose stand.
Really curious how it looks in real life!
|
Re: My DLP design: Reprep Petri May 14, 2014 07:58PM |
Registered: 10 years ago Posts: 1,381 |
The linear guides (smooth rods) need to be anchored, presently they are moving up with the lead screw.
Add the stepper motor, and lead screw to your assembly model, I don't think it's in the correct location, unless you're doing some thing non-traditional.
The lead screw distal end should be free to move about (float, i.e. unrestrained). The lead screw should be centered between the smooth guide rods.
The mirror bracket can be located with simple pin guides on the perimeter of the bracket. The mirror will be over sized, and won't require precision other than being orthogonal (i.e. right angle), and positioned at 45 degrees.
What size stepper motor, lead screw, guide rods, and bearings will you be using?
What is the frame made of e.g. 3d printed, wood? If it's 3d printed consider making it in multiple sections like the 3DR "Simple" Delta Printer [forums.reprap.org].
Where will you locate the hinge to the passive vat?
I like your design concept.
|
Re: My DLP design: Reprep Petri May 15, 2014 03:08AM |
Registered: 11 years ago Posts: 28 |
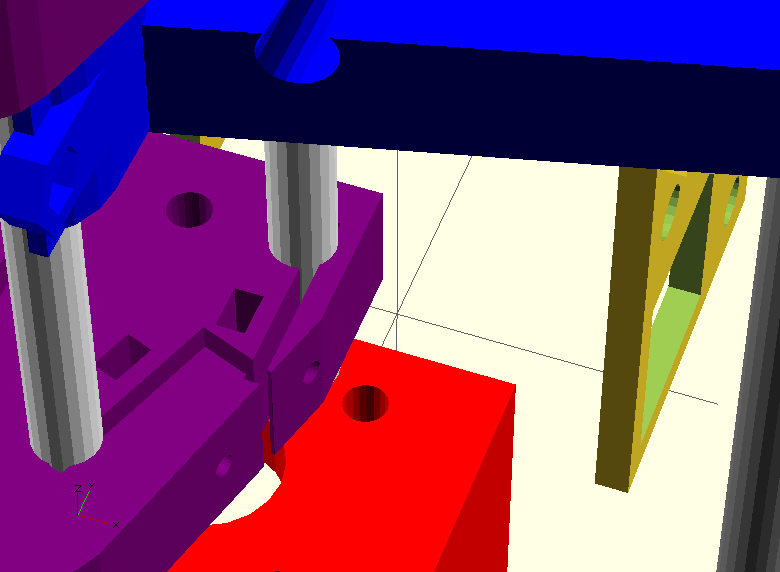
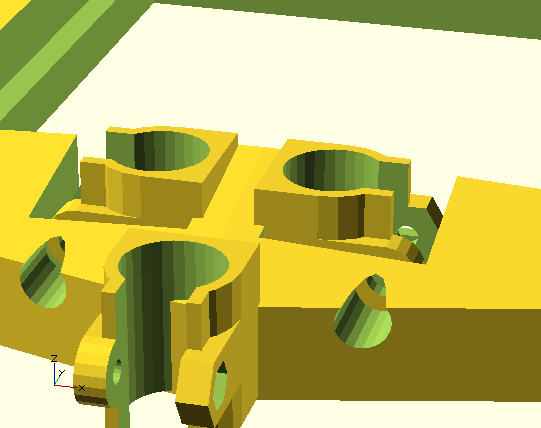
It seems the video and my description is unclear on many details. Included are some closeups.
There are currently 3 LM8UU, these are mounted in the only code i sourced elsewhere. I really liked the design by Jonas Kühling (http://www.thingiverse.com/thing:14942).
The lead screw is currently an m5 treaded rod. this vitamin is currently not included in the render. It shows as a little hole in the lower part of the Z. A more professional lead screw is currently shipping from china. I intend to include both options in the code.
I Always intended to print parts it on my prusa mendel. The first version will be scaled so it fits on my bed. However when things need to be scaled up and self replicating splitting parts is needed. I have looked at the Quick-Fit X carriage by RichRap (http://www.thingiverse.com/thing:19590) but the rostock might even be better as an example to devide and connect. Thanx!
The OpenScad code will end up on github but right now it is changing too much and needs some additional structuring commenting.
|
Re: My DLP design: Reprep Petri May 16, 2014 04:06PM |
Registered: 11 years ago Posts: 28 |
Today i received a stack of square petri dishes. These will become vats
The dishes have lids, handy during application of the PDMS layer (keep the dust out).
The dishes have lids, handy during application of the PDMS layer (keep the dust out).

|
Re: My DLP design: Reprep Petri May 19, 2014 02:37AM |
Registered: 11 years ago Posts: 28 |
Quick update: This weekend I printed my first small scale version. It needa many small fixes but it might be possible to assemble (with some filing and drilling). This will most likely never print anything, it would need a 70X70mm vat.

|
Re: My DLP design: Reprep Petri May 20, 2014 04:11PM |
Registered: 11 years ago Posts: 28 |
The first printed version is now assembled and actually is able to move. I only had to re-print one item in order to assemble a mostly complete mini version. The third smoothrod cannot be attached to the z stage because of an error, the main frame is about 2 mm off.
Here is a YouTube clip of the first movements:
[youtu.be]
Below some pictures:
Here is a YouTube clip of the first movements:
[youtu.be]
Below some pictures:


|
Re: My DLP design: Reprep Petri May 21, 2014 11:44AM |
Registered: 10 years ago Posts: 1,381 |

|
Re: My DLP design: Reprep Petri May 21, 2014 11:59AM |
Registered: 11 years ago Posts: 28 |
Thank you, reproducible was one of the main design factors.
Currently the lead screw is a plain m5 treaded rod with two nuts. Most prusa i3 printers are using the same. For my larger "final" version I want to use a better lead screw bought from e-bay as shown below. As this is not locally available for everyone lead screw types will be one of the parameters. I think options will be:
- M5 rod
- M8 rod
- True lead screw, options for diameter
Upgrading would only require a re-print of the lower z-axis part, this is the smallest part of the entire printer, easy upgrade.
I will start with an unmodded DLP projector. This small version could be used with a pico projector for super protable printer. Someone is already testing a pico projector for this purpose: [probjectblogs.blogspot.nl]
Edited 1 time(s). Last edit at 05/21/2014 12:00PM by bitflusher.
Currently the lead screw is a plain m5 treaded rod with two nuts. Most prusa i3 printers are using the same. For my larger "final" version I want to use a better lead screw bought from e-bay as shown below. As this is not locally available for everyone lead screw types will be one of the parameters. I think options will be:
- M5 rod
- M8 rod
- True lead screw, options for diameter
Upgrading would only require a re-print of the lower z-axis part, this is the smallest part of the entire printer, easy upgrade.

I will start with an unmodded DLP projector. This small version could be used with a pico projector for super protable printer. Someone is already testing a pico projector for this purpose: [probjectblogs.blogspot.nl]
Edited 1 time(s). Last edit at 05/21/2014 12:00PM by bitflusher.
Sorry, only registered users may post in this forum.