Home
>
Developers
>
Topic
IKEA RepRap LINNMON/ADILS
Posted by fASE-2
|
IKEA RepRap LINNMON/ADILS March 12, 2015 06:26AM |
Registered: 9 years ago Posts: 14 |
instead of hijacking other threads i finally decided to create my own.
this frame consists of 2 IKEA LINNMON tabletops connected by 4 ADILS legs. on its own, the table is actually pretty flimsy but when you 'sandwich' the two tabletops together, you end up w/ a stiff and square frame to which just about anything can be mounted. its a cartesian design using 4 full-size NEMA 17s for XY and 4 half-size NEMA 17s for the Z-axis. XY configuration uses identical LEGMOUNTS w/ belts running clockwise or CCW w/ one of the motors in an axis wired in reverse polarity so that each motor in an axis is synced. The Z-axis steppers sit on the lower tabletop's PLATE using a printed base. Their threaded rods run along their respective LEG and into the above XY stepper's printed base which has an ABEC-1 bearing in it. Right now each stepper is mounted at 45 degrees inside the frame. I included Z-hangers on the XY LEGMOUNTS incase you want to sink a metal screw in there so they don't slide up and down... mine don't even w/ plenty of weight on them--a single clamp is sufficient. The LEGMOUNTS are squared up by 3/4" aluminum tubing which I'm using for both mechanical and structural in XY, but you can choose any kind of shafting that suits you. I also designed a PLATEMOUNT for XY which screws directly into the 5 screwholes on the upper tabletop and spans the height of the frame w/ Z-axis (might make for a difficult extruder implementation). For extruder, I honestly haven't decided yet, but I'd like to use a Bowden-ducted J-head to reduce the weight on XY. I'll post what I have so far, and any advice/criticism is greatly appreciated. This might also work for CNC and laser cutter setups.
The LINNMON tabletop comes in a few sizes but i went w/ the smallest 60 x 75 cm. ADILS legs are 70 cm high and 4 cm in diameter. The total cost of my frame configuration was $40 CAD (2 tabletops and 8 legs--you only need the plates from the other 4 legs, or 4 legs total if you want to print your own plates for a PLATEMOUNT XY.
So how does this all work?
The ADILS legs have a height-adjustable FOOT which unscrews to level the table on uneven floors. When I was cutting the legs for my low-budget racing sim table a while ago i noticed the FEET were removable and could be inverted for a stiff 3D printer frame. So you basically unscrew the foot a little bit, carefully rock it out of the metal table leg, unscrew it completely, cut away the plastic w/ tinsnips so it can fit back into the LEG inverted w/ the thread sticking up which gets screwed into the upper tabletop's PLATE. i only had two tests so far plugging into my prusa i3 clone's RAMPS w/o any firmware configuration or speed adjustments.
IKEA RepRap early testing
the motors in that video will be assigned to Z-axis since they draw less current and suck in general. i'll post a new video as soon as i get my threaded rod and print off an alternate PLATEMOUNT for XY.
i've been asked if it can function as a table. it can but you can't stick your legs under it.... maybe w/ PLATEMOUNT instead of LEGMOUNT configuration:
|
Re: IKEA RepRap LINNMON/ADILS March 12, 2015 07:55AM |
Registered: 9 years ago Posts: 977 |

|
Re: IKEA RepRap LINNMON/ADILS March 13, 2015 05:50PM |
Registered: 10 years ago Posts: 553 |
As I said in the other thread, awesome job! It looks great. Do you have progress pictures? Would you be able to get a new video without the buzzing? I'd be interested in hearing it when everything is all tightened up.
Side note, it looks like the tables are square. I checked the Ikea website (US) and it looks like all they have are rectangular tables. Shouldnt be a problem, just an observation.
greghoge.com
HUGE 3D PRINTER PARTS SALE!!!
Side note, it looks like the tables are square. I checked the Ikea website (US) and it looks like all they have are rectangular tables. Shouldnt be a problem, just an observation.
greghoge.com
HUGE 3D PRINTER PARTS SALE!!!
|
Re: IKEA RepRap LINNMON/ADILS March 14, 2015 06:37PM |
Registered: 9 years ago Posts: 14 |
IKEA RepRap third test
as the description says:
stronger steppers now running XY. didn't adjust firmware for 0.9 degrees per step instead of 1.8 so its not moving as much as it should be.
still waiting on 2 more couplers for Z-axis and i have to redesign the foot slightly after a bit of math since plate screw hole closest to tabletop center is NOT 45 degrees as i assumed.
i made a really poor, rushed platemount for XY which i'll revisit later but for now i'm going to use the legmounts since they're already there.
right now, i think i need to cleanup more than anything and get organized.
the picture shows a terrible platemount, legmount, and Z-stepper foot whose angling is off (just like the platemount).
|
Re: IKEA RepRap LINNMON/ADILS March 20, 2015 05:59PM |
Registered: 9 years ago Posts: 14 |
First Z-axis weight test
Not the results i was hoping for. but then again, i just wanted to see how much these motors could lift. in the video they're lifting about 12 lbs. and sounding pretty horrible. i had them lifting about 22 lbs but they were skipping quite a bit at that point. i'll have to check my math and design to see how i can make this lift smoother, but a A4988 should be enough to power these 4 crappy steppers... if not i can up the current on the driver or get the 'black version' which promises +20% more power.
when i had these mercury steppers on XY they sounded just as bad (w/o that awful metal grinding sound though).
i'll realign the Z-frame, re-tighten it and make sure its more square. i can also rotate the mounts 180 degrees so they're further away from the legs (which don't make very useful Z smooth rods). i got a few ideas.
|
Re: IKEA RepRap LINNMON/ADILS March 21, 2015 01:43AM |
Registered: 9 years ago Posts: 977 |

|
Re: IKEA RepRap LINNMON/ADILS April 15, 2015 08:33PM |
Registered: 9 years ago Posts: 14 |
Platemount XY First Test
i switched from legmount to platemount and modified X-axis 'bearings' so both spanning bars fit under tabletop. now only 4 legs are needed instead of 8. most of the noise is coming from the X spanning bar w/ the modified bearings. i think i have some ideas on how to quiet it down. still waiting on my tax returns before revisiting the Z-axis since i'd rather buy new motors than work w/ my existing mercury-branded motors. gonna do extruder next as soon as i figure out how i can get some filament under there w/o cutting a giant hole into the table top.
also gonna need new threaded rod since my 440mm won't span the height of the table. might even switch to SAE threaded rod if i can find some SAE bearings or just print really goofy-looking couplers to make up the height difference.
|
Re: IKEA RepRap LINNMON/ADILS April 17, 2015 04:09PM |
Registered: 10 years ago Posts: 553 |
My work computer doesnt have sound, so I cant hear the noise. But I assume you are talking about either of the moving bars (when referring to the X spanning bar). Looking at the bearings, it looks like they are too short. a 2 :1 ratio of cantilever to bearing spacing helps to prevent twist in the cross beam. Id be willing to bet that is the noise your hearing. If you google "igus 2 to 1 rule" it should come up with a good explanation of it.
Since it is supported on both sides, you can probably get away with 4:1 using the assumption that each bearing is only supporting half of the bar.
Also try filling the bars with that expanding foam spray stuff (used for filling crack and such). It might absorb some of the vibrations.
Edited 1 time(s). Last edit at 04/17/2015 04:17PM by gmh39.
greghoge.com
HUGE 3D PRINTER PARTS SALE!!!
|
Re: IKEA RepRap LINNMON/ADILS August 08, 2015 10:42AM |
Registered: 9 years ago Posts: 14 |
a lot has changed. the z-axis is only temporary, but is at least using better steppers w/ more torque. my working old printer broke on me (i broke it  so i had to wait for parts to fix that. plus i ordered some bad parts off aliexpress wrt the hot end so i'm just waiting on better parts (hopefully) to finish the hot end/extruder. i didn't want to post anything until i had this thing printing, but i thought i'd just include a photo of where i am right now.
my working printer is quite limited in terms of build envelope, so certain parts for the big printer can only be printed by itself. unfortunately, i also bought some really dry, tightly-wound, hard 3.00mm filament and its giving me issues w/ feeding through the heatbreak so until i get my 1.75mm version or PTFE/PFA-lined heatbreaks. i'll post a video of it printing once i get my PSU and those heatbreaks i mentioned. taking apart my existing printer just to make the big printer work w/ temporary parts is a really bad idea so i guess i'll just have to wait another week.
i don't really have a changelog, but it would be really convoluted at this point. organisation is not my strong suite. but things that i'll be working on include:
-longer XY bearings (slot-loaded nuts make them convenient for tightening belts but just aren't practical)
-integrate endstop holes in platemounts
-better cable/bowden management integrated into existing plastic parts
-print huge bearings for table legs to revisit original z-axis idea.
-print spring-loaded bed supports for mirror once springs arrive.
-print stoppers for aluminum extrusions to kill some of the noise.
-XY crosshair slight redesign
ultimately i'd like to sort through hundreds of blender files and release this to anyone that's interested in trying it out... but i'll need to find out what size of metric round aluminum extrusions are available throughout europe since i only have access imperial ones here (i'm hoping there's 20mm round extrusions for XY smooth rod).
so i had to wait for parts to fix that. plus i ordered some bad parts off aliexpress wrt the hot end so i'm just waiting on better parts (hopefully) to finish the hot end/extruder. i didn't want to post anything until i had this thing printing, but i thought i'd just include a photo of where i am right now.my working printer is quite limited in terms of build envelope, so certain parts for the big printer can only be printed by itself. unfortunately, i also bought some really dry, tightly-wound, hard 3.00mm filament and its giving me issues w/ feeding through the heatbreak so until i get my 1.75mm version or PTFE/PFA-lined heatbreaks. i'll post a video of it printing once i get my PSU and those heatbreaks i mentioned. taking apart my existing printer just to make the big printer work w/ temporary parts is a really bad idea so i guess i'll just have to wait another week.
i don't really have a changelog, but it would be really convoluted at this point. organisation is not my strong suite. but things that i'll be working on include:
-longer XY bearings (slot-loaded nuts make them convenient for tightening belts but just aren't practical)
-integrate endstop holes in platemounts
-better cable/bowden management integrated into existing plastic parts
-print huge bearings for table legs to revisit original z-axis idea.
-print spring-loaded bed supports for mirror once springs arrive.
-print stoppers for aluminum extrusions to kill some of the noise.
-XY crosshair slight redesign
ultimately i'd like to sort through hundreds of blender files and release this to anyone that's interested in trying it out... but i'll need to find out what size of metric round aluminum extrusions are available throughout europe since i only have access imperial ones here (i'm hoping there's 20mm round extrusions for XY smooth rod).
|
Re: IKEA RepRap LINNMON/ADILS August 21, 2015 05:01PM |
Registered: 9 years ago Posts: 14 |
1st print
i guess the most pressing issue is the idlers. i tried to reinvent the wheel w/ my original design and the belt keeps flying off 'cause they're just BAD
i already swapped the front idler out to make the video but then the back belt flew out on me.
its a bit noisier but i changed too many things at once so i don't really know what's causing it. bearing length is 7.0mm instead of 4.2mm (also thicker), swapped A4988 drivers for DRV8825 (still gotta adjust the Vref for my setup), swapped in my old 1.2A 1.8 degrees/step motors instead of the 1.7A 0.9 degrees/step motors, bowden-style extruder (which i have no experience with), Marlin stock firmware instead of my old G1 firmware. i also adjusted the gap between the 'crosshair' since i had the wrong height spacer in between, causing my X-axis spanning tube to bend and make noise during fast moves.
i guess my second biggest issue is setting up Marlin for a bowden extruder since it seems retract is not pulling back enough filament between fast moves. any advice on which reprap type in Marlin i should start making changes to in order to save time?
also, any other advice is also greatly appreciated.
|
Re: IKEA RepRap LINNMON/ADILS January 27, 2016 11:05PM |
Registered: 9 years ago Posts: 14 |
its been a while. anyways. i'm working on a new printer... basically the opposite of the old giant LINNMON/ADILS i originally made. my very first 3D printer (the MixG1) wasn't worth the upkeep so i decided to gut it and build something reliable out of its parts.
okay. here are the details so far:
frameless - just a stiff XY plane to screw corner mounts into, Z-axis will be floating. i'm hoping to attach it to a wall.
both direct and bowden - i'm opting for versatility this time by cutting a hole in this stiff XY MDF plane (right now, a finished IKEA kitchen cabinet front i got AS IS for $1)
corner mounts will use metal NEMA 17 L-brackets
using short NEMA 17 steppers mounted horizontally this time instead of vertically
more conventional shafting consisting of 8mm stainless smooth rod w/ LM8LUU linear bearings - this will force a smaller build, therefore and won't scale as easily as 3/4" aluminum tubing
idlers will consist of a 'caddy' screwed into the back of the NEMA 17 (beige in the picture). this caddy will hold a spindle (5mm HSS shaft w/ a GT2 pulley, flanked by 2 MR105ZZ bearings) and the 8mm rod
on the front of the NEMA 17 (shaft side) i'm just finishing designing the holder for the other 8mm axial rod
once i get my other L-brackets and LM8LUU i'll put this thing together and post some vids.
|
Re: IKEA RepRap LINNMON/ADILS February 02, 2016 08:10AM |
Registered: 8 years ago Posts: 4 |
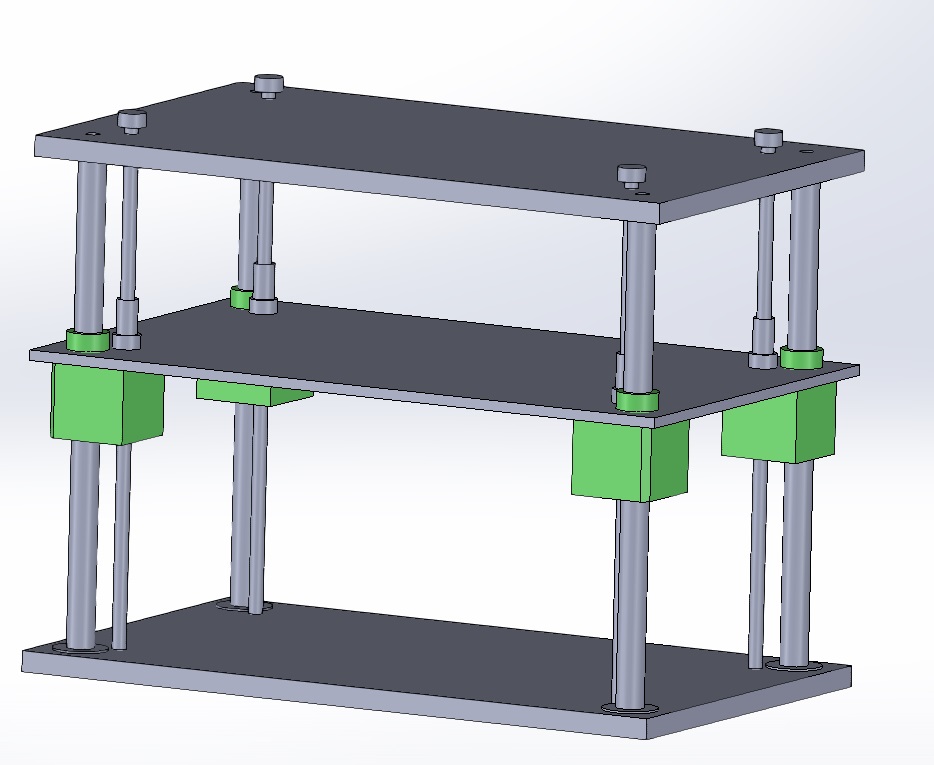
I like your idea using a IKEA linnmon table. I made some modifications as attached in the picture what do you think abaout the strenghts and weaknesses?
I used 4 legs to guide the corexy table. I use PE-HD (green) or similar . PE (polyethylene) guides are 150mm long so that they do not twist. The real robustness comes from the 4 guides so that the weak top and bottom plates of the linnmon table have no effect on stability. I plan to machine the holes of the guides which fit to the ADIS table leg a little tight , the leadscrew has no problem with it , but when operating on the xy plane they stick as much as possible to the legs and diminish vibrations.
I image to use 4 leadscrews attached to 1 Z motor on the top.
As the middle (made of steel) plate (carrying a corexy structure) moves upwards over a fixed heated bed, It stays allways on the center of gravity.imho it is also an advantage.
what do you think abaout the fixed bed. which design leads to more printing speed assuming that I use a light extuder (<250gr). Fixed bed and moving corexy+Z or corexy fixed on the top table and the bed moves upwards (again guided with 4 legs) ?
|
Re: IKEA RepRap LINNMON/ADILS April 03, 2016 03:31PM |
Registered: 9 years ago Posts: 14 |
i don't have any experience w/ coreXY, and have moved onto my next project. sorry, i can't really offer any advice... but if you want to go big.... two cheap IKEA LINNMON tabletops is still probably the way to go.
my new project is frameless, using L brackets to mount the NEMA 17 steppers horizontally. i should have it plugged in and testing for XY in a few days. Z-axis will be pretty basic w/ an upside down NEMA 17 flanked by two smooth rods. the smooth rods will be braced ABOVE and BELOW the XY platform. the platform by the way is IKEA kitchen fiberboard, i forget the specific name... but its 1.7cm fiberboard. the build is much smaller than my previous printer and is more of a 'proof-of-concept' at this stage. i will also be making a variant w/ VERTICAL short NEMA 17's as soon as i'm done testing this.
i forgot to mention... (i think) the idlers consist of a 5mm HSS shaft w/ a GT2 pulley flanked by 2 MR105ZZ bearings. also the VERTICAL variant i'll be building next will use aluminum shafting and PLA bearings, 'cause im not too thrilled w/ the weight on the XY (8mm steel + LM8LUU).
Edited 1 time(s). Last edit at 04/03/2016 03:34PM by fASE-2.
|
Re: IKEA RepRap LINNMON/ADILS April 04, 2016 09:43PM |
Registered: 9 years ago Posts: 14 |
|
Re: IKEA RepRap LINNMON/ADILS April 05, 2016 08:27AM |
Registered: 9 years ago Posts: 1,873 |
|
Re: IKEA RepRap LINNMON/ADILS April 18, 2016 10:47PM |
Registered: 9 years ago Posts: 14 |
Quote
JamesK
Nice! I like the directness of your approach. Do you think there will be enough upside to using two motors per axis to offset the costs and synchronization risks?
definitely. i figure an extra $30 is a small price to pay for printers sometimes costing well over a grand. there are no synchronization risks as far as i'm concerned. not to say that i didn't have sync issues at first, but that was a result of feeding the XY steppers half the power they actually needed. you either have a serious problem and won't get through one layer if they're not synced (usually happens on fast moves) or you have no problems at all. i think 1.0A - 1.2A is probably the best option... even though i printed pretty well on this new printer using 0.33A mercury steppers despite having three times the mass on XY vs. my bigger printer w/ PLA bearings and aluminum shafting.
here's my first print btw... z-axis is a disaster, but i'm pretty sure another stepper is needed to balance it out.
VIDEO
|
Re: IKEA RepRap LINNMON/ADILS January 27, 2017 01:41PM |
Registered: 9 years ago Posts: 14 |
Sorry, only registered users may post in this forum.