Home
>
Developers
>
Topic
5v bed pre-heater & dummy load for ATX PSU.
Posted by Mongrel_Shark
|
5v bed pre-heater & dummy load for ATX PSU. August 27, 2016 11:27PM |
Registered: 7 years ago Posts: 63 |
Hi everyone. I am a new member, but have been lurking and building for around 2 years.
I would like to present the following mod for RepRap's with ATX power supplies. Hopefully to be replicated and peer reviewed if possible.
Back story[b
For some time now I have been looking at the heat from 5v dummy loads on my ATX and wishing I could use it to help my heatbed out.
I considered putting all sorts of stuff like ceramic resistors, light globes of various voltage and wattage etc etc. under the bed to supplement the heater.
The problem with most of these loads is they will get too hot and there would be no way to turn it down, or use resistors with higher ohmage and you end up needing too many... ie: I worked out 1k 0.5w resistors could be used in groups of 100 in parallel. Then I worked out how much space this would take up to draw 2-5 amps from the 5v and it was busted. Not enough room and/or not enough current draw.
So I thought I would have a look at homebrew resistors. Clearly something with low ohms and huge surface area was needed. Then I saw an old toaster in the bin . A few minutes later I had a pile of Nichrome resistor wire.
I then used my PSU to apply 5v across various lengths of toaster wire while monitoring wire temp with a K-probe until I found the right heating rate. I got around 40c at around 1 amp with just short of 200mm of wire (wire varies, check your wire if you are replicating). I considered working this out with maths, but its a lot quicker to do the experiment than calculate heat dissipation over various surface areas. (Perhaps someone could make a spreadsheet for this? I'm useless at code.)
The Mod
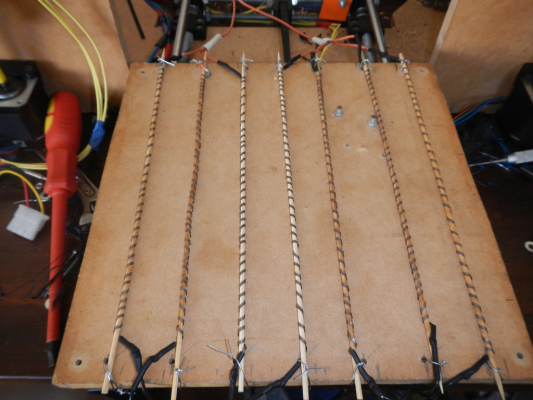
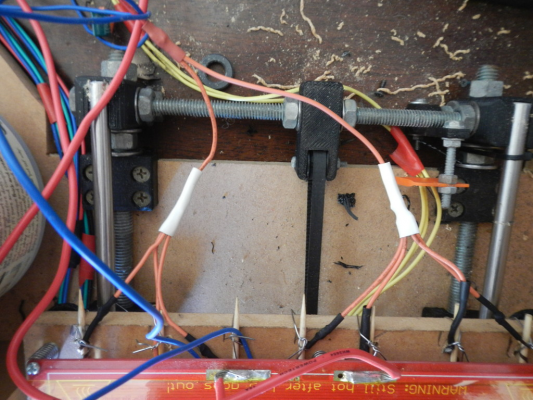
7x 200mm lengths of nichrome toaster wire were cut (switch toaster off before cutting element!) The original plan was to tape them to the bottom of the print bed, but a series of miscalculations (causing the elements to heat to 57c, maybe too hot for PLA) and issues with kapton not sticking to MDF forced me to rethink my plan. I ended up winding the resistor wire onto bamboo skewers to form some rod like heating elements. I then attached these to the sub bed to compensate for the too high temp. Convective heating losses balanced out the difference and I suspect improved heat distribution, reducing hot/cold spots.
This worked out a treat. Now after heating the bed to 140c the bed cools to 40-42c and no lower. So its still cool enough for PWM control of the main 12v bed heater for PLA.
If the atx is switched on but the bed heater is left off, it takes approx 15 min for the bed to reach 40c. If the bed heater is on it heats up very fast.
I have tested it with ABS and it works great. I was aiming for 2 birds with one stone, but got about 5 birds with the one stone.
Improvements I have noted since this mod include:
I haven’t found any disadvantages yet. I assume there will be some. If others could replicate and point out disadvantages that would be most helpful.
I have uploaded some pictures to this forum as well as video to youtube.
Pics
There are two versions of the video. one is just under 26 min. Including soldering instructions for dummies, an easy way to calculate how much wire you need and some things novice/intermediate electronics people may find helpful.
Long version 26min
[www.youtube.com]
There is also a short version with just the intro and summary from the long version that is aimed at experienced builders.
Short Version 5min
[www.youtube.com]
Some prints are shown at the end (last 30secs) of both videos.
I would love to see what the rest of the community thinks of this mod. Good or bad.
I am especially interested to see if I got the right temp for PLA to be removed. I have not printed with PLA at all....
I will be monitoring this thread and returning when I have time. So please feel free to comment or question. I may not reply with lightning speed, but I will be back.
Cheers.
Mong
Edited 1 time(s). Last edit at 08/27/2016 11:29PM by Mongrel_Shark.
I would like to present the following mod for RepRap's with ATX power supplies. Hopefully to be replicated and peer reviewed if possible.

Back story[b
For some time now I have been looking at the heat from 5v dummy loads on my ATX and wishing I could use it to help my heatbed out.
I considered putting all sorts of stuff like ceramic resistors, light globes of various voltage and wattage etc etc. under the bed to supplement the heater.
The problem with most of these loads is they will get too hot and there would be no way to turn it down, or use resistors with higher ohmage and you end up needing too many... ie: I worked out 1k 0.5w resistors could be used in groups of 100 in parallel. Then I worked out how much space this would take up to draw 2-5 amps from the 5v and it was busted. Not enough room and/or not enough current draw.
So I thought I would have a look at homebrew resistors. Clearly something with low ohms and huge surface area was needed. Then I saw an old toaster in the bin
 . A few minutes later I had a pile of Nichrome resistor wire.
I then used my PSU to apply 5v across various lengths of toaster wire while monitoring wire temp with a K-probe until I found the right heating rate. I got around 40c at around 1 amp with just short of 200mm of wire (wire varies, check your wire if you are replicating). I considered working this out with maths, but its a lot quicker to do the experiment than calculate heat dissipation over various surface areas. (Perhaps someone could make a spreadsheet for this? I'm useless at code.)
The Mod
7x 200mm lengths of nichrome toaster wire were cut (switch toaster off before cutting element!) The original plan was to tape them to the bottom of the print bed, but a series of miscalculations (causing the elements to heat to 57c, maybe too hot for PLA) and issues with kapton not sticking to MDF forced me to rethink my plan. I ended up winding the resistor wire onto bamboo skewers to form some rod like heating elements. I then attached these to the sub bed to compensate for the too high temp. Convective heating losses balanced out the difference and I suspect improved heat distribution, reducing hot/cold spots.
This worked out a treat. Now after heating the bed to 140c the bed cools to 40-42c and no lower. So its still cool enough for PWM control of the main 12v bed heater for PLA.
If the atx is switched on but the bed heater is left off, it takes approx 15 min for the bed to reach 40c. If the bed heater is on it heats up very fast.
I have tested it with ABS and it works great. I was aiming for 2 birds with one stone, but got about 5 birds with the one stone.
Improvements I have noted since this mod include:
- Improved 12v stability under load.
- Faster bed warm up and more stable print temps. This also reduced total print time significantly.
- Less chance of warpage during cooldown due to a slower cooldown time. (This wasn't a problem before, I now use the print fan to cool the bed if in a hurry.)
- No more fuse tripping when print fan comes on. (This was a problem for me due to 12v rail dropping to 10.80v under heavy load, the fuse was dissipating almost as much heat as the bed.)
- Improved power efficiency due to faster bed heating and less power wasted on dummy loads that do nothing useful.
I haven’t found any disadvantages yet. I assume there will be some. If others could replicate and point out disadvantages that would be most helpful.
I have uploaded some pictures to this forum as well as video to youtube.
Pics
There are two versions of the video. one is just under 26 min. Including soldering instructions for dummies, an easy way to calculate how much wire you need and some things novice/intermediate electronics people may find helpful.
Long version 26min
[www.youtube.com]
There is also a short version with just the intro and summary from the long version that is aimed at experienced builders.
Short Version 5min
[www.youtube.com]
Some prints are shown at the end (last 30secs) of both videos.
I would love to see what the rest of the community thinks of this mod. Good or bad.
I am especially interested to see if I got the right temp for PLA to be removed. I have not printed with PLA at all....
I will be monitoring this thread and returning when I have time. So please feel free to comment or question. I may not reply with lightning speed, but I will be back.
Cheers.
Mong
Edited 1 time(s). Last edit at 08/27/2016 11:29PM by Mongrel_Shark.
|
Re: 5v bed pre-heater & dummy load for ATX PSU. August 28, 2016 03:22AM |
Registered: 8 years ago Posts: 5,232 |
That's a pretty good idea to use the otherwise wasted energy of the 5V load.
I don't know if your printer has an enclosure, but the 5V heater would also be useful to heat the chamber. (which is does now, too)
I'd add self-adhesive aluminum foil on the MDF plate to reflect more IR rays to the top instead off into the MDF plate. That might reduce heatup times even more.
I don't know if your printer has an enclosure, but the 5V heater would also be useful to heat the chamber. (which is does now, too)
I'd add self-adhesive aluminum foil on the MDF plate to reflect more IR rays to the top instead off into the MDF plate. That might reduce heatup times even more.
|
Re: 5v bed pre-heater & dummy load for ATX PSU. August 28, 2016 08:11AM |
Registered: 7 years ago Posts: 63 |
Quote
o_lampe
I'd add self-adhesive aluminum foil on the MDF plate to reflect more IR rays to the top instead off into the MDF plate. That might reduce heatup times even more.
Thats a great idea
 Not for my one as I already made it borderline too hot. But if anyone tries this and needs more heat that could be good.
I'd recommend electrically isolating the elements form the ally tape though. I can see that going wrong somehow. lol
|
Re: 5v bed pre-heater & dummy load for ATX PSU. August 28, 2016 03:01PM |
Registered: 10 years ago Posts: 1,401 |
|
Re: 5v bed pre-heater & dummy load for ATX PSU. August 29, 2016 02:01AM |
Registered: 7 years ago Posts: 63 |
Sorry, only registered users may post in this forum.


