Huxley Dual Head Mod
Posted by rainingheavy
|
Huxley Dual Head Mod August 02, 2014 05:45PM |
Registered: 9 years ago Posts: 13 |
Hi all.
I thought I'd document my little project here, in the hopes that it might inspire someone. Or just so I can look back and work out how to put it back together...
I bought a Huxley a few months ago, and once it was properly set up, it prints beautifully. However, one of the shortfalls has been its lack of support material. Same material support (Slic3r generated) is pretty terrible, and a nightmare to remove. I get to play with a Stratasys Dimension at work, and whilst I can print much better quality, and more efficiently, the disolvable support is a really useful feature. So, why not mod my Huxley to be dual head?
How hard can it be?
Actually, so far; not overly. I started by buying a Sainsmart RAMPS 1.4 kit (w/ LCD) and setting that up. Next was the hardware.
I spent a while modelling the aluminium block and nozzle parts to see if it was physically possible to fit two heads in the same X-carriage as stock. The answer is yes, but it gets close! Drawings were sent to my Chief Engineer (Dad) to be milled out.
The Result (before threading):
The threaded holes have Helicoils for strength. (Absolutely nothing to do with my poorly labelled drawing and the oversize holes...)
Next, I needed to model the mount. Starting from scratch I re-drew the original, and then edited it to suit the Ali block.
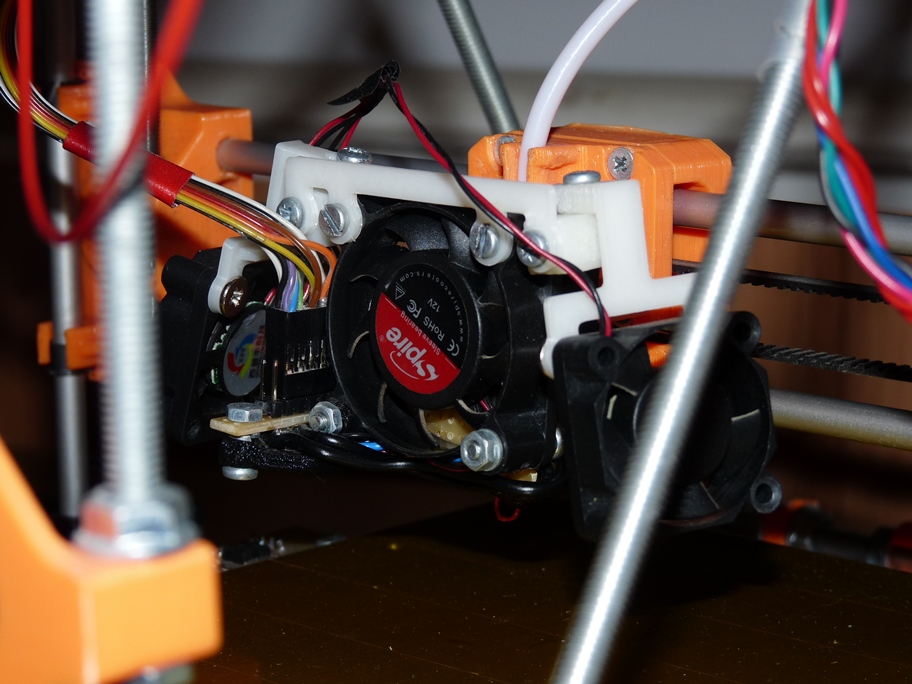
I needed to move two holes on the X-carriage, which meant printing that too. It later turned out that the holes I removed were needed to hold the 2nd fan on...
Spot the difference:
Next; Assembling the hot ends! The old one comes off:
Burned on PLA? It didn't shift with an Acetone bath... ...Scraping removed the worst.
Yes, it was a real PITA to screw both of them on. The gap between them is less than the overhang of the heater block.
Also, two bowden tubes are more than twice as annoying than one.
Test fit on the Carriage. Going well so far.
Cartridge heaters.
Thermistors. This took a bit of thinking about. I /think/ I'm happy with this as a solution though.
That's all so far.
To Do:
- 2nd Extruder and mount
- Wiring
- Firmware jiggling
- Testing!
Thoughts, ideas and abuse on the back of a postcard.
Cheers,
Michael.
I thought I'd document my little project here, in the hopes that it might inspire someone. Or just so I can look back and work out how to put it back together...
I bought a Huxley a few months ago, and once it was properly set up, it prints beautifully. However, one of the shortfalls has been its lack of support material. Same material support (Slic3r generated) is pretty terrible, and a nightmare to remove. I get to play with a Stratasys Dimension at work, and whilst I can print much better quality, and more efficiently, the disolvable support is a really useful feature. So, why not mod my Huxley to be dual head?
How hard can it be?
Actually, so far; not overly. I started by buying a Sainsmart RAMPS 1.4 kit (w/ LCD) and setting that up. Next was the hardware.
I spent a while modelling the aluminium block and nozzle parts to see if it was physically possible to fit two heads in the same X-carriage as stock. The answer is yes, but it gets close! Drawings were sent to my Chief Engineer (Dad) to be milled out.
The Result (before threading):

The threaded holes have Helicoils for strength. (Absolutely nothing to do with my poorly labelled drawing and the oversize holes...)
Next, I needed to model the mount. Starting from scratch I re-drew the original, and then edited it to suit the Ali block.

I needed to move two holes on the X-carriage, which meant printing that too. It later turned out that the holes I removed were needed to hold the 2nd fan on...
Spot the difference:


Next; Assembling the hot ends! The old one comes off:


Burned on PLA? It didn't shift with an Acetone bath... ...Scraping removed the worst.

Yes, it was a real PITA to screw both of them on. The gap between them is less than the overhang of the heater block.

Also, two bowden tubes are more than twice as annoying than one.

Test fit on the Carriage. Going well so far.

Cartridge heaters.

Thermistors. This took a bit of thinking about. I /think/ I'm happy with this as a solution though.
That's all so far.
To Do:
- 2nd Extruder and mount
- Wiring
- Firmware jiggling
- Testing!
Thoughts, ideas and abuse on the back of a postcard.
Cheers,
Michael.
|
Re: Huxley Dual Head Mod August 03, 2014 05:30PM |
Registered: 9 years ago Posts: 13 |
Hi all.
Part 2.
I pinched the parts for the extruder drive from a kit I'd printed earlier, and after ordering the same NEMA17 motor - with the 6 pin JST PH connector; no flying leads - from china (AliExpress) I found out that to install the drive on the opposite side to the original I'd need to extend the mounting bar by 20mm. This was another model-from-scratch job. While I was at it, I also made the stock one 5mm longer; to move the motor off the frame.
I started wiring the hot ends up using 20SWG Ribbon cable - I intend to do the whole printer in it soon. The thermistors are connected like stock; a terminal crimped onto the cable plugging onto the end of the thermistors lead. I may need to re-do the heatshrink with high temp PTFE as it is pretty close to the heater block...
The cable bundle was then wrapped in spiral wrap to keep it tidy. I may end up with a thin peice of piano wire or something in there as well to keep it up and out of the way.
The X-carriage was then re-assembled; the new design is a lot easier to get the belt in place. The fan mount was attached after drilling the two holes I got rid of earlier, and everything clips into place.
I spent a good few minutes with a parallel (read: shank of a broken milling bit) adjusting the heads to get them level; or at least, parallel to the bed. Only time will tell...
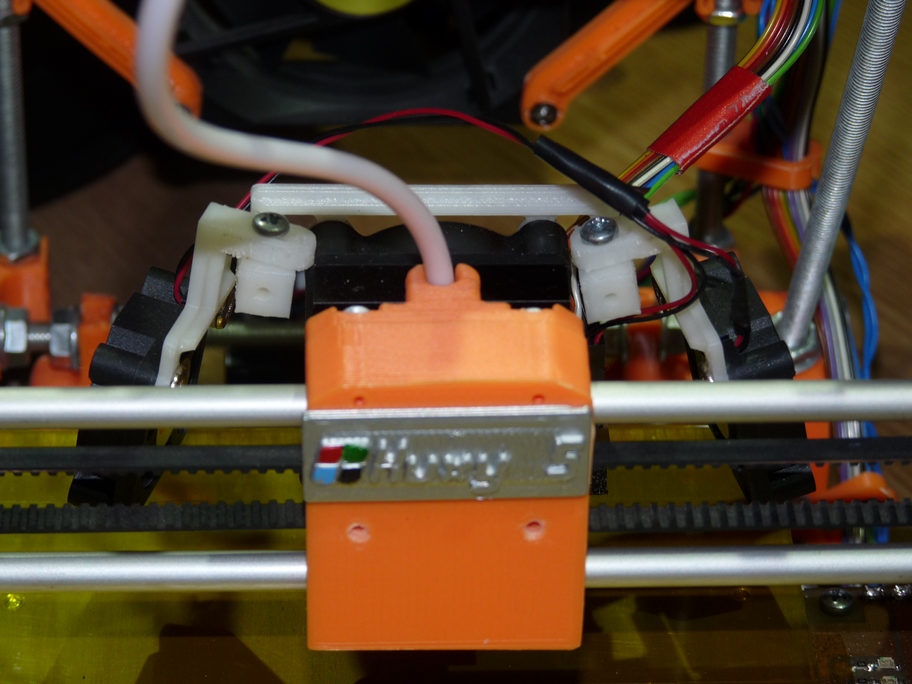
The lovely mess of wires that is my RAMPS controller. It will all be re-done once I have made an electronics box for it; having a massive laser cutter at work will see to that!
All plugged in. Preliminary tests are good; no smoke and a couple of temp readings. I'm probably gonna regret not doing the firmware before I plugged it all in...
All that is left now is to have a go at getting the firmware to play ball and then nothing can stop me! Mwahahahaha!
When I get 'round to it I'll post the modified parts on Thingiverse.
Cheers,
Michael.
Part 2.
I pinched the parts for the extruder drive from a kit I'd printed earlier, and after ordering the same NEMA17 motor - with the 6 pin JST PH connector; no flying leads - from china (AliExpress) I found out that to install the drive on the opposite side to the original I'd need to extend the mounting bar by 20mm. This was another model-from-scratch job. While I was at it, I also made the stock one 5mm longer; to move the motor off the frame.

I started wiring the hot ends up using 20SWG Ribbon cable - I intend to do the whole printer in it soon. The thermistors are connected like stock; a terminal crimped onto the cable plugging onto the end of the thermistors lead. I may need to re-do the heatshrink with high temp PTFE as it is pretty close to the heater block...

The cable bundle was then wrapped in spiral wrap to keep it tidy. I may end up with a thin peice of piano wire or something in there as well to keep it up and out of the way.
The X-carriage was then re-assembled; the new design is a lot easier to get the belt in place. The fan mount was attached after drilling the two holes I got rid of earlier, and everything clips into place.


I spent a good few minutes with a parallel (read: shank of a broken milling bit) adjusting the heads to get them level; or at least, parallel to the bed. Only time will tell...

The lovely mess of wires that is my RAMPS controller. It will all be re-done once I have made an electronics box for it; having a massive laser cutter at work will see to that!

All plugged in. Preliminary tests are good; no smoke and a couple of temp readings. I'm probably gonna regret not doing the firmware before I plugged it all in...

All that is left now is to have a go at getting the firmware to play ball and then nothing can stop me! Mwahahahaha!
When I get 'round to it I'll post the modified parts on Thingiverse.
Cheers,
Michael.
|
Re: Huxley Dual Head Mod August 04, 2014 01:01AM |
Registered: 10 years ago Posts: 208 |
Great job, congrats!
I also had a plan to do that, but I managed to get better support management and, since dual color didn't sound too appealing, I just dropped it.
One question about the "local cooling fan". I cannot see from the picture if you use a "duct" to direct the air or just simply hanged it at an angle, but my question is about it's efficiency. I mean, is the air flow is consistent enough to get the desired impact on the print quality?
All The Best,
Daniel
|
Re: Huxley Dual Head Mod August 04, 2014 01:23PM |
Registered: 9 years ago Posts: 13 |
Quote
3Dmaker4U
Great job, congrats!
I also had a plan to do that, but I managed to get better support management and, since dual color didn't sound too appealing, I just dropped it.
One question about the "local cooling fan". I cannot see from the picture if you use a "duct" to direct the air or just simply hanged it at an angle, but my question is about it's efficiency. I mean, is the air flow is consistent enough to get the desired impact on the print quality?
All The Best,
Daniel
Hi.
Cheers, I'd be interested to know how you do support.
The 'Local cooling fan' is ducted, it uses a slimmer version of this (slimmer means more Z height before it collides with the frame).
As to efficiency, I honestly couldn't say. Before I had a fan, my PLA prints were pretty naff. afterwards, they were ok, not perfect, but better. However, this happened very early on in it's life, so it might just be I have it set up better... I'll attach the file so you can try it out if you want; it gets pretty thin in places, and doesn't print that nicely, but I believe it works.

Cheers,
Michael.
|
Re: Huxley Dual Head Mod August 04, 2014 05:21PM |
Registered: 10 years ago Posts: 208 |
Whenever I have to print with support, I use the 0.9.1b version
The versions after generated an "indestructible" support, while the latest introduced pillars that cannot actually support too much.
I know the model, but is not very efficient. The issue is that small fans, including 40 mm ones, cannot sustain the air flow if it is obstructed.
I currently experiment a bi-lateral arrangement using 30 mm fans blowing directly to the hotend.
|
Re: Huxley Dual Head Mod August 05, 2014 04:51PM |
Registered: 9 years ago Posts: 13 |
Quote
3Dmaker4U
Whenever I have to print with support, I use the 0.9.1b version
The versions after generated an "indestructible" support, while the latest introduced pillars that cannot actually support too much.
I know the model, but is not very efficient. The issue is that small fans, including 40 mm ones, cannot sustain the air flow if it is obstructed.
I currently experiment a bi-lateral arrangement using 30 mm fans blowing directly to the hotend.
Hi,
I'll have to give that a go; you're quite right about "indestructible support"!
I think I see what you mean about the fans, but I haven't had a problem so far (touch wood). If the worst comes to the worst, I'll blast a 140mm fan across the whole thing!
You're bi-lateral arrangement is interesting though. I have wondered about more uniform cooling; for example, printing the Treefrog it is the overhangs on the back (air flow shadow side) that cause issue, those pointing into the wind are fine... Do you not experience a reduction in build area? or do they miss the Z rods?
Also; Part 3!
It turns out that the firmware wasn't nearly as fiddly as I was expecting; getting Slic3r's settings right is. at first I thought I had G-code issues as when I tried to extrude the motor rumbled/clunked/ground but did nothing. As if it had no power. I tested it, and it was fine; 0.45V.it was only after a while of scratching my head that I decided to swap the two motors to determine whether it was the motor or the driver, that I noticed that the blue and green wires were wrong! Would you believe it, once they were swapped it worked a treat.
It was getting late, so I put on a test print; the dual colour cone, and promptly died of boredom. That thing takes longer than you'd think.
What I noticed was this:
1. It only printed a purge skirt for T0
2. Ooze
3. Partially unprinted sections due to the empty chamber because of 2.
4. the heads moved away to heat up, but they hadn't dropped any. the 'cooldown to prevent ooze' thing wasn't working.
5. T1 offset needs adjusting.


I think that most of the above could be remedied with the purge pillar [Makerbot?] produces.

Playing with a calibration piece to get the offset right. For No.2 I turned off the Ooze control - temp drops and purge skirt - and increased retract. I reckon it's better now. I did change the offsets the wrong way though....
Anyway, that's the end of the story, I may post some shots of the electronics box in an attempt to cause jealousy, and when I find "The one easy tip" to dual head printing...

Thanks for putting up with me, my secretary will handle your questions.
Cheers,
Michael.
|
Re: Huxley Dual Head Mod September 24, 2014 07:55AM |
Registered: 10 years ago Posts: 14,672 |
Your dual head mod for the Huxley looks very similar to the way I converted my Ormerod to dual head. I've documented the process at [miscsolutions.wordpress.com]. In the process, I discovered a few things:
1. The standby temperature of the non-printing nozzle is very important, to minimise its effect when it passes over the print. For PLA, I use 185C for the printing nozzle (increased to 195C for the first layer), and 150C for the non-printing nozzle.
2. On a tool change, I wait for the new printing nozzle to reach the active temperature, but I don't wait for the old printing nozzle to cool down to standby temperature. This speeds up tool changes.
3. To further minimise the effect that the non-printing nozzle has on the print, it is important that when the non-printing nozzle passes over a point that has already been printed in the current layer, that point has cooled down sufficiently for the plastic to set. Having the nozzles further apart helps to achieve this in most cases. I originally had a nozzle spacing of 14mm, but I increased it to 22mm for better results. For some prints, I slow down the printing for particular parts to allow the plastic enough time to set. Better cooling from a fan should also help.
4. And of course you need to get the nozzles at exactly the same Z height! I do this by adjusting the relative torques of the two mounting screws.
I don't use a purge pillar, it doesn't seem to be necessary. Here are a couple of example prints.
Edited 1 time(s). Last edit at 09/24/2014 07:56AM by dc42.
Large delta printer [miscsolutions.wordpress.com], E3D tool changer, Robotdigg SCARA printer, Crane Quad and Ormerod
Disclosure: I design Duet electronics and work on RepRapFirmware, [duet3d.com].
1. The standby temperature of the non-printing nozzle is very important, to minimise its effect when it passes over the print. For PLA, I use 185C for the printing nozzle (increased to 195C for the first layer), and 150C for the non-printing nozzle.
2. On a tool change, I wait for the new printing nozzle to reach the active temperature, but I don't wait for the old printing nozzle to cool down to standby temperature. This speeds up tool changes.
3. To further minimise the effect that the non-printing nozzle has on the print, it is important that when the non-printing nozzle passes over a point that has already been printed in the current layer, that point has cooled down sufficiently for the plastic to set. Having the nozzles further apart helps to achieve this in most cases. I originally had a nozzle spacing of 14mm, but I increased it to 22mm for better results. For some prints, I slow down the printing for particular parts to allow the plastic enough time to set. Better cooling from a fan should also help.
4. And of course you need to get the nozzles at exactly the same Z height! I do this by adjusting the relative torques of the two mounting screws.
I don't use a purge pillar, it doesn't seem to be necessary. Here are a couple of example prints.


Edited 1 time(s). Last edit at 09/24/2014 07:56AM by dc42.
Large delta printer [miscsolutions.wordpress.com], E3D tool changer, Robotdigg SCARA printer, Crane Quad and Ormerod
Disclosure: I design Duet electronics and work on RepRapFirmware, [duet3d.com].
|
Re: Huxley Dual Head Mod September 24, 2014 02:54PM |
Registered: 9 years ago Posts: 13 |
Quote
dc42
Your dual head mod for the Huxley looks very similar to the way I converted my Ormerod to dual head. I've documented the process at [miscsolutions.wordpress.com]. In the process, I discovered a few things:
1. The standby temperature of the non-printing nozzle is very important, to minimise its effect when it passes over the print. For PLA, I use 185C for the printing nozzle (increased to 195C for the first layer), and 150C for the non-printing nozzle.
2. On a tool change, I wait for the new printing nozzle to reach the active temperature, but I don't wait for the old printing nozzle to cool down to standby temperature. This speeds up tool changes.
3. To further minimise the effect that the non-printing nozzle has on the print, it is important that when the non-printing nozzle passes over a point that has already been printed in the current layer, that point has cooled down sufficiently for the plastic to set. Having the nozzles further apart helps to achieve this in most cases. I originally had a nozzle spacing of 14mm, but I increased it to 22mm for better results. For some prints, I slow down the printing for particular parts to allow the plastic enough time to set. Better cooling from a fan should also help.
4. And of course you need to get the nozzles at exactly the same Z height! I do this by adjusting the relative torques of the two mounting screws.
I don't use a purge pillar, it doesn't seem to be necessary. Here are a couple of example prints.
Hi,
Thanks for your message. Your write up is much better than mine! I don't have the patience to make it particularly newbie-friendly
I see that we have put our heater blocks the opposite way round; mine put the nozzles as close together as possible - to maintain maximum build area; the huxley wastes no space! Yours are furthest apart - for reason 3.
I have found that my printer seems to ignore the cooldown part of the tool change. to the point where it would wander off to the side - to cool T0 and heat T1 - only to come straight back as T1 was already at temp... So I've turned the setting off in Slic3r for the moment.
My main issue is the amount of ooze. I have set it to retract by 8mm (off the top of my head) but I'm wondering if something more significant would be better - 50mm perhaps?
I am also getting tatty corners. I'm guessing it's too hot and dragging, but it eventually bunches up and often causes crashes which skip steps.
I'm very much in awe of your Frog; the joins between the colours on each layer are so crisp and sharp. I need to spend some time tuning and playing with it to get it back to the quality it was before.
All the best,
Michael.
|
Re: Huxley Dual Head Mod September 24, 2014 05:11PM |
Registered: 10 years ago Posts: 14,672 |
Hi Michael,
On my Ormerod (with Duet electronics and firmware), cool down when a tool is deselected is controlled by setting the standby temperature in a G10 command. So slic3r is not involved in it. I've not looked at what commands slic3r generates if you ask it to control standby temperatures. However, I did notice that slic3r generates M109 and M190 commands with an additional T parameter to specify which nozzle it wants to set. The Duet firmware was ignoring that parameter, so I modified the firmware to use it instead of assuming the currently selected nozzle. Perhaps the firmware you are using has a similar problem?
For retraction when changing tools, I am letting slic3r generate the retraction commands. I have this retraction set at the default value of 10mm and I left the extra length on restart at 0. This seems to work well for me so I haven't tried changing these values. I don't have any problem with ooze, I think 150C is low enough to prevent it.
I should point out that it took me quite a while to get the print quality you see in the photos. I went through a lot of traffic cones before I attempted the frog!
Edited 1 time(s). Last edit at 09/24/2014 05:14PM by dc42.
Large delta printer [miscsolutions.wordpress.com], E3D tool changer, Robotdigg SCARA printer, Crane Quad and Ormerod
Disclosure: I design Duet electronics and work on RepRapFirmware, [duet3d.com].
|
Re: Huxley Dual Head Mod September 27, 2014 12:39PM |
Registered: 9 years ago Posts: 13 |
Quote
dc42
Hi Michael,
On my Ormerod (with Duet electronics and firmware), cool down when a tool is deselected is controlled by setting the standby temperature in a G10 command. So slic3r is not involved in it. I've not looked at what commands slic3r generates if you ask it to control standby temperatures. However, I did notice that slic3r generates M109 and M190 commands with an additional T parameter to specify which nozzle it wants to set. The Duet firmware was ignoring that parameter, so I modified the firmware to use it instead of assuming the currently selected nozzle. Perhaps the firmware you are using has a similar problem?
For retraction when changing tools, I am letting slic3r generate the retraction commands. I have this retraction set at the default value of 10mm and I left the extra length on restart at 0. This seems to work well for me so I haven't tried changing these values. I don't have any problem with ooze, I think 150C is low enough to prevent it.
I should point out that it took me quite a while to get the print quality you see in the photos. I went through a lot of traffic cones before I attempted the frog!
Hi,
I have looked into the G10 command, but from the wiki it appears that it does a different role (retract / unretract) on the Marlin firmware... It reads slic3rs tool change and temp change codes fine, (I now remember why) I turned the "Ooze protection" off because it also builds the full height skirt. I have done a test piece with it back on, and nozzle temps dropping 50 degs when not in use. Retract was set to 20mm, but I think I can get away with less; as you say ~150C is low enough to prevent ooze. I have a feeling I'm going to have to post-process the G-code to remove the skirt, but keep the temp changes...
On a different note; when the stock PSU is only heating the bed, the bed is able to hold 115C all day long. Before, it would only just get there with a cardboard shield, and promptly drop to ~105C during the first layer... This might be causing my corner woes; I had a similar issue when I first got the machine and was printing PLA. Dropping the bed temp sorted this. Once I have finished re-wiring it (got my electrical box done - pics to follow) I will try dropping the bed temp. My reason for thinking this is that once I left it to make a mess, it sorted itself out and printed perfectly - it's far enough away from the heat of the bed that it can cool properly, see pic:

Forgive me if I don't reply for a fortnight, I'm off on holiday.
Cheers,
Michael.
Sorry, only registered users may post in this forum.