Homing issues
Posted by Stephanel
|
Homing issues September 29, 2014 12:36PM |
Registered: 9 years ago Posts: 113 |
Hi!
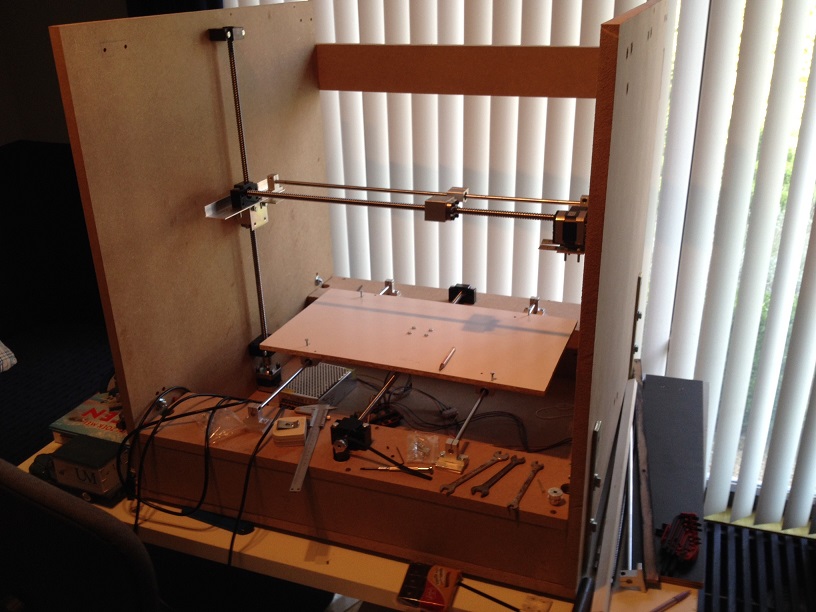
I am almost finished with building my 3D printer. The latest issue I now have is with the homing function (G28 in G code). I have setup all end stops (they are opto) correctly. The Z axis is a MAX, the other axes are MIN. When I manually move the axes, it correctly stops at the end stops.
Now I thought after this I would be able to use the homing functionality to put the extruder in start position. Sadly, when I use it (also per axes), the stepper motors make a high pitch sound for a while, after which it stops. Nothing moves.
Is there any setup in the configuration that I'm overlooking to setup the homing functionality?
Thanks!
Steph
|
Re: Homing issues September 29, 2014 01:51PM |
Registered: 9 years ago Posts: 119 |
|
Re: Homing issues September 29, 2014 02:09PM |
Registered: 11 years ago Posts: 1,320 |
Most likely George4657 is right. When you are moving around with the buttons, it is usually at a lower rate of speed. You can lower the homing speed as suggested, but you might experience similar issues while printing. You might have to play around a bit with the trimpot settings on the stepper driver boards.
|
Re: Homing issues September 29, 2014 02:23PM |
Registered: 9 years ago Posts: 113 |
|
Re: Homing issues October 01, 2014 06:58AM |
Registered: 9 years ago Posts: 113 |
And I keep struggling :-)
Now I have setup everything mechanically, I did the calibration of the X,Y and Z axis. That worked quite well. However, now I am trying to calibrate the extruder. I managed to calibrate the cold end of the extruder while it was not connected to the hot end. I had to use a setting of 5.9714 for the calibration (S parameter as specified here).
Now, to calibrate the extruder, I did this without the hot end connected. This way I could accurately test the speed of the cold end extruder. However, once I connect the cold end to the hot end and try to extrude material, nothing really happens.
At first I thought the hot end was blocked somehow. However, when I increased the temp to 250degC and manually pushed through the ABS filament, all seemed to work fine (I am however not sure how much force is OK to push through the filament).
The cold end extruder always slips over the filament, no matter how much pressure I put on the guide wheel. When I push to hard, the motor might block as well...
I tried to lower the speed, and increase it, nothing helped...
Any suggestions what I should do to fix this? Is this normal?
Thanks!
Steph
|
Re: Homing issues October 01, 2014 11:39AM |
Registered: 9 years ago Posts: 113 |
Hey!
An update: I managed to get the extruder going with the following setting:
M92 E105
This is an MK8 extruder. It seems that it requires a specific setting to be able to push the filament through the nozzle. However, currently, the extruder is pushing filament at a rate of ~10 cm through the nozzle when I only ask for 5 mm. If I have to change the parameters to get down to 5 mm, it would require:
M92 E6.3252
When I do this, the extruder blocks again, and is not able to transport the filament.
Any suggestions as to the correct parameters, and more specifically how to setup an MK8 extruder to properly extrude filament?
Thanks!
|
Re: Homing issues October 01, 2014 04:08PM |
Registered: 10 years ago Posts: 869 |
That's a huge difference in values and 6.3252 is an extremely small number, presuming that value represents steps per mm. If you're asking for 5mm, that would mean a typical 1.8 degree step motor (200/rev) would only turn about 57 degrees. My printer for instance has a 39:11 ratio Wades gear extruder with a 6.75 effective diameter hobbed bolt. My steps per mm is just under 535 with 1/16 microstepping.Quote
Stephanel
M92 E105
...
M92 E6.3252
Letting us know the specifics of your printer would help in determining the correct value. We'd need to know firmware and version, extruder type, gear ratio, hobbed bolt or drive wheel diameter, stepper step degrees, and microstepping if any to get to a starting value.
|
Re: Homing issues October 01, 2014 08:36PM |
Registered: 9 years ago Posts: 113 |
Thanks for your reply! I'm sorry, but I am kinda new into 3D printing, but to better understand everything behind it, I decided to create my 3D printer from scratch. That's why I probably hit that many roadblocks now in the end :-)
The calculation I used to get to the E6.3252 is the following. I took some filament and indicated a start point. I measured the distance between that point and the top of the extruder. That is point A. Then I instructed Pronterface to run for 5mm (SD). After that run, I measured the distance again, which gives me point B. A - B = RD.
A = 93.8mm
B = 10.8mm
SD = 5.0mm
RD = 83.0mm
S = (Initial Steps per mm x SD) / RD = (105 x 5.0) / 83 = 6.3253
Indeed, this is way too small, and does not work at all with my extruder motor. The Initial Steps per mm (105) worked well, but was way too fast.
As you requested the specifics of my printer:
Extruder stepper motor model 42HB34F08AB
1000MM stepper motor line
with extruder nozzle 0.4mm.
This is the product.
As you can see, the motor is directly connected to the gear.
I did a bit searching, and found the stepping: 1.8deg/step. I did not find whether it supports microstepping.
The gear is 11mm outer diameter (basically this one).
I use as firmware Marlin, latest version. The configuration file is in attachment as it is now (Configuration.h).
I'd be fine to use a Wade gear extruder, but now I'm a bit stuck to this MK8 type of extruder, as well as I do not have a 3D printer yet which can print the gear required for the Wade extruder :-)
Hope you can make anything out of the above!
Thanks a lot already!
|
Re: Homing issues October 02, 2014 10:23AM |
Registered: 10 years ago Posts: 869 |
Your electronics package will determine what your microstepping rate is, not the stepper You don't say if you're using RAMPS or some other package, so I'll presume you're using RAMPS since it's probably the most common. Under the stepper drivers there are header pins that need to be jumpered. If there are 3 jumpers on those pins, then you're in 1/16th stepping mode. No jumpers means full steps. There's also half, 1/4, and 1/8 modes but those aren't commonly used. Other electronics may have other ways to set the microstepping rate, but usually it's jumpers or dipswitches. My guess is that you don't have any microstepping enabled, but your numbers are set that it is enabled. I saw this because the actual length extruded (83mm) divided by what was asked for (5mm) = 16.6. The microcontroller is sending 16x as many pulsed to the motor driver as it's configured to use.
You say that your stepper is 200 full steps per revolution. Figure out how to set your driver so that it's using 1/16th microstepping. Then you should have 3200 steps per revolution (200 * 16).
If your drive gear is 11mm in diameter, the effective diameter is actually a little less since the teeth bite into the filament. How much depends on the tension wheel and can vary, but we'll use 10.75mm as the effective diameter as a starting point. This will get tweaked during the calibration step. The circumference is then 10.75mm * pi = ~33.77mm per revolution.
Now knowing how many steps you have per revolution, and the circumference of the drive gear, we can compute how many steps are required per mm of filament. Using our 3200 steps example above, we get 3200 steps / 33.77mm steps = 94.75 steps/mm. That is what you should put in your config file in this line:
#define DEFAULT_AXIS_STEPS_PER_UNIT {70.4225,70.1083,50.0000,94.75}
Try that after setting your microstepping (or alternatively, recompute without microsteps but you'll lose resolution as the amount of filament extruded per step goes up 16x) and adjusting your configuration file. Then, once you have all that done, try a test extrusion again. You can use 5mm again, but a longer length will give you a more accurate indication on the amount of over/underextrusion. Whatever length do do use, multiply your existing rate by the length you asked for divided by the length you got. So if your rate was the above 94.75, you asked for 20mm, and you got 22, then your formula would be 94.75 * 20 / 22 giving you 86.14. If instead of getting 22, more than you asked for, you got less, say 18, then it would be 47.40 * 20 / 18 giving you 105.28.
You'll probably need rinse, repeat a few times to get things dialed in and you're extruding exactly what you asked for.
Edited: Fixed numbers since I'm an idiot.
Edited 1 time(s). Last edit at 10/02/2014 02:33PM by cdru.
|
Re: Homing issues October 02, 2014 11:22AM |
Registered: 9 years ago Posts: 119 |
cdru:
Circumference = pi * dia or radius *2 * pi so your values are 1/2 proper values.
At 16 microstepping = 93 steps per mm which is close to the 105 in config file depending on actual dia.
At no microstepping = 5.8 steps per mm which is close to the 6.3 value
Stephanel:
In addition to cdru's good advice.
Make sure your hot end is up to temp and extrude at slow speed to test. (50mm / min)
If that works increase the speed to find out how fast your hot end can run.
Too much pressure can deform filament and cause jamb as well so you need to start with lower presure as well.
|
Re: Homing issues October 02, 2014 02:35PM |
Registered: 10 years ago Posts: 869 |
You and your silly geometrical formulas. Pfft.Quote
george4657
cdru:
Circumference = pi * dia or radius *2 * pi so your values are 1/2 proper values.
At 16 microstepping = 93 steps per mm which is close to the 105 in config file depending on actual dia.
At no microstepping = 5.8 steps per mm which is close to the 6.3 value
I fixed my numbers above and you are correct. The numbers he was using make much more sense and the wrong microstepping configuration is likely his issue.
|
Re: Homing issues October 03, 2014 11:58AM |
Registered: 9 years ago Posts: 113 |
Fantastic! Thanks guys! The trick with the jumpers did work. I totally missed those ones... I use a RAMPS 1.4, and setting the 3 jumpers really solved the problem with the extruder being too fast and not extruding at all. I have been able to calibrate the extruder itself, and am now starting with calibration of the bed. Do you use any microstepping for the X, Y and Z axis? Atm I do not.
BTW: at the moment I'm at the following calibration values:
#define DEFAULT_AXIS_STEPS_PER_UNIT {70.4225,70.1083,50.0000,101.0869}
I still have to finetune, as the printer is quite big and all mistakes are magnified along the axes. First however, I want to start testing the printing itself :-)
Maybe your two insights: I put my Z axis home point at the top. As the total height is about 45cm, the Z is moving all the way down to the bed at a breakneck pace. What is the best place to set the actual speed of this Z axis? The homing speed I can setup in the firmware, and atm is very very slow... I always get a heartattack when the Z axis is moving down at such speed, as I always fear it will hit the bed :-)
Thanks again for all your help!
Steph
|
Re: Homing issues October 03, 2014 04:25PM |
Registered: 9 years ago Posts: 113 |
I solved the issue of the speed of the Z axis. It was embedded in the G code which was generated by the Slicer software.
G1 Z5 F5000 ; lift nozzle
As my homing position for the Z axis is MAX, the whole device moves down all the way. I changed this to a more reasonable speed (F2000).
However, this means probably I will have to manually change all G code generated files. So I think I will change the position of the end stop to the MIN position.
After making my bed next to the printer, I also avoided disaster, as the printer for some reason did not understand the following line of G code:
G1 X208.772 Y87.741 F7800.000
As it did not move to the middle of the bed, after a while it tried to move to a negative X position and broke down the entire X axis...
Also when I remove the F7800 piece, it does not work in the complete file. However, when I just run separately
G1 X208.772 Y87.741
it does move to the correct position. However, using
G1 X25 Y25
did not?... I imagine that this has something to do with the step speed of my motors. I have used the following setting:
#define DEFAULT_AXIS_STEPS_PER_UNIT {70.4225,70.1083,50.0000,101.0869} // default steps per unit for Ultimaker
I did not use microstepping for any motor except the extruders.
It remains quite a difficult feat to calibrate this printer :-) Sorry for all my questions!!
|
Re: Homing issues October 03, 2014 04:53PM |
Registered: 10 years ago Posts: 869 |
Yes, I use microstepping. And unless your motors are weak and can't maintain microsteps, you're probably losing out.
You'll change your max speed in the line below where you set your steps, at DEFAULT_MAX_FEEDRATE. Your 50 steps/mm for your z-axis implies that your z-axis lead screw has a lead of 4mm. Saying that your steppers can spin the screw so it travels 50mm/sec translates into 12.5 rotations per second. I doubt your motors can do that under load without missing steps. I'd start at something much more conservative, 2-4 times your actual lead. So if you indeed have 4mm lead screws, replace 50 with a value from 8 to 12. That'll cause a full travel to take 37-56 seconds instead of trying to do it in 9 seconds. While you're in there, you might want to adjust your homing feed rates (several lines up) to something higher. Homing you usually don't worry if you skip a step since you're zeroing out anyway.
Also, it looks like you have similar lead screws for all your axes, but your steps per mm and feedrates are not the same. If they are indeed the same specs, then your values should be the same or at least a lot closer. The max values might differ if there's more load or friction for a particular axis.
Sorry, only registered users may post in this forum.