How to modify a standard RAMPS 1.4 to work with Arduino Due?
Posted by AndrewBCN
How to modify a standard RAMPS 1.4 to work with Arduino Due? March 05, 2015 03:41PM |
Registered: 9 years ago Posts: 977 |
Hi everybody,
I am trying to figure out a way to do some low-cost development of 3D printer controller firmware for 32-bit ARM, and one possible solution would be to modify a standard RAMPS 1.4 clone (these can costs as little as $7) to use with an Arduino Due (again, a Chinese Due clone is only around $16).
So my question is: how do I modify/hack a RAMPS 1.4 so that I can plug it on an Arduino Due and not have the thing go up in flames as soon as I apply 12V from the PSU?
Yes, I have read the relevant page on the wiki, but it is a little bit short on actual examples: [reprap.org]
Has anybody actually already tried to hack a standard RAMPS 1.4 and got it working with a Due?
Thanks for any hints / tips / pointers to more information.
Andrew
Re: How to modify a standard RAMPS 1.4 to work with Arduino Due? March 06, 2015 12:19AM |
Admin Registered: 13 years ago Posts: 6,998 |
You have to do serious work to do that. thats why people designed new boards. it was easier
Main issue is voltage. Due is 3.3v while ramps and mega are 5v logic levels.
so you have to replace the MOSFET, rewire the power and add in a eeprom (if you want to save to real eeprom)
Also I wouldnt take a crap on a $7 ramps. bad connetors, tracks two thin for the current, inferior MOSFETS, shorts, open ccts, incorrect compoents you name it. Its a fire risk waiting to happen.
Re: How to modify a standard RAMPS 1.4 to work with Arduino Due? March 06, 2015 01:13AM |
Registered: 9 years ago Posts: 977 |
Hi,
Thanks for your input.
I have checked the datasheet for the DRV8825 (which is the Pololu-style carrier board that I am using right now) and it seems to work fine with 3.3V logic levels.
i have been doing fine without using the eeprom of my Arduino Mega 2560 for the past few months. I understand it is a desirable feature but for development purposes I am willing to do without it.
The MOSFETs seem like a major problem. I have some IRLB8743 MOSFETs right here but it seems that in any case a driver would be recommended. I was wondering what would be the easiest, simplest and least expensive way to drive the 8743's with the 3.3V logic levels of the Arduino Due. Any suggestions?
I have been using them for the past few months without any fire issues until now. Obviously I check them for problems before I assemble them into my RepRaps, and I have not had any of those issues until now (except for the MOSFETs which I agree are not very well specified, but then that is the case with the original RAMPS too - that's why I have the 8743's).
Thanks for your input.
Quote
Dust
You have to do serious work to do that. thats why people designed new boards. it was easier
Main issue is voltage. Due is 3.3v while ramps and mega are 5v logic levels.
I have checked the datasheet for the DRV8825 (which is the Pololu-style carrier board that I am using right now) and it seems to work fine with 3.3V logic levels.
Quote
Dust
so you have to replace the MOSFET, rewire the power and add in a eeprom (if you want to save to real eeprom)
i have been doing fine without using the eeprom of my Arduino Mega 2560 for the past few months. I understand it is a desirable feature but for development purposes I am willing to do without it.
The MOSFETs seem like a major problem. I have some IRLB8743 MOSFETs right here but it seems that in any case a driver would be recommended. I was wondering what would be the easiest, simplest and least expensive way to drive the 8743's with the 3.3V logic levels of the Arduino Due. Any suggestions?
Quote
Dust
Also I wouldnt take a crap on a $7 ramps. bad connetors, tracks two thin for the current, inferior MOSFETS, shorts, open ccts, incorrect compoents you name it. Its a fire risk waiting to happen.
I have been using them for the past few months without any fire issues until now. Obviously I check them for problems before I assemble them into my RepRaps, and I have not had any of those issues until now (except for the MOSFETs which I agree are not very well specified, but then that is the case with the original RAMPS too - that's why I have the 8743's).
Re: How to modify a standard RAMPS 1.4 to work with Arduino Due? March 06, 2015 02:41AM |
Registered: 14 years ago Posts: 1,092 |
There are problems with using the Due with the standard RAMPS boards. That was the reason Bob and I were working on RAMPS-FD. Bob and myself just dropped the project after a bunch of issues where we both pretty much decided that the hassle we were getting from various people simply wasn't worth it, and we both ended up quite time-poor to work further on it. The fact that Geeetech simply took the original V1 beta (we were developing this completely open/open source) and decided to start selling it (they don't care if it doesn't work, they're making money off people who don't know better who are/were buying a lemon) was just the icing on the cake.
For the issues:
For a start, RAMPS is hard-wired to the 5V line, so you'll need to either cut that and run it to 3.3V so the logic levels work, or work out some way of level shifting things (will require a lot of extra circuitry - see below).
End stops will have to be microswitches. Can't be Optos or Hall-O's, as they require 5V (and put out 5V logic levels). You'll have to provide some sort of logic level buffer between them and the inputs on the Due if you want to use them.
You can't use servos (so no auto-levelling) as the servo outputs will not do the full 5V swing needed, and simply connecting a servo (as one side is 5V) may fry your Due output(s) from the higher voltage.
None of the LCD boards are 3.3V compatible, so you either need to do without or provide I/O level buffering (as per the end stops).
You will probably have issues with thermistors as well (one again, 3.3V input).
But most of all, the big issue will be that the Due itself doesn't provide much current out at 3.3V, and even 5V isn't as capable as what the Mega is usually capable of. So unless you pretty much run all the I/O through logic level shifting circuitry, you may find that you're going to draw way too much current, and the board will just randomly reset. You really need to provide an external voltage source to supply all these values. You can get that out of something like an ATX supply, but you won't be able to use the existing PS ON circuitry with a PC ATX PSU. Once again, problems with 5V into a 3.3V I/O pin on the Due.
As for the MOSFETs, you can use the 8743's directly with no real issue (it's used on RADDS and was the plan for RAMPS-FDv2), but there is now better components out there with even lower Rds(on) values and suitable Vgs thresholds. However, given the issues with 3.3V current output on the Due, you may as well use level shifting to get that to 5V as well and simply drive it from those outputs (or use a driver).
All in all, without level shifting to/from 5V, I think you'll be heading into the realm of random resets if you put more than 3 x DRV8825's on the 3.3V lines (this is assuming all the other current drain that goes along with the bits of the board). You might be lucky and be able to do 4, but maybe not. It may even fail once the regulator gets warm, which makes it unreliable. And since 4 is the minimum requirement for most 3D printers (3 axes, 1 extruder), it's a problem.
Re: How to modify a standard RAMPS 1.4 to work with Arduino Due? March 06, 2015 04:11AM |
Registered: 9 years ago Posts: 977 |
Stuart,
Thank you indeed for the very detailed answer.
Yes, I intend to remove the pins that carry 5V from the Due to the RAMPS and then connect the RAMPS VCC to the 3.3V from the Due.
That's OK too, I am using microswitches.
No servos for now, so that' s not a problem either, at least at this point in time.
Yes, I am using an ATX PSU. PS_ON is active low and is (as far as I know) pulled up to either 3.3V or 5V inside the power supply, I'll have to check into that, but that too should not be too much of a problem.
That is something I'll have to check in detail when I get my Due (it's in the mail from China right now).
Thanks again for sharing your deep knowledge of the issues here, that was a most helpful post.
Cheers,
Andrew
Edited 1 time(s). Last edit at 03/06/2015 04:12AM by AndrewBCN.
Thank you indeed for the very detailed answer.
I am quite saddened by the fact that you had all these issues despite working for free in the design of the RAMPS-FD. :-(Quote
Cefiar
There are problems with using the Due with the standard RAMPS boards. That was the reason Bob and I were working on RAMPS-FD. Bob and myself just dropped the project after a bunch of issues where we both pretty much decided that the hassle we were getting from various people simply wasn't worth it, and we both ended up quite time-poor to work further on it. The fact that Geeetech simply took the original V1 beta (we were developing this completely open/open source) and decided to start selling it (they don't care if it doesn't work, they're making money off people who don't know better who are/were buying a lemon) was just the icing on the cake.
Quote
Cefiar
For the issues:
For a start, RAMPS is hard-wired to the 5V line, so you'll need to either cut that and run it to 3.3V so the logic levels work, or work out some way of level shifting things (will require a lot of extra circuitry - see below).
Yes, I intend to remove the pins that carry 5V from the Due to the RAMPS and then connect the RAMPS VCC to the 3.3V from the Due.
Quote
Cefiar
End stops will have to be microswitches. Can't be Optos or Hall-O's, as they require 5V (and put out 5V logic levels). You'll have to provide some sort of logic level buffer between them and the inputs on the Due if you want to use them.
That's OK too, I am using microswitches.
Quote
Cefiar
You can't use servos (so no auto-levelling) as the servo outputs will not do the full 5V swing needed, and simply connecting a servo (as one side is 5V) may fry your Due output(s) from the higher voltage.
No servos for now, so that' s not a problem either, at least at this point in time.
LCDs are optional in my setup (I am using Octoprint) but I certainly would prefer to have the option of installing one. I'll have to check into that. The thermistors are actually connected in a voltage divider circuit, so I don't see that as a big problem.Quote
Cefiar
None of the LCD boards are 3.3V compatible, so you either need to do without or provide I/O level buffering (as per the end stops).
You will probably have issues with thermistors as well (once again, 3.3V input).
Quote
Cefiar
But most of all, the big issue will be that the Due itself doesn't provide much current out at 3.3V, and even 5V isn't as capable as what the Mega is usually capable of. So unless you pretty much run all the I/O through logic level shifting circuitry, you may find that you're going to draw way too much current, and the board will just randomly reset. You really need to provide an external voltage source to supply all these values. You can get that out of something like an ATX supply, but you won't be able to use the existing PS ON circuitry with a PC ATX PSU. Once again, problems with 5V into a 3.3V I/O pin on the Due.
Yes, I am using an ATX PSU. PS_ON is active low and is (as far as I know) pulled up to either 3.3V or 5V inside the power supply, I'll have to check into that, but that too should not be too much of a problem.
Quote
Cefiar
As for the MOSFETs, you can use the 8743's directly with no real issue (it's used on RADDS and was the plan for RAMPS-FDv2), but there is now better components out there with even lower Rds(on) values and suitable Vgs thresholds. However, given the issues with 3.3V current output on the Due, you may as well use level shifting to get that to 5V as well and simply drive it from those outputs (or use a driver).
All in all, without level shifting to/from 5V, I think you'll be heading into the realm of random resets if you put more than 3 x DRV8825's on the 3.3V lines (this is assuming all the other current drain that goes along with the bits of the board). You might be lucky and be able to do 4, but maybe not. It may even fail once the regulator gets warm, which makes it unreliable. And since 4 is the minimum requirement for most 3D printers (3 axes, 1 extruder), it's a problem.
That is something I'll have to check in detail when I get my Due (it's in the mail from China right now).
Thanks again for sharing your deep knowledge of the issues here, that was a most helpful post.
Cheers,
Andrew
Edited 1 time(s). Last edit at 03/06/2015 04:12AM by AndrewBCN.
Re: How to modify a standard RAMPS 1.4 to work with Arduino Due? March 06, 2015 07:01AM |
Registered: 10 years ago Posts: 14,672 |
A couple of comments on the above replies:
1. DRV8825 stepper drivers don't take power from the logic supply rail. So they will be compatible with 3.3V inputs even if you power the RAMPS from 5V. OTOH if you use A4982 or A4982 drivers instead, then they would need to be powered from 3.3V instead of 5V.
2. If you leave the RAMPS powered from 5V, then you need to disconnect the thermistor series resistors from +5V and wire them to +3.3V instead, to avoid excessive voltage on the analog input pins and to get the correct readings.
3. The main issue is that 3.3V isn't enough to drive the mosfets to turn them on enough to ensure they run cool. You could get different mosfets for the extruder heater and fan output that will work with 3.3V, but not for the heated bed. So the best approach is probably to use a 74HCT series gate or buffer to level-shift the 3.3V outputs to 5V for the mosfets.
4. The Arduino Due outputs float high when the board is first powered up because the internal pullup resistors are enabled. You don't want this to turn all the mosfets on. There are a couple of solutions:
(a) use inverting buffers to drive the mosfets, and amend whatever firmware you use to generate active low mosfet outputs instead of active high.
(b) use non-inverting buffers to drive the mosfets and put a pulldown resistor to ground on each input. A resistor of 3.3K or lower should do.
Edited 1 time(s). Last edit at 03/06/2015 07:02AM by dc42.
Large delta printer [miscsolutions.wordpress.com], E3D tool changer, Robotdigg SCARA printer, Crane Quad and Ormerod
Disclosure: I design Duet electronics and work on RepRapFirmware, [duet3d.com].
Re: How to modify a standard RAMPS 1.4 to work with Arduino Due? March 06, 2015 08:45AM |
Registered: 9 years ago Posts: 977 |
Thank you indeed dc42, that is some excellent additional information.
About point 4. that you made above, how long do you think the Due would take during+after reset until it effectively initializes the GPIOs to the MOSFETs? If it is a matter of 100 ~ 500 milliseconds then I am thinking that having the MOSFETs turned on during that time would not be a problem, since neither the heatbed, nor the fans, nor the heat cartridge in the extruder, are particularly sensitive to such transients.
About driving the MOSFETs, I think you have nailed the real problem here: 3.3V is (at least in theory) not enough to drive the 8743 correctly when the load is like 10~11 A (heatbed). I really have to think some more about that, right now the only guaranteed solution that comes to my mind is to use - as you suggested - some kind of MOSFET driver.
Well, I still have some time to digest all that good information in all the above posts, the Due is not due (hehe) to arrive until the 10th or so...
Re: How to modify a standard RAMPS 1.4 to work with Arduino Due? March 06, 2015 09:09AM |
Registered: 10 years ago Posts: 14,672 |
Quote
AndrewBCN
About point 4. that you made above, how long do you think the Due would take during+after reset until it effectively initializes the GPIOs to the MOSFETs? If it is a matter of 100 ~ 500 milliseconds then I am thinking that having the MOSFETs turned on during that time would not be a problem, since neither the heatbed, nor the fans, nor the heat cartridge in the extruder, are particularly sensitive to such transients.
That depends on the firmware you use. I would expect most firmware to initialize the ports early on, so the time that the pins are pulled high should be very short. However, when you upload new firmware to the Due, if the system is powered from 12V at that time then the mosfets will I think all be turned on during the time that firmware is being uploaded. Ditto if the new firmware you upload doesn't start up properly for any reason. So you would need to be careful to power the system only from USB during firmware upload, and until you have established that the new firmware is communicating with the host properly.
Large delta printer [miscsolutions.wordpress.com], E3D tool changer, Robotdigg SCARA printer, Crane Quad and Ormerod
Disclosure: I design Duet electronics and work on RepRapFirmware, [duet3d.com].
Re: How to modify a standard RAMPS 1.4 to work with Arduino Due? March 06, 2015 02:12PM |
Registered: 9 years ago Posts: 977 |
Quote
dc42
That depends on the firmware you use. I would expect most firmware to initialize the ports early on, ...
I am willing to try three or four different firmwares in this project (it's a delta), respectively and in that order:
- Bobc's version of Marlin.
- Your own version of the Duet firmware for deltas.
- Repetier firmware.
- Apparently someone is working with Markus to get the required code in Teacup to drive deltas, and there is already a version of Teacup for ARM.
Right now I am using Marlin on a Cartesian printer and with an AVR Arduino and I can read and understand the source to a point. I haven't looked yet at the other alternatives.
My guess is on an 84MHz ARM processor there is no way any of these firmwares will take more than 200 milliseconds to initialize all the GPIOs after reset. If I have some time I'll try to catch the pulse on an oscilloscope and see what happens and take some measurements.
Re: How to modify a standard RAMPS 1.4 to work with Arduino Due? March 07, 2015 04:34AM |
Registered: 9 years ago Posts: 977 |
About the LCD:
I checked the schematics for the Full Graphics 12864 LCD Controller and the datasheet for the LCD module itself, and it seems there is no problem with using 3.3V for it. The only part that needs 5V is the LCD backlight and I can have a separate line for that. Even the SD card reader does not use 5V at all.
I wonder why people have stayed away from using these LCD displays with ARM-based controller boards?
In any case, that is one thing I intend to try when I get the Due and RAMPS working.
Re: How to modify a standard RAMPS 1.4 to work with Arduino Due? March 21, 2015 10:11AM |
Registered: 9 years ago Posts: 977 |
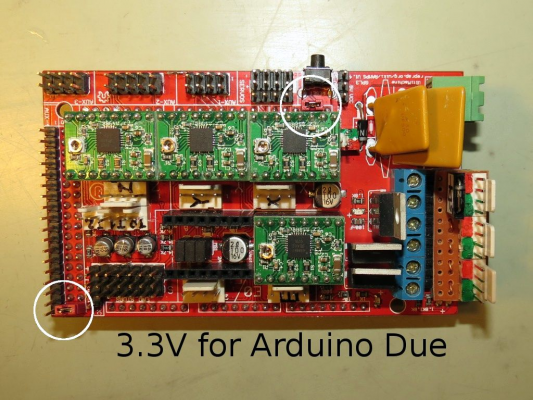
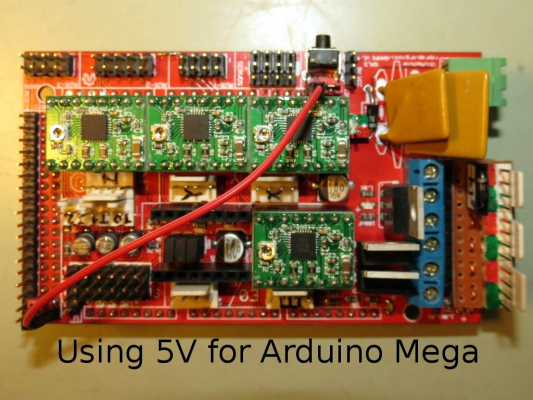
Hacked RAMPS 1.4:
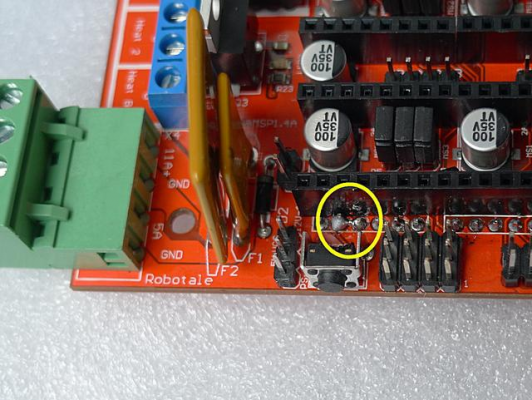
bridge +3.3V and VCC pins on component side of RAMPS.
Now connect A9 to the first thermistor (which used to be on A13) and connect A10 to the second thermistor (which used to be on A14).
The changes above concern only the first two thermistors and switching VCC to +3.3V from the Due.
I have tested these changes (including the thermistors) using Marlin4Due (see Experimental Firmware subforum) and everything is working.
Tested the hacked RAMPS on the Due and no smoke, no fire, Due apparently not damaged by anything.
Next step is getting a full graphics LCD controller working.
Edited 3 time(s). Last edit at 03/22/2015 01:45PM by AndrewBCN.
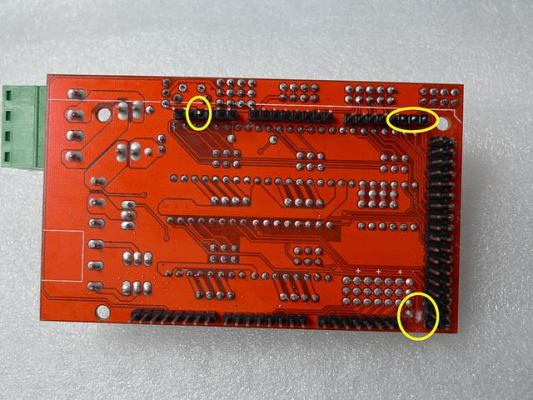
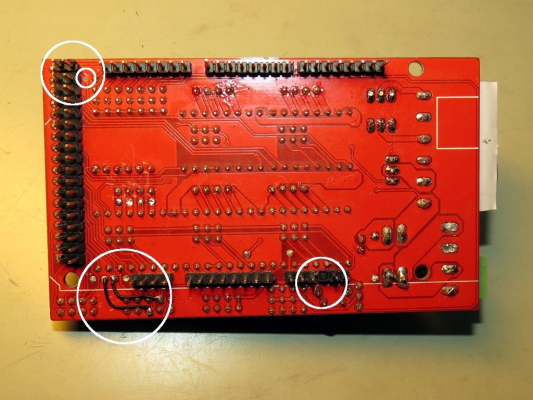
- top left, cut pin that connects +5V from Due to VCC on RAMPS
- top right cut pins A13, A14, A15, these are not ADC inputs on Due
- bottom right cut trace that connect two bottom +5V pins to VCC
bridge +3.3V and VCC pins on component side of RAMPS.
Now connect A9 to the first thermistor (which used to be on A13) and connect A10 to the second thermistor (which used to be on A14).
The changes above concern only the first two thermistors and switching VCC to +3.3V from the Due.
I have tested these changes (including the thermistors) using Marlin4Due (see Experimental Firmware subforum) and everything is working.
Tested the hacked RAMPS on the Due and no smoke, no fire, Due apparently not damaged by anything.

Next step is getting a full graphics LCD controller working.
Edited 3 time(s). Last edit at 03/22/2015 01:45PM by AndrewBCN.
Re: How to modify a standard RAMPS 1.4 to work with Arduino Due? March 22, 2015 09:48AM |
Registered: 9 years ago Posts: 9 |
Re: How to modify a standard RAMPS 1.4 to work with Arduino Due? March 22, 2015 01:49PM |
Registered: 9 years ago Posts: 977 |
Quote
NickE
@AndrewBCN,
Could you please describe the changes that are depicted in each of the pictures above? I find the pictures are not enough to adequately understand what is being done.
Thank you!
Sure! I have edited the post above and I intend to create a page for these hacks in the wiki, with larger photos and more detailed explanations. I haven't done so yet because of lack of time...

If you intend to undertake these hacks don't hesitate to post any questions here!
Re: How to modify a standard RAMPS 1.4 to work with Arduino Due? March 23, 2015 03:24AM |
Registered: 9 years ago Posts: 4,977 |
Here is a picture from Willy who developed the RADDS. Maybe this helps for assembling the sd-card. [www.dr-henschke.de]
Also this thread could help: [forums.reprap.org] and [forums.reprap.org]
Also this thread could help: [forums.reprap.org] and [forums.reprap.org]
| Triffid Hunter's Calibration Guide | --> X <-- Drill for new Monitor | Most important Gcode. |
Re: How to modify a standard RAMPS 1.4 to work with Arduino Due? March 23, 2015 05:17AM |
Registered: 9 years ago Posts: 977 |
Re: How to modify a standard RAMPS 1.4 to work with Arduino Due? March 29, 2015 07:07AM |
Registered: 11 years ago Posts: 469 |
Re: How to modify a standard RAMPS 1.4 to work with Arduino Due? March 29, 2015 07:30AM |
Registered: 9 years ago Posts: 977 |
Hi!
I have put this project temporarily at the bottom of my TODO list until I finish my prototype linear delta printer.
The problem I see here is not related to the RAMPS + Arduino Due combination, this works fine with the very simple mods I have shown above.
The problem is the firmware. There are three different versions of Marlin that can run on ARM that I could find:
- Bobc's original Marlin fork, based on an older version of Marlin. The problem with this fork is that the code is really old and practically abandoned.
- Wurstnase's fork, which seems to be based on Bobc's work, but very much up to date with the latest version of Marlin. This has only been tested on RADDS and I am finding it a pain to modify for my test setup. Some parts of the code are not in such a good shape, but this is in active development.
- Another Marlin fork by MagoKimbra, again up to date with the latest version of Marlin and developed more specifically for the Alligator controller board. Even more of a pain to modify compared to Wurstnase's fork, although some parts of the code are in better shape.
I have also checked Repetier firmware and the code seems to be well maintained, so I will base my next attempts to get things working on this. But again, not until I finish assembling my linear delta printer.
If you want to have a go at it, just order an Arduino Due clone and a made in China RAMPS, the expense is $25 at most.
Re: How to modify a standard RAMPS 1.4 to work with Arduino Due? April 16, 2015 02:07PM |
Registered: 9 years ago Posts: 590 |
Andrew, thanks very much for posting your modifications!!! What you propose makes really sense and is very easy to do.
I followed your instructions to modify a RAMPS board and configured/loaded Marlin4Due on my Arduino Due - and now it is already doing the first test print! So far everything seems to work nicely
I only had one problem, but it was not related to the modifications, but to Marlin4Due, which did not like my X-MAX endstop. It homed ok to the right, but then thought it was at 0, so only allowed going further right, i.e. bumping into the endstop. As it turns out, Marlin4Due seems not to like the "G28 X0" command issued by pronterface for "Home X". But after changing that to "G28 X", it now works fine.
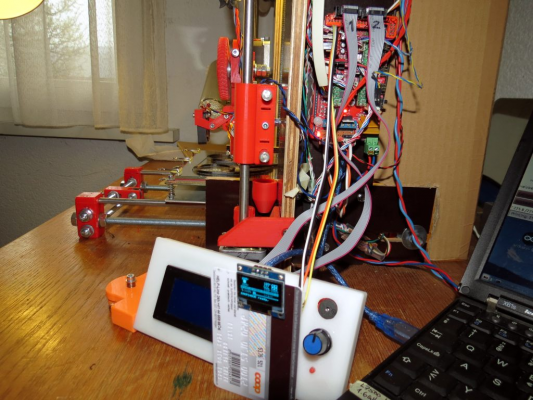
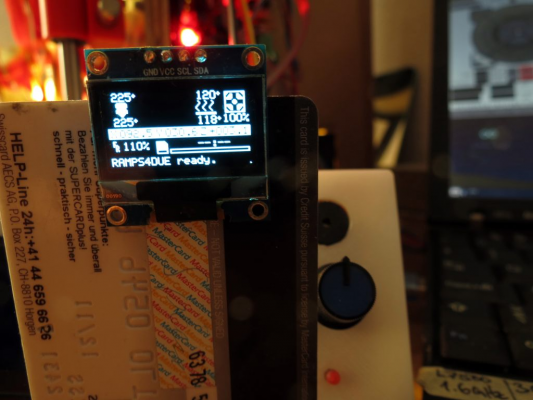
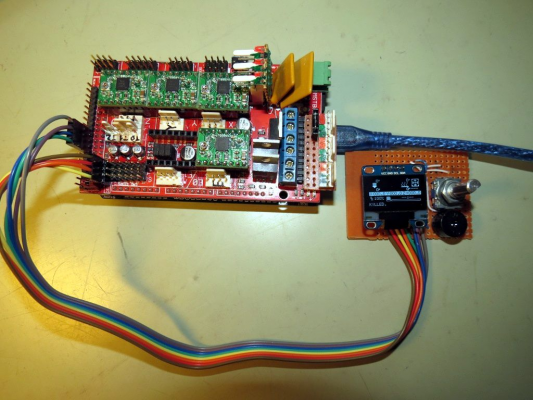
The RRD Smart LCD first worked (but rather faintly with only the 3.3V) when I tested it without everything attached to the RAMPS. But it remained dark once everything was connected to the printer. So for the moment I use a tiny SSD1306 Oled I2C LCD for displaying, and from the RRD Smart LCD I just use the rotary switch... As you see on the photos, it's still very experimental and quite a mess - but it works!
I followed your instructions to modify a RAMPS board and configured/loaded Marlin4Due on my Arduino Due - and now it is already doing the first test print! So far everything seems to work nicely

I only had one problem, but it was not related to the modifications, but to Marlin4Due, which did not like my X-MAX endstop. It homed ok to the right, but then thought it was at 0, so only allowed going further right, i.e. bumping into the endstop. As it turns out, Marlin4Due seems not to like the "G28 X0" command issued by pronterface for "Home X". But after changing that to "G28 X", it now works fine.
The RRD Smart LCD first worked (but rather faintly with only the 3.3V) when I tested it without everything attached to the RAMPS. But it remained dark once everything was connected to the printer. So for the moment I use a tiny SSD1306 Oled I2C LCD for displaying, and from the RRD Smart LCD I just use the rotary switch... As you see on the photos, it's still very experimental and quite a mess - but it works!
Re: How to modify a standard RAMPS 1.4 to work with Arduino Due? April 16, 2015 02:49PM |
Registered: 11 years ago Posts: 469 |
Impressive work there Enif
Very tempted to try this as i have a spare Ramps sitting here doing nothing . Guess i better jump on ebay and get a Due ordered
PS You might want to change the pics so we cant read your credit card info
Edited 1 time(s). Last edit at 04/16/2015 02:52PM by bigfilsing.
Very tempted to try this as i have a spare Ramps sitting here doing nothing . Guess i better jump on ebay and get a Due ordered

PS You might want to change the pics so we cant read your credit card info

Edited 1 time(s). Last edit at 04/16/2015 02:52PM by bigfilsing.
Re: How to modify a standard RAMPS 1.4 to work with Arduino Due? April 16, 2015 04:26PM |
Registered: 9 years ago Posts: 977 |
Well done! 
I am particularly interested in the way you connected that minute OLED display to the RAMPS, and whatever changes you made to the Marlin files to make it work. Could you please post some more details about that?
I think your demonstration validates my original idea of using a standard RAMPS and Due for small budget 32-bit firmware development, even for a Cartesian printer such as a Prusa i3. The difference in price between a clone Mega 2560 and a clone Due being something like $5, if somebody comes up with a factory-compatible RAMPS 1.5, usage of the Due + RAMPS combo is bound to catch up the traditional Mega 2560 + RAMPS 1.4 in a short time.
Oh, I also noticed you added a small board to the heatbed output, please could you also provide some details for that?
Re: How to modify a standard RAMPS 1.4 to work with Arduino Due? April 16, 2015 10:42PM |
Registered: 10 years ago Posts: 814 |
Re: How to modify a standard RAMPS 1.4 to work with Arduino Due? April 17, 2015 05:46AM |
Registered: 11 years ago Posts: 469 |
Re: How to modify a standard RAMPS 1.4 to work with Arduino Due? April 17, 2015 10:23AM |
Registered: 9 years ago Posts: 590 |
I completely agree with you, Andrew!Quote
AndrewBCN
I think your demonstration validates my original idea of using a standard RAMPS and Due for small budget 32-bit firmware development, even for a Cartesian printer such as a Prusa i3. The difference in price between a clone Mega 2560 and a clone Due being something like $5, if somebody comes up with a factory-compatible RAMPS 1.5, usage of the Due + RAMPS combo is bound to catch up the traditional Mega 2560 + RAMPS 1.4 in a short time.
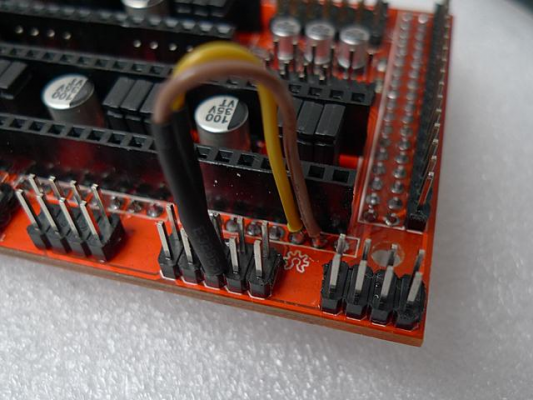
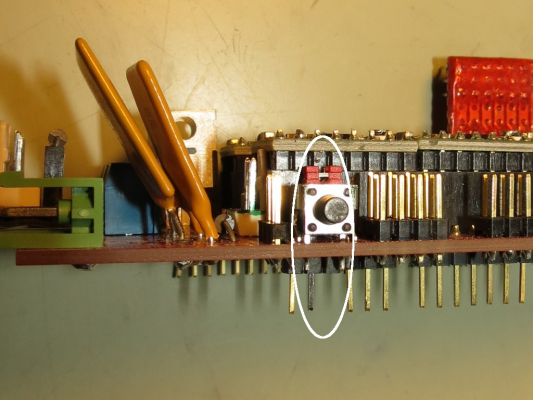
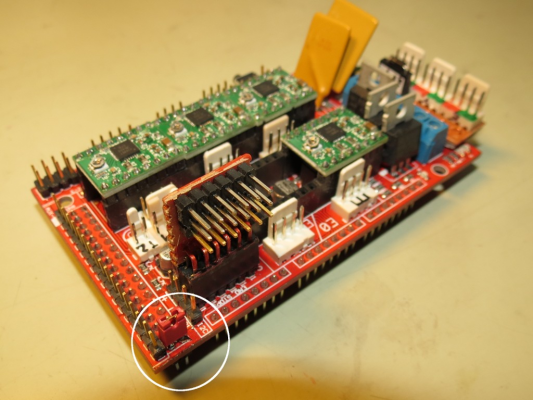
Here some more pictures showing how I did Andrew's modifications. I decided not to directly solder solder the 3.3V and 5V lines together, but to replace the 3.3V pin with a long one, push the 5V pin to the component side and install ajumper on the component side connecting the two. I also replaces the two cut-off 5V pins in the corner by two long pins which allow me to still access the 5V from the component side. This way, I can still use the RAMPS with a Arduino Mega, by simply removing the 3.3V-5V jumper and reconnecting 5V-5V with a short cable.
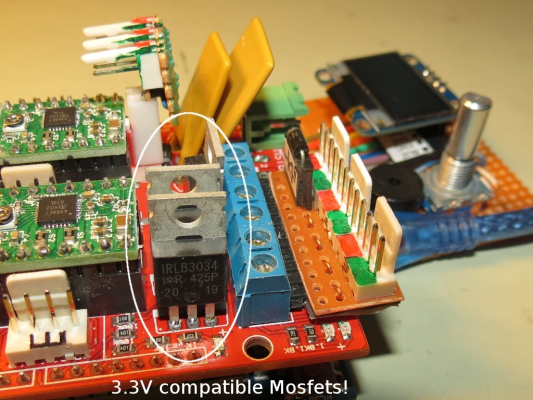
Edit 2015-04-18: I forgot to mention the important point that I also replaced the original mosfets with a type that is compatible with the reduced 3.3V gate voltage, so I added the last photo above. Thanks to dc42 for pointing this out!
As for the little add-on board(s) you see on some photos, this is just because I also use Sanguinololu on some printer, so that I added some converters allowing me to use the Sanguinololu cables (note that I don't connect my head beds direcy, but always go through a automotive relay or a seven switch).
As for the tiny Oled display, I have now assembled the display, a rotary encoder and a buzzer on a little prototype board, so that I can now use it as a little stand-alone Oled controller (but without SD card, which I don't really need).
The display is a SSD1306 128x64 0.96" Oled, which uses I2C, so together with the inputs from the rotary encoder and the buzzer output, it only needs 8 connections. I will post more details about this display and the few modifications it requires in Marlin in another thread, since this is not really specific to the Arduino Due mods.
Edited 1 time(s). Last edit at 04/18/2015 02:56AM by enif.
Re: How to modify a standard RAMPS 1.4 to work with Arduino Due? April 17, 2015 11:59AM |
Registered: 9 years ago Posts: 977 |
Re: How to modify a standard RAMPS 1.4 to work with Arduino Due? April 17, 2015 01:16PM |
Registered: 10 years ago Posts: 814 |
Re: How to modify a standard RAMPS 1.4 to work with Arduino Due? April 17, 2015 02:28PM |
Registered: 11 years ago Posts: 469 |
Fantastic info
Honestly speaking, however cool, i think we need to de-focus the LCD for a while and get the basic printing configuration working properly.
At the end of the day LCD's & screens & SD cards are just toys . We need quality prints first and foremost
Just my 2 cents
Edited 1 time(s). Last edit at 04/17/2015 02:29PM by bigfilsing.
Re: How to modify a standard RAMPS 1.4 to work with Arduino Due? April 17, 2015 03:41PM |
Registered: 9 years ago Posts: 590 |
Ok, leaving aside my printer specific configuration and the oled stuff, here are just the Arduino Due related changes I made to Wurstnase's Marlin4Due, in order to make it work with my Arduino Due + standard RAMPS 1.4 with Andrew's modifications:
1) Copied pins_RAMPS_13.h from the standard Marlin version to pins_RAMPS4DUE.h and made the following modifications to it:
2) Added the following line to boards.h
3) Modified pins.h as follows:
That's it!
1) Copied pins_RAMPS_13.h from the standard Marlin version to pins_RAMPS4DUE.h and made the following modifications to it:
$diff ../Marlin102/pins_RAMPS_13.h pins_RAMPS4DUE.h
14,17d13
< #if !defined(__AVR_ATmega1280__) && !defined(__AVR_ATmega2560__)
<   #error Oops!  Make sure you have 'Arduino Mega' selected from the 'Tools -> Boards' menu.
< #endif
<
97,98c93,94
< #define TEMP_0_PIN         13   // ANALOG NUMBERING
< #define TEMP_1_PIN         15   // ANALOG NUMBERING
---
> #define TEMP_0_PIN         9   // ANALOG NUMBERING / WAS 13 - MODIFIED RAMPS4DUE!
> #define TEMP_1_PIN         -1   // ANALOG NUMBERING / WAS 15 - MODIFIED RAMPS4DUE!
107c103
< #define TEMP_BED_PIN       14   // ANALOG NUMBERING
---
> #define TEMP_BED_PIN       10   // ANALOG NUMBERING / WAS 14 - MODIFIED RAMPS4DUE!
2) Added the following line to boards.h
#define BOARD_RAMPS4DUE 433 // RAMP4DUE with AndrewBCN's RAMPS modsand defined the board type in Configuration.h as follows
#define MOTHERBOARD BOARD_RAMPS4DUE
3) Modified pins.h as follows:
$diff pins.h.ori pins.h
26a27,28
> #elif MB(RAMPS4DUE)
>   #include "pins_RAMPS4DUE.h"
That's it!
Re: How to modify a standard RAMPS 1.4 to work with Arduino Due? April 17, 2015 05:38PM |
Registered: 10 years ago Posts: 814 |
Re: How to modify a standard RAMPS 1.4 to work with Arduino Due? April 17, 2015 06:59PM |
Registered: 10 years ago Posts: 14,672 |
I advise caution to anyone else trying this out. Driving the gates of the heated bed and hot end heaters with 3.3V from the Due in this way is well out of their specification. No professional electronics engineer would ever design a board like this, there would be too many failures in the field. You might be lucky and have it work OK. Or you might burn out the mosfets. It all depends on whether you are lucky enough to have mosfets with a lower than average gate threshold rather than higher, and a Due with a higher than average output voltage from the 3.3V regulator rather than a lower voltage.
Large delta printer [miscsolutions.wordpress.com], E3D tool changer, Robotdigg SCARA printer, Crane Quad and Ormerod
Disclosure: I design Duet electronics and work on RepRapFirmware, [duet3d.com].
Large delta printer [miscsolutions.wordpress.com], E3D tool changer, Robotdigg SCARA printer, Crane Quad and Ormerod
Disclosure: I design Duet electronics and work on RepRapFirmware, [duet3d.com].
Re: How to modify a standard RAMPS 1.4 to work with Arduino Due? April 17, 2015 07:32PM |
Registered: 9 years ago Posts: 977 |
Sorry, only registered users may post in this forum.
