New RAMPS design
Posted by MrAlvin
|
Re: New RAMPS design August 28, 2018 08:32AM |
Registered: 14 years ago Posts: 140 |
The quality from seeedstudio is good. Over the years I have ordered many PCB's from seeedstudio, and they have all beed good.Quote
kabelfrikkler
how was the quality of the seestudio PCBs? and mostly: what quantetys and price range are we talking?
It is still prototype quality, but have always been perfectly fine for my use.
I usually order 10 pcs, as this is the amount included in the very low prototype prices.
Always good to know of a place with reasonable prices for boards with one side larger than 10cm.Quote
kabelfrikkler
ALLPCB would be more interesting if we (you) say to order 10/20pcs and all go and try and test them out.
I have also got a batch made from JLCPCB, and they look good too.
Those boards look nice.
What type are those SMD mosfets?
I am always looking for good parts to have in my parts drawer, and those mosfets are a different size than those I have in stock.
|
Re: New RAMPS design August 28, 2018 03:14PM |
Registered: 8 years ago Posts: 28 |
I had a bord with these, (or i do sell a bord that use these in work) they are good but you do need the right angle to insert the cable and triger the releas mechanics, but they grip to everything if it fits in.
for high current i would recomend [www.reichelt.de]
(sorry i dont have a english suplier)
they ar availible for "in house instalations" dirt cheep and i use them for all my prototyping, no tools reqired and they dont care if i use 4mm² or 0.2mm² cable, thined or not. very fast an easy.
and now that you mentioned it, i thing i will be using these [www.reichelt.de] for my board as it has RM2.54 for my fans and leds thermistors..
|
Re: New RAMPS design August 28, 2018 03:19PM |
Registered: 8 years ago Posts: 28 |
@alvin
they are SOT-223 Nchannel mosfets, had them from a previous "fan/led extender board" i made for Ramps,
and just copied the design to the new PCB :-) "you can be lazy if your not a fool"
the PCB's here are: ZVN 2106 G 0.7A (fans and LEDs) a little overpower, [www.reichelt.de]
had tham befor cause Vgs(th) is low at 2.4V
Edited 1 time(s). Last edit at 08/28/2018 03:24PM by kabelfrikkler.
|
Re: New RAMPS design August 28, 2018 03:21PM |
Registered: 9 years ago Posts: 93 |
i hope i can get a few boards like they are now then
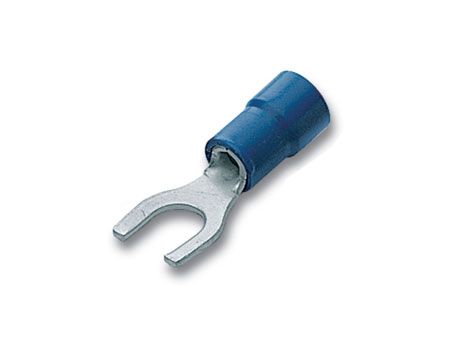
big screw terminals for the bed that accept a fork style crimp connector like these:
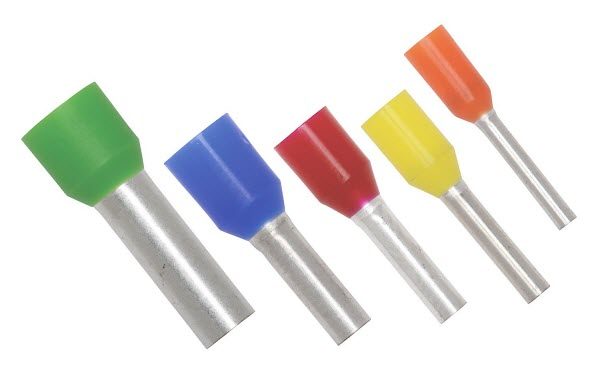
the remaining green connectors take an 1½mm² wire and i plan to use terminal tubes like these:
both require a crimp tool to work perfect, but i have found out over the years that it pays off in the end... you still get what you pay for
Edited 1 time(s). Last edit at 08/28/2018 03:22PM by boelle.
|
Re: New RAMPS design August 28, 2018 03:27PM |
Registered: 8 years ago Posts: 28 |
hm... serious, why not drill/mill a hole in the PCB and Screw down the y conector on the Thined PCB. that wold give at least 2-3mm² contact. and cost nothing, (okay 0.5ct screw)
i thing i Try this on the weekend. i did it in my car to get ground somwher on the metal works for years now....
Edited 2 time(s). Last edit at 08/28/2018 03:29PM by kabelfrikkler.
i thing i Try this on the weekend. i did it in my car to get ground somwher on the metal works for years now....
Edited 2 time(s). Last edit at 08/28/2018 03:29PM by kabelfrikkler.
|
Re: New RAMPS design August 28, 2018 03:33PM |
Registered: 9 years ago Posts: 93 |
well i just like crimped connections, its better than soldered conections. But the crimps has to be done right
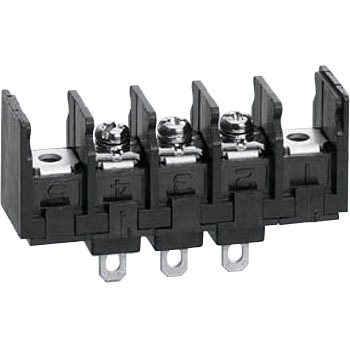
the bed has a terminal block almost like this one
but of course everyone is free to use parts like they want,
we cant agree on everything and we each have a taste for what we like
the bed has a terminal block almost like this one
but of course everyone is free to use parts like they want,
we cant agree on everything and we each have a taste for what we like
|
Re: New RAMPS design August 28, 2018 04:03PM |
Registered: 8 years ago Posts: 28 |
|
Re: New RAMPS design August 29, 2018 02:24AM |
Registered: 6 years ago Posts: 3 |
Also late to the party. I'm liking seeing all this new activity on making new OS printer boards.
I too also had been working on a RAMPS respin for personal use, though I got distracted from it for a good 12-18 months on life and other board projects and never got it to completely initial version, just a 90% schematic and half routed board.
One major departure it had right away was to replace the PTH Mega header with SMD ones (this style) which freed a lot of space on the top layer without the long rows of PTHs bisecting the board. I was also adding a 6th stepper, I want to upgrade my delta to a 3 channel mixing extruder, eventually. The bed heater mosfet was also omitted as I planned to use an external one.
Since my last attempt at working on a printer board, I have started working with rather small pitch SMD ICs and found it nowhere near as difficult as I had though. If I were to start on it again, I'd likely go for putting the TMC2130's (or another Trinamic driver) directly on the PCB instead of of using stepstick headers, possibly also the MCU or use something other than the Mega footprint (too bad LPC1768 based dev boards are so expensive).
For contacts, I usually prefer plug-in ones to make everything easier to service to swap out/disconnect for testing. For direct insertion, I'd likely go with ones like these. 32A, 2pos ones are less than $1 in 10 offs, and the 6pos is under $3.
I'd spec the connectors to well above the expected max they will be used at. Many of the board failures I've seen, or have had happen to me, were from the terminals. It's definitely one of the parts I would not source from China or ebay, just saying.
For 24V>5V regulation, I was going to use the R-78E5.0-1.0 with has the same foot print as a TO- 220. I was considering adding addition 5V hardware to my printers and the 1A the R-78E provides would have been ample, though I might have upped it to at least 2A so an internal RasPi 3 could be powered directly (a Zero W would have been fine).
+1 for the crimp wire ferrules. I bought a set of ferrules and a cheap crimp tool last year and have since started using them on any wire going in to a terminal block. Wish I had found these sooner.
Those are cool. Sadly looks like they are not stateside yet with the major suppliers.
Edited 1 time(s). Last edit at 08/29/2018 02:28AM by Kadah.
I too also had been working on a RAMPS respin for personal use, though I got distracted from it for a good 12-18 months on life and other board projects and never got it to completely initial version, just a 90% schematic and half routed board.
One major departure it had right away was to replace the PTH Mega header with SMD ones (this style) which freed a lot of space on the top layer without the long rows of PTHs bisecting the board. I was also adding a 6th stepper, I want to upgrade my delta to a 3 channel mixing extruder, eventually. The bed heater mosfet was also omitted as I planned to use an external one.
Since my last attempt at working on a printer board, I have started working with rather small pitch SMD ICs and found it nowhere near as difficult as I had though. If I were to start on it again, I'd likely go for putting the TMC2130's (or another Trinamic driver) directly on the PCB instead of of using stepstick headers, possibly also the MCU or use something other than the Mega footprint (too bad LPC1768 based dev boards are so expensive).
For contacts, I usually prefer plug-in ones to make everything easier to service to swap out/disconnect for testing. For direct insertion, I'd likely go with ones like these. 32A, 2pos ones are less than $1 in 10 offs, and the 6pos is under $3.
I'd spec the connectors to well above the expected max they will be used at. Many of the board failures I've seen, or have had happen to me, were from the terminals. It's definitely one of the parts I would not source from China or ebay, just saying.

For 24V>5V regulation, I was going to use the R-78E5.0-1.0 with has the same foot print as a TO- 220. I was considering adding addition 5V hardware to my printers and the 1A the R-78E provides would have been ample, though I might have upped it to at least 2A so an internal RasPi 3 could be powered directly (a Zero W would have been fine).
+1 for the crimp wire ferrules. I bought a set of ferrules and a cheap crimp tool last year and have since started using them on any wire going in to a terminal block. Wish I had found these sooner.
Quote
kabelfrikkler
I had a bord with these, (or i do sell a bord that use these in work) they are good but you do need the right angle to insert the cable and triger the releas mechanics, but they grip to everything if it fits in.
for high current i would recomend [www.reichelt.de]
(sorry i dont have a english suplier)
they ar availible for "in house instalations" dirt cheep and i use them for all my prototyping, no tools reqired and they dont care if i use 4mm² or 0.2mm² cable, thined or not. very fast an easy.
and now that you mentioned it, i thing i will be using these [www.reichelt.de] for my board as it has RM2.54 for my fans and leds thermistors..
Those are cool. Sadly looks like they are not stateside yet with the major suppliers.
Edited 1 time(s). Last edit at 08/29/2018 02:28AM by Kadah.
|
Re: New RAMPS design August 30, 2018 03:50PM |
Registered: 8 years ago Posts: 28 |
|
Re: New RAMPS design August 31, 2018 03:08AM |
Registered: 6 years ago Posts: 3 |
Quote
kabelfrikkler
@ kadah
in a not PCB enviroment like construction sides in Germany they are the standart and srews are forbidden for mains power and the "push connectors" widly used are about to get forbidden, on commercial use.
I see, this would explain why Wago is so prevalent there. I wish they were common here instead of premium specialty product.
|
Re: New RAMPS design September 02, 2018 07:26AM |
Registered: 14 years ago Posts: 140 |
Just a short update to this project.
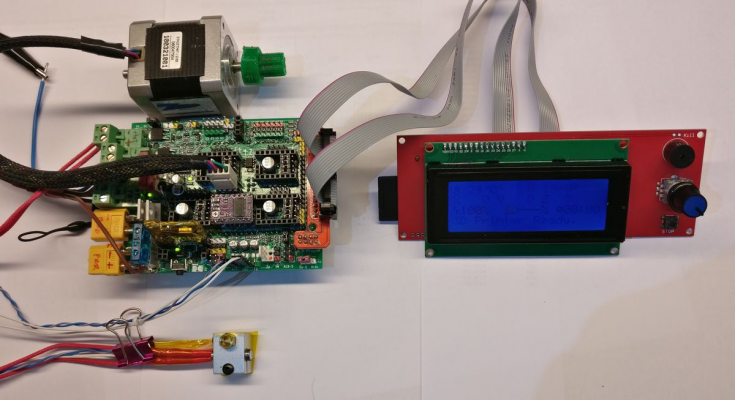
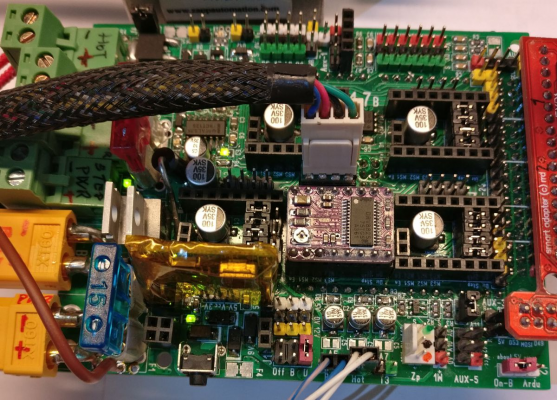
Here is my current test setup.
I have made some test sketches, that addresses each section, like end-stops, temperature, mosfets, steppers (normal mode), sd-card
These sketches are available here: [github.com]
I am also testing, and finding the correct settings in Marlin 2.0 (bugfix) version, as this is the Marlin version that will run on both Arduino Mega and Due.
A fork of Marlin (including everything RAMPS 1.7 specific) can be found here: [github.com]
I think I am currently about 80% through the testing, and finding the right settings, with Marlin 2.0
I keep status, settings and test notes at the very top of the configuration.h file. So I can myself, remember what needs to be done, to get Marlin to work with this RAMPS 1.7 shield.
And a few close-up pictures
As I knew that I would be testing, probing, measuring and connecting ramdom wires to this test-shield, I decided to add some colors to the pins, to hopefully limit me connecting to the wrong pins, and limiting mistakes like shorting out power rails, or sending 5V or 12V directly into the Due ports.
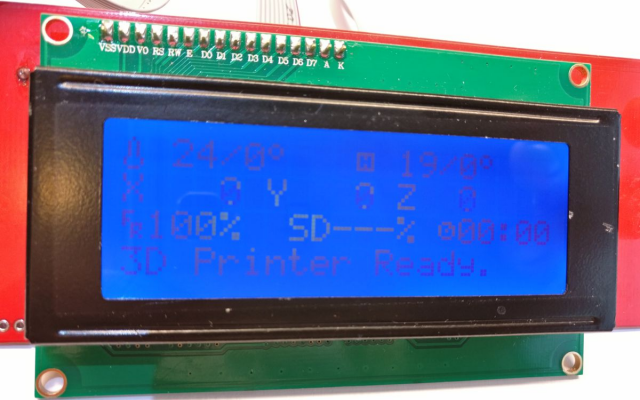
By simply shorting the 5V regulator on a ReprapDiscount Smart Controller LCD and SD-card board, I have got the LCD and SD-card to work when connected directly to the Due.
Contrast is however not optimal. So I will design a LCD interface card, that will send 5V and 5V signal to the Display, and convert any signals going back to the DUE, down to 3V signals.
Edited 1 time(s). Last edit at 09/02/2018 07:37AM by MrAlvin.
|
Re: New RAMPS design September 02, 2018 07:35AM |
Registered: 14 years ago Posts: 140 |
In the hopes to have a universal interface board between the 3V Due pins, and any Display, I did design a Universal Bi-directional 3V<->5V level converter board, that would connect to Aux-3 and Aux-4.
[Edit]
Unfortunately it does not work with the SD-card signals. It works with every other aspect of the ReprapDiscount Smart Controller LCD board, but so far I have not had any luck reading the sd-card
Perhaps if I use other mosfets, the data signal will act differently, but I think it may (unfortunately) be necessary to design a more specific interface board for each LCD, using more conventional chips, like the 74-125 and 4050 buffer chips..
[/Edit]
Either way, I will keep testing, until I have found some low-cost solutions.
[Edit]
And as it turned out, the DUE HAL SPI pins file needed some additions, and now SD-card is working.
[/Edit]
Edited 1 time(s). Last edit at 09/03/2018 04:34AM by MrAlvin.
[Edit]
Perhaps if I use other mosfets, the data signal will act differently, but I think it may (unfortunately) be necessary to design a more specific interface board for each LCD, using more conventional chips, like the 74-125 and 4050 buffer chips.
[/Edit]
Either way, I will keep testing, until I have found some low-cost solutions.
[Edit]
And as it turned out, the DUE HAL SPI pins file needed some additions, and now SD-card is working.
[/Edit]
Edited 1 time(s). Last edit at 09/03/2018 04:34AM by MrAlvin.
|
Re: New RAMPS design September 03, 2018 12:54AM |
Registered: 8 years ago Posts: 5,232 |
|
Re: New RAMPS design September 03, 2018 05:29AM |
Registered: 14 years ago Posts: 140 |
Quote
o_lampe
AFAIK, the LCD has a 5V_to_3.3V regulator onboard. With this bypassed regulator ( shorted ) it should work without any levelshifting.
And indeed it does.
On this LCD board (the 4x20 text based ReprapDiscount Smart Controller) the contrast is however hardly readable when powered by 3V and with the linear 5V->3V regulator shorted.
So I have done some testing to find the best/easiest/optimal solution.
On this RAMPS 1.7 board, the normal power pin on the Aux-3 port follows the voltage of the processor, so it becomes 3V when used with the Due. The Aux-3 port (even on the RAMPS 1.4 shield) does however have an un-used pin. So this pin is available to be, for instance, connected to an always-5V source. So on RAMPS 1.7 this is what I have chosen to do.
So far I have come up with four options:
1) Use the level-shifter adapter, as it provides 5V to the power pin on the LCD board. This is a plug-and-play solution.
2) reroute (hack) one pcb wire on the standard LCD adapter board that connects to the Aux3+4 port. As all signals going back to the DUE, from the LCD board is actually always only 3V anyway. As luck would have it, this was the cheapest way to design the LCD board in the first place, and the Mega, despite it being 5V is 3V tolerant on its input pins.
This is a very simple hack, and I would consider it an easy and low-cost solution.
3) Use the standard LCD aux3+4 adapter as is, and short the on-board regulator on the LCD board, so everything operates on 3V. And one accepts the lower contrast. Perhaps it is possible to find a way to increase the contrast. I have not yet tested further to find a fix.
4) Design a new LCD aux3+4 adapter that sends 5V to the LCD board. And also adresses an issue about the beeper, as the beeper is activated during booting and programming.
This would then be a plug-and-play solution.
About the beeper issue.
The issue is caused by the pins on the Due being pulled high at power-up. As far as I remember, the pull-up is about 100K.
A similar issue had to be addressed for all of the mosfet pins. And the same solution can be used: attach a more powerful pull-down resistor (4K7 works) to the Due pin, so the Due pin will appear to be LOW during power-up, boot or programming.
This 4K7 pull-down resistor can be placed on the Due, the RAMPS 1.7 board or the LCD adapter or even on the LCD board itself.
This pull-down method will however not work if used on the 3V side of the bi-directional level-shift adapter.
I have however hacked my LCD board, and have placed the 4K7 pull-down resistor on that board. As this gives me more freedom to use/test aux-3+4 adapters.
Edited 1 time(s). Last edit at 09/03/2018 05:40AM by MrAlvin.
|
Re: New RAMPS design September 11, 2018 10:11AM |
Registered: 14 years ago Posts: 140 |
For now, it works for me to use a hacked (modified) LCD adapter board.
This way I do not need to change anything on the main LCD board, but the LCD contrast is still as optimal as it can be. And all data pins going back to the Arduino is always still only 3V signals anyway.
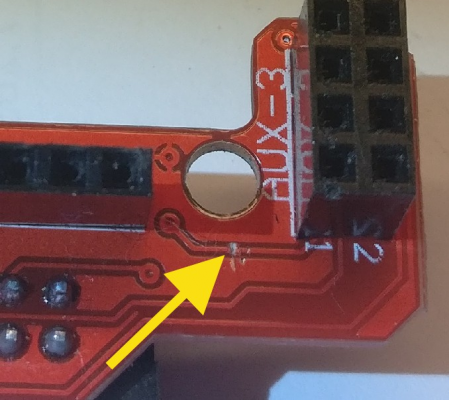
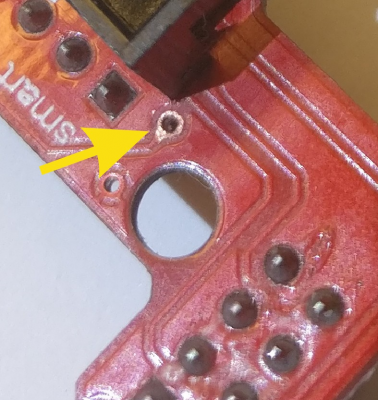
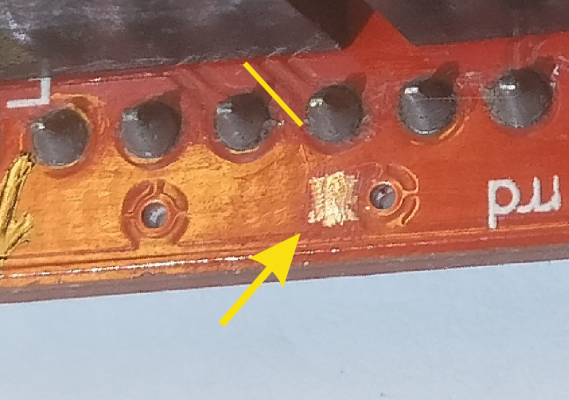
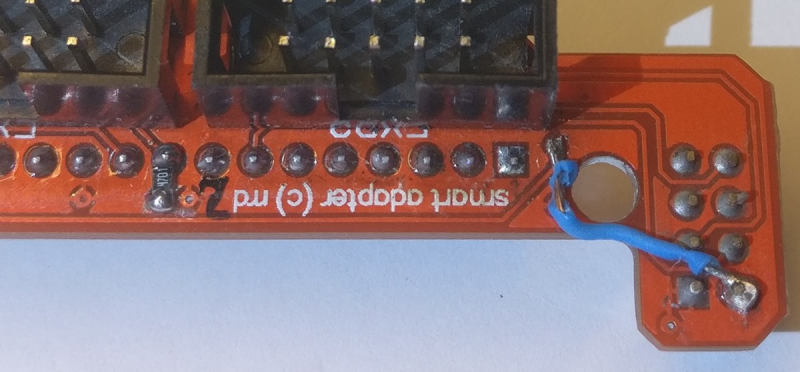
I have cut the pcb wire (on the bottom side) between the Vcc/+ pin of Aux-3 and the Vcc/+ pin in the EXP-1 socket.
Then I (carefully) scraped the solder mask off on the top side, at the via point
And likewise scraped a ground spot, to solder in a 4K7 resistor (size 0805) for the pull-down of pin D37, so the buzzer will not sound while the DUE boots or while the DUE is being programmed.
And finally, soldered in the resistor, and soldered a wire between the always-5V pin (on the RAMPS 1.7 shield. On RAMPS 1.4 this is a nc (no connection) pin) and the uncovered via point, so there will always be 5V going to the LCD, no matter if the RAMPS 1.7 shield is used with a Mega or a DUE.
|
Re: New RAMPS design September 11, 2018 11:15AM |
Registered: 14 years ago Posts: 140 |
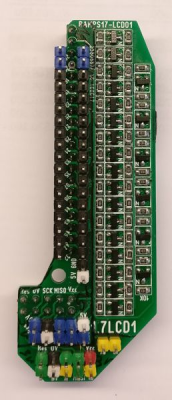
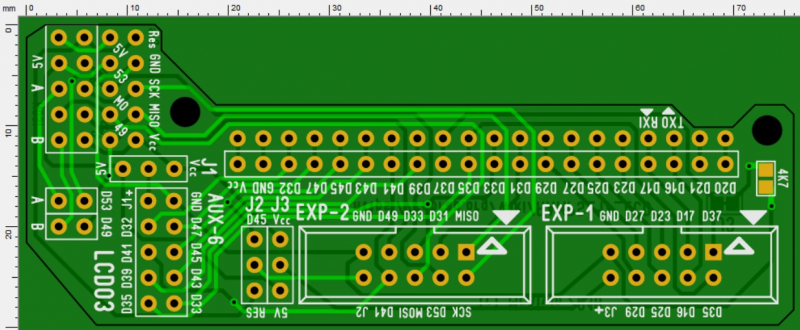
As nice as hacks are, I also like to have the option of plug-and-play solutions, so I have also designed a new LCD adapter board.
This LCD adapter also helps to make more pins and LCD options available for the RAMPS 1.7 shield.
Because of the need for extra pins to go to each stepper driver, when using the TMC2130 drivers, the RAMPS 1.7 shield, has more pins pre-determined for use, than the RAMPS 1.4 shield does.
And as such, the AUX-2 port no longer exists for the RAMPS 1.7 shield, and some LCD boards makes use of the AUX-2 port. So this LCD adapter makes a "simulated" Aux-2 port available for those LCDs. I call it Aux-6. And the pins_RAMPS_17.h file already moves those Aux-2 pins to the new Aux-6 pins, so (in theory at least), it should be easy to attach those LCDs that made use of the Aux-2 port.
As I (currently) do however not own other LCD boards, besides the RepRapDiscount designs, I have not (yet) been able to do tests.
As this is iteration 3 of my attempts to make a suitable adapter board for use with the Aux-3 and Aux-4 ports, I have named this LCD adapter board LCD03.
Besides the EXP-1, EXP-2 and AUX-6 ports, I have added:
- a top-side connector for AUX-3, because I sometimes find myself wanting to add some SPI controlled things to the mix, but can not easily do so when the LCD adapter is typically blocking AUX-3.
- a top-side AUX-4 connector. As it might be nice to easily be able to have access to those pins on AUX-4, that are not being used by my LCD system.
- "A" and "B" jumpers for easy connection of the D49 and D53 pins to the top side AUX-3 port. Should I decide to use another SD-card reader, besides the one on my LCD board.
These pins can also be used to easily wire/route other pins to function as the CS (chip select) pins for the top-side AUX-3 port, should I decide to want two SD-card readers to function side by side. Or if the top-side AUX-3 port were to be used for a MAX6675 thermal couple option, and the D49 and D53 pins are already in use on my LCD board.
- a J1 jumper, so it is easy to choose to have 5V or Vcc volt on the + pin of the AUX-6 port.
- a J3 jumper, so it is easy to choose to have 5V or Vcc volt on the + pin of the EXP-2 socket. For use of a ReprapDiscount LCD controller, I think it should always be 5V, but perhaps someone, some day will need it to be different, and now it is easy to do so.
- a J2 jumper, so it is possible to connect the KILL button directly to the reset pin of the Arduino.
On the RAMPS 1.7 shield, AUX-3 port has been extended from a 2x4 pin, to a 2x5 pin connector. The extra two pins are: Reset and nc (not connected to anything, yet).
On the ReprapDiscount LCD boards that I have, there are both a STOP button, and a placeholder for a KILL button.
The STOP button is connected to the KILL pin, as it is named in the Marlin firmware. So the original (software controlled) KILL option, as it was thought up by Adrian Bowyer back in the day, at the beginning of the Reprap era, is alive and well.
But for some reason, I have always wanted a Reset button-option on the outside of my printer. And with the Reprap Discount LCD boards this is easy to implement. And now, with the RAMPS 1.7 shield, it becomes even easier to actually connect that Reset button, to the reset pin of the Arduino.
If, for some reason or other, someone thinks up another reason to have an extra button on the outside of the printer, and thus wants that button to be software monitored, the J2 jumper also makes it easy for this connection to be made.
A note: Some pins are being used for both the AUX-6 port AND the EXP1+2 sockets, so this LCD adapter board should be thought of as an either-or option for connecting LCDs. Lik, one can choose a LCD that used EXP1+2 OR one can choose a LCD that uses the AUX-3 and (former AUX-2, now AUX-6 port(s). I hope this makes sense.
This LCD adapter also helps to make more pins and LCD options available for the RAMPS 1.7 shield.
Because of the need for extra pins to go to each stepper driver, when using the TMC2130 drivers, the RAMPS 1.7 shield, has more pins pre-determined for use, than the RAMPS 1.4 shield does.
And as such, the AUX-2 port no longer exists for the RAMPS 1.7 shield, and some LCD boards makes use of the AUX-2 port. So this LCD adapter makes a "simulated" Aux-2 port available for those LCDs. I call it Aux-6. And the pins_RAMPS_17.h file already moves those Aux-2 pins to the new Aux-6 pins, so (in theory at least), it should be easy to attach those LCDs that made use of the Aux-2 port.
As I (currently) do however not own other LCD boards, besides the RepRapDiscount designs, I have not (yet) been able to do tests.
As this is iteration 3 of my attempts to make a suitable adapter board for use with the Aux-3 and Aux-4 ports, I have named this LCD adapter board LCD03.
Besides the EXP-1, EXP-2 and AUX-6 ports, I have added:
- a top-side connector for AUX-3, because I sometimes find myself wanting to add some SPI controlled things to the mix, but can not easily do so when the LCD adapter is typically blocking AUX-3.
- a top-side AUX-4 connector. As it might be nice to easily be able to have access to those pins on AUX-4, that are not being used by my LCD system.
- "A" and "B" jumpers for easy connection of the D49 and D53 pins to the top side AUX-3 port. Should I decide to use another SD-card reader, besides the one on my LCD board.
These pins can also be used to easily wire/route other pins to function as the CS (chip select) pins for the top-side AUX-3 port, should I decide to want two SD-card readers to function side by side. Or if the top-side AUX-3 port were to be used for a MAX6675 thermal couple option, and the D49 and D53 pins are already in use on my LCD board.
- a J1 jumper, so it is easy to choose to have 5V or Vcc volt on the + pin of the AUX-6 port.
- a J3 jumper, so it is easy to choose to have 5V or Vcc volt on the + pin of the EXP-2 socket. For use of a ReprapDiscount LCD controller, I think it should always be 5V, but perhaps someone, some day will need it to be different, and now it is easy to do so.
- a J2 jumper, so it is possible to connect the KILL button directly to the reset pin of the Arduino.
On the RAMPS 1.7 shield, AUX-3 port has been extended from a 2x4 pin, to a 2x5 pin connector. The extra two pins are: Reset and nc (not connected to anything, yet).
On the ReprapDiscount LCD boards that I have, there are both a STOP button, and a placeholder for a KILL button.
The STOP button is connected to the KILL pin, as it is named in the Marlin firmware. So the original (software controlled) KILL option, as it was thought up by Adrian Bowyer back in the day, at the beginning of the Reprap era, is alive and well.
But for some reason, I have always wanted a Reset button-option on the outside of my printer. And with the Reprap Discount LCD boards this is easy to implement. And now, with the RAMPS 1.7 shield, it becomes even easier to actually connect that Reset button, to the reset pin of the Arduino.
If, for some reason or other, someone thinks up another reason to have an extra button on the outside of the printer, and thus wants that button to be software monitored, the J2 jumper also makes it easy for this connection to be made.
A note: Some pins are being used for both the AUX-6 port AND the EXP1+2 sockets, so this LCD adapter board should be thought of as an either-or option for connecting LCDs. Lik, one can choose a LCD that used EXP1+2 OR one can choose a LCD that uses the AUX-3 and (former AUX-2, now
 AUX-6 port(s). I hope this makes sense.
|
Re: New RAMPS design September 11, 2018 11:34AM |
Registered: 14 years ago Posts: 140 |
On another note: I have basically finished all of my preliminary tests of this, the RAMPS 1.7 shield, and probably more importantly; made the adjustments and additions to Marlin 2.0, that makes Marlin function with this shield, both when it is being controlled by the Arduino Mega, but also when it is being controlled by the Arduino DUE.
I am especially happy to see that the TMC2130 drivers seem to work smoothly with this shield.
Next step will be to connect everything to an actual printer, and see what kind of prints can be made
I hope for this to happen this week :
I keep basic notes of my findings and developments at the top of the configuration.h file with this fork of Marlin 2.0
[github.com]
I am especially happy to see that the TMC2130 drivers seem to work smoothly with this shield.
Next step will be to connect everything to an actual printer, and see what kind of prints can be made

I hope for this to happen this week :

I keep basic notes of my findings and developments at the top of the configuration.h file with this fork of Marlin 2.0
[github.com]
|
Re: New RAMPS design October 23, 2018 03:06AM |
Registered: 10 years ago Posts: 2 |
|
Re: New RAMPS design October 23, 2018 04:27PM |
Registered: 14 years ago Posts: 140 |
|
Re: New RAMPS design October 25, 2018 04:36PM |
Registered: 10 years ago Posts: 2 |
|
Re: New RAMPS design October 31, 2018 05:53AM |
Registered: 10 years ago Posts: 14,672 |
I hope you make a speedy recovery from your bike accident.
As your board is 3.3V-compatible, have you considered using it with the SAME70-XPLD board? It has a 300MHz ARM Cortex M7 processor, on-board Ethernet, and SD card with high speed interface. RepRapFirmware has been running on it for over a year (including the network interface, of course) because we used it to prototype parts of Duet 3. It's just $38.82 from Digikey, see [www.digikey.com]. It has Arduino-layout expansion pads, although you need to add the socket strips yourself.
Edited 1 time(s). Last edit at 10/31/2018 05:53AM by dc42.
Large delta printer [miscsolutions.wordpress.com], E3D tool changer, Robotdigg SCARA printer, Crane Quad and Ormerod
Disclosure: I design Duet electronics and work on RepRapFirmware, [duet3d.com].
|
Re: New RAMPS design November 03, 2018 08:19PM |
Registered: 5 years ago Posts: 1 |
maybe for esp and raspberry pi add this idea:
[github.com]
maybe to add two shift registers
also, I have an idea for this not sure if it is possible. to lose the 1st bit, output the 1st bit, already each time after write, add the rest later on write, to not have a delay of one step but it is insignificant.
Edited 1 time(s). Last edit at 11/03/2018 08:19PM by shimondoodkin.
|
Re: New RAMPS design January 07, 2019 10:55PM |
Registered: 5 years ago Posts: 1 |
A ) How is your recovery? I hope all is going well.
B ) how is the board coming along ? any progress?
If i am following correctly, it seems like the 1.7 would be compatible with the up coming "Grand Central" release from Ada Fruit?
Grand Central
It seems like a very powerful board, but it 3.3V. In some of their tweets about it, they mention #Ramps, but your work here is the only Ramps i know of that will work with 3.3V.
I am very excited that with the release of this powerful new board in the mega format, the Ramps form factor may make a resurgence. It is also exciting that you are leading the wave with this awesome work!!!
Edited 1 time(s). Last edit at 01/07/2019 11:00PM by HomeGamer_Engineer.
|
Re: New RAMPS design January 20, 2019 06:18AM |
Registered: 14 years ago Posts: 140 |
Hi All,
I am finally getting to a point where I again have enough control and movement in my right shoulder.... to be able to sustain the 'rigor' of supporting and controlling a soldering iron!
I am thrilled at the prospect of this improvement
So this past week, I have finally been able to do some sessions of further assembly and testing, so I very much hope to have a printer up and running some time this spring.
I am finally getting to a point where I again have enough control and movement in my right shoulder.... to be able to sustain the 'rigor' of supporting and controlling a soldering iron!

I am thrilled at the prospect of this improvement

So this past week, I have finally been able to do some sessions of further assembly and testing, so I very much hope to have a printer up and running some time this spring.
|
Re: New RAMPS design January 20, 2019 06:23AM |
Registered: 14 years ago Posts: 140 |
Quote
dc42
......have you considered using it with the SAME70-XPLD board? It has a 300MHz ARM Cortex M7 processor, on-board Ethernet, and SD card with high speed interface. RepRapFirmware has been running on it for over a year (including the network interface, of course) because we used it to prototype parts of Duet 3. It's just $38.82 from Digikey, see [www.digikey.com]. It has Arduino-layout expansion pads, although you need to add the socket strips yourself.
Hi dc42,
I was not aware of the existence of this board, so Thank You for pointing out this option.
At first glance I notice that some Arduino pin positions are not connected to the MCU. Pins like D34 and D42. In order to possibly test out this RAMPS 1.7 board with the SAME70-XPLD, I have added some solder jumpers to the RAMPS 1.7 board, so other pins from Aux-4 can easily be connected and used for the functions that D34 and D42 otherwise has on the RAMPS 1.7 board.
On a similar note, I have (this past week) also added some solder jumpers, so one might also choose to try using the RAMPS 1.7 shield in combination with the Re-ARM board.
So for both of these other controller options, it remains to be seen, if they can also be used with this RAMPS 1.7 shield.
For now, I have added the solder jumper options.
|
Re: New RAMPS design January 20, 2019 06:43AM |
Registered: 14 years ago Posts: 140 |
Quote
shimondoodkin
maybe for esp and raspberry pi add this idea:
[github.com]
maybe to add two shift registers
Hi shimondoodkin,
thank you for pointing out this ESP8266 option.
It is indeed an interesting prospect, that simply adding a few shift registers, might make it feasible to use the very low cost ESP-series of controllers to control a 3D printer.
As I am however fast running out of space on the max size of the 10x10 cm shield, my conclusions have so far been; that it will be necessary to create a carrier board when testing with new controllers that have a limited number of pins. This approach will also allow one to test out various ways of adding different kinds of pin-extender chips to these new (and low cost) controllers, so it can be determined which solution will work the best/easiest.
|
Re: New RAMPS design January 20, 2019 08:39AM |
Registered: 14 years ago Posts: 140 |
Quote
HomeGamer_Engineer
If i am following correctly, it seems like the 1.7 would be compatible with the up coming "Grand Central" release from Ada Fruit?
Grand Central
It seems like a very powerful board, but it 3.3V. In some of their tweets about it, they mention #Ramps, but your work here is the only Ramps i know of that will work with 3.3V.
I am very excited that with the release of this powerful new board in the mega format, the Ramps form factor may make a resurgence. It is also exciting that you are leading the wave with this awesome work!!!
Hi HomeGamer_Engineer,
that Grand Central board does indeed seem like a very interesting Arduino-style controller. And from what I can see on the Adafruit website, it does indeed seem like the Grand Central board and the RAMPS 1.7 board will be very compatible.
As with all new MCU's it will however be necessary for someone to also test/adjust/expand the 3D firmwares HAL layer, to work with the new MCU. But so far it does indeed seem like the pinout and the electric interfaces will work right out of the box.
As for any development on the 1.7 board, I have been implementing a few changes that has irritated me while I have been testing the current prototype shields.
Some of the changes have been:
- the board has been expanded from 10x8 to 10x10 cm. And this has allowed for many minor adjustments.
- better room for the D2 diode. Before, the D2 diode basically needed to 'float' above one of the 100uF electrolyte capacitors.
- addition of R3 (Arduino revision 3) compatible I2C pins at the D0-D13 positions. It turns out that on the Due, those two pins are an additional I2C-2 port, or simply two additional digital pins (D70 and D71), and who can not use two additional pins to control something on their 3D printer :-)
- LEDs have been added to the fan ports.
- two additional fan ports have been added, so a total of 4 fans can now be directly controlled by the shield, without 'sacrificing' the power-on digital pin for fan control.
- an additional 74HC125 chip has been added, so all mosfets (all 8 of them) now have 5V gate signals.
- there is now room for a third blade fuse option, for the stepper-power-port
- an option for a third DC-DC converter has been added. This may especially prove useful for the combination Mega + 24V heat bed and hot-end + 12V silent fans. Or as holder for an additional 5V supply, to power a RPi, or...
- the 1-wire port has been removed. It turns out that implementing a reliable 1-wire port in software, when also dealing with a myriade of other time sensitive issues (like many steppers), may not really be a very good idea. So I have chosen to move the 1-wire option to become a part of the 'advanced' LCD expansion adapter/board.
- added options so it will hopefully be very simple and easy to power and use PT100 temperature probes
- all end-stop pins have possibly been hardened, so they are now 24V tolerant.
You know how the AVR chips are 5V tolerant, even when they are operated at 3V? I have discovered that it might be possible to make any/most 3V MCU pins 24V tolerant in a very simple (and crude) way, by simply adding a resistor in series with the signal path! A resistor in series will however limit how many mA (or uA) it is possible to sink/source, so this method will only have a limited use, for voltage detection inputs. But for end-stops, is this not exactly what is being done?
It appears that so long as one limits the max current flow, to be no more than the MCU pin can sink (lets say max 1.5mA), then the magic of the (esd? or other internal) protection circuits on MCU pins, will make it so... that the MCU will only see the signal as max 3V!?
For example, if we say 24V / 1.5mA = 16000 ohm. Then a 20K resistor in series with the digital signal, will seem to make Due input pins 24V tolerant!?
So far I have however only had the courage to test this on an Arduino Nano Pro, but on the Nano it works. My voltmeter will measure 5V at the pin, when the Nano is operated at 5V!
When my next Due arrives, I will try to summon the courage to also test this principle on the Due. hmmm.... perhaps I could first test it on a less expensive 3V board. So far I have fried 3 Due boards, during my fiddling and testing. It seems to me that the Due chip is much less resilient than the Mega chip. Adding 12V to a normal Mega input pin WILL fry the pin, but in my experience it will usually not fry the entire chip. Not so for the Due! You try to (accidentally) drop a test wire with 12V on a Due pin, and the entire chip lets out the magic smoke. Bummer :-(
So I very much hope this simple design solution will actually make any MCU input pin 24V tolerant.
- additional pcb wires and solder jumpers have been added, so it might be easy to use the RAMPS 1.7 board on a Re-ARM board
- additional solder jumpers have been added, to possibly be able to use the RAMPS 1.7 board on a SAME70-XPLD board
If all goes as hoped for, then I am very likely to order a new batch of prototype boards within a week or so.
Edited 2 time(s). Last edit at 01/20/2019 01:57PM by MrAlvin.
|
Re: New RAMPS design January 23, 2019 06:31PM |
Registered: 5 years ago Posts: 1 |
|
Re: New RAMPS design January 24, 2019 09:14AM |
Registered: 14 years ago Posts: 140 |
Quote
HammerDown
Ill pay to play for 1
Hi HammerDown,
that can be arranged.
But unless you are extremely eager and impatient, I think you will want to wait until revision C is ready.
The revision B is strictly Mega and Due (and possibly GrandCentral) ready, though I still have one or two of those boards that you can have for only production-cost and shipping expenses.
So I will let everyone know, when I have that first C-batch ready for prototype play and testing. Okay?
|
Re: New RAMPS design January 24, 2019 02:35PM |
Registered: 6 years ago Posts: 1,863 |
Sorry, only registered users may post in this forum.
