This is a new one... Pock marks
Posted by tmorris9
|
This is a new one... Pock marks August 01, 2014 05:22PM |
Registered: 11 years ago Posts: 1,171 |
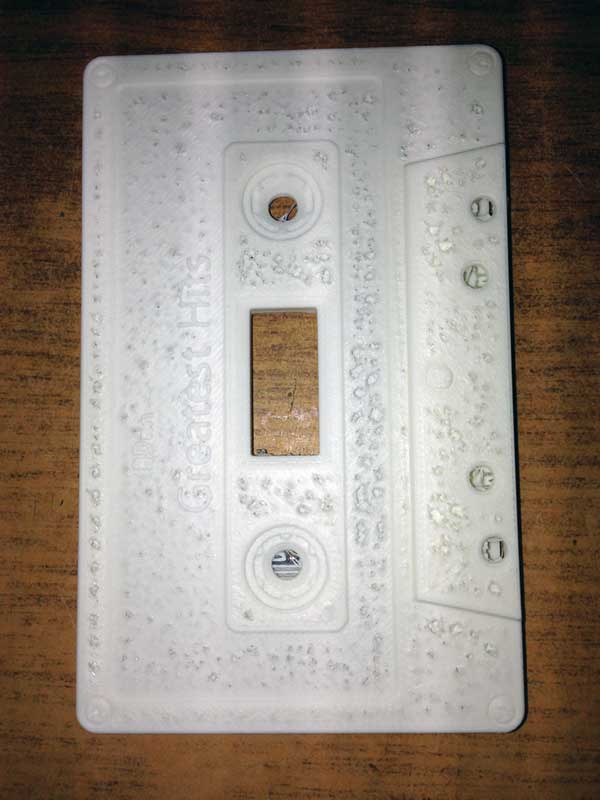
So I am using my new TAZ 4 and I bought Simplify3D and used it's TAZ setting with highest quality for this print. Oh and it took like 6 hours.
Looks like it had chicken pocks or something.
4 top layers so that's not it and ABS filament that I have great prints with in the past.
The preview looked good. Printed at 230c
Looks like it had chicken pocks or something.
4 top layers so that's not it and ABS filament that I have great prints with in the past.
The preview looked good. Printed at 230c
|
Re: This is a new one... Pock marks August 01, 2014 09:01PM |
Registered: 11 years ago Posts: 1,171 |
|
Re: This is a new one... Pock marks August 01, 2014 09:33PM |
Registered: 11 years ago Posts: 1,592 |
|
Re: This is a new one... Pock marks August 01, 2014 09:40PM |
Registered: 13 years ago Posts: 2,947 |
You say "4 top layers so that's not it" but sometimes for certain infill percentages and layer heights you may need 20 layers to make a solid top. My rule is usually I try and make the top and bottom 1mm - 1.5mm thick (thickness is also the way Kisslicer and Cura set the the top and bottom since layer count means very little without layer thickness being taken in to account). So if you are setting it based on layer count and you are using 0.1mm layers and medium to dense infill you will want at least 10 layers. If you are using 0.1mm layers and low infill I would set it to at least 15 layers.
| FFF Settings Calculator | Gcode post processors | Geometric Object Deposition Tool Blog |
| Tantillus.org | Mini Printable Lathe | How NOT to install a Pololu driver |
|
Re: This is a new one... Pock marks August 01, 2014 09:46PM |
Registered: 11 years ago Posts: 1,171 |
It was the default TAZ high quality setting. It was .1 layer height. On my old printer I always used either 3 or 4 top layers. Just checked the Slic3r (with Lulzbot supplied settings) and it was .14 layer height with 4 top layers.
I am not going to test this model again as it took over 5 hours to print.
I am not going to test this model again as it took over 5 hours to print.
|
Re: This is a new one... Pock marks August 01, 2014 09:47PM |
Registered: 11 years ago Posts: 1,171 |
|
Re: This is a new one... Pock marks August 01, 2014 09:59PM |
Registered: 13 years ago Posts: 2,947 |
With that said you were printing 0.14 * 4 = 0.56 mm's so at 0.1mm layers you should have at least 6 layers to have the same top and bottom thickness. But with 0.1mm layers you may find you need even more since 0.1mm layers do not bridge well and take a few extra to make a solid base for the final layers.
| FFF Settings Calculator | Gcode post processors | Geometric Object Deposition Tool Blog |
| Tantillus.org | Mini Printable Lathe | How NOT to install a Pololu driver |
|
Re: This is a new one... Pock marks August 01, 2014 10:42PM |
Registered: 11 years ago Posts: 1,171 |
|
Re: This is a new one... Pock marks August 01, 2014 10:55PM |
Registered: 10 years ago Posts: 231 |

|
Re: This is a new one... Pock marks August 01, 2014 10:55PM |
Registered: 11 years ago Posts: 1,171 |
By the way I am a logical thinker and I like to understand why something needs to be set the way it is rather than someone just saying set it at this with no explanation. Sublime you showed me with the calculation something I had not considered before (layer height x layer numbers = thickness) it seems so simple now and I feel a little stupid for not thinking of it that way. So thank you.
Edited 1 time(s). Last edit at 08/01/2014 10:56PM by tmorris9.
Edited 1 time(s). Last edit at 08/01/2014 10:56PM by tmorris9.
|
Re: This is a new one... Pock marks August 02, 2014 02:04AM |
Registered: 13 years ago Posts: 2,947 |
Glad I could help.
Quote
tmorris9
By the way I am a logical thinker and I like to understand why something needs to be set the way it is rather than someone just saying set it at this with no explanation. Sublime you showed me with the calculation something I had not considered before (layer height x layer numbers = thickness) it seems so simple now and I feel a little stupid for not thinking of it that way. So thank you.
| FFF Settings Calculator | Gcode post processors | Geometric Object Deposition Tool Blog |
| Tantillus.org | Mini Printable Lathe | How NOT to install a Pololu driver |
|
Re: This is a new one... Pock marks August 06, 2014 11:24AM |
Registered: 10 years ago Posts: 136 |
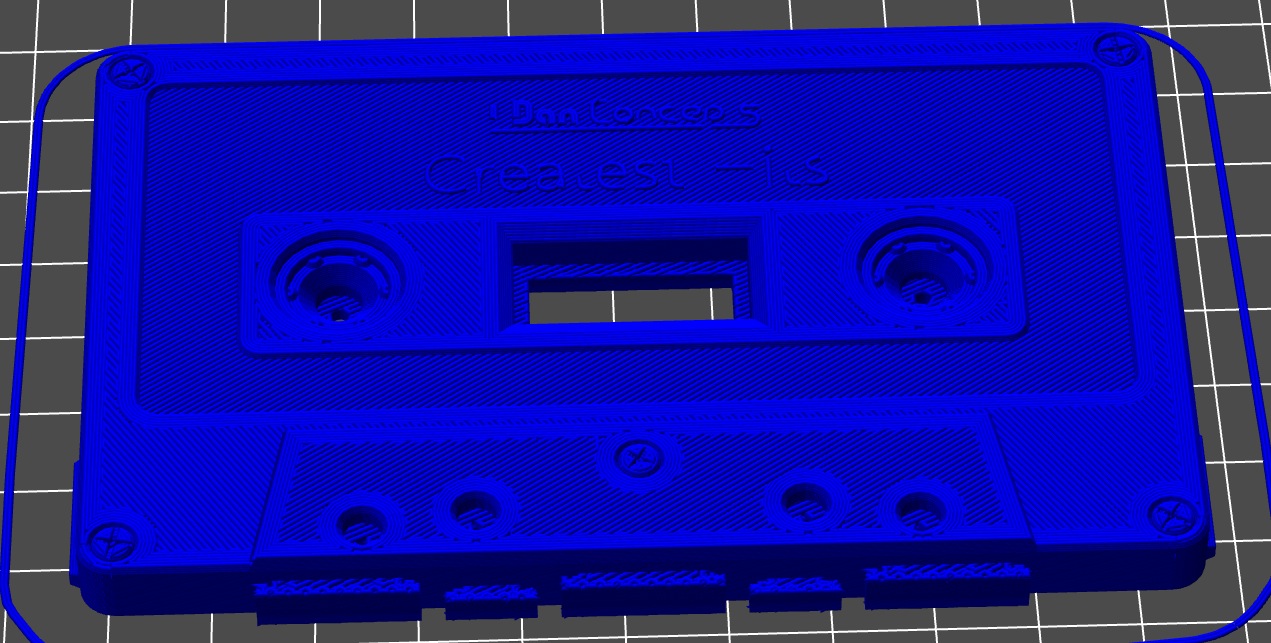
I wouldn't say "perfect". It seems like the text came out much nicer in your s3d print. Higher infill + more top layers, as I'm sure you've already gathered...Quote
tmorris9
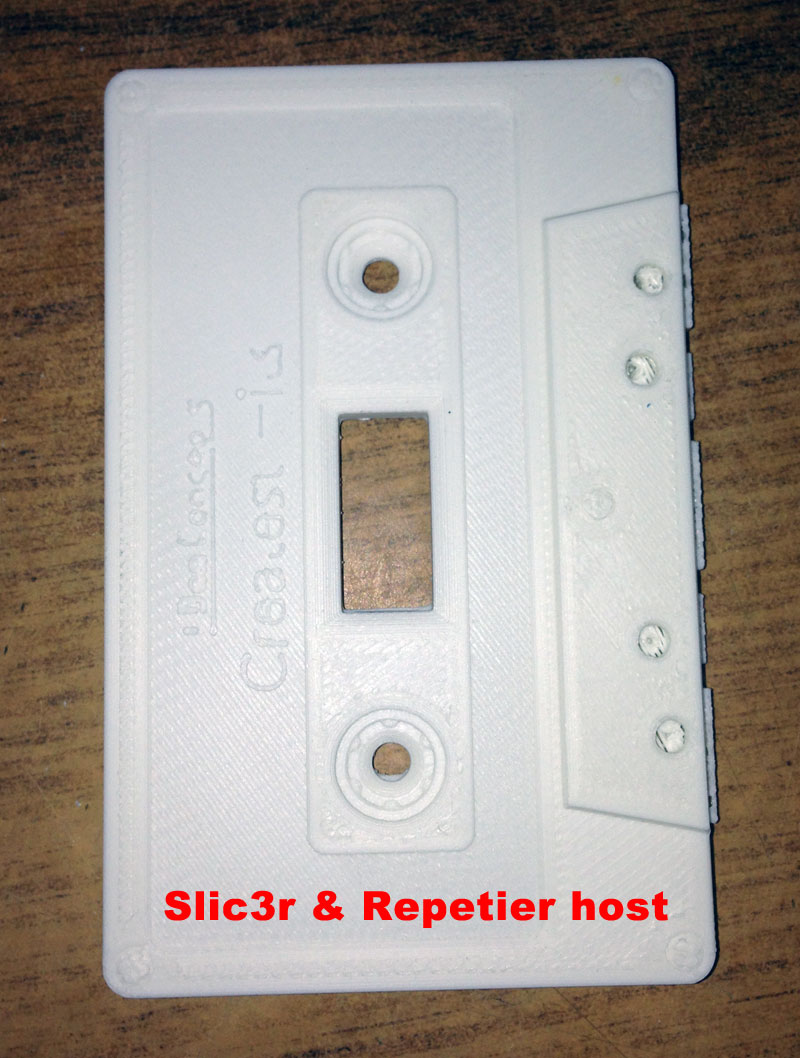
So I remade it using Slic3r and the results are perfect... Hope I didn't waste $140 on Simplify3D, it's suppose to be way better than Slic3r.
|
Re: This is a new one... Pock marks August 06, 2014 03:01PM |
Registered: 11 years ago Posts: 1,171 |
Quote
isonoob
I wouldn't say "perfect". It seems like the text came out much nicer in your s3d print. Higher infill + more top layers, as I'm sure you've already gathered...Quote
tmorris9
So I remade it using Slic3r and the results are perfect... Hope I didn't waste $140 on Simplify3D, it's suppose to be way better than Slic3r.
The text problem was actually a failure in the file, it had errors that even netfabb basic could not fix. I guess Simplify3D was more forgiving in that respect.
|
Re: This is a new one... Pock marks August 06, 2014 08:35PM |
Registered: 10 years ago Posts: 136 |
Quote
tmorris9
The text problem was actually a failure in the file, it had errors that even netfabb basic could not fix. I guess Simplify3D was more forgiving in that respect.
ahh I see, If it was missing manifolds/triangles in the STL file, I know s3d does mesh repair, believe the setting for errors is in the advanced or other tab forget which one. Been using it for a few months now.
|
Re: This is a new one... Pock marks August 06, 2014 11:46PM |
Registered: 10 years ago Posts: 790 |
Just throwing out my potentially useless thought:
You were using the same temp on both, correct? I've noticed in my limited tests that ABS will parse like that along bridging areas when temp is too low.
Realizer- One who realizes dreams by making them a reality either by possibility or by completion. Also creating or renewing hopes of dreams.
"keep in mind, even the best printer can not print with the best filament if the user is the problem." -Ohmarinus
|
Re: This is a new one... Pock marks August 06, 2014 11:52PM |
Registered: 11 years ago Posts: 1,171 |
Quote
MrDoctorDIV
Just throwing out my potentially useless thought:
You were using the same temp on both, correct? I've noticed in my limited tests that ABS will parse like that along bridging areas when temp is too low.
Yes, same temp but not a useless post because you never know.
I did a different model tonight with 12 top layers and it's terrible. 2 of the same parts, one had holes in it with some infill sticking up a tiny amount. The other has bubbles where the top layer is sticking up a bit. I am beginning to wonder if there is an issue with the infill, it's really ugly. Printing another right now with 25 top layers but turns out that is nearly solid with only a few layers of infill.
|
Re: This is a new one... Pock marks August 07, 2014 12:04AM |
Registered: 10 years ago Posts: 136 |
care to share the model? I've had nothing but great prints, I know mrdoctordiv is a fellow s3d user on this board and has been getting great prints as well.
here we both printed a t-rex shower head:
[forums.reprap.org]
here we both printed a t-rex shower head:
[forums.reprap.org]
|
Re: This is a new one... Pock marks August 07, 2014 12:38AM |
Registered: 10 years ago Posts: 790 |
I used S3D exclusively now [for slicing, still use Repetier Host]. I've had no major issues, clean, sharp prints, and any small issues I've had I've easily fixed except one: thin walls cause problems with S3D. Slic3r had its limits, but S3D's seems to be thicker in its limit. It just trashes the wall and will not print it. The 0.5mm calibration cube prints as nothing when sliced with S3D. I have a 0.3mm nozzle. I haven't run into anything that this poses a real threat to, so I haven't bothered to figure out why or how to get around it if possible.
Beyond that, on the slicer side it's the best I've used, better by far than the printer I've used it with. My new printer I'm building will truly tell its tales.
Realizer- One who realizes dreams by making them a reality either by possibility or by completion. Also creating or renewing hopes of dreams.
"keep in mind, even the best printer can not print with the best filament if the user is the problem." -Ohmarinus
|
Re: This is a new one... Pock marks August 07, 2014 01:04AM |
Registered: 11 years ago Posts: 1,171 |
This is just the handle of the object (sorry the rest is proprietary) and it's the part that looks bad anyway.
Now, I wanted to use the "Best" setting which is for .1mm layer height. my infill this time was 20% but the tape from above was 30%.
Now, I used the default setting for TAZ 3 (they did not have one for TAZ 4)
I got to thinking about the filament diameter setting as I did not set it myself. Took me a while to find it but it was set to 3.00mm while my filament is actually 2.87mm so that might be an issue.
|
Re: This is a new one... Pock marks August 07, 2014 01:06AM |
Registered: 11 years ago Posts: 1,171 |
|
Re: This is a new one... Pock marks August 07, 2014 04:44AM |
Registered: 11 years ago Posts: 1,171 |
OK, I think I have it nailed down. I changed a few things
Extruder Width was set to manual & .42mm I changed to Automatic. <--- Just seemed odd
Infill was set to "Use random infill placement" turned that off.
Layers, set top layers to 12
And under "Other" (odd placement) I set Filament Diameter to 2.97mm (my filament diameter).
First print with these settings came out perfect!
Don't know of it was a combination of these settings or just one. I suspect Filament Diameter was mostly to blame.
|
Re: This is a new one... Pock marks August 07, 2014 09:28AM |
Registered: 10 years ago Posts: 136 |
Im thinking you could proabbly get away with less solid top & bottom layers. extruder width in my experience has always been set to manual and is the same size as the nozzle diameter, it's very odd it was at .42, what is the setting for the nozzle diameter on the process vs your machine's nozzle diameter? Once you fine tune your extrusion multiplier, it's always good to measure the diameter of the filament you buy before printing and adjust it accordingly. The extrusion multiplier and filament diameter usually go hand in hand.
|
Re: This is a new one... Pock marks August 07, 2014 09:40AM |
Registered: 10 years ago Posts: 790 |
The extrusion width and nozzle diameter are two different numbers. Your extrusion width, by rule of thumb, should be 1.2X your nozzle diameter.
I typically use 3-7 top/bottom layers depending on my layer height.
Realizer- One who realizes dreams by making them a reality either by possibility or by completion. Also creating or renewing hopes of dreams.
"keep in mind, even the best printer can not print with the best filament if the user is the problem." -Ohmarinus
Sorry, only registered users may post in this forum.