The BASICS for 1st Time - HELP
Posted by psneddon
|
The BASICS for 1st Time - HELP June 07, 2015 10:23AM |
Registered: 9 years ago Posts: 124 |
Hello All.
I don't know if this subject has been covered before or not. I've done a lot of reading, skimming and searching, but I can't find the answer(s) I'm looking for.
I tried to do a basic thin wall test print with my completed I3 Rework, but the PLA was not sticking to the heated bed (heat bed + borosilicate glass). I didn't use hairspray, or glue stick or anything - just cleaned the glass with alcohol.
After a few attempts (and failing every time) I decided I needed to put something on the bed to get the PLA to stick. So, a few days later I got some of the purple Elmer's glue stick recommended by others on the forum. According to what I've read, you should level your bed every time prior to printing.
Now here is my BASIC setup dilemma. The hot end has a bit of solid PLA sticking out of it (about 2 or 3 mm) which was left over from my previous attempts. I know I can heat it up and it should flow out again, but how do I level my bed without getting plastic smeared everywhere while I'm trying to do it? I thought the bed was supposed to be leveled with a cold hot end.
Is the PLA supposed to be removed from the extruder every time you're done printing? I know this is REALLY BASIC stuff to most of you that have successfully printed something, but is there a step by step "BEGINNING and ENDING Your Print" guide anywhere?
Any help would be greatly appreciated! Thanks!
Edited 1 time(s). Last edit at 06/07/2015 10:24AM by psneddon.
|
Re: The BASICS for 1st Time - HELP June 07, 2015 06:40PM |
Registered: 9 years ago Posts: 396 |
|
Re: The BASICS for 1st Time - HELP June 07, 2015 07:03PM |
Registered: 9 years ago Posts: 124 |
Thanks for the reply.
Do I need to remove my PLA from the extruder altogether after it heats up so I can level the bed? Also, does the extruder fan have to point slightly down toward the PLA as it's printing, or just at the plastic (ABS) portion of the hot end (which is how I had it set when I tried printing my test piece)?
Do I need to remove my PLA from the extruder altogether after it heats up so I can level the bed? Also, does the extruder fan have to point slightly down toward the PLA as it's printing, or just at the plastic (ABS) portion of the hot end (which is how I had it set when I tried printing my test piece)?
|
Re: The BASICS for 1st Time - HELP June 07, 2015 09:51PM |
Registered: 9 years ago Posts: 396 |
I think with pla it needs cooling on the part being printed. Best to search the forum for pla cooling...
But yes clean the nozzle tip of any hard pla or other plastic prior to doing your leveling. But that depends on how you do the levelling... Servo or probe stick probably you dont need to... If using the paper method then yes. Clean it.
But yes clean the nozzle tip of any hard pla or other plastic prior to doing your leveling. But that depends on how you do the levelling... Servo or probe stick probably you dont need to... If using the paper method then yes. Clean it.
|
Re: The BASICS for 1st Time - HELP June 08, 2015 02:55PM |
Registered: 9 years ago Posts: 569 |
As the TazzBot mentioned, if using the standard paper test or otherwise relying on the nozzle for leveling your bed, you will need to clean off the tip of your hot end, though you shouldn't need to worry about it at other times as long as you are printing a brim (?) around the outside of your prints. I find it useful for priming the nozzle on my printer, just a single pass around the perimeter at 6mm.
I also tend to get a little oozing after my print is finishing, while the hot end is cooling. If I remember, I can grab a cooled portion of the filament around 140-150 and just pull it away to clean up the nozzle. If not, I can normally just snap it at the nozzle (1-2 inch long normally) to clean it up.
I believe it is an either or printing PLA, use a heated bed on clean glass or a cold bed with a glue stick. I have been having great success with a glue stick. But if your print is not sticking, it could be due to z-height issues. If the filament isn't catching the bed at all, you are likely too high. Consider trying to lower your nozzle in 0.05mm increments at first. Perhaps post some pictures of the issue.
|
Re: The BASICS for 1st Time - HELP June 10, 2015 11:50PM |
Registered: 9 years ago Posts: 124 |
|
Re: The BASICS for 1st Time - HELP June 11, 2015 03:18PM |
Registered: 8 years ago Posts: 82 |
What I do before leveling is pull off any plastic on the nozzle with needlenose pliers, then gently run a fine file over the nozzle end until I don't feel/hear any plastic on the tip. I worry a little that I'm scraping off some brass, but haven't seen any ill effects (I don't think!) and nozzles aren't expensive.
|
Re: The BASICS for 1st Time - HELP June 11, 2015 03:20PM |
Registered: 9 years ago Posts: 396 |
You really should not scrape your nozzle with a file. The reason is, you could get a fine piece of brass stuff inside the nozzle and it will cause a hard to clear clog or some wierd issue with plastic squirting sideways
The best practice I think is to heat up the nozzle, lower it to a piece of paper and move it using the X or Y mover thing just to wipe it off, then raise it and do your tramming.
Edited 1 time(s). Last edit at 06/11/2015 03:21PM by thetazzbot.
The best practice I think is to heat up the nozzle, lower it to a piece of paper and move it using the X or Y mover thing just to wipe it off, then raise it and do your tramming.
Edited 1 time(s). Last edit at 06/11/2015 03:21PM by thetazzbot.
|
Re: The BASICS for 1st Time - HELP June 11, 2015 03:32PM |
Registered: 10 years ago Posts: 770 |
|
Re: The BASICS for 1st Time - HELP June 11, 2015 03:43PM |
Registered: 8 years ago Posts: 82 |
|
Re: The BASICS for 1st Time - HELP June 11, 2015 05:12PM |
Registered: 10 years ago Posts: 770 |
|
Re: The BASICS for 1st Time - HELP June 13, 2015 12:34PM |
Registered: 9 years ago Posts: 124 |
Well, I finally got the PLA to stick to the heated bed! 
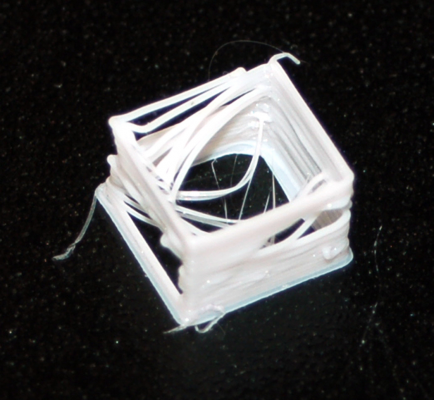
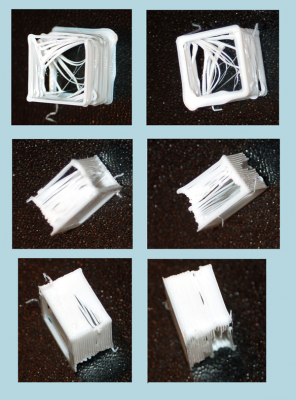
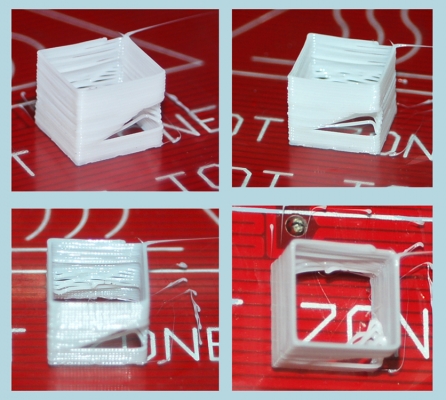
Now I have to figure out how to get a decent print. I tried printing the .5mm thin wall calibration test print with limited success, as you can see from the pictures.
My first test print was at 200C:
I increased the temperature to 205C and this was the result:
Before I go any further, opinions/advice would be greatly appreciated and welcomed.
|
Re: The BASICS for 1st Time - HELP June 14, 2015 05:02AM |
Registered: 11 years ago Posts: 1,592 |
|
Re: The BASICS for 1st Time - HELP June 14, 2015 09:34AM |
Registered: 9 years ago Posts: 124 |
First off, Elmer's purple glue stick works GREAT!  My first prints were done at 200C and 205C with a print bed temp. of 72C.
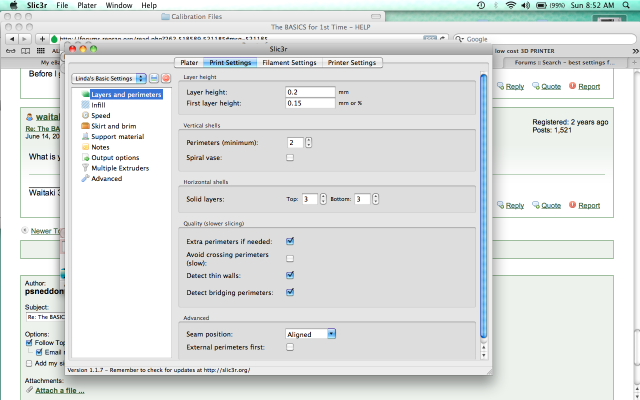
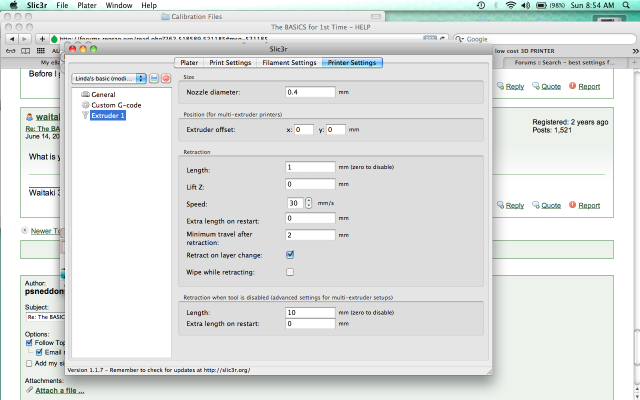
I took a couple of screen shots of my general Slicer settings.
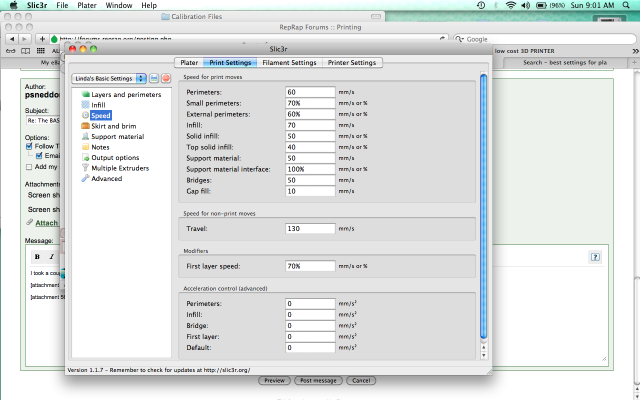
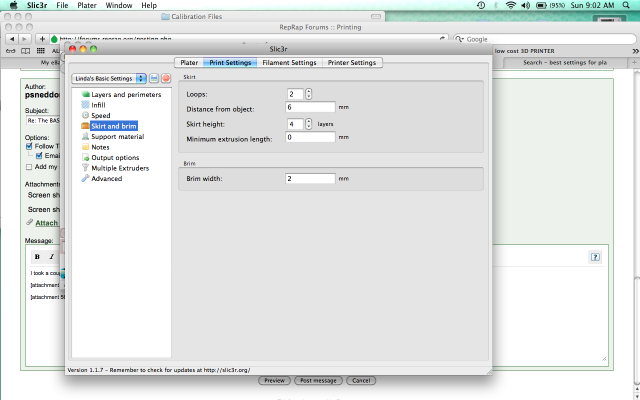
I also noticed that my printer isn't laying down a perimeter line or brim before it starts printing. Here are some of my other Slicer settings.
At this point I am not interested in producing fast prints as I am about quality and consistency.
 My first prints were done at 200C and 205C with a print bed temp. of 72C.
I took a couple of screen shots of my general Slicer settings.
I also noticed that my printer isn't laying down a perimeter line or brim before it starts printing. Here are some of my other Slicer settings.
At this point I am not interested in producing fast prints as I am about quality and consistency.
|
Re: The BASICS for 1st Time - HELP June 15, 2015 02:31AM |
Registered: 11 years ago Posts: 1,592 |
This is what I suggest....
Remove the filament from the extruder completely so you are left with a nice clean non-oozing nozzle.
Level the bed all round. (you should not need to keep doing this unless you have build problems - mine was set 2 or 3 years ago and is still in spec).
Heat the bed to 60C
Switch on the hotend - 150C should be enough for setting up.
Adjust the nozzle gap using the pronterface home command to somewhere between 0.05 and 0.1mm (a till receipt is typically .05 and a sheet of 80gsm photocopy paper is 0.1mm). A piece of copy paper should drag lightly under the nozzle when Z is homed.
Once that's all good, install the filament, set hotend to temp and ensure you have primed the hot-end before printing.
Try again and see what you get. If the set-up is spot on, it makes it easier to diagnose problems after.
and finally...
Have a stiff drink!
_______________________________________
Waitaki 3D Printer
|
Re: The BASICS for 1st Time - HELP June 15, 2015 08:25AM |
Registered: 9 years ago Posts: 1,873 |
|
Re: The BASICS for 1st Time - HELP June 20, 2015 10:36AM |
Registered: 9 years ago Posts: 124 |
Quote
waitaki
This is what I suggest....
Remove the filament from the extruder completely so you are left with a nice clean non-oozing nozzle.
Level the bed all round. (you should not need to keep doing this unless you have build problems - mine was set 2 or 3 years ago and is still in spec).
Heat the bed to 60C
Switch on the hotend - 150C should be enough for setting up.
Adjust the nozzle gap using the pronterface home command to somewhere between 0.05 and 0.1mm (a till receipt is typically .05 and a sheet of 80gsm photocopy paper is 0.1mm). A piece of copy paper should drag lightly under the nozzle when Z is homed.
Once that's all good, install the filament, set hotend to temp and ensure you have primed the hot-end before printing.
Try again and see what you get. If the set-up is spot on, it makes it easier to diagnose problems after.
and finally...
Have a stiff drink!
I think I should have started with the stiff drink!
Edited 2 time(s). Last edit at 06/20/2015 10:42AM by psneddon.
|
Re: The BASICS for 1st Time - HELP June 20, 2015 05:12PM |
Registered: 9 years ago Posts: 124 |
I was looking at trying CURA, since it seemed to have a bed leveling routine, instead of Pronterface. Well, I couldn't get the printer to connect to CURA to try the bed leveling, so I went back to Pronterface. My print head didn't want to go any further than +100 in the X direction and +100 in the Y direction!!
I figured, maybe CURA reset the bed size parameters, so I reloaded my Arduino settings and tried Pronterface again. I still had the same issue - +100X and +100Y max bed size - the nozzle ended up going no further than the middle of my print bed!!
I checked the build dimensions in Pronterface and it was X=200 Y=200 Z=200, but it still would not go any farther than half way. The print head HOMES correctly. I even tried turning the printer off and manually moving the print head near the max positions and HOMING, but the print head stopped before it got to the endstops??
I ended up checking my Marlin firmware and found that I had my bed size set to X=100 and Y = 100!
So, I went back to CURA and was able to connect and perform the bed leveling routine. Then I decided to download this open top box from Thingiverse:
[www.thingiverse.com]
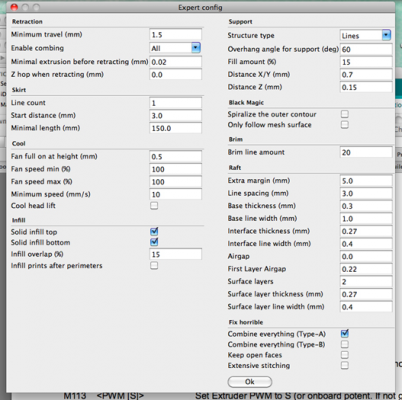
I had CURA set to these default settings:
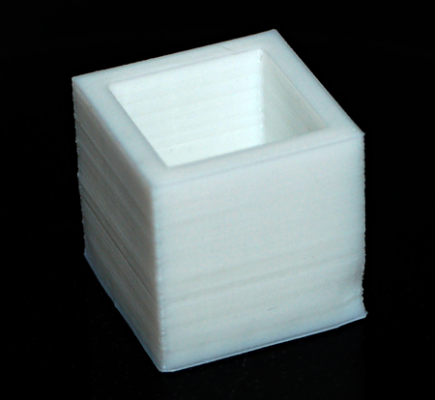
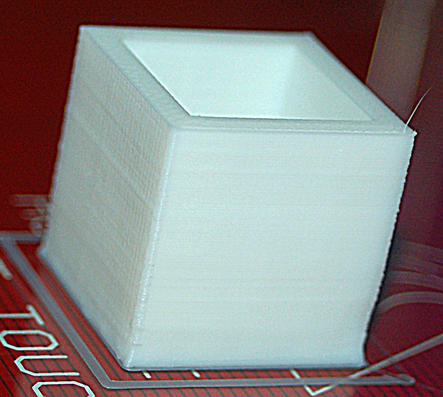
I was able to print the box and it looks pretty decent except for a couple of issues:
1. The right rear corner of the box has a problem (shift?)
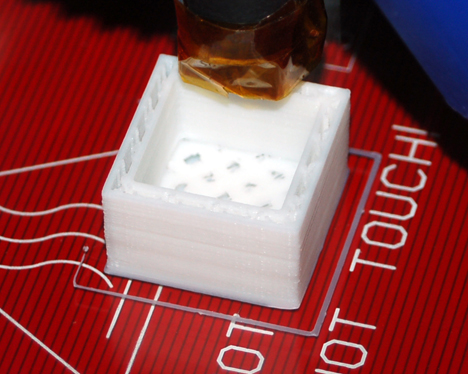
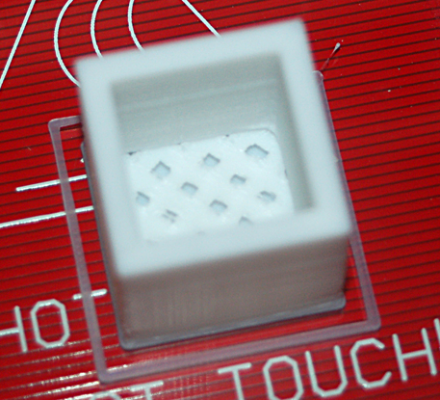
2. The interior "floor" of the box didn't fill completely
There was also a slight curl on the corners.
So, I printed a second cube with the same settings and the result was a bit better - no curl on the corners. But I still have the same two main issues. The right rear corner seems to "shift" for whatever reason and the interior "floor" of the cube doesn't fill all the way as seen here:
Otherwise, I'm very happy with the results so far! Can't wait to solve this and continue my calibration process!
Edited 1 time(s). Last edit at 06/21/2015 10:05AM by psneddon.
I figured, maybe CURA reset the bed size parameters, so I reloaded my Arduino settings and tried Pronterface again. I still had the same issue - +100X and +100Y max bed size - the nozzle ended up going no further than the middle of my print bed!!
I checked the build dimensions in Pronterface and it was X=200 Y=200 Z=200, but it still would not go any farther than half way. The print head HOMES correctly. I even tried turning the printer off and manually moving the print head near the max positions and HOMING, but the print head stopped before it got to the endstops??
I ended up checking my Marlin firmware and found that I had my bed size set to X=100 and Y = 100!

So, I went back to CURA and was able to connect and perform the bed leveling routine. Then I decided to download this open top box from Thingiverse:
[www.thingiverse.com]
I had CURA set to these default settings:
I was able to print the box and it looks pretty decent except for a couple of issues:
1. The right rear corner of the box has a problem (shift?)
2. The interior "floor" of the box didn't fill completely
There was also a slight curl on the corners.
So, I printed a second cube with the same settings and the result was a bit better - no curl on the corners. But I still have the same two main issues. The right rear corner seems to "shift" for whatever reason and the interior "floor" of the cube doesn't fill all the way as seen here:
Otherwise, I'm very happy with the results so far! Can't wait to solve this and continue my calibration process!

Edited 1 time(s). Last edit at 06/21/2015 10:05AM by psneddon.
Sorry, only registered users may post in this forum.
