Lip around perimeter near top
Posted by nebbian
|
Lip around perimeter near top December 02, 2015 10:14PM |
Registered: 8 years ago Posts: 916 |
Hi,
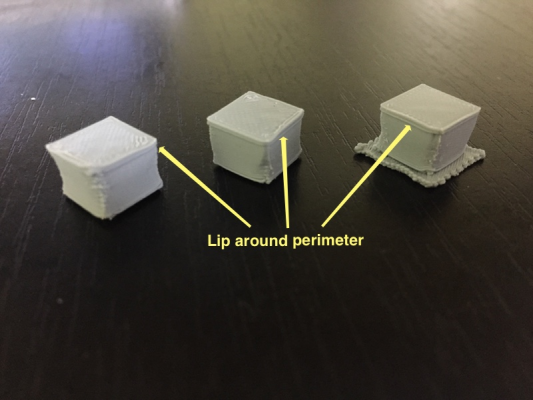
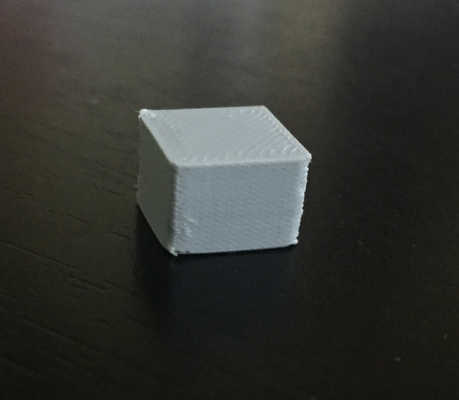
I've been chasing this issue ever since starting to print (3 months or so). Basically when printing a cube with a solid top surface (but hollow inside), the outside surface has a small lip of about 0.1mm size around the perimeter, which corresponds to where the top solid surface is located.
I created a test piece that is quite small to demonstrate the issue, which is attached. This is small enough to print in 15 minutes or so, which allows me to tweak various settings to try to sort this issue out.
Here's a picture of what I'm seeing:
(Yes, there are heat issues on this piece, but I need the heat to get better layer adhesion on larger prints, on larger prints the heat is fine but that lip is still there).
Printed in ABS at around 250 degrees, 0.1mm layer height, on a Kossel Mini running the latest Marlin release candidate. Sliced using Slic3r with many different combinations of settings, none of which seem to help the issue.
I originally thought that it was related to backlash, so replaced my roller bearings with linear slides but the issue remained. I also updated marlin to the latest release candidate.
Can someone either tell me what's going on here, and how to fix it, or print it themselves to see if their printer is doing it too?
I'd really appreciate any insight you guys might be able to provide.
Edited 1 time(s). Last edit at 12/02/2015 10:18PM by nebbian.
|
Re: Lip around perimeter near top December 02, 2015 11:37PM |
Registered: 8 years ago Posts: 778 |
Did you try a different slic3r version or other software to do the slicing already?
If not try it.
If your print software has a preview option: is that lip present there or is the cube just a cube in the preview?
With the heat issue it is a bit hard to judge the print, so maybe with the next test print one or two duplicates at the same time, this allows the part to cool without the need to change your print settings.
Last one: Is the lip with as many layers are your top solid infill?
|
Re: Lip around perimeter near top December 03, 2015 01:09AM |
Registered: 8 years ago Posts: 916 |
Thanks Downunder.
Answers to your questions:
I haven't tried other slicing software, but that's my next step.
The preview shows no lip.
The lip has the same number of layers as the top infill (it's 0.8mm wide, the same height as the top surface).
If anyone wants to try to print it themselves I'd be really grateful. No support needed, no need to change infill settings, it's a hollow cube with a cross pattern inside it.
Edited 1 time(s). Last edit at 12/03/2015 01:11AM by nebbian.
|
Re: Lip around perimeter near top December 03, 2015 01:36AM |
Registered: 8 years ago Posts: 778 |
Well, my cubes come out as cubes if I print them 
Try a different slicer and if the problem does not persists I assume it is a problem with the top infill calculations.
If a different slicer produces the same result it might help to check if other objects behave the same way, for example if a box gets the added rim or if round objects won't show it.
|
Re: Lip around perimeter near top December 03, 2015 11:03AM |
Registered: 9 years ago Posts: 1,873 |
|
Re: Lip around perimeter near top December 03, 2015 04:14PM |
Registered: 8 years ago Posts: 778 |
|
Re: Lip around perimeter near top December 03, 2015 07:00PM |
Registered: 8 years ago Posts: 916 |
Thanks for the responses.
I did a few more cubes last night while changing a lot of parameters, and am starting to think that this is due to a combination of factors, namely:
1) Too high a print speed on infill
2) A long bowden cable
These two conspire to increase the pressure at the nozzle while doing infill, so that then when doing the perimeters for the next layer it overextrudes slightly due to the pressure being too high (and the bowden tube having stretched and keeping that high pressure present). This would fit all the available evidence.
More experiments to come.
|
Re: Lip around perimeter near top December 03, 2015 08:52PM |
Registered: 8 years ago Posts: 778 |
You can confirm that by adjusting the retraction setttings.
Extrude some filament directly onto the bed, e.g. start a new print, then just stop the print.
The nozzle will be mostly sealed by the bed now.
Mark the filament near the extruder and open it up to release the pressure.
Note how far the filament "jumps" back - this is your minimum retraction distance to start playing with.
A bowden system can need far over a cm depending how long the tube is and how much the filament can flex in it.
You basically want the retraction to be just a bit more than what is needed to release all pressure from the bowden system.
Still it can be very hard to get it right as a longer retraction needs more time and can cause blobs while the nozzle is not moving.
But try a different approach first:
Print with relatively low speeds and NO retraction at all.
Keep all print speeds at the same level, e.g. 30mm/s and all else to 100%.
This way you keep an even pressure in the system!
If the other parameters are fine your cube should print just fine as no retraction is needed, if it still does get the extra rim than it must be something else.
You can also set the infill width to about 80 or 70% to check how the top infill forms then.
|
Re: Lip around perimeter near top December 05, 2015 06:37AM |
Registered: 10 years ago Posts: 444 |
|
Re: Lip around perimeter near top December 05, 2015 03:34PM |
Registered: 8 years ago Posts: 778 |
|
Re: Lip around perimeter near top December 06, 2015 02:36AM |
Registered: 8 years ago Posts: 916 |
|
Re: Lip around perimeter near top December 06, 2015 04:53AM |
Registered: 10 years ago Posts: 38 |
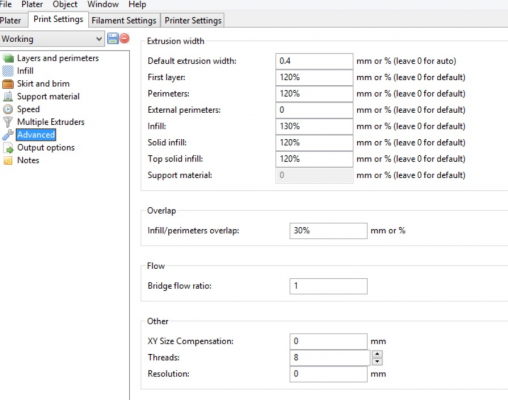
In Slicer > on Print settings tab > Advanced > try to play with the extrusion width value. I'll explain the things that I understand from there. My prints are great and I think that now I know how to fight with the print issues.
Default extrusion width: 0.4mm (great starting point is the nozzle diameter. I have 0.4mm nozzle so I put 0.4mm here)
First layer: 120% (when you start a test cube - look closely for the first layer. It needs to be flat and strait - small or no bumps. The speed is SLOW!)
Perimeters: 120% (the walls. Read it like Internal perimeters)
External perimeters: 130% (here I can't notice a difference between 0, 120% and 130% - it's for the "outer shell")
Infill: 140% (the "honeycomb" or whatever infill you chose - try to make a beautiful infill - no big holes, no big messes inside)
Solid infill: 120% (the infill after the first layer and before the last layer - here I have 3 of them. You can slightly increase the speed)
Top solid infill: 120% (this is the last layer itself. You need to make it level and no bumps are allowed! Everything from smooth finish is unaxeptable!)
Overlap:
Infill/perimeters overlap: 30% (when this option was 15% the infill didn't touch the perimeters so I increase it twice).
So I suggest to start with external perimeters and after that with the solid infill because your issue is closer to the top.
Best regards and keep printing!
Bobby
P.S. Notice that everything I wrote here means that you need to see everything that your printer is doing. Print some cubes, look at every aspect of the print, every issue. This is our feedback here.
Edited 2 time(s). Last edit at 12/06/2015 04:57AM by BoByS.
Default extrusion width: 0.4mm (great starting point is the nozzle diameter. I have 0.4mm nozzle so I put 0.4mm here)
First layer: 120% (when you start a test cube - look closely for the first layer. It needs to be flat and strait - small or no bumps. The speed is SLOW!)
Perimeters: 120% (the walls. Read it like Internal perimeters)
External perimeters: 130% (here I can't notice a difference between 0, 120% and 130% - it's for the "outer shell")
Infill: 140% (the "honeycomb" or whatever infill you chose - try to make a beautiful infill - no big holes, no big messes inside)
Solid infill: 120% (the infill after the first layer and before the last layer - here I have 3 of them. You can slightly increase the speed)
Top solid infill: 120% (this is the last layer itself. You need to make it level and no bumps are allowed! Everything from smooth finish is unaxeptable!)
Overlap:
Infill/perimeters overlap: 30% (when this option was 15% the infill didn't touch the perimeters so I increase it twice).
So I suggest to start with external perimeters and after that with the solid infill because your issue is closer to the top.
Best regards and keep printing!
Bobby
P.S. Notice that everything I wrote here means that you need to see everything that your printer is doing. Print some cubes, look at every aspect of the print, every issue. This is our feedback here.

Edited 2 time(s). Last edit at 12/06/2015 04:57AM by BoByS.
|
Re: Lip around perimeter near top December 06, 2015 05:58AM |
Registered: 8 years ago Posts: 916 |
Bobys, thanks for your input.
Did you know that the percentages are based on the layer height? So if you choose 150%, you might think that this is a lot, but with a 0.1mm layer height this means an extrusion width of 0.15mm. With a nozzle of 0.4mm this extrusion width seems crazy to me.
I've had a massive weekend with my wife's 40th, lots of people staying here so haven't been able to try these ideas. I'll get to them in the next few days.
I'd really appreciate seeing someone else printing this cube and seeing their lack of lip (hint hint).
Edited 1 time(s). Last edit at 12/06/2015 06:00AM by nebbian.
|
Re: Lip around perimeter near top December 06, 2015 07:32AM |
Registered: 9 years ago Posts: 1,873 |
[edited because I was plain wrong]
Sorry for the incorrect posting based on the Cura preview - I confused myself badly there.
I imported the model into Freecad to get a better look, the lower part of the model is a hollow tube with a diagonal cross in it. The top section is solid, so the details of how a slicer calculates paths for this will be very dependent on the settings. With the default values I had in Cura the top section was completely solid filled, presumably because of it using both bottom infill and top infil settings. I think we're still coming back to over-extrusion in a largish volume of solid infill.
Edited 2 time(s). Last edit at 12/06/2015 07:47AM by JamesK.
|
Re: Lip around perimeter near top December 06, 2015 03:22PM |
Registered: 10 years ago Posts: 38 |
Quote
nebbian
Bobys, thanks for your input.
Did you know that the percentages are based on the layer height? So if you choose 150%, you might think that this is a lot, but with a 0.1mm layer height this means an extrusion width of 0.15mm. With a nozzle of 0.4mm this extrusion width seems crazy to me.
I've had a massive weekend with my wife's 40th, lots of people staying here so haven't been able to try these ideas. I'll get to them in the next few days.
I'd really appreciate seeing someone else printing this cube and seeing their lack of lip (hint hint).
Yep I know that and I don't think that this is a lot. In my case for the Infill: 140% it's 0.56mm but I really doubt that the printer could make a difference between 0.5 and 0.6. I'm just playing with the values until I have a good results. Basically I live in the 0.2 and 0.3 layer heights.
 My best advice could be only to put 0's everywhere and look at the print.
They are based on the layer height ONLY if you put 0 there (well as far as I know). Extrusion width = diameter of the nozzle is a good starting point.
I'll try the cube tomorrow.

Best regards and keep printing!
Bobby
|
Re: Lip around perimeter near top December 07, 2015 01:43AM |
Registered: 8 years ago Posts: 916 |
Quote
BoByS
Yep I know that and I don't think that this is a lot. In my case for the Infill: 140% it's 0.56mm but I really doubt that the printer could make a difference between 0.5 and 0.6. I'm just playing with the values until I have a good results. Basically I live in the 0.2 and 0.3 layer heights.My best advice could be only to put 0's everywhere and look at the print.
They are based on the layer height ONLY if you put 0 there (well as far as I know). Extrusion width = diameter of the nozzle is a good starting point.
I'll try the cube tomorrow.
Best regards and keep printing!
Bobby
I really don't think that this is true. 140% is 0.14mm when you're using a 0.1mm layer height.
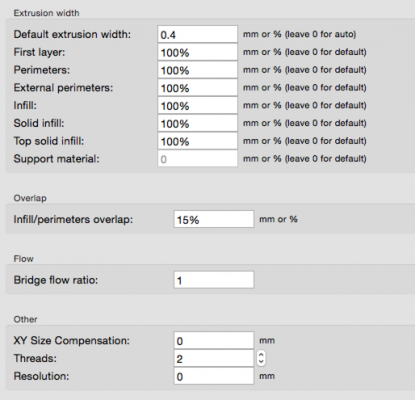
For example:
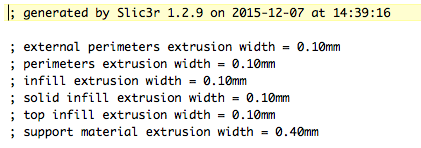
results in this:
Setting the extrusion width based on a percentage of the layer height isn't the way that I like to do things, it confused the heck out of me when I realised what was going on.
|
Re: Lip around perimeter near top December 07, 2015 03:08AM |
Registered: 10 years ago Posts: 38 |
Quote
nebbian
I really don't think that this is true. 140% is 0.14mm when you're using a 0.1mm layer height.
Interesting... I was actually talking about 140% of 0.4mm which equals 0.56mm. With 140% of 0.1mm = 0.14mm. In Slicer there is a pop-up-balloon that is talking about "If you put 0 here [in Default extrusion width] it will calculate automatically based on the Layer height" or something like that. But as what as I see from your results - if you put a percentage value, it's already calculating it based on the layer height (e.g. you have 100% for the external perimeters which equals 0.10mm).
Thanks for the info, I'll check my options as well.
Notice that I really doubt that there is any difference for the printer with values between 0.1 and 0.2 in this case... The extrusion width is a function of too many variables.
Can't wait to try it. My results with 20x20x20 test cubes with 0.2mm LH are great. My best cube so far was with dimensions - 20.05 x 20.2 x 20.03 (XxYxZ) but for the others, the dimensions' tolerances are +/- 0.1mm. Notice that I'm not pro in 3D printing as well. I'm printing for almost 2 years now but only now I started to understand what the printed parts are trying to "tell" me when something is wrong.

Best regards!
Bobby
|
Re: Lip around perimeter near top December 07, 2015 03:10PM |
Registered: 10 years ago Posts: 38 |
Sorry for the double post.
I finally had some time to play with the cube. The pictures aren't good - actually the walls are pretty straight and smooth (except for the rib (Second picture - the far right corner) where the starting point is - if I have some time this weekend I will be able to adjust the extrusions and retracts). Notice that this was my first print with LH 0.1mm - but there is no lip on top.
I'll be happy if someone print it on a Delta printer for better comparison... Because my printer is Cartesian.
Best regards and keep printing!
Bobby
Edited 3 time(s). Last edit at 12/07/2015 03:27PM by BoByS.
|
Re: Lip around perimeter near top December 07, 2015 08:30PM |
Registered: 8 years ago Posts: 916 |
Thanks for that Bobby, it helps a lot.
Would you be able to post your gcode for the cube please? I'll try throwing that through my printer to see what happens. Are you printing in PLA or ABS?
I printed 4 more cubes last night, with no real improvement despite setting the extrusion rate to be crazy low and setting ALL the speeds to 20 mm/s. I'm running out of ideas here.
|
Re: Lip around perimeter near top December 08, 2015 07:29AM |
Registered: 10 years ago Posts: 444 |
|
Re: Lip around perimeter near top December 08, 2015 12:57PM |
Registered: 10 years ago Posts: 38 |
Sure, I'm sharing my options.
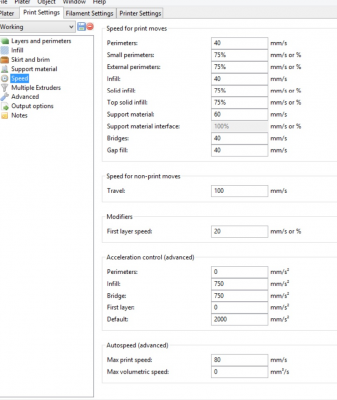
My speed settings:
My advanced print settings:
The test was with Black PLA - 235 deg for the nozzle (230 for the rest) and 65 deg for the bed (55 for the rest). Keep in mind that the temperatures may vary based on the filament you're using...
My retracts are 3mm at 100mm/min. I have a PWM powered 50x50x10mm PC fan with good parameters (really high CFM value) blowing on the print through an ABS printed funnel. The fan is turned off for the first layer and start working after it. Also, I have an auto bed levelling sensor (I can highly recommend that upgrade!).
Notice my extrusion width. I tried the cube first with 0.1mm but my extruder was rotating reeeeally slow so the first layer couldn't stick to the bed (I really should've decrease the speed but I was too lazy and tired yesterday ). When I left it 0.4mm it was a success. Also I'm using 3 loops raft on all of my prints because in 80% of the cases - the sharp angles on my test cubes wrap.
If you need more info - just ask.
I was looking at the print while printing... I'm almost sure that the lip is created because of the solid layer infill on the top of the part...
Best regards and keep printing!
Bobby
My speed settings:
My advanced print settings:
The test was with Black PLA - 235 deg for the nozzle (230 for the rest) and 65 deg for the bed (55 for the rest). Keep in mind that the temperatures may vary based on the filament you're using...
My retracts are 3mm at 100mm/min. I have a PWM powered 50x50x10mm PC fan with good parameters (really high CFM value) blowing on the print through an ABS printed funnel. The fan is turned off for the first layer and start working after it. Also, I have an auto bed levelling sensor (I can highly recommend that upgrade!).
Notice my extrusion width. I tried the cube first with 0.1mm but my extruder was rotating reeeeally slow so the first layer couldn't stick to the bed (I really should've decrease the speed but I was too lazy and tired yesterday
 ). When I left it 0.4mm it was a success. Also I'm using 3 loops raft on all of my prints because in 80% of the cases - the sharp angles on my test cubes wrap.
If you need more info - just ask.
I was looking at the print while printing... I'm almost sure that the lip is created because of the solid layer infill on the top of the part...
Best regards and keep printing!
Bobby
|
Re: Lip around perimeter near top December 08, 2015 05:40PM |
Registered: 8 years ago Posts: 916 |
|
Re: Lip around perimeter near top December 09, 2015 12:42PM |
Registered: 10 years ago Posts: 38 |
|
Re: Lip around perimeter near top December 10, 2015 09:07AM |
Registered: 8 years ago Posts: 916 |
Thanks for that Bobys, exactly what I was after.
Unfortunately I wasn't able to run that gcode file, even after lots of manually editing the start and end parameters -- the first time I tried it I ended up with really hard head crash into my PEI bed, which has left a permanent mark right in the middle. Oh well such is life. I tried several times to edit that file, and finally got something to start the sequence properly, but it just stayed at 0,0,0 while the code flowed through pronterface for some reason. It looked like it would have completed in some crazy short time.
Anyway yesterday I rebuilt the effector, and tightened up a very slight amount of slop in the extruder mount, as well as rerouting the way that the bowden cable ran, and replaced my nozzle. This didn't help the issue.
HOWEVER, in reading the slic3r subforum to get some information on another issue, I discovered the "bridge flow" parameter. When it is set to 1, it will try to extrude a layer height that is the same width as the nozzle! So if you're running a 0.1mm layer height and 0.4mm nozzle, it will try to extrude a bridge with a layer height of 0.4mm. Obviously this is 4 times as much as it would normally extrude, which I think was building up pressure in the bowden cable, which forced higher extrusion rates in the rest of the print.
When I set the bridge flow ratio to 30%, FINALLY I have no lip on my print!
I know there are other issues with this print, but we're certainly getting there. And now that the lip is gone I can start concentrating on some other areas of printing.
Thank you all for your help and suggestions, especially Bobby.
Happy printing!
|
Re: Lip around perimeter near top December 11, 2015 06:19AM |
Registered: 10 years ago Posts: 38 |
I'm really happy for the progress.
I need to mention, thought, that it's a bad idea to edit the G-code file (this was my concern when I share mine). Every machine has it's own options that are build in, for example with the printers - Autobed leveling procedure, Z-offset (if it's adjusted in the Slicer, of course), etc so every machine has its own G-codes. Sorry for the collision with your heatbed you definitely need to see mine when I was making the autobed leveling. Nevermind, I stick blue painters tape on the bed.
Thanks for the info about the "bridge flow ratio". I will definitely try this on my printer.
Best regards,
Bobby
I need to mention, thought, that it's a bad idea to edit the G-code file (this was my concern when I share mine). Every machine has it's own options that are build in, for example with the printers - Autobed leveling procedure, Z-offset (if it's adjusted in the Slicer, of course), etc so every machine has its own G-codes. Sorry for the collision with your heatbed you definitely need to see mine when I was making the autobed leveling.
 Nevermind, I stick blue painters tape on the bed.
Thanks for the info about the "bridge flow ratio". I will definitely try this on my printer.
Best regards,
Bobby
Sorry, only registered users may post in this forum.
