Corners on Circles
Posted by peonking
|
Corners on Circles December 14, 2015 11:42PM |
Registered: 8 years ago Posts: 13 |
Hi
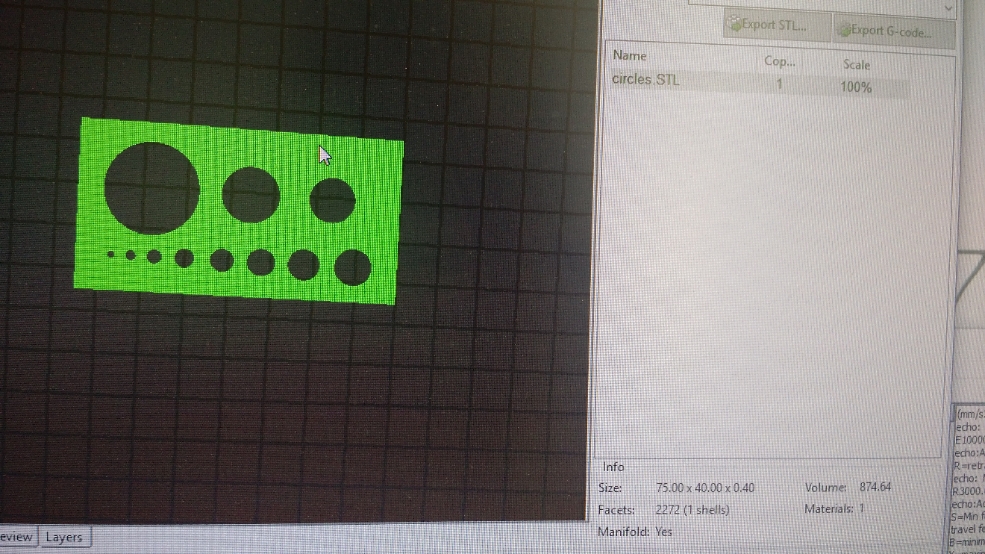
I have a MendelMax 1.5. Bought a long while ago, but only decided to finish it recently. Been spending a lot of time calibrating and playing with settings for the past months. I also built an oven out of plexi glass. The prints have gotten alot better since the first time i used it, but it just can't print a perfect circles. It seems smaller, but one problem at a time....
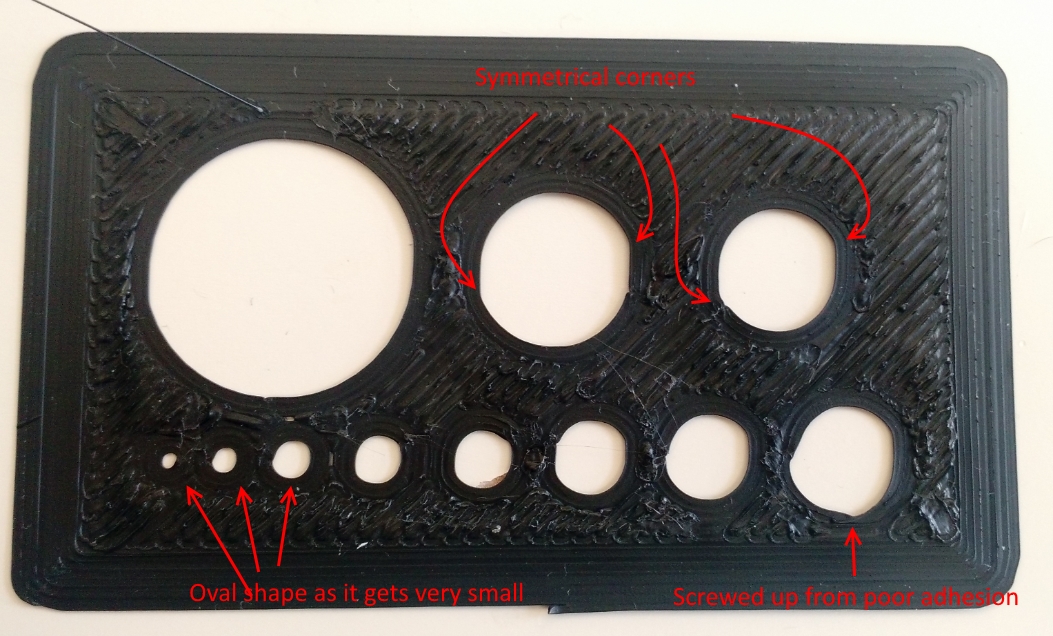
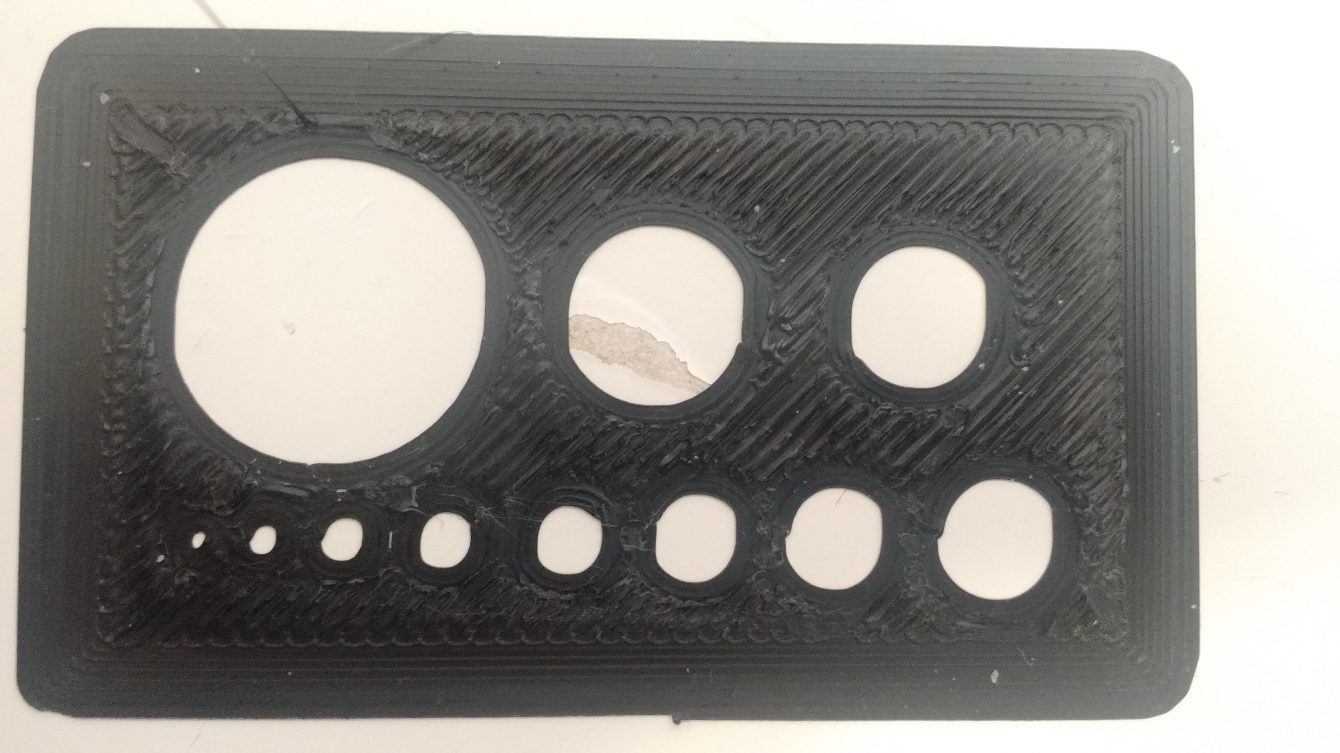
So I consistently get 2 corners on circles. they are always at the same part of the circle, and across each other. It gets more obvious as the circle gets smaller. Eventually, circle just becomes oval. I don't know what I can do. I drew the circles on SolidWorks. I believe they are M1 to M8 sized holes.
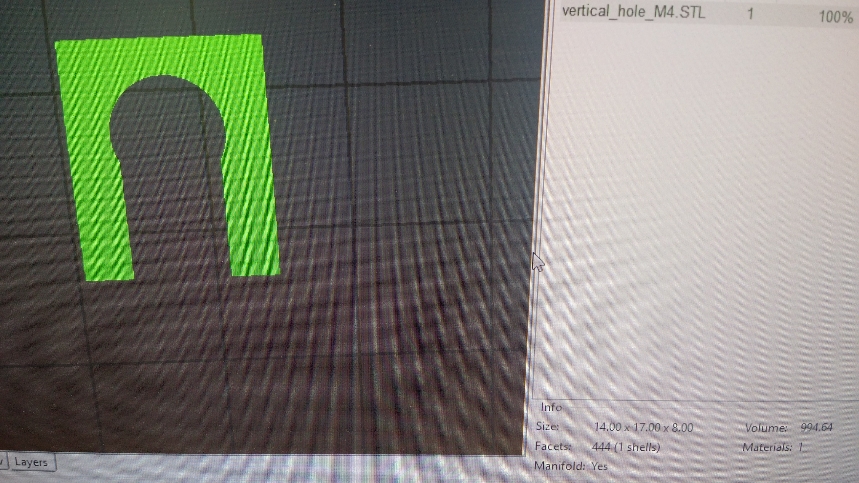
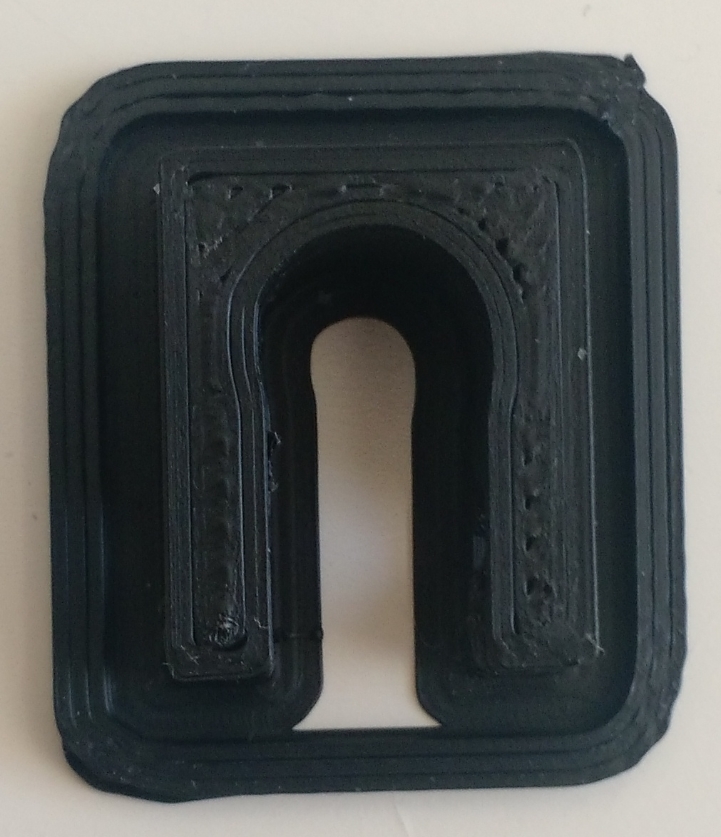
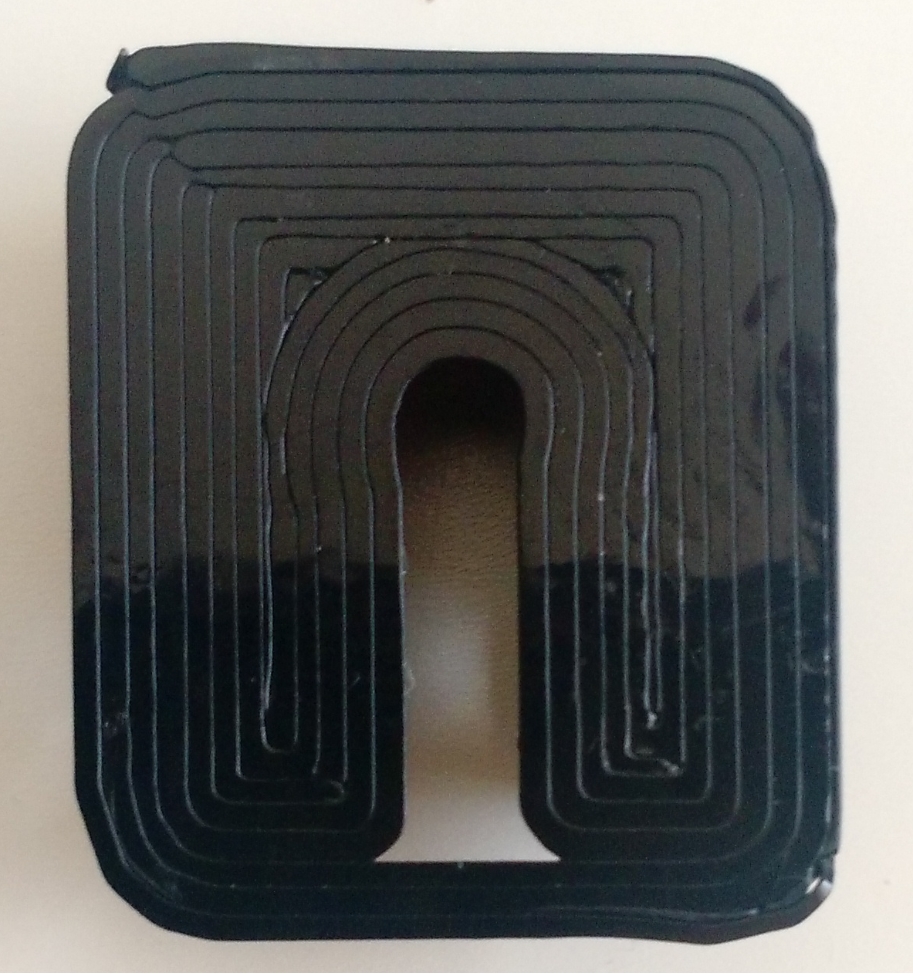
As for the arch I tried to print, it looks like the details are lost. I don't know how to describe it, but you could tell from the photos.
I've also posted my slic3r configuration ini.
Thanks
I have a MendelMax 1.5. Bought a long while ago, but only decided to finish it recently. Been spending a lot of time calibrating and playing with settings for the past months. I also built an oven out of plexi glass. The prints have gotten alot better since the first time i used it, but it just can't print a perfect circles. It seems smaller, but one problem at a time....
So I consistently get 2 corners on circles. they are always at the same part of the circle, and across each other. It gets more obvious as the circle gets smaller. Eventually, circle just becomes oval. I don't know what I can do. I drew the circles on SolidWorks. I believe they are M1 to M8 sized holes.
As for the arch I tried to print, it looks like the details are lost. I don't know how to describe it, but you could tell from the photos.
I've also posted my slic3r configuration ini.
Thanks
|
Re: Corners on Circles December 14, 2015 11:49PM |
Registered: 11 years ago Posts: 5,780 |
It looks to me like you're grossly over extruding. You need to calibrate the extruder before you do anything else.
See [reprap.org]
Start with the extruder calibration and use the average measured filament diameter (don't assume the nominal 1.75mm is accurate- it usually isn't). Measure the filament diameter in 20 or 30 places and calculate the average value. THAT is the filament diameter you use in the slicer.
Ultra MegaMax Dominator 3D printer: [drmrehorst.blogspot.com]
|
Re: Corners on Circles December 15, 2015 12:00AM |
Registered: 8 years ago Posts: 13 |
|
Re: Corners on Circles December 15, 2015 03:58AM |
Registered: 8 years ago Posts: 916 |
Yep as the good dentist noticed, you're way overextruding. There's an extrusion factor parameter in slic3r that you can tweak if your filament is not exactly as fat as it should be.
Also the ovals look like backlash in your X movement. Can you wiggle the nozzle back and forth with your fingers? See if there's any slop in the system, that's what causes round holes to become ovals like this.
Interestingly it looks like it's only in your X movement, not Y as well.
Edited 1 time(s). Last edit at 12/15/2015 03:58AM by nebbian.
|
Re: Corners on Circles December 15, 2015 06:05AM |
Registered: 8 years ago Posts: 25 |
|
Re: Corners on Circles December 15, 2015 01:53PM |
Registered: 8 years ago Posts: 13 |
I have the extrusion multiplier set to 0.84.
I'll try to wiggle the nozzle when i get home tonight. I hope there isn't any slop. I have a tensioner on X and Y belt.
I've recently reinstalled the x- pulley, and I made sure i tightened the grubscrew really hard. I'll just the Y grubscrew tonight.
Thanks
Edited 1 time(s). Last edit at 12/15/2015 02:00PM by peonking.
|
Re: Corners on Circles December 16, 2015 01:46AM |
Registered: 8 years ago Posts: 13 |
Hi
I've calibrated the E steps, tightened the y belt grubscrew. The nozzle doesn't wobble. I also checked the extrusion multiplier to 0.9321.
I haven't done E Steps Fine Tuning part of the calibration yet. I'll do that tomorrow.
I printed the circles again, but it looks the same to me.
I've calibrated the E steps, tightened the y belt grubscrew. The nozzle doesn't wobble. I also checked the extrusion multiplier to 0.9321.
I haven't done E Steps Fine Tuning part of the calibration yet. I'll do that tomorrow.
I printed the circles again, but it looks the same to me.
|
Re: Corners on Circles December 16, 2015 02:40AM |
Registered: 11 years ago Posts: 1,171 |
Your infill at least is still way over extruding. Go to Print Settings/ Advanced and see what the infill or solid infill are set to. (Zero is default).
Also try printing slower. It could just be the photos but the images look slightly slanted wish might be slipping or backlash which might also be an issue with your circles.
It's also helpful if you post your main settings like nozzle size, print speed, and so on.
Also try printing slower. It could just be the photos but the images look slightly slanted wish might be slipping or backlash which might also be an issue with your circles.
It's also helpful if you post your main settings like nozzle size, print speed, and so on.
|
Re: Corners on Circles December 16, 2015 09:28AM |
Registered: 8 years ago Posts: 13 |
Hi
How do you tell if its over extruding? the bulging stripes?
I've updated my slic3r configuration in the first post. It's basic.ini.
# generated by Slic3r 1.2.9 on Wed Dec 16 00:07:48 2015
avoid_crossing_perimeters = 0
bed_shape = 0x0,205x0,205x270,0x270
bed_temperature = 60
before_layer_gcode =
bottom_solid_layers = 3
bridge_acceleration = 0
bridge_fan_speed = 100
bridge_flow_ratio = 1
bridge_speed = 60
brim_width = 2
complete_objects = 0
cooling = 1
default_acceleration = 0
disable_fan_first_layers = 1
dont_support_bridges = 1
duplicate_distance = 6
end_gcode = M104 S0 ; turn off temperature\nM140 S0 ; turn off heat bed\nG28 X Z ; home X and Z axis\nG1 Y270 ;\nM84 ; disable motors
external_fill_pattern = rectilinear
external_perimeter_extrusion_width = 0
external_perimeter_speed = 50%
external_perimeters_first = 0
extra_perimeters = 1
extruder_clearance_height = 20
extruder_clearance_radius = 20
extruder_offset = 0x0
extrusion_axis = E
extrusion_multiplier = 0.9321
extrusion_width = 0
fan_always_on = 0
fan_below_layer_time = 60
filament_colour = #FFFFFF
filament_diameter = 2.9
fill_angle = 45
fill_density = 20%
fill_pattern = honeycomb
first_layer_acceleration = 0
first_layer_bed_temperature = 65
first_layer_extrusion_width = 200%
first_layer_height = 0.35
first_layer_speed = 10
first_layer_temperature = 235
gap_fill_speed = 20
gcode_arcs = 0
gcode_comments = 0
gcode_flavor = reprap
infill_acceleration = 0
infill_every_layers = 1
infill_extruder = 1
infill_extrusion_width = 0
infill_first = 0
infill_only_where_needed = 1
infill_overlap = 15%
infill_speed = 80
interface_shells = 0
layer_gcode =
layer_height = 0.2
max_fan_speed = 100
max_print_speed = 80
max_volumetric_speed = 0
min_fan_speed = 35
min_print_speed = 10
min_skirt_length = 0
notes =
nozzle_diameter = 0.35
octoprint_apikey =
octoprint_host =
only_retract_when_crossing_perimeters = 1
ooze_prevention = 0
output_filename_format = [input_filename_base].gcode
overhangs = 1
perimeter_acceleration = 0
perimeter_extruder = 1
perimeter_extrusion_width = 0
perimeter_speed = 60
perimeters = 3
post_process =
pressure_advance = 0
raft_layers = 0
resolution = 0
retract_before_travel = 2
retract_layer_change = 1
retract_length = 1
retract_length_toolchange = 10
retract_lift = 0.2
retract_restart_extra = 0
retract_restart_extra_toolchange = 0
retract_speed = 30
seam_position = aligned
skirt_distance = 0
skirt_height = 8
skirts = 3
slowdown_below_layer_time = 20
small_perimeter_speed = 67%
solid_infill_below_area = 59
solid_infill_every_layers = 0
solid_infill_extruder = 1
solid_infill_extrusion_width = 0
solid_infill_speed = 60
spiral_vase = 0
standby_temperature_delta = -5
start_gcode = G28 ; home all axes\nG1 Z5 F5000 ; lift nozzle
support_material = 0
support_material_angle = 0
support_material_contact_distance = 0.2
support_material_enforce_layers = 0
support_material_extruder = 1
support_material_extrusion_width = 0
support_material_interface_extruder = 1
support_material_interface_layers = 2
support_material_interface_spacing = 1.5
support_material_interface_speed = 100%
support_material_pattern = honeycomb
support_material_spacing = 2.5
support_material_speed = 80
support_material_threshold = 0
temperature = 235
thin_walls = 1
threads = 2
toolchange_gcode =
top_infill_extrusion_width = 0
top_solid_infill_speed = 50
top_solid_layers = 3
travel_speed = 130
use_firmware_retraction = 0
use_relative_e_distances = 0
use_volumetric_e = 0
vibration_limit = 0
wipe = 0
xy_size_compensation = 0
z_offset = 0
|
Re: Corners on Circles December 16, 2015 07:32PM |
Registered: 8 years ago Posts: 13 |
|
Re: Corners on Circles December 17, 2015 12:23PM |
Registered: 8 years ago Posts: 13 |
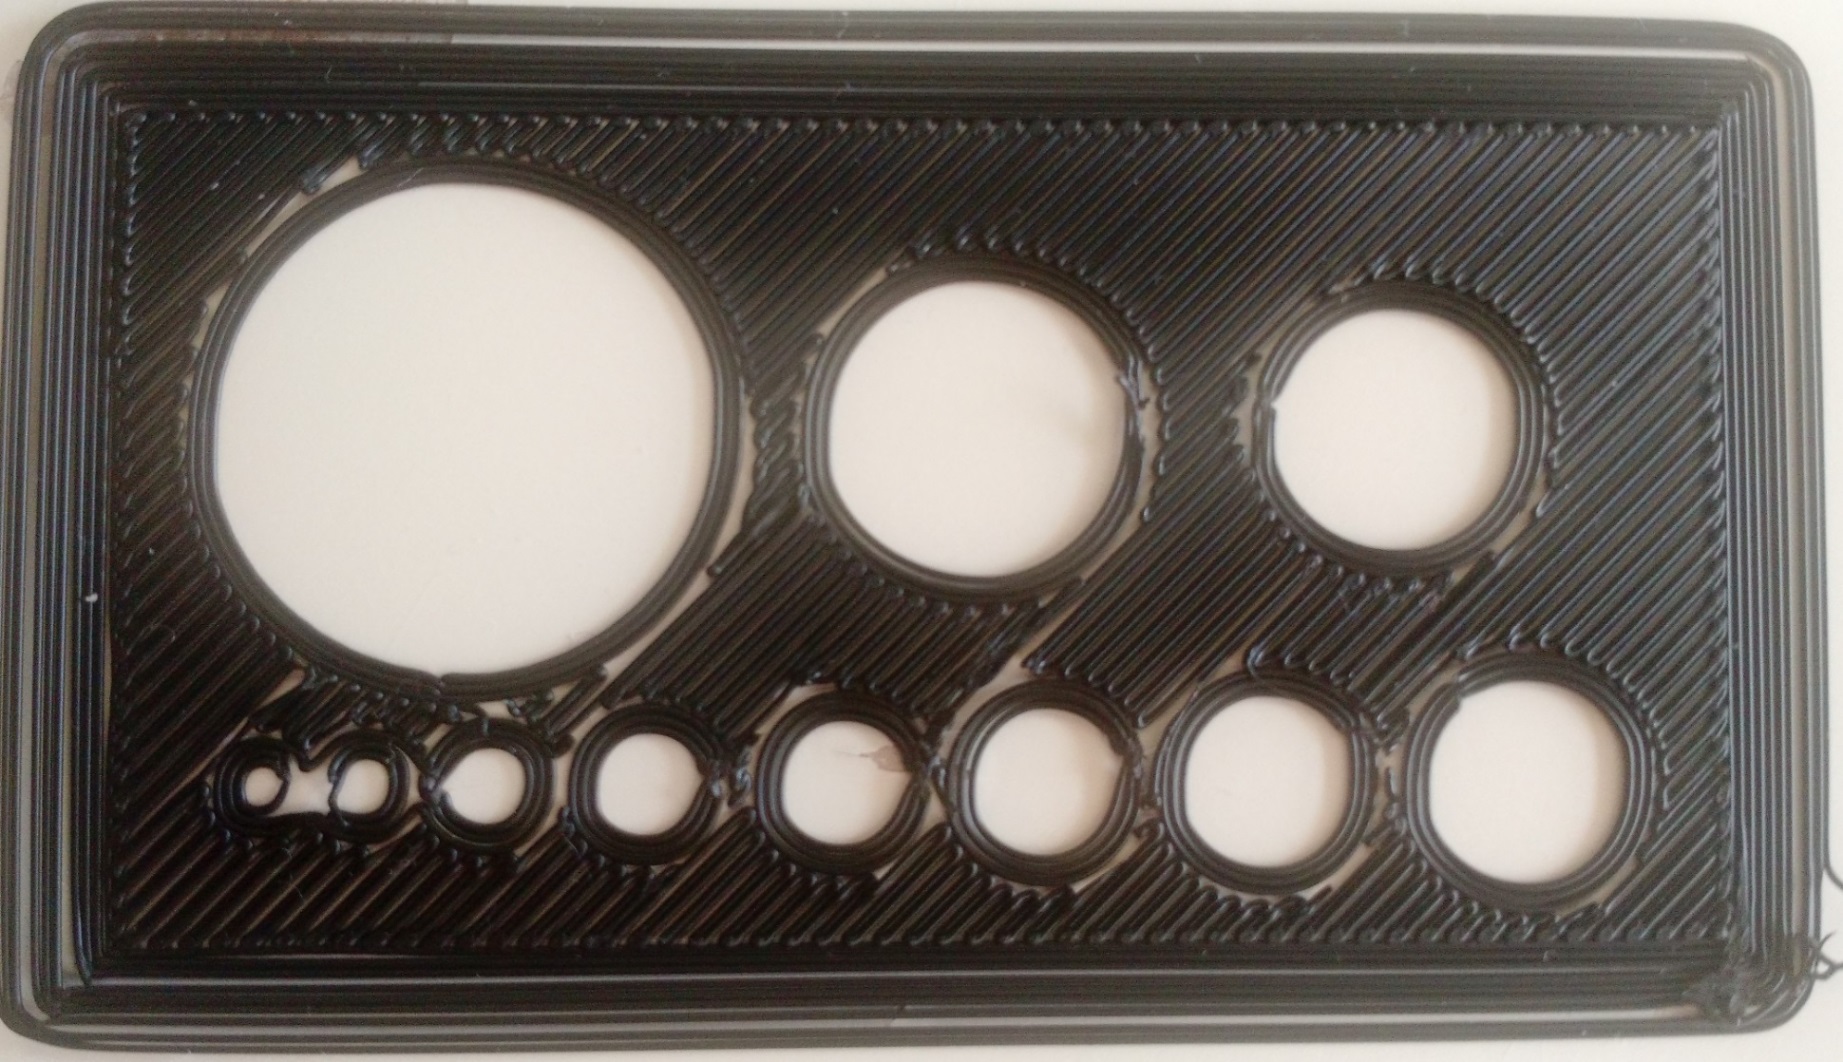
So i lowered first layer height from 0.35 to 0.3mm and first_layer_extrustion_width to 150%
The prints looks better. I think that makes sense, since first layer is over extruded to have better adhesion to the glass.
I've attached the picture of it.
Regarding the corners, I think the Z axis lead screw and rod on on both side of the frame are not directly across each other. So the X-carriage might be moving slightly diagonally across the print bed. I was playing with the position of z axis a while ago to reduce noise coming from the carriage when it moves along the z axis.
This might be the issue? That's the only thing I can think of.
|
Re: Corners on Circles December 20, 2015 01:53AM |
Registered: 9 years ago Posts: 705 |
|
Re: Corners on Circles January 06, 2016 12:02PM |
Registered: 8 years ago Posts: 13 |
Hi,
@elwood127 - yes I do save them.
I finally found out what was giving slack on the X-axis. Before i knew the existence of belt tensioner and when I my knowledge in slack were little, I had a makeshift solution to avoid belt slipping on the motor gear. I tied the belt onto a block and zip tied this block onto the x-carriage, so the belt would be closer to the gear in height and wrap around the gear more. The problem was the way this block was tied, there was some degree of elasticity that allowed the block to shift a little when the belt tension got stronger.
Anyway, I got proper belt clamp and the circles look better. ( i think ).
However, the piece looks under extruded to me. What do you think? I don't get how my fix in slack affected the under/over extursion.
Thanks
Edited 1 time(s). Last edit at 01/06/2016 12:04PM by peonking.
|
Re: Corners on Circles January 06, 2016 11:48PM |
Registered: 10 years ago Posts: 444 |
|
Re: Corners on Circles March 09, 2016 05:58AM |
Registered: 8 years ago Posts: 155 |
mmmmmm You are indeed over/under extruded, but I think that is in no way related to your circles problems, wich almost sure are related to same backlash problem, wich I have, and my circles look exactly like yours!!!!! (but my extrusion is perfect). Yesterday I dismantled my printer (prusa I3), and I discovered that my X axis was not 90 degrees with the Y axis. I fixed it and today will do a print test.
|
Re: Corners on Circles March 09, 2016 08:22AM |
Registered: 10 years ago Posts: 550 |
I think it's under extruding now but if this it the first layer then there is also an issue with the distance between the nozzle and bed. As far as I can guess the nozzle is so far above the bed that the plastic doesn't stick to the bed and the nozzle will drag the plastic away from the place where it first deposited it.
|
Re: Corners on Circles May 15, 2016 09:18AM |
Registered: 7 years ago Posts: 6 |
Hi all,
It is a little bit frustrating not to see if the problem was resolved or not in the end.
I guess not judging by the last picture you've posted?
Anyway I got to this thread because I had the same problem. My wheels and holes (especially small ones - less than 20mm in diameter looked a little bit like lemon cut in the middle along the long axis...
After a lot of googling and head scratching I think I got it sorted.
I did few things so I will list them all and I think all are relevant anyway... so:
- belt tensions - be sure belts are really tight. I was thinking mine are all right but added couple of more twist on tensioning screws just in case... Any backslash should go away.
- I dismantled my Y axis and put it back together. I in my case this came pre-assembled in kit and I made a mistake and ASSUMED it's all put nice and tight together. Well, it wasn't, so make sure there is no movement in your Y and X axis bits.
- Y and X perpendicularity - I didn't pay much attention to that aspect because I ASSUMED construction takes care of that. Well, it doesn't... so make sure it is the case and you axis are perpendicular to each other.
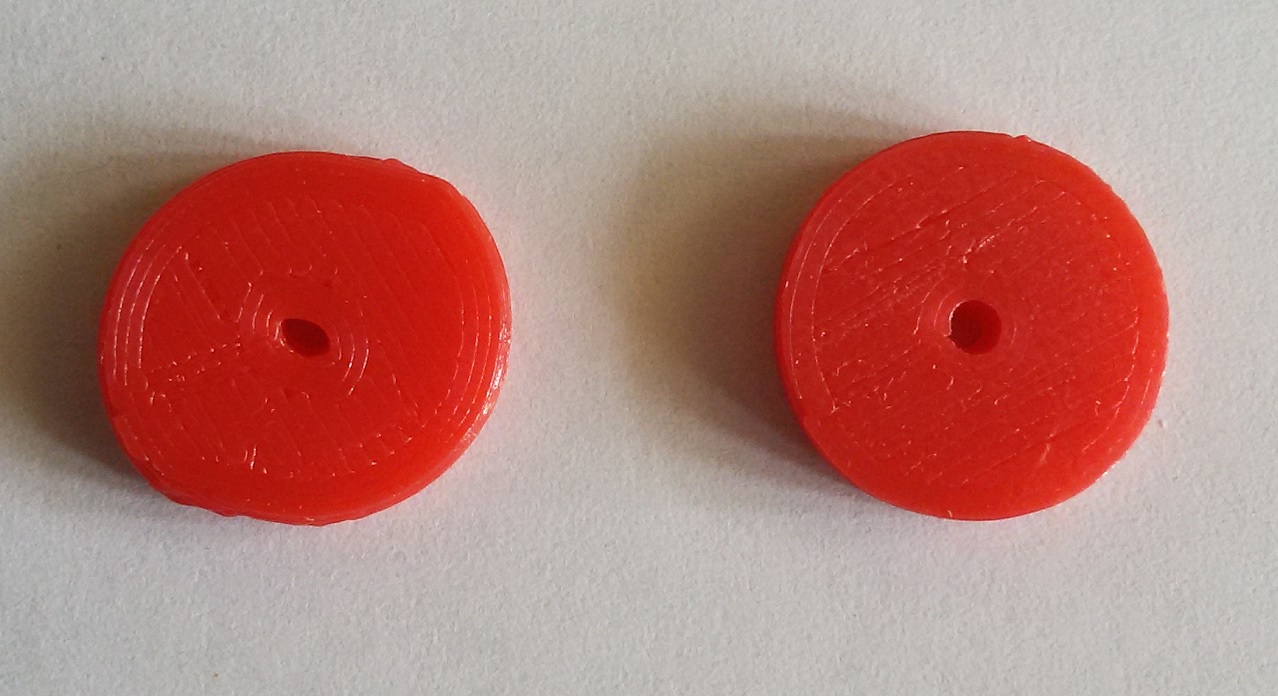
The picture shows you the first layer. Both suppose to be around 16mm in diameter and the one on the right is the result of the above tinkering and as you can see almost perfect.
There is still around 0.2 mm difference in diameter measured 90 degrees apart but it is MUCH better, isn't it?
Hope this helps.
Edited 1 time(s). Last edit at 05/15/2016 09:20AM by vladek7.
It is a little bit frustrating not to see if the problem was resolved or not in the end.
I guess not judging by the last picture you've posted?
Anyway I got to this thread because I had the same problem. My wheels and holes (especially small ones - less than 20mm in diameter looked a little bit like lemon cut in the middle along the long axis...
After a lot of googling and head scratching I think I got it sorted.
I did few things so I will list them all and I think all are relevant anyway... so:
- belt tensions - be sure belts are really tight. I was thinking mine are all right but added couple of more twist on tensioning screws just in case... Any backslash should go away.
- I dismantled my Y axis and put it back together. I in my case this came pre-assembled in kit and I made a mistake and ASSUMED it's all put nice and tight together. Well, it wasn't, so make sure there is no movement in your Y and X axis bits.
- Y and X perpendicularity - I didn't pay much attention to that aspect because I ASSUMED construction takes care of that. Well, it doesn't... so make sure it is the case and you axis are perpendicular to each other.
The picture shows you the first layer. Both suppose to be around 16mm in diameter and the one on the right is the result of the above tinkering and as you can see almost perfect.
There is still around 0.2 mm difference in diameter measured 90 degrees apart but it is MUCH better, isn't it?
Hope this helps.
Edited 1 time(s). Last edit at 05/15/2016 09:20AM by vladek7.
|
Re: Corners on Circles May 15, 2016 05:12PM |
Registered: 8 years ago Posts: 88 |
@peonking: your linear bearings or bushings are most likely binding. I've had this with cheap IGUS bushings. If your axes are not near perfectly parallel or your carriage is not aligned properly to the axes there will be some friction/stopping. This translates to abrupt stop (when motors don't have torque, on deceleration) and a slow start on acceleration. This is the main cause of backlash in Prusa i3 design. Check the movement without belts installed. Try to push the carriage with very small force and feel if there is some "stiction".
Sorry, only registered users may post in this forum.