Random missing filament
Posted by tristann
|
Random missing filament March 17, 2016 08:27PM |
Registered: 8 years ago Posts: 10 |

Please help me, I am in distress.
Could it be the motor? I was paying attention to the print and the motor wasn't skipping steps, but the filament stopped sometimes at the start so I tightened the bearing to the hobbed bolt and then it went well. Well on faster moves the filament still could stop.
Then maybe it's the temperature, I went from 245 to 255 for ABS. Or could it even be a configuration issue?
Issue number 2 are the edges of the circles. It starts the line there where the overhang edge is?
I stopped the print, because it started making short bridges and skipped a lot of steps. The speed settings for bridging were too high.
Also, where do you buy your filament? Mine is not of good quality.
Another picture:

--
Tristan
|
Re: Random missing filament March 18, 2016 12:21AM |
Registered: 9 years ago Posts: 705 |
Over tightening your hob bearing might amplify a possible issue with your stepper voltages. If low it may skip steps. I use Foxsmart filament. It is checked multiple times for diameter accuracy and is cheap at $16.00 a kilo. Flat $4.00 shipping no matter how many rolls you buy. Get good filament before wasting any time on settings.
|
Re: Random missing filament March 18, 2016 02:47AM |
Registered: 11 years ago Posts: 5,780 |
Has the extruder been calibrated? What sort of Z axis does the machine have? It looks like you may have layer to layer adhesion problems. What is the nozzle diameter and how thick are the layers you're printing?
Has the extruder drive gear ever chewed a divot into the filament when the hot-end jammed? If so you may need to clean up the drive gear- it may have dust stuck in the teeth that prevents the gear from properly grabbing the filament.
Ultra MegaMax Dominator 3D printer: [drmrehorst.blogspot.com]
Has the extruder drive gear ever chewed a divot into the filament when the hot-end jammed? If so you may need to clean up the drive gear- it may have dust stuck in the teeth that prevents the gear from properly grabbing the filament.
Ultra MegaMax Dominator 3D printer: [drmrehorst.blogspot.com]
|
Re: Random missing filament March 18, 2016 05:35AM |
Registered: 8 years ago Posts: 10 |
What do you mean with calibration? I only calculated the steps required per mm. Is microstepping a must with extruder motor?
Z axis is 2 M5 screws.
Nozzle=0.4; Layer=0.32; First layer=0.35;
Yes it has. This is how the hobbed bolt looks like:
Could it be that the groove isn't wide enough? It grabs the filament on one side only and when I tighten the bearing too much it makes the filament too wide and then the extrusion stops after some cm, because it get's stuck.
So I should widthen the groove?
Z axis is 2 M5 screws.
Nozzle=0.4; Layer=0.32; First layer=0.35;
Yes it has. This is how the hobbed bolt looks like:

Could it be that the groove isn't wide enough? It grabs the filament on one side only and when I tighten the bearing too much it makes the filament too wide and then the extrusion stops after some cm, because it get's stuck.
So I should widthen the groove?
|
Re: Random missing filament March 18, 2016 06:35AM |
Registered: 12 years ago Posts: 2,470 |
The bolt looks extremely uneven and blunt, i would not expect it to be able to transport the filament continously.
[www.bonkers.de]
[merlin-hotend.de]
[www.hackerspace-ffm.de]
[www.bonkers.de]
[merlin-hotend.de]
[www.hackerspace-ffm.de]
|
Re: Random missing filament March 18, 2016 10:32AM |
Registered: 11 years ago Posts: 5,780 |
OK, lots of stuff here.
1) I think you need to start with a better drive gear for the filament. Look at the design of a "hobbed bolt" or an "extruder drive gear" by looking them up on ebay- you'll see many examples of what they should look like. If you're going to DIY, copy them.
2) After you get the drive gear sorted out, everything has to be calibrated. Starting with calculated steps/mm is fine, but it isn't the same thing as calibration. see: [reprap.org] Pay particular attention to extruder calibration. I recommend calibrating the extruder before the X and Y axes.
3) Your extruder has some gear reduction that makes for pretty fine steps, but if the controller board can drive enough usteps per second to keep up with your print speeds, I'd use microstepping for the extruder. Using microstepping usually results in improved print surface quality.
4) Your first layer is too thick for that nozzle diameter. The rule of thumb is max layer height = nozzle diameter x 0.8 (in your case, 320 um). I would try using 250 um layers (including the first).
5) If the drive gear chews a divot into the filament, the pinch wheel pressure is too low. The extruder motor should miss steps if the hot-end jams. It should not chew a divot into the filament. That said, you don't want to crush the filament either. If the filament gets distorted and won't fit into the hot-end entrance you won't be able to print. Once you get the drive gear sorted out I think you'll find the right setting for the pinch wheel pressure pretty easily.
6) you didn't say how fast you're trying to print, but in general, you always trade speed for quality. What are your acceleration and jerk settings? How fast are you printing?
Edited 1 time(s). Last edit at 03/18/2016 10:34AM by the_digital_dentist.
Ultra MegaMax Dominator 3D printer: [drmrehorst.blogspot.com]
|
Re: Random missing filament March 19, 2016 10:05AM |
Registered: 8 years ago Posts: 10 |
Well i started with 80 but that was too fast and then went down to 60 and it went fine, but after I fixed the Y axis holders because the belt moved a bit out of them.
I don't know the exact jerk settings but they are a bit lower than the defaults. Will report them when I get home.
What about acceleration? I don't have an idea how to set those so I kept them default.
@srek @dentist 1, I found this on the reprap wiki, look at the link. It is written there that it works quite good. It's just that mine isn't wide enough (I think). I will try widening first and then making a new one.
I am also making a box for the printer because of bending corners. Can you also give me some advice on this? Any problems that you have encountered?
|
Re: Random missing filament March 19, 2016 12:17PM |
Registered: 12 years ago Posts: 2,470 |
Please make a photo of your bolt then. The one on this picture is serious crap. If yours looks like it, it is the problem.Quote
tristann
@srek @dentist 1, I found this on the reprap wiki, look at the link. It is written there that it works quite good. It's just that mine isn't wide enough (I think). I will try widening first and then making a new one.
Don't change to many parameters at once, or better yet, only one at a time. Changing more than one parameter at a time will lead you on a merry chase and will cost you hours, if not days.
[www.bonkers.de]
[merlin-hotend.de]
[www.hackerspace-ffm.de]
|
Re: Random missing filament March 19, 2016 06:34PM |
Registered: 8 years ago Posts: 10 |
Making A Hobbed Bolt #Indexed groove method
This here, the main differences are mine is not so wide, the filament doesn't go as deep and i have ABS instead of PLA. That surely makes a difference.
I made this one because it was the easiest to make with my toolset. Before this one I had the same as those under Anthony's investigations but it was cutting my filament apart.
If this one really is such "serious crap" then tomorrow I'm going to make the wades original. Or should I go with another one? If yes, which one?
@Dentist
1) X,Y,Z axises are all calibrated and the belts are tight, but not too tight. I used tape and put it on the bed which were exactly 10cm apart. then I moved the head for 10cm and changed the steps so long until it was exactly 10cm. But this can still have an error, but smaller than half a mm. Z axis is correct, it's the same as the calculated steps.
2) Set up microstepping for the extruder.
3) I read about acceleration and speeds, will change them accordingly.
4) Box is almost done, didn't have enough time today.
Thanks for the help you two.
|
Re: Random missing filament March 20, 2016 05:16AM |
Registered: 12 years ago Posts: 2,470 |
I made them myself as well (using a different method than the indexed groove), until i got these
[reprapteile.de]
and later switched to direct drive instead of Wade.
[www.bonkers.de]
[merlin-hotend.de]
[www.hackerspace-ffm.de]
[reprapteile.de]
and later switched to direct drive instead of Wade.
[www.bonkers.de]
[merlin-hotend.de]
[www.hackerspace-ffm.de]
|
Re: Random missing filament March 20, 2016 07:37AM |
Registered: 8 years ago Posts: 778 |
I experimented with a lot of designs for this damn bolt.
My first came with the printer and was just a round groove with straight cuts.
The next was ordered online and claimed to grip like tarzan, well it did...
Problem was it had a very deep groove with the diameter of the filament.
This caused a lot of fine dust to build up and the bolt was constantly clogged - it also made it into the bowden tube I used at this time, what a pain...
After these disasters I decided to follow some of the online tutorials for making a "proper" hobbed bolt.
Let's just say that after wasting a lot of bolts I came to the conclusion that most cause far too much damage on the filament.
What is required is a bolt that is able to transport the filament with as little damage and deformation as possible.
The actual "grip" is done through the pressure adjustment on the extruder.
I got a few tools for actual "hobbing" on the lathe, like used for thumb srews or making dial grippy.
Was quite happy with the diamond pattern for quite some time until I went back to using nylon.
For PLA this diamond patter was perfect as the filament is quite hard, ABS worked good too as it is flexible enough for the diamonds to push into the material without too much damage.
Nylon however required intense force on the pressure plate and still slipped at higher speeds.
I am lucky to have a little lathe to make things easier but my current bolt design can quite easy be done on a drill press with a machining vice.
There are a lot of printable designs for grooving a bolt with a dremel or similar.
Basically just a frame with two bearings ans something to adjust the spacing of the grooves.
I simplified this to just a bearing holder where the bolt fits in so I can put it into the machining vice.
The next step is to use a suitable tap to cut a "thread" into the bolt.
Opinions differ what size is perfect to grab the filament without clogging too much or damaging it.
I found 3.5mm or 4mm works great, so if you are in the imperial world check what fractions would best fit into these mm ranges
Now for the hard part:
You holder needs enough room so you can fit the tap between vice and bolt.
It also pays off to make a fiiting for the head so you put this into one bearing and while cutting the tap pushes the bolt towards the head - this keeps everything nice and vibration free.
If your bolt has some play in the bearing add some tape around it, you don't want it banging around in the bearings
Put enough cutting oil on the tap and bolt and lower the tap so the last third of the thread is at the same height as the center of the bolt.
Fix the drill heigth in this position.
Start the drill press at a very low speed - the lowest you have...
Now use the maching vice to move the bolt towards the tap - it will scratch first and you might need to assist the spinning by hand until you move close enough for the bolt to keep spinning alone.
Once you reached this point you start to move the other axis of the vice so the tap can move up and down the bolt.
Overlap your measured groove region by about 2mm - so if you need a 4mm wide groove you move the tap so it cuts 4.2-4.3mm wide into the bolt.
Make one turn down the bolt and one turn up the bolt, than move a tiny bit closer to the tap and repeat.
What actually counts is the pitch of the tap, so for your first try on handling it you might want to try 5 or 6mm tap with a 0.8mm or finer pitch - they can take more abuse than the thin models
Keep in mind the multiplied pitch must equal the cutting diameter!
You will know what I mean when you cut - the cut will look very ugly at first, almost like you used an angle grinder on it.
While you move closer to the tap you actually cut deeper into the bolt and also reduce the diameter slightly with every round.
At the beginning you might also notice that the diameter actuall increased a bit first because the material is also pushed outwards.
You want to keep cutting and moving towards the tap until you get an even spacing between the grooves and a clean look.
To avoid a bad and useless result you have to use enough oil and never push things too hard!
The first few rounds can be a bit tricky until the bolt spins properly and you will be tempted to force things a bit once it cuts good - don't!
Once you see clean and even grooves forming that are not outside the bolt diameter it is time to clean up.
I prefer a dremel with a stainless steel wire disk to got lengthwise through the grooves but on soft material a normal wire brush works too.
For even better results use high tensile bolts and heat treatment.
Before cutting bring them to a nice orange glow and let cool down again.
After the cutting and cleaning make them glow bright again and dump into cold oil - old oil from a diesel engine works great here.
Give it a proper clean and go over the grooves with a brass wire brush - the result should be an almost black bolt that is very smooth and very hard, so long lasting and less prone to clogging.
|
Re: Random missing filament March 20, 2016 09:48AM |
Registered: 8 years ago Posts: 10 |
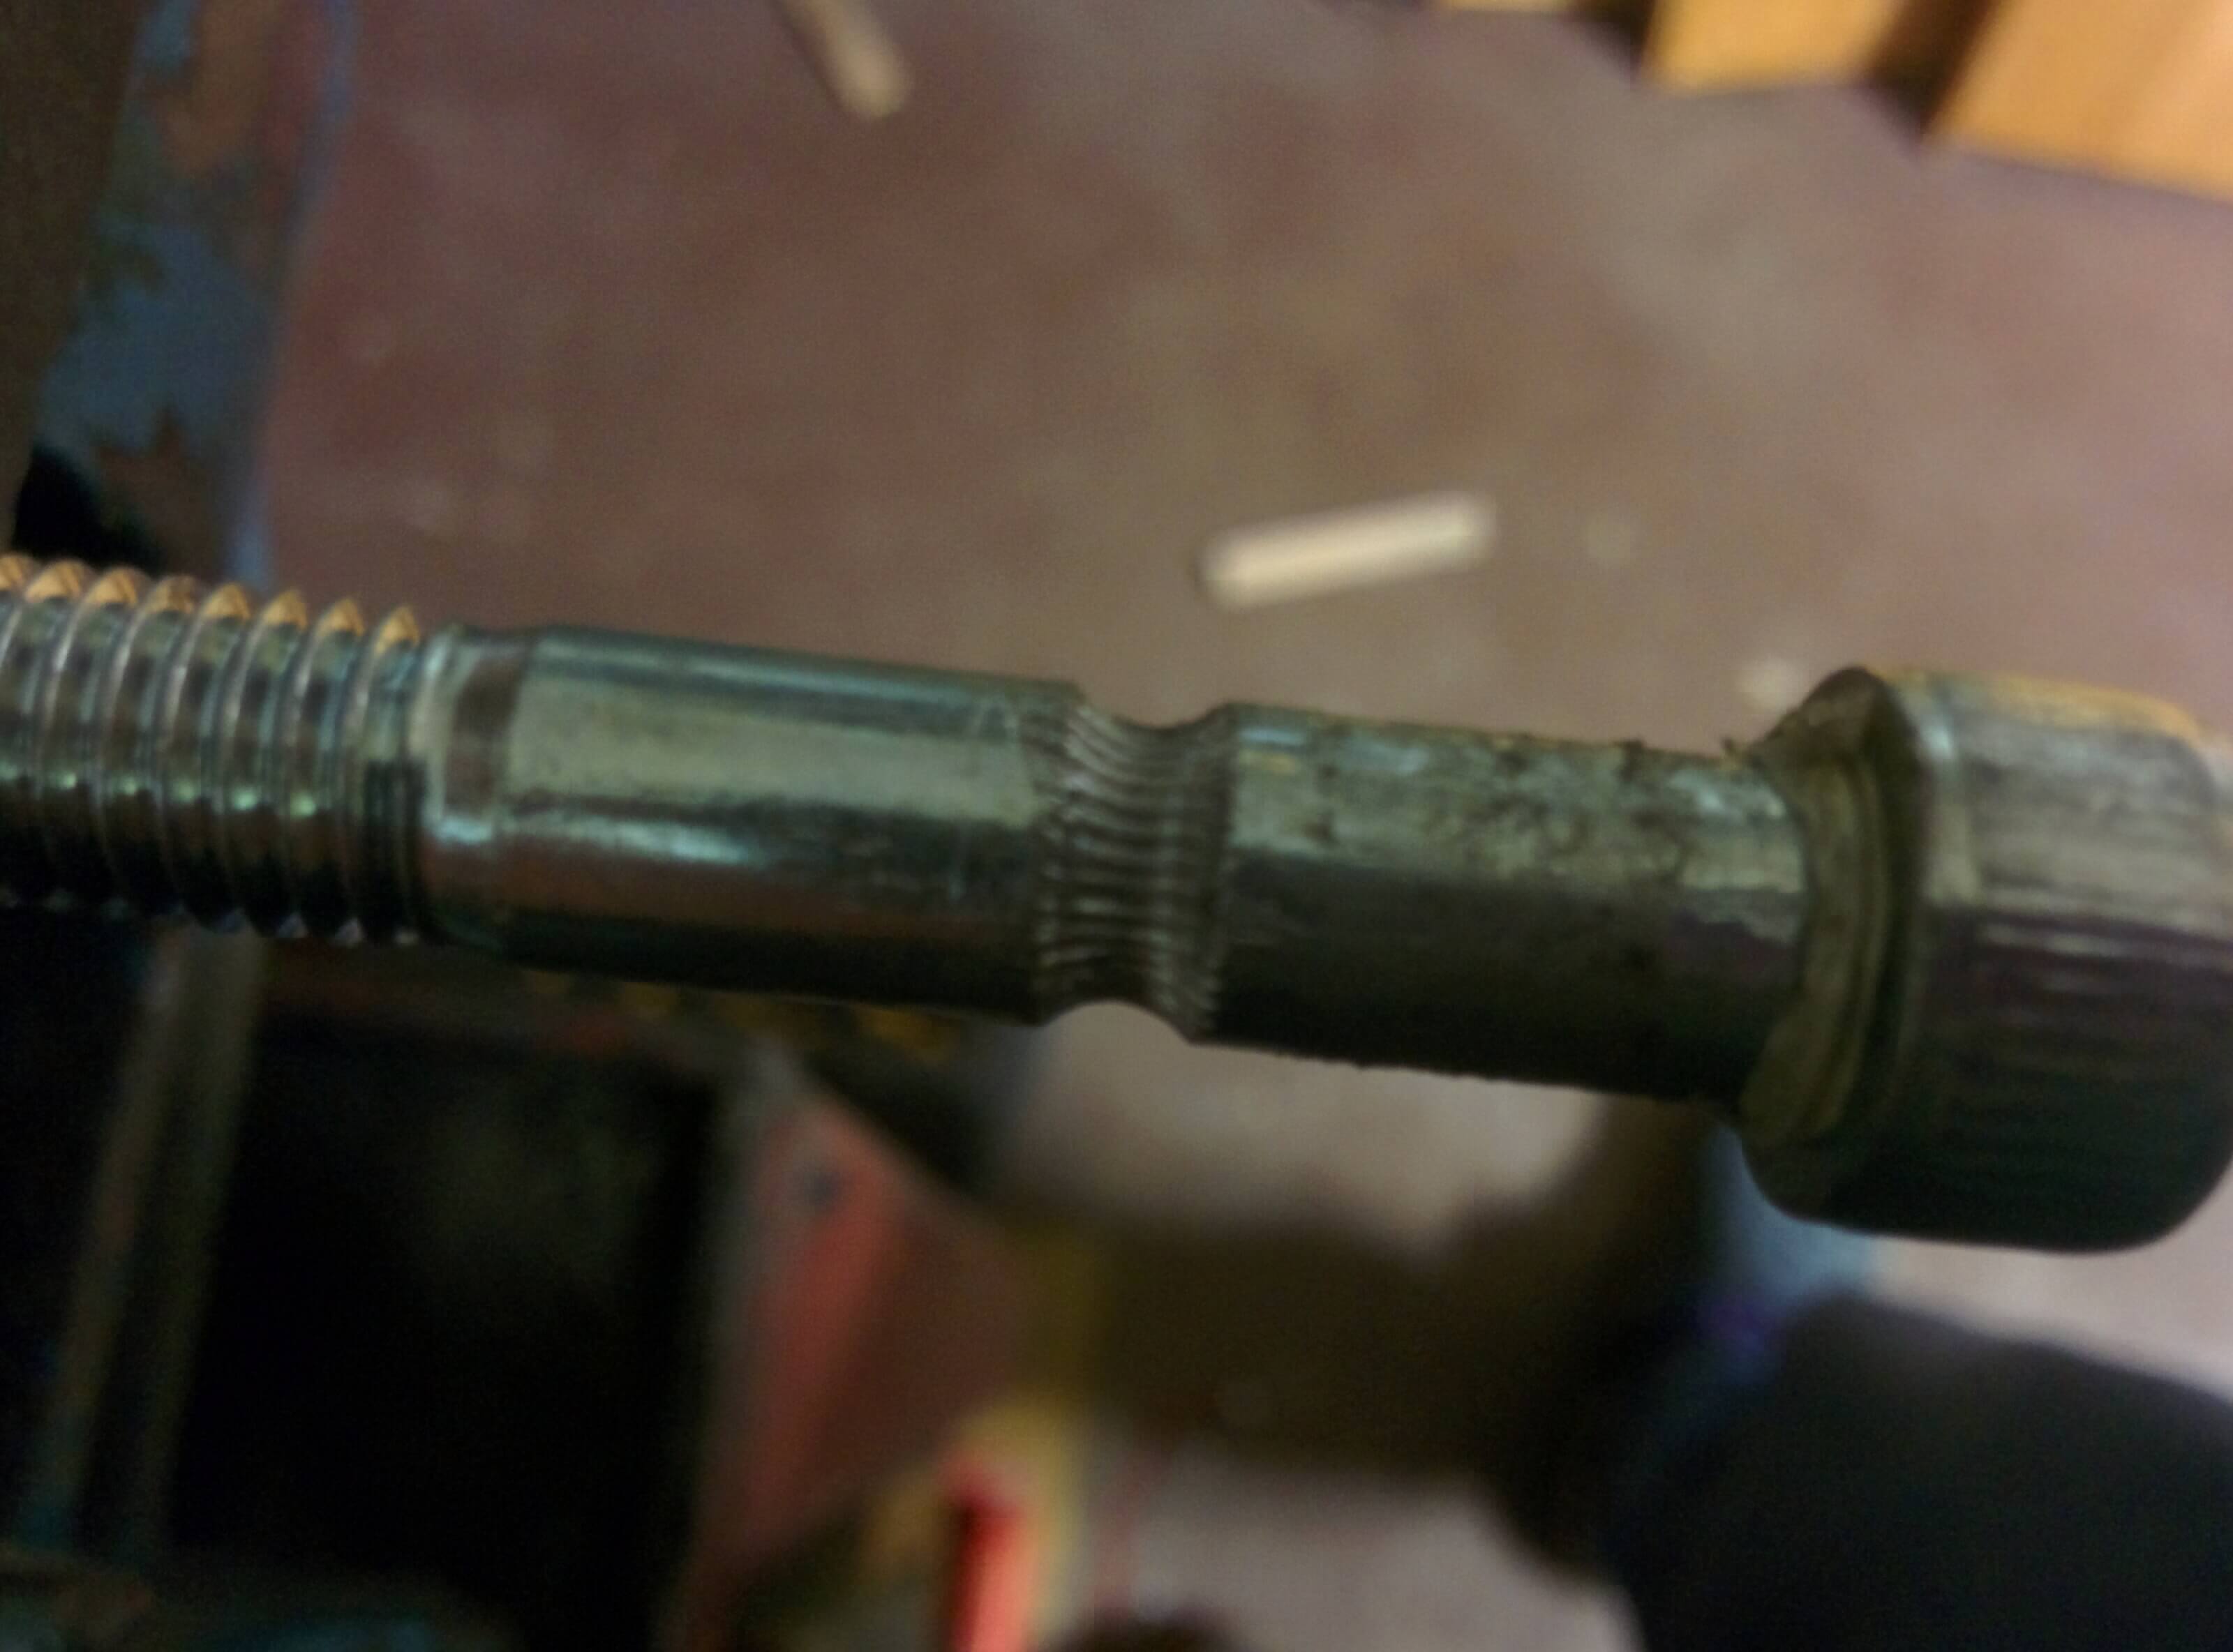
Well, I made one right now. It was hard with the tap method. But it came out pretty. Didn't advance on the box. Want to enjoy my well earned sunday.
In the picture you'll see the one I made. If possible please tell me if it's again "serious crap" or if it's good. It definately has a grip.
Will report back when the box is done and wired.
In the picture you'll see the one I made. If possible please tell me if it's again "serious crap" or if it's good. It definately has a grip.
Will report back when the box is done and wired.
|
Re: Random missing filament March 20, 2016 09:55AM |
Registered: 12 years ago Posts: 2,470 |
Looks good, it should work.
I tend to use a pretty coars tap for mine (M8), but finer should work as well.
[www.bonkers.de]
[merlin-hotend.de]
[www.hackerspace-ffm.de]
I tend to use a pretty coars tap for mine (M8), but finer should work as well.
[www.bonkers.de]
[merlin-hotend.de]
[www.hackerspace-ffm.de]
|
Re: Random missing filament March 20, 2016 05:53PM |
Registered: 8 years ago Posts: 778 |

|
Re: Random missing filament March 26, 2016 07:42PM |
Registered: 8 years ago Posts: 10 |
There is no more missing filament, the bolt was the culprit. This new one works really great. So I guess this thread is done. Should I open a new thread for every question or can I just add them here?
Will post picture when possible.
Well here it is: Sometimes it stops midprint (the electronics are outside of the box, so no heating issue, but sometimes they are warm).
I am printing from OctoPrint and it reports something along the lines of "Device reported readiness to read, but returned no data". When this happens sometimes the printer controller restarts, sometimes it just stops printing and the firmware works normally henceforth.
|
Re: Random missing filament March 27, 2016 07:08PM |
Registered: 8 years ago Posts: 10 |
Well here are the pictures the layers are pretty good now. but when printing in mid air the plastic bends upwards as you can see in the first picture. Then there are waves (I hope they are visible on the pictures), but I believe this is from the direct feed extruder. Then in the second picture you can see the bigger piece where it just stopped. Then the third one is from today and my Y-axis changed it's mind midprint. But I sorted that out.
My controller board is GT2560, and I'm starting to believe that it's crap (from finding no info on it except some forum posts that don't talk well of it). I'm running on 24V and there is a SMD coil and around it are some capacitors which heat up quite well.
There is a jumper on the board (which I didn't know about until now) it switches between 12V and 24V. Everything it did was that it changed the fan voltage to 24V.
So here is a pretty list:
- Plastic bending upwards when printing in mid air (first picture)
- Waves in prints (maybe x-axis wobble)
- GT2560 heating issue or maybe something else (device reported readiness to read but returned no data)
|
Re: Random missing filament March 29, 2016 09:41PM |
Registered: 8 years ago Posts: 10 |
Well I fixed all my issues, so if anybody needs answers:
The plastic bending was fixed with speed settings (making them a tad lower).
The waves were formed because the hotend moved a bit sideways inside the extruder mount. Fixed it with a new extruder (the charlstruder), that is currently being printed.
The disconnection wasn't caused by GT2560, so the heating is not a problem. The problem was that the host pc sometimes looses it and reconnects all usb devices.
So that's it. Thanks everybody for the help, you helped a maker to his happiness.
Sorry, only registered users may post in this forum.