Pockmarks on surface
Posted by blt3dp
|
Pockmarks on surface November 08, 2016 02:37PM |
Registered: 10 years ago Posts: 651 |
Had a fan cooling my Hotend that was off balance. Didn't realize that the vibration was causing my nozzle or heater block to loosen over time. Finally saw that filament was coming up out of the heater block and pooling on top of it. Odd thing is that prints were perfect. I would have expected inconsistent extrusion.
This is with a Hexagon Hotend, .4mm nozzle, Greg's Accessible Extruder (5:1 geared) and running Monoprice Yellow 1.75mm PETG (which I was out of at this point)
I replaced the fan, now no more vibration
I took the Hotend apart, torched it and cleaned it. Put it back together with the normal process, Eg. Heat up to 240c and tighten down nozzle.
I printed more PETG after this, perfectly.
I then ran out.
I heated it up to 240c and put in my new filament, ESUN Orange 1.75mm PLA and pushed through by hand until all that was coming out was ornage. Set the temperature down to 180c and continued pushing it through by hand as the temp dropped to hopefully take any leftover PETG with it.
It seemed to move easily.
So I print and I notice the surface finish is a bit garbage and solid infill layers have holes. Plus the Extruder ticks, very, very infrequently. But it ticks nonetheless. It's not grinding the filament. I'm thinking it just slips one tooth of the Hobbed Bolt and catches again. Prints complete, and don't appear to ever be starving for filament.
Thinking I might have a partially blocked nozzle, I do several cold pulls. I pull out what appears to be carbonized filament, I do cold pulls until it is gone.
Additionally I take a precision drill bit, smaller than .40 and push it into the nozzle while hot, thinking there might be something there.
Do more cold pulls and it's clean.
The holes in solid infill layers:
Maybe when the Extruder does tick, it is starving for filament on these layers.
I dunno if I don't have the pinch wheel tightened enough, I notice this PLA is very hard and the cut marks are fairly shallow when I pull the filament out. Maybe more?
I'm pretty sure that it's not temperature, the print in the pictures is actually a temperature tower, it's 240c (filament's rated for 180c-220c) at the bottom and every 10mm it drops 5c. This one the top 10mm are at 215c
Oh yeah, and these exist on prints with prints done at 185c.
It also ticks regardless of the temperature.
I suppose it could still be partially blocked nozzle though the filament flows super smooth by hand at 240c, all the way down to 180c
Filament diameter measures consistently 1.74 over the span of a meter. have 1.74 in Slic3r with no extrusion multiplier. Single wall print measured perfectly. And also single wall test print came out clean, only artifact was the scar left at layer change each where it oozed a bit.
And the surface finish
Now the striations I expect, just because it's not a precision threaded rod it looks consistent with my M5 rod threads.
The pock marks I'm not sure if it's a layer change artifact, Eg, Retraction on layer change or if it corresponds with a tick of the Extruder.
Retractions is set to 1mm at 30mm/sec
This is 2 perimeters with the layer starting on the innermost perimeter first.
Or is it just cheap filament? I mean I hear good things about ESUN filament, but it was cheap $14 off of Amazon.
Any ideas?
Edited 6 time(s). Last edit at 11/09/2016 12:36PM by FA-MAS.
This is with a Hexagon Hotend, .4mm nozzle, Greg's Accessible Extruder (5:1 geared) and running Monoprice Yellow 1.75mm PETG (which I was out of at this point)
I replaced the fan, now no more vibration
I took the Hotend apart, torched it and cleaned it. Put it back together with the normal process, Eg. Heat up to 240c and tighten down nozzle.
I printed more PETG after this, perfectly.
I then ran out.
I heated it up to 240c and put in my new filament, ESUN Orange 1.75mm PLA and pushed through by hand until all that was coming out was ornage. Set the temperature down to 180c and continued pushing it through by hand as the temp dropped to hopefully take any leftover PETG with it.
It seemed to move easily.
So I print and I notice the surface finish is a bit garbage and solid infill layers have holes. Plus the Extruder ticks, very, very infrequently. But it ticks nonetheless. It's not grinding the filament. I'm thinking it just slips one tooth of the Hobbed Bolt and catches again. Prints complete, and don't appear to ever be starving for filament.
Thinking I might have a partially blocked nozzle, I do several cold pulls. I pull out what appears to be carbonized filament, I do cold pulls until it is gone.
Additionally I take a precision drill bit, smaller than .40 and push it into the nozzle while hot, thinking there might be something there.
Do more cold pulls and it's clean.
The holes in solid infill layers:
Maybe when the Extruder does tick, it is starving for filament on these layers.
I dunno if I don't have the pinch wheel tightened enough, I notice this PLA is very hard and the cut marks are fairly shallow when I pull the filament out. Maybe more?
I'm pretty sure that it's not temperature, the print in the pictures is actually a temperature tower, it's 240c (filament's rated for 180c-220c) at the bottom and every 10mm it drops 5c. This one the top 10mm are at 215c
Oh yeah, and these exist on prints with prints done at 185c.
It also ticks regardless of the temperature.
I suppose it could still be partially blocked nozzle though the filament flows super smooth by hand at 240c, all the way down to 180c
Filament diameter measures consistently 1.74 over the span of a meter. have 1.74 in Slic3r with no extrusion multiplier. Single wall print measured perfectly. And also single wall test print came out clean, only artifact was the scar left at layer change each where it oozed a bit.
And the surface finish
Now the striations I expect, just because it's not a precision threaded rod it looks consistent with my M5 rod threads.
The pock marks I'm not sure if it's a layer change artifact, Eg, Retraction on layer change or if it corresponds with a tick of the Extruder.
Retractions is set to 1mm at 30mm/sec
This is 2 perimeters with the layer starting on the innermost perimeter first.
Or is it just cheap filament? I mean I hear good things about ESUN filament, but it was cheap $14 off of Amazon.
Any ideas?


Edited 6 time(s). Last edit at 11/09/2016 12:36PM by FA-MAS.
|
Re: Switching from PETG to PLA November 08, 2016 04:19PM |
Registered: 7 years ago Posts: 558 |
I've gotten really inconsistent prints from that Deltaprinter PLA filament (from the For Sale section of the forums) that was $9 a roll compared to the Hatchbox PLA I normally use from Amazon for $22-$24 a spool. I wasn't ever able to figure out why, and changing my filament back to Hatchbox PLA solved my inconsistencies. Cheap filament is exactly that, cheap and inconsistent. I learned my lesson with 4 rolls of useless PLA from Deltaprinter.
If you use some other filament, does it still go inconsistent or is it any better? From what I've seen the eSun filament is about the same $20-$24 per spool for 1kg with their PLA Pro being $25-$35 per 1kg, so you might not have true eSun filament at $14.
If you use some other filament, does it still go inconsistent or is it any better? From what I've seen the eSun filament is about the same $20-$24 per spool for 1kg with their PLA Pro being $25-$35 per 1kg, so you might not have true eSun filament at $14.
|
Re: Switching from PETG to PLA November 08, 2016 04:23PM |
Registered: 8 years ago Posts: 165 |
Drop few drops of Dexos2 inside the barrel. (5W-30 engine oil)
It helps with eSun PLA.
PLA likes to melt in the barrel (tip becomes thicker) and creep up, untill it blocks the barrel and starts to click. It might recover and continue printing, or jams because the hobbed bolt has grind itself onto filament. It is not feeding anymore and you will notice the tip of the filament is really thick when you pull it out.
Anyway, drop of oil will help you on this and it will also make a shinier surface. Seems to somehow stabilize the ooze flow.
|
Re: Switching from PETG to PLA November 08, 2016 04:49PM |
Registered: 10 years ago Posts: 651 |
Quote
PDBeal
Cheap filament is exactly that, cheap and inconsistent...
If you use some other filament, does it still go inconsistent or is it any better? From what I've seen the eSun filament is about the same $20-$24 per spool for 1kg with their PLA Pro being $25-$35 per 1kg, so you might not have true eSun filament at $14.
Yeah, though I heard good things about ESUN, and it was cheap, I thought why not. The packaging of what I got doesn't match up with what is shown on Amazon, it didn't come on a clear spool, it only came in a white box that said 3D Printer Filament on it. It may not be actual ESUN filament. I didn't think to pay attention to the actual seller either, probably should have picked one sold directly by INTSERVO.
I hadn't had a problem printing PLA previously. I dunno if I want to try putting oil.
Going to give it a go with this filament, going to try aligning the layer start points just to see if the pock marks are all aligned.
Also I have a sample of this that I can try.
Edited 1 time(s). Last edit at 11/08/2016 04:53PM by FA-MAS.
|
Re: Switching from PETG to PLA November 09, 2016 10:18AM |
Registered: 10 years ago Posts: 651 |
|
Re: Switching from PETG to PLA November 09, 2016 12:28PM |
Registered: 10 years ago Posts: 651 |
So here's a pic.
The Orange one is a new print.
Seams are set to align, all retractions are off.
It printed out perfectly. Odd, even the seams are hidden somewhere I cannot see on the surface.
The Gold one is printed with retractions off, same as above. But I turned the seam position back to random.
I have another print going now in which I turned back on retraction, but set it to .5mm and I also set it to do external perimeters first.
It's much improved. They're not bulging scars anymore, they're barely noticeable. I'll post a pic of that later.
Also found what the tick of the extruder was.
Looks like the washer I use to adjust the Hob on the bolt to line up with the filament hole is a little larger than the bolt.
So the tick was it sometimes being rotated to the top and then dropping, falling against the bolt.

|
Re: Pockmarks on surface November 10, 2016 11:47AM |
Registered: 10 years ago Posts: 651 |
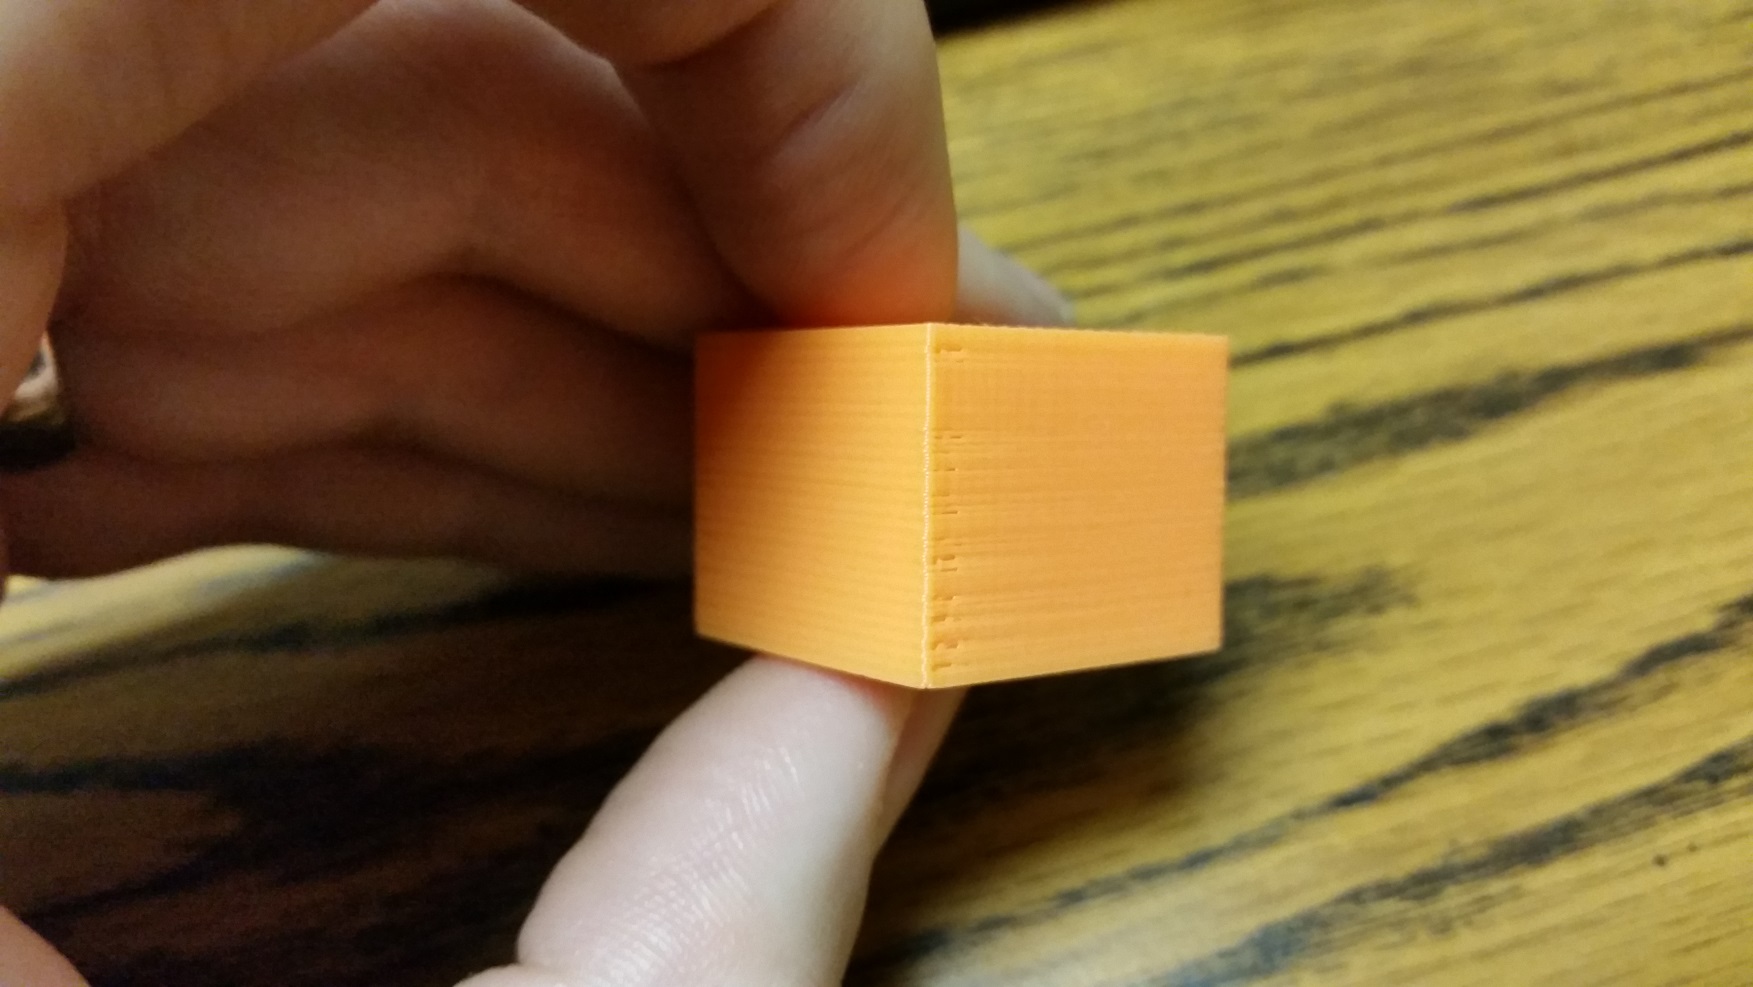
Here's a pic of the print with external perimeters first option turned on. In the pic, it's the one on the left.
As you might see, the start/stop point for the external perimeter is visible and it seemed to over extrude a bit when starting
Found an issue on slic3r github, that basically by design Slic3r does it's external perimeter thinner in order to help with small details.
It sets this to exactly the same as the nozzle size, in my case .40mm
Going from infill at .67mm seemed to cause a pressure difference in the nozzle and it to overextrude.
This is apparently a change in the more recent versions, 1.1.7 and below it the external perimeters the same width as the internal ones.
1.1.7 was actually the version I was using when I last printed PLA.
It seems wierd to me to set it to the same as the nozzle, a .40 nozzle is never going to be able to extrude a .40mm line
As it was setting this automatically, I set it manually to .67mm and printed the cube on the right.
This cube is more than acceptable to me. Only thing I think might improve it is to somehow get the seam smaller than it is.
Edited 1 time(s). Last edit at 11/10/2016 11:47AM by FA-MAS.
As you might see, the start/stop point for the external perimeter is visible and it seemed to over extrude a bit when starting
Found an issue on slic3r github, that basically by design Slic3r does it's external perimeter thinner in order to help with small details.
It sets this to exactly the same as the nozzle size, in my case .40mm
Going from infill at .67mm seemed to cause a pressure difference in the nozzle and it to overextrude.
This is apparently a change in the more recent versions, 1.1.7 and below it the external perimeters the same width as the internal ones.
1.1.7 was actually the version I was using when I last printed PLA.
It seems wierd to me to set it to the same as the nozzle, a .40 nozzle is never going to be able to extrude a .40mm line
As it was setting this automatically, I set it manually to .67mm and printed the cube on the right.
This cube is more than acceptable to me. Only thing I think might improve it is to somehow get the seam smaller than it is.

Edited 1 time(s). Last edit at 11/10/2016 11:47AM by FA-MAS.
|
Re: Pockmarks on surface November 10, 2016 12:03PM |
Registered: 7 years ago Posts: 558 |
You should try re-slice it with the Cura 2.3 version. I've been getting much higher quality with Cura over slic3r primarily due to improved tool paths. It would be interesting to compare the two with your external perimeter findings.
Edited 1 time(s). Last edit at 11/10/2016 12:03PM by PDBeal.
Edited 1 time(s). Last edit at 11/10/2016 12:03PM by PDBeal.
|
Re: Pockmarks on surface November 10, 2016 01:07PM |
Registered: 10 years ago Posts: 770 |
|
Re: Pockmarks on surface November 10, 2016 01:11PM |
Registered: 10 years ago Posts: 651 |
I'd actually like to get a cura profile setup for Cura Engine 15.04 so I can slice on Octopi rather than have to do it on my laptop. Though that looks to be a fairly old version of the engine. Maybe just best to slice with the app on my laptop.
Edited 1 time(s). Last edit at 11/10/2016 01:20PM by FA-MAS.
Edited 1 time(s). Last edit at 11/10/2016 01:20PM by FA-MAS.
|
Re: Pockmarks on surface November 10, 2016 01:28PM |
Registered: 7 years ago Posts: 558 |
|
Re: Pockmarks on surface November 10, 2016 01:47PM |
Registered: 10 years ago Posts: 770 |
|
Re: Pockmarks on surface November 13, 2016 01:26PM |
Registered: 10 years ago Posts: 651 |
Running a print from Cura generated gcode
Couple of things I don't like
It inserts M203 into the gcode, for my Z axis, the interface doesn't allow it to be set low enough to stop it from missing steps. I have to modify it in the gcode.
If it's going to insert a M203, i need it to be able to set it to M203 Z0.5 and it won't go below 1
It produces absolute E values, i had to add a G92 E0 in the start gcode otherwise it would retract the filament.
Oh, and first thing it does is a retract, i don't want it to do that either.
Any ideas on those little issues?
Edited 1 time(s). Last edit at 11/13/2016 01:37PM by FA-MAS.
|
Re: Pockmarks on surface November 14, 2016 10:45AM |
Registered: 7 years ago Posts: 558 |
Are you used the latest Cura 2.3.1 or Cura 2.3?
In Cura, I'm using a custom machine that uses the following for start code
And my generated Gcode file looks like the following:
I'm not seeing the M203 that your talking about. I didn't notice the retract in the code till you mentioned it, but I purposely prime the extruder before the print starts so that really doesn't affect my prints.
In Cura, I'm using a custom machine that uses the following for start code
T0 ; Select Tool 0
M82 ; Set extruder to absolute mode
G28 ; Home X, Y, and Z
G32 ; Probe Z and calculate Z plane
G1 Z15.0 F6000 ;Move the platform down 15mm
G92 E0
G1 F200 E10
G92 E0
And my generated Gcode file looks like the following:
;FLAVOR:RepRap
;TIME:3185
;Generated with Cura_SteamEngine 2.3.0
M190 S65
M104 S200
M109 S200
T0 ; Select Tool 0
M82 ; Set extruder to absolute mode
G28 ; Home X, Y, and Z
G32 ; Probe Z and calculate Z plane
G1 Z15.0 F6000 ;Move the platform down 15mm
G92 E0
G1 F200 E5
G92 E0
;LAYER_COUNT:240
;LAYER:0
M107
G1 F1800 E-3.5
G1 Z22
G0 F4500 X120.424 Y91.505 Z2.2
;TYPEKIRT
G1 Z.2
G1 F1800 E0
G1 X120.971 Y90.805 E0.03546
G1 X121.379 Y90.349 E0.05988
etc...
I'm not seeing the M203 that your talking about. I didn't notice the retract in the code till you mentioned it, but I purposely prime the extruder before the print starts so that really doesn't affect my prints.
|
Re: Pockmarks on surface November 14, 2016 11:24AM |
Registered: 10 years ago Posts: 651 |
I've installed Cura 2.3.1
It seems there might have been a couple of changes since the previous version.
I posted on the github about a few issues
First being the Z Max Speed and M203, how it calculates it and places it at the beginning of the gcode
Second being the retract at the beginning of the gcode and how it's not user controllable
Third, the random M203 at the end of the gcode with a high value, it's actually far beyond any machine should be able to do.
They've recognized that one as a bug and have said they're working to fix it.
Thinking I'll try going to Cura 2.3.0
|
Re: Pockmarks on surface November 15, 2016 08:00PM |
Registered: 10 years ago Posts: 580 |
Sorry for my slow response to your pm, and I apologize in advance for the long response. Not been feeling well.
Looking closely at the first photo, I recognize that those pock marks are from steam bubbles. The way to know this is how sudden they appear - the extrusion immediately to the left and right of the pock marks is not thinned out.
In my opinion this eliminates the possibility that these pock marks were caused by slipping filament, a stalled extruder motor, clogs, temperature, or an over-driven extruder. If it was any of those things then the extrusion thins out just before it fails completely, and it would take a bit of distance to re-pressurize. Always examine your prints with a magnifier, or photograph and enlarge, and look just before and after the failure.
Keep PLA dry
I do not recommend using auto features in Slicer for extrusion width. Set the widths that you want (and do not use %), and then you can tune the speeds - knowing then that you are only changing one thing. The auto speed feature is useful for limiting extrusion rates at the high end (there are some cases I have found where Slic3r will output double or more the extrusion rate that you think it should - for instance when doing infill, support, or gap fill - and auto speed will help tame this). It may help in other cases to keep the pressure more constant, but you would need to set "Max Volumetric Speed" to a low value.
Also, you can set your extrusion to Relative instead of Absolute in whatever slicer. With that setting you do not need to worry about the extruder position needing to be zeroed all the time, it's easier to read, and it should cause no problem with virtually all printer firmware. In some slicers you can also turn on comments (verbose gcode).
As to your issue with the perimeter widths - you do need to pay attention to extrusion rate changes. (This is another reason not to use auto-width settings, you do not know what you will get. That's also my conclusion after many months of research on software for extrusion pressure management/compensation.)
With current slicers it's best to try to maintain a similar pressure when doing different kinds of features. This can be done by reducing the speed of wider extrusions. (There is one firmware I know of that may do some pressure compensation - Reprapfirmware. I've not tried it as I use a Smoothie.)
The pressure in the nozzle is proportional to the extrusion rate, measured in cubic mm/second. If pressure compensation is not applied (and it isn't in any current slicer, unless you use a low "Max Volumetric Speed" in Slic3r and that will slow things down a lot) then several bad things happen (as you've realized):
1) When going from a slow/narrow extrude to a high speed/wide extrude the pressure in the nozzle needs to go from low to high pressure instantly - the result is: the beginning of the higher extrusion-rate loop is starved while the pressure builds up. You will see this at the beginning of infill (if infill is done 2nd), when starting a bridge, and when starting support material.
2) When going from high speed/wide extrusion to lower feedrate/lower width - the extra pressure in the nozzle will cause wider extrusion than desired at the start. This may be one reason (among others) that small holes are too small - slicers often set a slower speed when printing small diameter holes (your's is set to 10mms) and the bled-off extra pressure causes over extrusion there. That extra extrusion width will also push outer perimeters over (if inner perimeters are printed first), and that can telegraph through to the outside.
The extrusion rates in the gcode file you posted did vary a lot:
- external perimeters printed at between 0.89 and 1.51 mm3/sec (these were printed first)
- the two inside perimeters printed at between 2.23 and 3.86 mm3/sec
You can get an idea of the extrusion rate by the simple calculation: Layer height * extrusion width * speed = mm3/second
So for your file at Z 0.70:
1st perimeter (Outer):
Note: the F736.948 is in MM per Minute, so /60 = 12.28mms
.2mm height x 0.40mm width x 12.28 mms = 0.89 mm3/sec
2nd perimeter:
.2mm height x 0.67mm width x 17.546 mms = 2.35 mm3/sec
So there was a 2.64x difference in pressure there.
(I also converted the absolute amount extruded to relative, and checked the mm3/sec based on the width of the filament, and it matched close enough, your extrusion multiplier was 1.01).
The bottom of a Slic3r file shows the settings:
And you can see from the actual gcode that it did not use the default speeds. This may be because of a cooling slowdown, since there is also this setting: slowdown_below_layer_time = 30
However it did not use the same speeds for every layer (that sounds like a bug).
For instance at Z0.30 the first perimeter is printed at (1260/60) = 21 mm/sec .
This may just be a problem in the older version you used. Similar problems I encountered (and the need for customizable support) are why I no longer use Slic3r. Time is money, so I got S3D. I'm still researching pressure compensation using post processing of the Gcode...
My printer: Raptosaur - Large Format Delta - [www.paulwanamaker.wordpress.com]
Can you answer questions about Calibration, Printing issues, Mechanics? Write it up and improve the Wiki!
Looking closely at the first photo, I recognize that those pock marks are from steam bubbles. The way to know this is how sudden they appear - the extrusion immediately to the left and right of the pock marks is not thinned out.
In my opinion this eliminates the possibility that these pock marks were caused by slipping filament, a stalled extruder motor, clogs, temperature, or an over-driven extruder. If it was any of those things then the extrusion thins out just before it fails completely, and it would take a bit of distance to re-pressurize. Always examine your prints with a magnifier, or photograph and enlarge, and look just before and after the failure.

Keep PLA dry
I do not recommend using auto features in Slicer for extrusion width. Set the widths that you want (and do not use %), and then you can tune the speeds - knowing then that you are only changing one thing. The auto speed feature is useful for limiting extrusion rates at the high end (there are some cases I have found where Slic3r will output double or more the extrusion rate that you think it should - for instance when doing infill, support, or gap fill - and auto speed will help tame this). It may help in other cases to keep the pressure more constant, but you would need to set "Max Volumetric Speed" to a low value.
Also, you can set your extrusion to Relative instead of Absolute in whatever slicer. With that setting you do not need to worry about the extruder position needing to be zeroed all the time, it's easier to read, and it should cause no problem with virtually all printer firmware. In some slicers you can also turn on comments (verbose gcode).
As to your issue with the perimeter widths - you do need to pay attention to extrusion rate changes. (This is another reason not to use auto-width settings, you do not know what you will get. That's also my conclusion after many months of research on software for extrusion pressure management/compensation.)
With current slicers it's best to try to maintain a similar pressure when doing different kinds of features. This can be done by reducing the speed of wider extrusions. (There is one firmware I know of that may do some pressure compensation - Reprapfirmware. I've not tried it as I use a Smoothie.)
The pressure in the nozzle is proportional to the extrusion rate, measured in cubic mm/second. If pressure compensation is not applied (and it isn't in any current slicer, unless you use a low "Max Volumetric Speed" in Slic3r and that will slow things down a lot) then several bad things happen (as you've realized):
1) When going from a slow/narrow extrude to a high speed/wide extrude the pressure in the nozzle needs to go from low to high pressure instantly - the result is: the beginning of the higher extrusion-rate loop is starved while the pressure builds up. You will see this at the beginning of infill (if infill is done 2nd), when starting a bridge, and when starting support material.
2) When going from high speed/wide extrusion to lower feedrate/lower width - the extra pressure in the nozzle will cause wider extrusion than desired at the start. This may be one reason (among others) that small holes are too small - slicers often set a slower speed when printing small diameter holes (your's is set to 10mms) and the bled-off extra pressure causes over extrusion there. That extra extrusion width will also push outer perimeters over (if inner perimeters are printed first), and that can telegraph through to the outside.
The extrusion rates in the gcode file you posted did vary a lot:
- external perimeters printed at between 0.89 and 1.51 mm3/sec (these were printed first)
- the two inside perimeters printed at between 2.23 and 3.86 mm3/sec
You can get an idea of the extrusion rate by the simple calculation: Layer height * extrusion width * speed = mm3/second
So for your file at Z 0.70:
1st perimeter (Outer):
G1 X72.300 Y97.300 E132.75066 F736.948
Note: the F736.948 is in MM per Minute, so /60 = 12.28mms
.2mm height x 0.40mm width x 12.28 mms = 0.89 mm3/sec
2nd perimeter:
G1 X71.807 Y73.193 E135.78426 F1052.783
.2mm height x 0.67mm width x 17.546 mms = 2.35 mm3/sec
So there was a 2.64x difference in pressure there.
(I also converted the absolute amount extruded to relative, and checked the mm3/sec based on the width of the filament, and it matched close enough, your extrusion multiplier was 1.01).
The bottom of a Slic3r file shows the settings:
; external_perimeter_extrusion_width = 0     (this is auto)
; external_perimeter_speed = 70%
; external_perimeters_first = 1

; perimeter_extrusion_width = 0
; perimeter_speed = 30
; perimeters = 2
; small_perimeter_speed = 10
And you can see from the actual gcode that it did not use the default speeds. This may be because of a cooling slowdown, since there is also this setting: slowdown_below_layer_time = 30
However it did not use the same speeds for every layer (that sounds like a bug).
For instance at Z0.30 the first perimeter is printed at (1260/60) = 21 mm/sec .
G1 X47.700 Y72.700 E55.24330 F1260.000
This may just be a problem in the older version you used. Similar problems I encountered (and the need for customizable support) are why I no longer use Slic3r. Time is money, so I got S3D. I'm still researching pressure compensation using post processing of the Gcode...
My printer: Raptosaur - Large Format Delta - [www.paulwanamaker.wordpress.com]
Can you answer questions about Calibration, Printing issues, Mechanics? Write it up and improve the Wiki!
|
Re: Pockmarks on surface November 16, 2016 12:24PM |
Registered: 10 years ago Posts: 651 |
Wow, thanks for the detailed analysis.
I can't say the pock marks are from steam pockets. The orange filament is brand new, it was vacuum sealed with desiccant. The same symptoms experienced with the gold filament which has been stored in desiccant since the start of the year. Plus they correlate directly to the start and begin of the perimeters for the layer.
Thinking of switching from Slic3r
Too many different issues between the different versions.
Had an issue with the way it was doing stuff in 1.2.9 so I switch to 1.2.7 and it fixes thing one, but now thing 2 is an issue.
I think I'll try different slicers and compare the gcode.
At least downgrading to Cura 2.3.0 seems to have stopped the wierd M203 in the gcode, and the feedrates seem to be predictabe.
Edit: Now begs the question
They say outer perimeters should be printed thinner and slower to allow for higher details.
But when you do the math, the flow rate differs greatly between it and the inner perimeter.
To get them even close, the outer perimeter would actually have to be printed wider right?
Seems counter intuitive.
Would it be best to just print everything at the same width and speed? Internal & External perimeters. Say find an average thickness you'd like to use between perimeters and infill, and print them all at an average speed?
Edited 2 time(s). Last edit at 11/16/2016 07:03PM by FA-MAS.
|
Re: Pockmarks on surface November 17, 2016 01:05PM |
Registered: 10 years ago Posts: 580 |
As to the pock marks, as I mentioned - try to get a very high resolution photo of one, and look just before and after. If it is very sudden cut off/cut on then I think it has to be steam or some other impurity. A closeup is the only way to really see that.
I think the answer is a qualified Yes, you should print things with a similar flow rate - a more similar flow rate depending on how your hot-end/extruder combo handles pressure change Making the perimeters closer in size and speed is the primary way to do that, however any large fluctuations can affect the next segment.
I will describe why I think pressure changes are worse for some configurations (just my opinion):
- With a conventional one piece extruder, there is a very short distance between where the extruder gear pushes the filament, and where it enters the hot end. So the system is very "stiff", pressure can build up faster.
- With a bowden system you have a lot of spring in the system, and some extra friction due to the bowden tube. This causes a slightly longer delay in building up pressure.
- A 3mm system will have higher pressure on the filament to start with (possibly more deformation of the filament from the drive gear).
- The flow rate from a larger diameter nozzle may be harder to control - oozes easier, faster extrusion means more filament to heat in a shorter time.
- The construction and configuration of the hot-end affects how fast changes in flow can be achieved - depending on the friction at the heat zone boundary, shape of the liquifier chamber, composition (heat conductivity) of it's walls, length of the liquifier chamber, and various angles and channel lengths.
- The shape of the drive gear and pressure bearing will affect how much slip and deformation/damage occur to the filament with retract/unretract and changes in pressure.
The way commercial printers handle this is by large but controlled changes in the movement of the filament at the beginning of a loop to generate the pressure/flow rate change. They have mathematical models that tell them how much extra filament to push or remove to generate the desired pressure in the nozzle when they want it, and when to taper the pressure off according to the nozzle speed. This is not at all the same as how the "Advance" algorithm works. The advance algorithm adds a pulse of extra pressure at the start, and then removes it, leaving you with a better start perhaps but not better overall extrusion rates (according to my tests with my particular setup - your results will vary according to all of the above and more...).
I'm not going to go into my work here, as it is ongoing, but it achieves pressure compensation by a different method than the commercial printers.
So if you are having problems with pressure changes causing inconsistent extrusion, my advice is just to try printing with a more similar speed and extrusion width, and see if it helps. You may also need a very small amount of "extra length on restart" if you have a lot of retracts in your print (to overcome deformation of the filament). Every filament will have a particular speed and temperature that it likes best, lots of tests are the only way to know.
I hope that is helpful.
My printer: Raptosaur - Large Format Delta - [www.paulwanamaker.wordpress.com]
Can you answer questions about Calibration, Printing issues, Mechanics? Write it up and improve the Wiki!
Quote
FA-MAS
Edit: Now begs the question
They say outer perimeters should be printed thinner and slower to allow for higher details.
But when you do the math, the flow rate differs greatly between it and the inner perimeter.
To get them even close, the outer perimeter would actually have to be printed wider right?
Seems counter intuitive.
Would it be best to just print everything at the same width and speed? Internal & External perimeters. Say find an average thickness you'd like to use between perimeters and infill, and print them all at an average speed?
I think the answer is a qualified Yes, you should print things with a similar flow rate - a more similar flow rate depending on how your hot-end/extruder combo handles pressure change Making the perimeters closer in size and speed is the primary way to do that, however any large fluctuations can affect the next segment.
I will describe why I think pressure changes are worse for some configurations (just my opinion):
- With a conventional one piece extruder, there is a very short distance between where the extruder gear pushes the filament, and where it enters the hot end. So the system is very "stiff", pressure can build up faster.
- With a bowden system you have a lot of spring in the system, and some extra friction due to the bowden tube. This causes a slightly longer delay in building up pressure.
- A 3mm system will have higher pressure on the filament to start with (possibly more deformation of the filament from the drive gear).
- The flow rate from a larger diameter nozzle may be harder to control - oozes easier, faster extrusion means more filament to heat in a shorter time.
- The construction and configuration of the hot-end affects how fast changes in flow can be achieved - depending on the friction at the heat zone boundary, shape of the liquifier chamber, composition (heat conductivity) of it's walls, length of the liquifier chamber, and various angles and channel lengths.
- The shape of the drive gear and pressure bearing will affect how much slip and deformation/damage occur to the filament with retract/unretract and changes in pressure.
The way commercial printers handle this is by large but controlled changes in the movement of the filament at the beginning of a loop to generate the pressure/flow rate change. They have mathematical models that tell them how much extra filament to push or remove to generate the desired pressure in the nozzle when they want it, and when to taper the pressure off according to the nozzle speed. This is not at all the same as how the "Advance" algorithm works. The advance algorithm adds a pulse of extra pressure at the start, and then removes it, leaving you with a better start perhaps but not better overall extrusion rates (according to my tests with my particular setup - your results will vary according to all of the above and more...).
I'm not going to go into my work here, as it is ongoing, but it achieves pressure compensation by a different method than the commercial printers.
So if you are having problems with pressure changes causing inconsistent extrusion, my advice is just to try printing with a more similar speed and extrusion width, and see if it helps. You may also need a very small amount of "extra length on restart" if you have a lot of retracts in your print (to overcome deformation of the filament). Every filament will have a particular speed and temperature that it likes best, lots of tests are the only way to know.
I hope that is helpful.
My printer: Raptosaur - Large Format Delta - [www.paulwanamaker.wordpress.com]
Can you answer questions about Calibration, Printing issues, Mechanics? Write it up and improve the Wiki!
|
Re: Pockmarks on surface November 19, 2016 02:41PM |
Registered: 10 years ago Posts: 651 |
So I'm inspecting the gcode created by Cura
The first layer (Layer 0) is printing as I expect, 15mm print moves, 30mm travel moves.
The 2nd layer (Layer 1) looks like it sets the feedrate to 1350 (aka, 22.5mm print and travel moves)
On the 3rd layer, it sets feedrate to 1800 (aka, 30mm) and it remains there till the end of the print which is what I want.
Looks like Cura's doing some calculating somewhere, but I don't know what values would affect this.
Anyone have an idea?
The first layer (Layer 0) is printing as I expect, 15mm print moves, 30mm travel moves.
The 2nd layer (Layer 1) looks like it sets the feedrate to 1350 (aka, 22.5mm print and travel moves)
;LAYER:1
M106 S255
G0 F1350 X85.753 Y63.7 Z.4
G0 X63.29 Y63.29
G0 X62.74 Y62.74
;TYPE:WALL-OUTER
G1 X87.26 Y62.74 E70.14428
G1 X87.26 Y87.26 E71.12293
G1 X62.74 Y87.26 E72.10158
G1 X62.74 Y62.74 E73.08022
G0 X63.22 Y63.22
On the 3rd layer, it sets feedrate to 1800 (aka, 30mm) and it remains there till the end of the print which is what I want.
Looks like Cura's doing some calculating somewhere, but I don't know what values would affect this.
Anyone have an idea?
|
Re: Pockmarks on surface November 19, 2016 04:39PM |
Registered: 7 years ago Posts: 558 |
I would assume it's from these two settings plus what you define for print speed. And then making the calculations based upon those three values.

|
Re: Pockmarks on surface November 19, 2016 05:41PM |
Registered: 10 years ago Posts: 651 |
Yep that did it.
So now I dunno if it was Cura 2.3.1 or if when I downgraded to 2.3.0 that I never got close to the Max Z Speed option, the erroneous M203 are gone. I've been able to stabilize the flow rate, it's running a test now. Think my line width may be a little small, trying .48 for a .4 nozzle.
Edited 1 time(s). Last edit at 11/19/2016 05:48PM by FA-MAS.
|
Re: Pockmarks on surface November 19, 2016 10:33PM |
Registered: 7 years ago Posts: 558 |
I found I got very accurate parts and hole with this new Cura 2.3.1 when I set my line width to the nozzle size. So 0.4 nozzle has 0.4 line width and all my printed holes are exactly as designed when measured. Same on my volcano setup with 0.6 nozzle set to 0.6 line width. I've not had to drill anything out yet. Very pleased with how this new Cura 2.3.1 is working out above and beyond what I ever got out of Slic3r.
|
Re: Pockmarks on surface November 21, 2016 12:39PM |
Registered: 10 years ago Posts: 651 |
Still having problems with this.
Now using Cura 2.3.0
Feedrates should be consistent, except the 1st layer, it's slower.
Nozzle is .40
Line width is .58
Speed is 30mm
And I'm getting gaps in the corners
Wierd thing is these are not where the layer perimeter starts.
Take for example layer 4, it starts on one corner and then after it turns the first corner, is where the gap ocurrs.
I've attached a picture of one of the corners
The first one from the bottom here occurs at layer 4.
|
Re: Pockmarks on surface November 21, 2016 03:53PM |
Registered: 7 years ago Posts: 558 |
|
Re: Pockmarks on surface November 21, 2016 04:18PM |
Registered: 10 years ago Posts: 651 |
I'll try, though I don't quite understand. The filament expands as it exits the nozzle, it will never draw a .4 mm line. Plus it needs to be squished onto the layer before it. I'm having a hard time with "guessing" what the line width should be. I'll try it at .4 and back at .67
Edit: Correction, I take it back. Closer inspection, it looks like it is at the start of each layer. It does the outer perimeter first and it does looks like there's no filament for that first section. I know it's not retract distance because it's not retracting on layer change. But i do notice sometimes as it positions to do the next layer, that there's a little bit of ooze that dribbles across the infill. Maybe add a little length on restart?
Edit, is it possible that using .67 (Slic3r calculated figure, transplanted to Cura for line width) is enough to overcome the void left by filament oozing prior to restart?
Edited 2 time(s). Last edit at 11/21/2016 04:34PM by FA-MAS.
|
Re: Pockmarks on surface November 22, 2016 02:19AM |
Registered: 10 years ago Posts: 580 |
I will take a look at the gcode.
In the mean time, do you have a fan cooling the print but not blowing on the hot end? That's a must have for PLA.
The best type of fan for this is a "blower" type fan.
Can you post a picture of your setup?
My printer: Raptosaur - Large Format Delta - [www.paulwanamaker.wordpress.com]
Can you answer questions about Calibration, Printing issues, Mechanics? Write it up and improve the Wiki!
|
Re: Pockmarks on surface November 22, 2016 04:59AM |
Registered: 10 years ago Posts: 580 |
OK, I took a close look at the gcode.
What I calculate for the actual extrusion width is 0.623mm, based on 0.20 layer height and amount of extrusion. Your speeds are 30mms everywhere, and Cubic MM/S = 3.480, which is fairly consistent from the graphs I make. This is not a high extrusion rate. So I don't see a problem with the gcode.
One odd thing I did notice was this at the top:
M203 Z0.5 ; reset max Z axis speed
That is setting your max Z axis speed to 0.5MM per Minute, or .008mm per second.
Ehhh.... If this is doing what it says, is it taking a long time to change layers?
So, back to your observation:
I do think you are on to it. Any amount of ooze will equal loss of pressure for the next printing operation.
Yes, adding some "extra length on restart" could compensate - but that's for restart ---> after retraction!
I did an experiment once with a very large object that had a lot of retracts. I thought - hey I'll just remove those retracts so it will print faster. The result was depressurization, and bad starts at every new loop. Think of it like a pressurized hose you'd spray your car with, that had no valve at the end. If you could instantly turn the faucet off - the water would still spray out for a bit as the pressure bled off. When the faucet was turned back on, the spray would take a bit of time to get back up to full pressure.
With a 3D printer, you have no valve at the end of the nozzle, so the only way to "save the pressure" so to speak, is to retract a bit. This keeps it from oozing, so when the un-retract happens you get nearly that full amount of pressure (and flow).
The Extra Length on Restart is made to compensate for the filament deforming slightly when the drive gear runs back and forth over it, and for a little bit of ooze. This length should be kept small, otherwise when you get to a print that has a lot of retracts there will be a pressure buildup, and you will have over-extrusion.
So what I think you need to do is use some retraction (and a fan). I wrote an article about tuning retraction here.
Now, for your extrusion width. The rule of thumb is: extrusion width >= nozzle diameter * 1.05, and < nozzle diameter * 1.7.
The larger the extrusion width, the better the layer bond will be, as the filament is forced to flow out wider.
There is a limit where the extrusion width is too wide, and the edges could start curling (depends on the shape of the end of the nozzle). I've never hit that limit myself. Generally somewhere between 1.15 and 1.6x nozzle diameter is the sweet spot.
In order to print wider, you may also need to print slower, or raise the temp - the hot end will only be able to liquefy the filament so fast. But this is not an issue at the speeds you are going, I don't think. If you try to print faster, or wider and notice that it's not printing as wide as it should, or getting starved, or the filament slipping then you may have hit the limit. It is a good thing to test and see what that limit is, but you could also clog your nozzle testing that.
Edit:
One other thing about ooze - there are several other ways to reduce it (in addition to retraction).
- Lower the temperature a small amount (as long as it is still in the "good" range). PLA gets runnier than ABS when hotter.
- Reduce travel time - by increasing travel speed and/or acceleration.
- Reduce retract/un-retract time by increasing retract speed and/or acceleration.
These last two just give it less time to ooze.
These kind of things are best tested one at a time, with lots of tests with fairly small objects, so they don't take much time. If you find you are hitting a failure point then back that setting off - and then you will know it's limits. That's all part of the tuning process.
Hope that helps.
Edited 1 time(s). Last edit at 11/22/2016 05:15AM by Paul Wanamaker.
My printer: Raptosaur - Large Format Delta - [www.paulwanamaker.wordpress.com]
Can you answer questions about Calibration, Printing issues, Mechanics? Write it up and improve the Wiki!
What I calculate for the actual extrusion width is 0.623mm, based on 0.20 layer height and amount of extrusion. Your speeds are 30mms everywhere, and Cubic MM/S = 3.480, which is fairly consistent from the graphs I make. This is not a high extrusion rate. So I don't see a problem with the gcode.
One odd thing I did notice was this at the top:
M203 Z0.5 ; reset max Z axis speed
That is setting your max Z axis speed to 0.5MM per Minute, or .008mm per second.
Ehhh.... If this is doing what it says, is it taking a long time to change layers?
So, back to your observation:
Quote
FA-MAS
Closer inspection, it looks like it is at the start of each layer. It does the outer perimeter first and it does looks like there's no filament for that first section. I know it's not retract distance because it's not retracting on layer change. But I do notice sometimes as it positions to do the next layer, that there's a little bit of ooze that dribbles across the infill. Maybe add a little length on restart?
I do think you are on to it. Any amount of ooze will equal loss of pressure for the next printing operation.
Yes, adding some "extra length on restart" could compensate - but that's for restart ---> after retraction!
I did an experiment once with a very large object that had a lot of retracts. I thought - hey I'll just remove those retracts so it will print faster. The result was depressurization, and bad starts at every new loop. Think of it like a pressurized hose you'd spray your car with, that had no valve at the end. If you could instantly turn the faucet off - the water would still spray out for a bit as the pressure bled off. When the faucet was turned back on, the spray would take a bit of time to get back up to full pressure.
With a 3D printer, you have no valve at the end of the nozzle, so the only way to "save the pressure" so to speak, is to retract a bit. This keeps it from oozing, so when the un-retract happens you get nearly that full amount of pressure (and flow).
The Extra Length on Restart is made to compensate for the filament deforming slightly when the drive gear runs back and forth over it, and for a little bit of ooze. This length should be kept small, otherwise when you get to a print that has a lot of retracts there will be a pressure buildup, and you will have over-extrusion.
So what I think you need to do is use some retraction (and a fan). I wrote an article about tuning retraction here.
Now, for your extrusion width. The rule of thumb is: extrusion width >= nozzle diameter * 1.05, and < nozzle diameter * 1.7.
The larger the extrusion width, the better the layer bond will be, as the filament is forced to flow out wider.
There is a limit where the extrusion width is too wide, and the edges could start curling (depends on the shape of the end of the nozzle). I've never hit that limit myself. Generally somewhere between 1.15 and 1.6x nozzle diameter is the sweet spot.
In order to print wider, you may also need to print slower, or raise the temp - the hot end will only be able to liquefy the filament so fast. But this is not an issue at the speeds you are going, I don't think. If you try to print faster, or wider and notice that it's not printing as wide as it should, or getting starved, or the filament slipping then you may have hit the limit. It is a good thing to test and see what that limit is, but you could also clog your nozzle testing that.
Edit:
One other thing about ooze - there are several other ways to reduce it (in addition to retraction).
- Lower the temperature a small amount (as long as it is still in the "good" range). PLA gets runnier than ABS when hotter.
- Reduce travel time - by increasing travel speed and/or acceleration.
- Reduce retract/un-retract time by increasing retract speed and/or acceleration.
These last two just give it less time to ooze.
These kind of things are best tested one at a time, with lots of tests with fairly small objects, so they don't take much time. If you find you are hitting a failure point then back that setting off - and then you will know it's limits. That's all part of the tuning process.
Hope that helps.
Edited 1 time(s). Last edit at 11/22/2016 05:15AM by Paul Wanamaker.
My printer: Raptosaur - Large Format Delta - [www.paulwanamaker.wordpress.com]
Can you answer questions about Calibration, Printing issues, Mechanics? Write it up and improve the Wiki!
|
Re: Pockmarks on surface November 22, 2016 08:44AM |
Registered: 10 years ago Posts: 651 |
Just verified my Cura settings, retract is turned on.
I also ran a job with Slic3r which I know produces good outer perimeters.
It is retracting on layer change, and then doing the outer perimeter.
Cura is not.
I don't see an option for retract on layer change.
Any ideas on that?
Since no retract on layer change, I disabled the "external perimeters first"
So now it does inner perimeters first, and then outer. It appears to be hiding the fact that the layer starts off a little starved for filament.
Now I would expect it to, and want it to, retract after completing the inner perimeter because it usually does a good size move to where it's going to start the outer perimeter
But it does not retract.
I have retraction turned on
And the minimum move length before retract is 1.34 mm, it's doing moves upwards of 15 mm and it's not retracting.
Am I missing something in Cura?
Edit: Blah, could it be the combing option in Cura?
I never touched it, but looks like it could be enabled by default, but not visible under advanced view, and apparently it doesn't retract when combing is on?
Edited 5 time(s). Last edit at 11/22/2016 12:17PM by FA-MAS.
|
Re: Pockmarks on surface November 22, 2016 01:05PM |
Registered: 7 years ago Posts: 558 |
You have to set Combing Mode off if you want it to retract on layer change. This makes it retract and Z-hop instead of flying through the part. For PETG printing, this feels like its almost required, but PLA doesn't care, and Ninjaflex just turns out bad with Combing Mode off for me at least.
|
Re: Pockmarks on surface November 28, 2016 02:07PM |
Registered: 8 years ago Posts: 80 |
Lets go back to the tick-tick sound. Could that be your stepper motor in your extruder skipping steps. Did you ever tune your stepper motors. The stepper drivers are rarely set to the proper amperage since each brand and model of motor is different. You need to find the MAX amperage for your motor. It may be in your instructions or you may have to contact the manufacturer. If you are using A4988 or DRV8825 stepper drivers the voltage at the potentiometer should be approximately 1/2 the maximum amperage for your motors. See [www.youtube.com] for detailed instructions on how to do this. If you are skipping steps, you will not be pushing plastic through your extruder while skipping, and you may get pocks.

Sorry, only registered users may post in this forum.