Where to start with problem solving...?
Posted by ampapa
|
Where to start with problem solving...? May 31, 2018 07:27AM |
Registered: 7 years ago Posts: 128 |
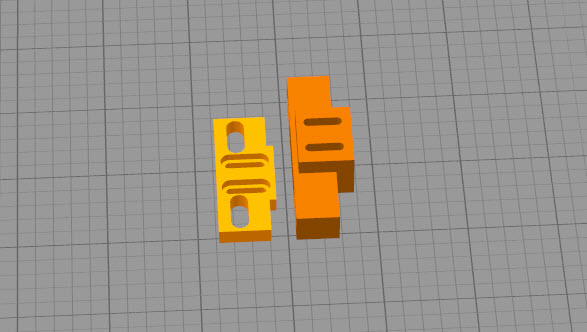
I needed to print some switch brackets for my CNC and so I pulled out my corexy printer zero'd up the axis and got to printing but I have some issues and don't really know what the best course of action is to resolve them and where to begin.
I used S3D for this print printing PLA at 185, .4 nozzle, .25 layer height, 2300 retraction speed, .95 Extrusion multiplier, 17% infill, 3600 print speed.
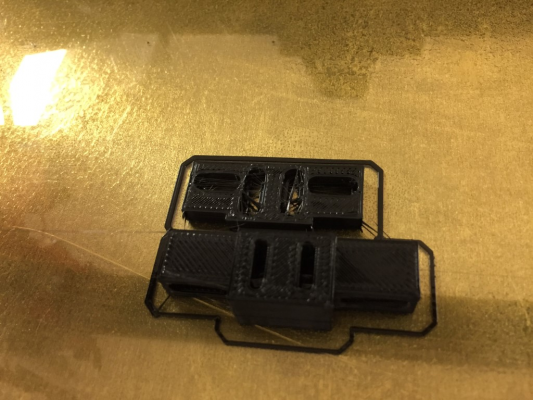
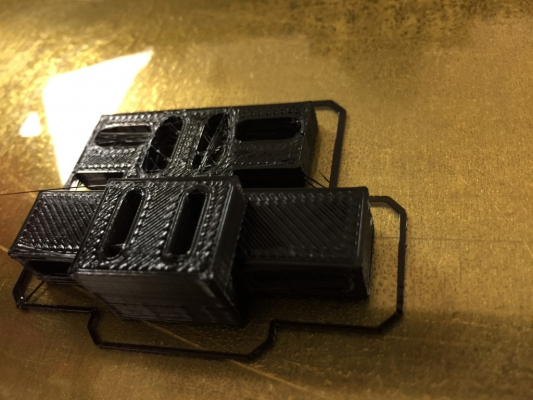
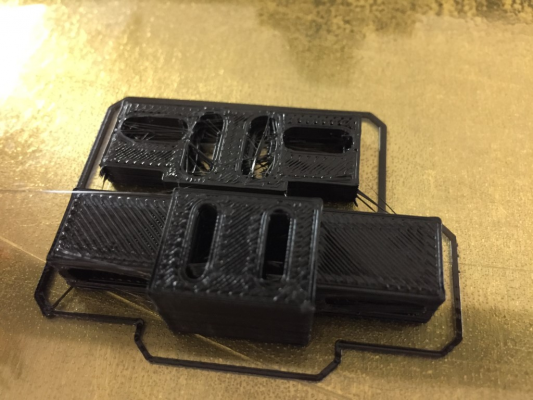
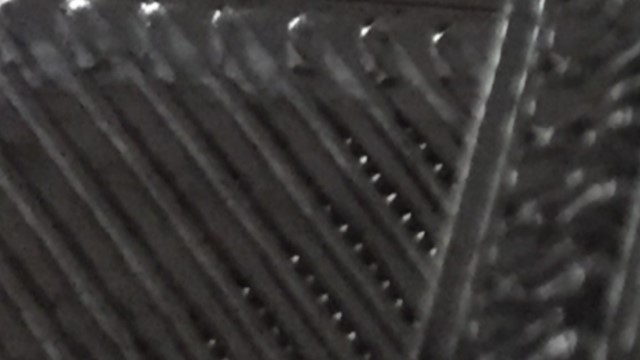
Since I'm pretty new to 3D printing I'm not 100% what I'm seeing but I see stringiness between moves, under extrusion on top/bottom layers or gaps?, poor definition.
Striginess 1
Striginess 2
Where to start??
ampapa,
|
Re: Where to start with problem solving...? May 31, 2018 09:00AM |
Registered: 11 years ago Posts: 5,780 |
First it looks over extruded. Calibrate the extruder.
Stringiness is a function of temperature and filament, and is minimized for most materials by making adjustments to temperature and turning on (and tuning) retraction.
Materials like TPU and PETG are just inherently stringy and you deal with it by cleaning up the prints after they are done.
Ultra MegaMax Dominator 3D printer: [drmrehorst.blogspot.com]
|
Re: Where to start with problem solving...? May 31, 2018 09:25AM |
Registered: 7 years ago Posts: 128 |
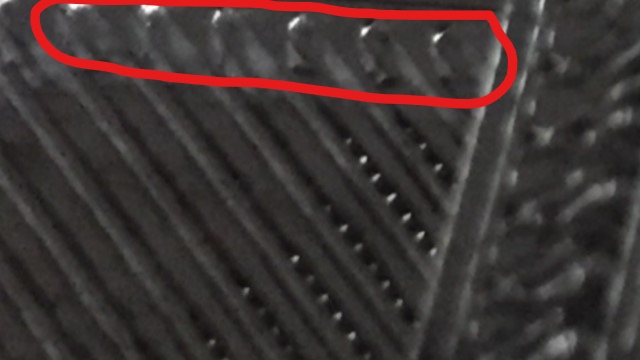
@thedigitaldentist it looks to me like the top layer(s) has gaps is that a function of under extrusion, that 3rd picture has a good look at it... is it possibly to have both in the same print?
Also, any ideas about the detail and how to sharpen it up? I assume that is a function of the layer height?
ampapa,
Also, any ideas about the detail and how to sharpen it up? I assume that is a function of the layer height?
ampapa,
|
Re: Where to start with problem solving...? May 31, 2018 09:35AM |
Registered: 11 years ago Posts: 5,780 |
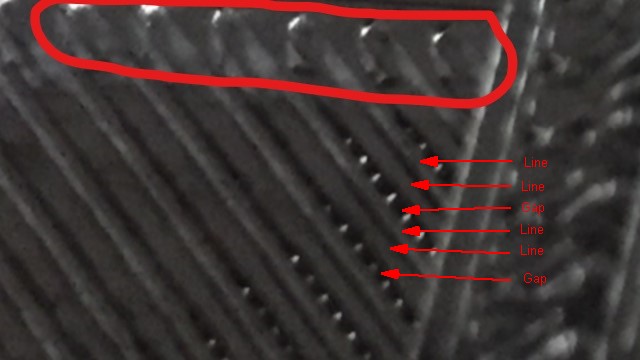
The gaps you see in the third image are due to backlash in the XY mechanism. Notice that the gaps occur between every other line. The extruder should be moving equal distances with each reversal of direction, but it isn't. It's either moving too far, or not far enough, every other layer.
Detail is a function of the nozzle diameter and the line width. If you want best detail, use a small nozzle and line width that matches the nozzle diameter. And don't over extrude.
Maximum layer thickness is a function of nozzle diameter- The rule of thumb is to stay below 80% of nozzle diameter or prints will have weak interlayer bonding. I typically use about 50% or less (so 0.2 mm layers for a 0.4 mm nozzle, etc.). Very thin Z layers will reduce appearance of layer lines in the print, but doesn't really help detail in the XY plane. The thinner you want to print, the more critical it is that you calibrate the extruder well. If you calibrate the extruder well with 50 um layers, it will usually be good for thicker layers, too. If you calibrate the extruder using 300 um layers, you may find it doesn't work so well at much thinner layers.
Edited 1 time(s). Last edit at 05/31/2018 10:12AM by the_digital_dentist.
Ultra MegaMax Dominator 3D printer: [drmrehorst.blogspot.com]
|
Re: Where to start with problem solving...? May 31, 2018 11:48AM |
Registered: 7 years ago Posts: 128 |
Quote
the_digital_dentist
The gaps you see in the third image are due to backlash in the XY mechanism. Notice that the gaps occur between every other line. The extruder should be moving equal distances with each reversal of direction, but it isn't. It's either moving too far, or not far enough, every other layer..
I think I understand what your saying but I'm not sure I understand what it should look like, any images that could explain it better? The image attached looks like it is moving in both directions correctly just in thin lines and not filling the space..
ampapa,
|
Re: Where to start with problem solving...? May 31, 2018 12:29PM |
Registered: 11 years ago Posts: 5,780 |
What you're seeing is two lines in contact with each other, then a gap, then two lines in contact, etc.
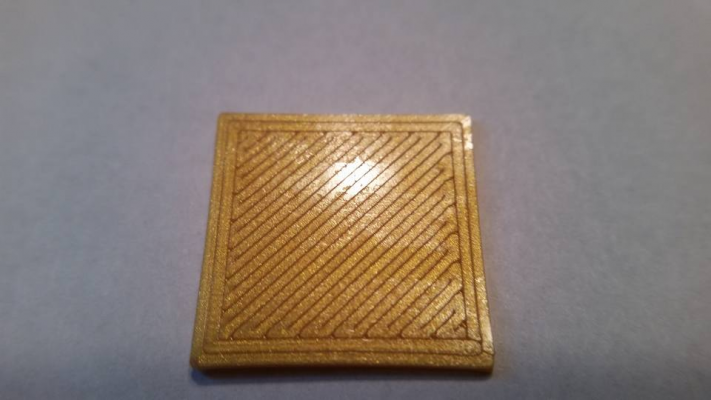
You should see same-width lines, all in contact with each other, and no gaps.
When the extruder is printing solid infill, it should lay down a line of plastic, shift a little, then lay down another line going the opposite direction, in contact with the first line, then shift a little (the same amount) and reverse direction and lay down another line, in contact with the previous line.
It isn't under extrusion- it's backlash causing the gaps in your print. The solution is not to increase the extrusion, but to fix the backlash. The blobbiness at the ends of the lines where the motion reverses look like it is already over extruding, though it may be that the extruder carriage isn't shifting far enough and the result is too much overlap, making it look like over extrusion.
The top layer should look pretty much like the first layer. Here's a picture of a good first layer:
Notice the even spacing of the lines. The top surface will always be a little rougher than the first layer because the plastic isn't being printed against a smooth bed surface like the first layer, but the line spacing should be the same.
Edited 2 time(s). Last edit at 05/31/2018 12:39PM by the_digital_dentist.
Ultra MegaMax Dominator 3D printer: [drmrehorst.blogspot.com]
|
Re: Where to start with problem solving...? May 31, 2018 01:31PM |
Registered: 7 years ago Posts: 128 |
@thedigitaldentist, in terms of backlash what are you referring to? I think you're referring to how far past it prints into the border?
When I said "not filling the space", maybe I should have said the lines aren't being "flattened" enough.
Thanks.
When I said "not filling the space", maybe I should have said the lines aren't being "flattened" enough.
Thanks.
|
Re: Where to start with problem solving...? May 31, 2018 01:42PM |
Registered: 9 years ago Posts: 465 |
Backlash is when things can move without the motor moving.
This can happen when the belts have a little slack in them, or when the parts that hold a belt can move relative to the parts that they're supposed to move. In the case of leadscrews, instead of loose belts, it's a little slack in the threads of the nut.
Most printers I've seen have some sort of accommodation to allow you to tighten the belts once installed, though not all. Some you just need to ensure that the belts are as tight as possible when you assemble them.
MBot3D Printer
MakerBot clone Kit from Amazon
Added heated bed.
Leadscrew self-built printer (in progress)
Duet Wifi, Precision Piezo parts
|
Re: Where to start with problem solving...? May 31, 2018 02:06PM |
Registered: 11 years ago Posts: 5,780 |
The ends of the lines usually overlap the perimeters a bit. That's normal and intentional to prevent the perimeters from separating from the rest of the print.
What isn't normal is the gaps between every other line.
Try wiggling the hot-end, if that isn't wiggly, try wiggling the extruder carriage, if that isn't wiggly, grab the two ends of the X axis and try wiggling them, etc. Something is moving either more or less than it should.
Edited 2 time(s). Last edit at 05/31/2018 02:11PM by the_digital_dentist.
Ultra MegaMax Dominator 3D printer: [drmrehorst.blogspot.com]
|
Re: Where to start with problem solving...? June 01, 2018 06:45AM |
Registered: 7 years ago Posts: 128 |
Maybe its the word "backlash" that I'm not understanding in terms of the print?
I don't see backlash in something that is printing in a straight line and only the perimeter is being overlapped a little.. the backlash would have to take place at the ends as it reverses itself. The lines in the images appear to be straight and consistent as it prints in the x and y direction, just containing a gap between them as it steps over for the next infill if that's what it does, not sure there.
So if the print head goes back and forth and lays down filament in a straight line then the only place for backlash is on the ends? @thedigitaldentist I'm really confused here... ugh.
I have a precision pezio installed so the tip of the printer end could have movement based on the deign itself.
ampapa,
|
Re: Where to start with problem solving...? June 01, 2018 09:11AM |
Registered: 11 years ago Posts: 5,780 |
The nozzle isn't the only thing that's moving. You can have backlash occur anywhere.
You can call it whatever you want, but there should not be gaps between every two lines.
Ultra MegaMax Dominator 3D printer: [drmrehorst.blogspot.com]
You can call it whatever you want, but there should not be gaps between every two lines.
Ultra MegaMax Dominator 3D printer: [drmrehorst.blogspot.com]
Sorry, only registered users may post in this forum.
