"Randon" fat lines on outside, can't find any example on the issue
Posted by aFrazatto
|
"Randon" fat lines on outside, can't find any example on the issue March 01, 2021 08:59AM |
Registered: 8 years ago Posts: 47 |
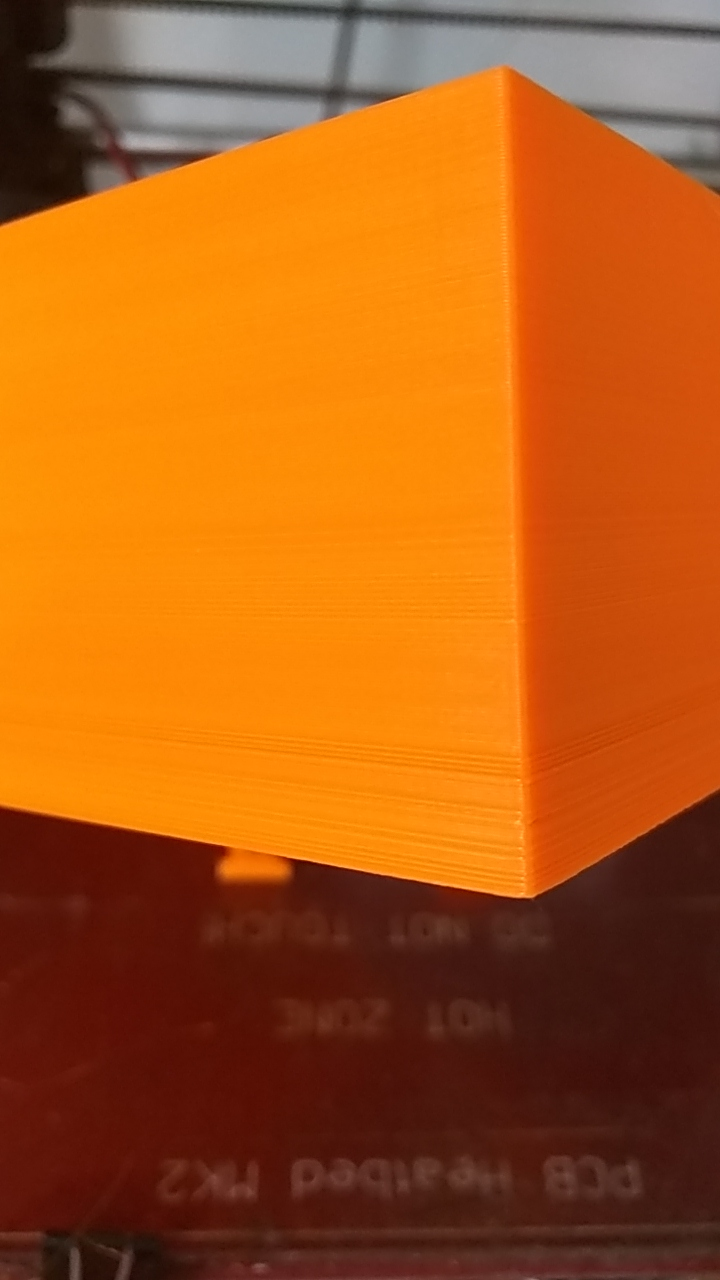
Please take a look at the picture, I don't know how to properly describe what is happening, so I can't even search for similar cases (yes I tried  )
)
This is my "last" issue with my printer, I built it myself many years ago and always thought the cause was my extruder. Recently I upgraded my X/Z/extruder axis to the Prusa MK3s standard, run all recalibration I could find and the issue persists.
In the picture it doesn't seam that big of a deal, but those fat lines closer to the bottom are really prominent when looking at it personaly and it's very difficult to sand out.
The fat line is consistent all around the object, it's definitely not X/Y skipping steps.
Final object height is always spot on too and I can't see any indication of z-wobble.
I can make it almost go away when printing with 0.1mm layer high, but they are still there compared to the sections with almost perfect finishing.
I can notice a correlation between infill and outside quality overall, the worst lines are clearly on layers with solid infill.
But! I can also notice that layers that are not completely close (as when you have a hole in the wall, round is worse) have a similar problem but much less noticeable. If you take a second look at the picture, you will notice the really bad bottom ones and just short of halfway up there are some more.
My wildest guess?
The walls are "curling" in while cooling, the solid infill stops it from happening.
But if this is the case, I have NO IDEA how to fix it. I tried to increase or decrease cooling in different occasions and it never made any difference for this problem.
Have anyone seen this issue and was able to fix it?
Any crazy ideas what I could try to debug ti further?
My printer is a homemade Prusa i3, axis X/Z and extruder are MK3s (but no bed leveling), the Y/bed is still the original Prusa i3 glass bed and a 0.4mm nozzle.
I'm using Slic3r with latest dev build (but it never really made any difference to this problem), for the object in the picture I was printing a box shaped object with 0.2 layer high with 15% infill (quality was irrelevant). Adaptive slicing is Off, supports only on the table.
Printing with basic 1.75 PLA (nothing fancy, just local produced brands you people never heard about)
Thanks o/
)This is my "last" issue with my printer, I built it myself many years ago and always thought the cause was my extruder. Recently I upgraded my X/Z/extruder axis to the Prusa MK3s standard, run all recalibration I could find and the issue persists.
In the picture it doesn't seam that big of a deal, but those fat lines closer to the bottom are really prominent when looking at it personaly and it's very difficult to sand out.
The fat line is consistent all around the object, it's definitely not X/Y skipping steps.
Final object height is always spot on too and I can't see any indication of z-wobble.
I can make it almost go away when printing with 0.1mm layer high, but they are still there compared to the sections with almost perfect finishing.
I can notice a correlation between infill and outside quality overall, the worst lines are clearly on layers with solid infill.
But! I can also notice that layers that are not completely close (as when you have a hole in the wall, round is worse) have a similar problem but much less noticeable. If you take a second look at the picture, you will notice the really bad bottom ones and just short of halfway up there are some more.
My wildest guess?
The walls are "curling" in while cooling, the solid infill stops it from happening.
But if this is the case, I have NO IDEA how to fix it. I tried to increase or decrease cooling in different occasions and it never made any difference for this problem.
Have anyone seen this issue and was able to fix it?
Any crazy ideas what I could try to debug ti further?
My printer is a homemade Prusa i3, axis X/Z and extruder are MK3s (but no bed leveling), the Y/bed is still the original Prusa i3 glass bed and a 0.4mm nozzle.
I'm using Slic3r with latest dev build (but it never really made any difference to this problem), for the object in the picture I was printing a box shaped object with 0.2 layer high with 15% infill (quality was irrelevant). Adaptive slicing is Off, supports only on the table.
Printing with basic 1.75 PLA (nothing fancy, just local produced brands you people never heard about)
Thanks o/
|
Re: "Randon" fat lines on outside, can't find any example on the issue March 01, 2021 12:07PM |
Registered: 3 years ago Posts: 8 |
|
Re: "Randon" fat lines on outside, can't find any example on the issue March 01, 2021 01:41PM |
Registered: 8 years ago Posts: 47 |
Quote
blkzera
i have a corexy homemade printer and i am with the same issue. I think it called ghosting issue, you should look into it, i may be wrong, but do a google to see if you think it is similar.
Nop, it's not ghosting.
At least it's my understanding ghosting is one of the symptoms to z-wobble and it happens on Z direction.
None of the pictures I saw for ghosting matches my case either.
|
Re: "Randon" fat lines on outside, can't find any example on the issue March 02, 2021 03:24AM |
Registered: 9 years ago Posts: 893 |
|
Re: "Randon" fat lines on outside, can't find any example on the issue March 02, 2021 07:15AM |
Registered: 8 years ago Posts: 47 |
|
Re: "Randon" fat lines on outside, can't find any example on the issue March 02, 2021 08:50AM |
Registered: 9 years ago Posts: 893 |
You could measure the number of threads in a set length of your Z leadscrew - mine is 10 tpi - then convert the measurements to metric and work from there.
So 10 turns per inch, or 25.4mm
One successful fraction of this (for me) is to have a layer height of 0.25mm. By using this I get a far smoother finish than by using 0.2 or 0.3. I suppose I could make it 0.252mm, or even 0.126mm, but I have tried neither of these.
This formula doesn't work on my delta as there's no easy way of calculating the pitch equivalent - but I tend not to get that problem on that printer anyway.
|
Re: "Randon" fat lines on outside, can't find any example on the issue March 02, 2021 12:17PM |
Registered: 8 years ago Posts: 47 |
Okkkk there seams to be ALOT of discord about what is called "magic numbers" for layer height on the MK3, check this very recent thread on the prusa [forum.prusaprinters.org]
After a lot of math being trowed around, people seams divided on if it's any multiplier of 0.0025 if you consider micro stepping, or 0.04 if you consider only full steps.
Most people allegating there is no significant change in quality whatever you choose on a stock MK3.....mine it is not!
So I will be testing the 0.04 multiplier and see what happens, will let you know the result as soon as possible.
Edited 1 time(s). Last edit at 03/02/2021 12:18PM by aFrazatto.
|
Re: "Randon" fat lines on outside, can't find any example on the issue March 02, 2021 02:12PM |
Registered: 9 years ago Posts: 893 |

|
Re: "Randon" fat lines on outside, can't find any example on the issue March 02, 2021 02:59PM |
Registered: 8 years ago Posts: 47 |
If you take a look at the picture, left one is printed with 0.1mm layer high and the right one is printed with, 0.04 multiplier, 1.2mm layer high.
I can notice no difference in overall quality and it even shows the same low layer on the exact same spot where the gap begins, it's the first solid layer before starting the gap.
It makes sense really, the bigger box was printed with 0.2mm layer, which is a multiplier of 0.0025 and 0.04, so it shouldn't make a difference for the problem we are currently debugging.
|
Re: "Randon" fat lines on outside, can't find any example on the issue March 12, 2021 09:29AM |
Registered: 8 years ago Posts: 47 |
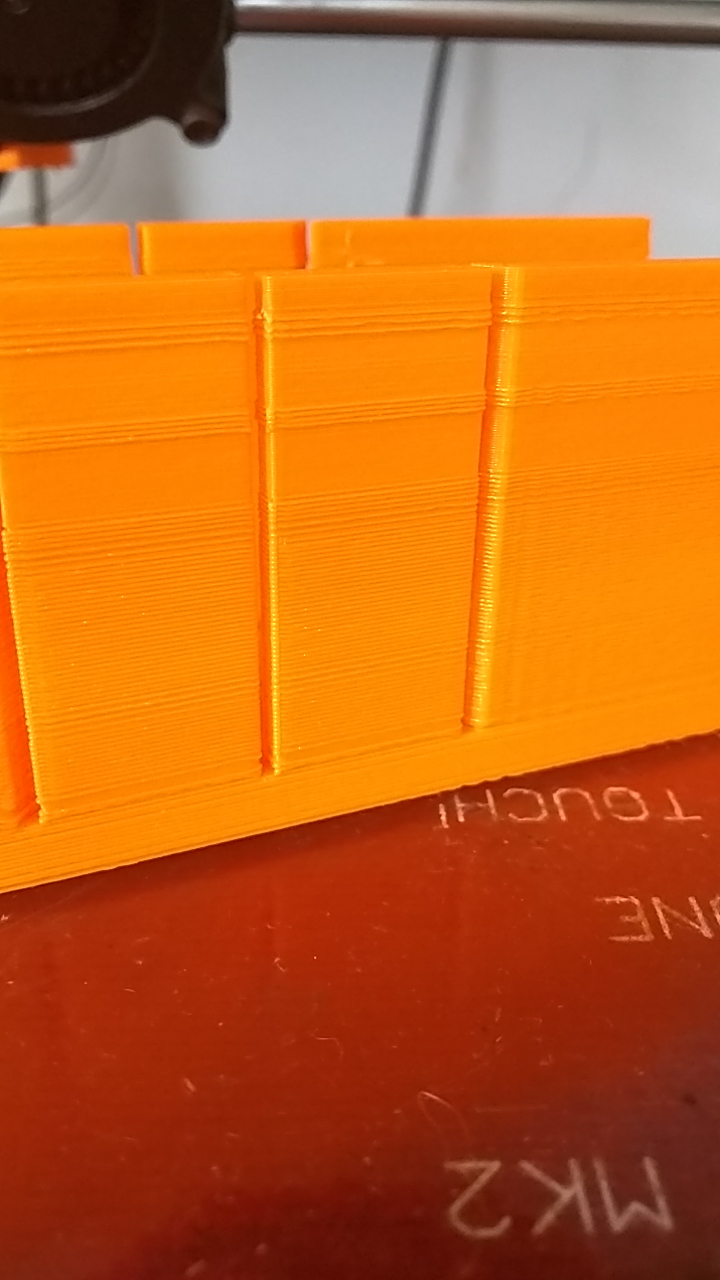
Alright, I was able to fix half the issue, take a look at the picture.
Apparently, one of the problems was cooling, the difference between solid infill and the rest was being caused by the difference between slow cooling fan and fast cooling fan.
I tried with the fun at 25% and everything got worse, I tried with the fan at 75% and the transition error was gone (plus! bridges and retraction got better).
But as you can see, the overall quality has not increased, any error is just more consistent.
I can't explain how on the same surface, with the same settings I get under extrusion, perfect beautiful lines and fat lines, all at the same time.
Is there the possibility the filament I'm using is completely inconsistent in diameter?
I only have an analogical caliper, so I cant really tell any difference after 0.0Xmm.
|
Re: "Randon" fat lines on outside, can't find any example on the issue May 03, 2021 11:52AM |
Registered: 3 years ago Posts: 55 |
|
Re: "Randon" fat lines on outside, can't find any example on the issue May 03, 2021 01:05PM |
Registered: 8 years ago Posts: 47 |
|
Re: "Randon" fat lines on outside, can't find any example on the issue May 04, 2021 02:56AM |
Registered: 9 years ago Posts: 330 |
I believe the problem you have is quite similar to mine. Please have a look at this thread : [reprap.org]
This is a difficult problem to solve. A lot of people, in my case, suggested a problem with belts being loose or too tight, however I don't think that's the case. I have printed the same object (the Make printer test file, which can be found at [reprap.org]) with different orientations but the same artefact (thicker layers when there is a hole) persists in all of them. I have measured the thickness of the layers with the visible bulging and they are thicker than the layers without the hole. I think it might be a problem related to the extrusion of the plastic or cooling maybe and I feel like it is a physics problem and not something that can be corrected. Could you try to print the object I used in my post and see if you have bulgings where the holes are. I also can observe a change in layer orientation (or thickness) that depends on which features are available on that layer, or if the layer can be printed continously in one direction or if it needs to move in different directions due to holes or other features).
Another observation, which makes me think it is an extrusion problem, is that there are 2 variations of the object in the Make printer test files. One version has 1 mm thick walls and the other 0.8 mm walls. The artefact is less visible with 1 mm walls, whicj makes me think it is also related to the extrusion width (most slicers make this width wider than the nozzle's tip, so for example for a 0.4 mm nozzle, it is around 0.46-0.48, so a 0.8 mm thick object can theoretically never have the right thickness, or the calculations required for that purpose messes with the layer thickness of the other layers.
By the way, I use a Bondetech and was using a Titan previously, they were and are both calibrated. Maybe it is just physics of the molten plastic cooling but then everybody should have this problem.
Edited 1 time(s). Last edit at 05/04/2021 03:01AM by drmaestro.
|
Re: "Randon" fat lines on outside, can't find any example on the issue May 04, 2021 08:50AM |
Registered: 8 years ago Posts: 47 |
Quote
drmaestro
I think it might be a problem related to the extrusion of the plastic or cooling maybe and I feel like it is a physics problem and not something that can be corrected.
I went to somewhat that direction myself, but this is my second extruder and the issue persists, so I can't quite accept it's a extrusion issue.
Unless it was a controller issue, but I use Marlin and generic step drivers, so other people would be bound to have the same issues at some point.
What I'm closing in is this:
https://www.youtube.com/watch?v=9JyydfcOcD0
It's a difficult problem to isolate since I don't have an enclosure and still use a glass plate, but the temperature on the bed was waving from 59~61°C in a very steady pace and that would very well be the issue.
You would get a consistent pattern where the lines would go smaller and squishier as the plate expands and back again to normal as it cools down, combined with very noticeable lines when the printing fan goes faster on solid layers as the bed tries to compensate and overshoots for a longer period.
I successfully used PID auto tune to stop the heated bed from overshooting with a constant printing fan power of 40% at 40mm from the bed, now I just need something to test it and see if it made any difference.
|
Re: "Randon" fat lines on outside, can't find any example on the issue May 04, 2021 11:13AM |
Registered: 9 years ago Posts: 330 |
It is true that fluctuations in bed temperature would create expensions or shrinkages, however I am quite sure that my problem is different. My reasons:
1) My bed temperature is calibrated and themperature changes 0.1 C at most (I print PLA at 60 degrees, so I may get 59.9 or 60.1 degrees) and I don't think a variation of 0.1 degree is capable of making drastic changes.
2) My print cooling fans are 100% active after the third layer, so there is no temperature related fluctuations at the hot-end level after the third layer (when the fans turn on from 0% to 100% instantaneously, there is a few degrees of variation at the hot-end level but it is quickly compensated and stabilizes afterwards).
3) I'd expect this artefact to be the most promininet in lower layers, as they are colser to the bed, so will be more affected by its temperature variations. The object in your first picture can be an example, as the lower layers are visibly affected but in your last picture, there are variations on upper levels too. Plastic isn't a very good conductor of heat, so I don't think a variation of 1 degree (that you told your bed could generate) would be carried to these heights.
|
Re: "Randon" fat lines on outside, can't find any example on the issue May 04, 2021 01:10PM |
Registered: 8 years ago Posts: 47 |
Quote
drmaestro
It is true that fluctuations in bed temperature would create expensions or shrinkages, however I am quite sure that my problem is different. My reasons:
You are right, your context is quite different.
Man! I'm envy of your 100% fan all the time.
I get much better parts over 60%, but the temperature on the tip of the nozzle drops too fast on long extrusions and causes it to skip steps.
40% is the maximum I was able to get without going so slow it's not worth anymore.
|
Re: "Randon" fat lines on outside, can't find any example on the issue (solved) May 26, 2021 02:02PM |
Registered: 8 years ago Posts: 47 |
OK, I have printed a big box and my issue is confirmed solved!
It really was a problem with the bed temperature swinging too much and overshooting for too long.
You can see a full explanation in this video: https://www.youtube.com/watch?v=9JyydfcOcD0
Since I still use a glass bed, precise maintenance of the temperature is kind of impossible, but with a new PID calibration with the printing fan on stopped it from overshooting and now I only get some occasional low spot that is easily sanded or filled.
Sorry, only registered users may post in this forum.