Why no bridges for this?
Posted by GhremHatesSlic3r
|
Why no bridges for this? February 12, 2017 06:51PM |
Registered: 7 years ago Posts: 6 |
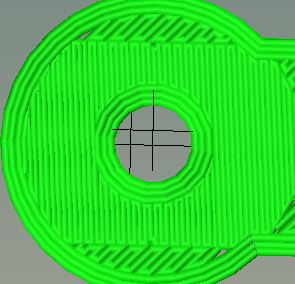
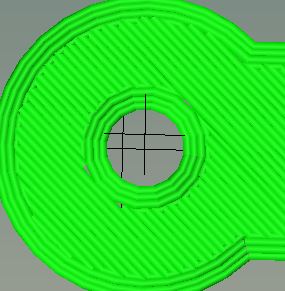
Between Layer 20 and Layer 21 there is never any bridging and Layer 21 just dumps circles into midair and becomes a mess... What do I do to make this sort of thing print correctly?
|
Re: Why no bridges for this? February 12, 2017 11:33PM |
Registered: 9 years ago Posts: 351 |
I don't know if any of the slicers handle that gracefully without support material. There's no destination point for a bridge due to the hole. In order of preference:
1) Orient the part so holes in x-y planes touch the build platform if that doesn't cause other problems.
2) Design the model with the hole filled in layer 21 and:
2a) Backdrill through the rest of the layers where the hole is present to open the hole in layer 21.
2b) If the hole is blind or otherwise not accessible from the top (in printing orientation), coming from the accessible side of what will ultimately be a hole, use a drill undersized enough that you can position it to not remove any inappropriate material and file the remaining excess from the hole in layer 21.
3) Design support into the model. I like a single-extrusion-thickness wall at the perimeter of an unsupported face, but using three perimeters would probably make that insufficient and dictate a support that will be harder to remove.
4) Use the slicer's built-in support function. If you can't dual-extrude with soluble support you will have to remove the support material mechanically.
|
Re: Why no bridges for this? February 13, 2017 07:25AM |
Registered: 8 years ago Posts: 5,232 |
|
Re: Why no bridges for this? February 13, 2017 11:46AM |
Registered: 10 years ago Posts: 2,472 |
|
Re: Why no bridges for this? February 13, 2017 01:20PM |
Registered: 7 years ago Posts: 6 |
|
Re: Why no bridges for this? February 13, 2017 01:53PM |
Registered: 8 years ago Posts: 5,232 |
Quote
GhremHatesSlic3r
I would expect bridging to be done between the edges but not in the center. Totally lame there isn't. If bridging was done edge to edge then the circles would have something to hold them and it would come out way cleaner.
Maybe with printing "infill before perimeters" it would work. But you'd have to print the whole part with that setting and it always looked ugly when I tried it.
|
Re: Why no bridges for this? February 13, 2017 03:47PM |
Registered: 7 years ago Posts: 6 |
Nah, the interior ends in deadspace, it would still be strings and the circles would still fall through... MIGHT get one good layer with doing that but it would still be crap. I would think they could do a partial bridge detect and print the bridges on the left/right or top/bottom around the center hole. Would that not be a valid feature request? I'm quite shocked it doesn't already do this.
|
Re: Why no bridges for this? February 13, 2017 05:19PM |
Registered: 7 years ago Posts: 17 |
Quote
GhremHatesSlic3r
Nah, the interior ends in deadspace, it would still be strings and the circles would still fall through... MIGHT get one good layer with doing that but it would still be crap. I would think they could do a partial bridge detect and print the bridges on the left/right or top/bottom around the center hole. Would that not be a valid feature request? I'm quite shocked it doesn't already do this.
It seems possible.
Lets say you have a need to print a 4mm hole in the middle of a 20mm square starting at 5mm high. The printer could make a bridge spanning the 20mm block starting at one side and then stop at the edge of the 4mm hole perimeter wall then do the same on the other side of the hole. following that it could bridge the 4mm gap between the newly made bridges up the remaining to edges of the hole perimeter. Then it could bridge on a 45deg angle the gaps at the 4 edges of the hole perimeter wall interface. by continuing this, based on the size of the hole wall, eventually there would be enough support available to build the first hole perimeter wall.
|
Re: Why no bridges for this? February 13, 2017 05:38PM |
Registered: 7 years ago Posts: 6 |
Quote
doodady
Quote
GhremHatesSlic3r
Nah, the interior ends in deadspace, it would still be strings and the circles would still fall through... MIGHT get one good layer with doing that but it would still be crap. I would think they could do a partial bridge detect and print the bridges on the left/right or top/bottom around the center hole. Would that not be a valid feature request? I'm quite shocked it doesn't already do this.
It seems possible.
Lets say you have a need to print a 4mm hole in the middle of a 20mm square starting at 5mm high. The printer could make a bridge spanning the 20mm block starting at one side and then stop at the edge of the 4mm hole perimeter wall then do the same on the other side of the hole. following that it could bridge the 4mm gap between the newly made bridges up the remaining to edges of the hole perimeter. Then it could bridge on a 45deg angle the gaps at the 4 edges of the hole perimeter wall interface. by continuing this, based on the size of the hole wall, eventually there would be enough support available to build the first hole perimeter wall.
Just doing a bridge set at 0º and then maybe the ones at 180º, would be pretty nice, even with only the first partial bridging I think the first layer would be it's own bridge for the remaining gap, then at least the 2nd+ layers would be solid compared to what we have right now which is all 3 layers coming apart and the infill being openly visible once you clean up the mess.
|
Re: Why no bridges for this? February 14, 2017 07:24AM |
Registered: 10 years ago Posts: 2,472 |
A bridge needs to start and end on a horizontal surface. You cannot bridge from or to another bridge on the same layer that is hanging in mid-air, bridges must be from wall to wall so there is at least a small base section to adhere to. Creating two bridges either side of a hole would still result in the perimeter of the hole falling through most of the time, and even if the perimeter managed to fuse to the side of the bridge, it would not be circular unless you had special cooling arrangements, the extrusion would just sag and follow the nozzle around as there is nothing to hold it in place. I see little point in requesting a "feature" that won't work for most printers. Just do as suggested and modify the STL to create a single layer skin at the base of the hole, and you'll get perfect results. Drilling or cutting out the thin diaphragm is quick and simple for almost any model, or just push the bolt or spindle through.
Dave
Dave
|
Re: Why no bridges for this? February 14, 2017 07:40AM |
Registered: 7 years ago Posts: 17 |
|
Re: Why no bridges for this? February 14, 2017 10:17AM |
Registered: 9 years ago Posts: 351 |
With a traditional bridge supported on a lower layer, you have overlap on both sides of the bridge and all the bond has to do is resist being drawn towards the void as the bridged filament tries to sag. If you bridge within a layer, not only do you have what's in essence a point contact at each end (very weak), but the adhesion at those point contacts would have to directly support the full weight of the bridged filament. In short, it likely won't work at all and it certainly won't work reliably.
|
Re: Why no bridges for this? February 14, 2017 11:54AM |
Registered: 7 years ago Posts: 6 |
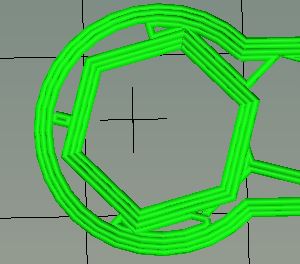
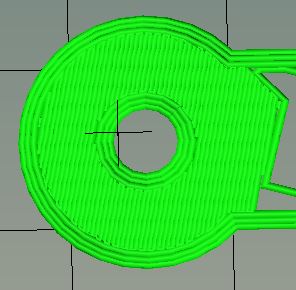
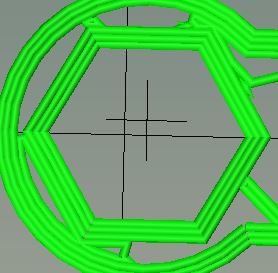
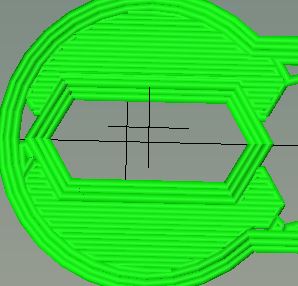
Creating a .2mm bump(Layer 14) in the nut space (Layer13) to the top and bottom of the hole forces the slicer to create the desired effect of adding a partial bridge first to the top/bottom (Layer 14, the bump) and then to left/right (Layer 15) before doing infill on Layer 16+. I just printed this and it turned out freaking awesome.
I know 14/15 are bridge since they are straight and not 45º, also because they printed at my bridge setting of .5 feed rate (uber thin). It can be done and it does work so much better than without the bridging. Feel free to try, the modified stl is [www.thingiverse.com]
Edited 1 time(s). Last edit at 02/14/2017 02:19PM by GhremHatesSlic3r.
|
Re: Why no bridges for this? February 15, 2017 07:54AM |
Registered: 7 years ago Posts: 17 |
Quote
GhremHatesSlic3r
[attachment 90566 Layer13.JPG][attachment 90567 Layer14.JPG][attachment 90568 Layer15.JPG][attachment 90569 Layer16.JPG]
Creating a .2mm bump(Layer 14) in the nut space (Layer13) to the top and bottom of the hole forces the slicer to create the desired effect of adding a partial bridge first to the top/bottom (Layer 14, the bump) and then to left/right (Layer 15) before doing infill on Layer 16+. I just printed this and it turned out freaking awesome.
I know 14/15 are bridge since they are straight and not 45º, also because they printed at my bridge setting of .5 feed rate (uber thin). It can be done and it does work so much better than without the bridging. Feel free to try, the modified stl is [www.thingiverse.com]
very nice. I think it is possible to have slic3r do that automatically. I am not a programmer but I mess with programs a little.....its way over my head to modify the code to implement.
If I am correct you would have to allow some irregularity on the bottom of the bridge. (it takes more than 1 layer to complete the bridge and hole) not a problem in most cases.
|
Re: Why no bridges for this? February 16, 2017 07:05AM |
Registered: 10 years ago Posts: 2,472 |
Quote
doodady
What happens if you try to bridge to or from the middle of a bridge?
Please understand I am relatively new here
The same as if you try to bridge a gap of exactly 2m with a plank of wood that is exactly 2m long. The wood has nothing to rest on at each end, so it falls into the gap.
Dave
|
Re: Why no bridges for this? February 16, 2017 07:41AM |
Registered: 7 years ago Posts: 17 |
Quote
dmould
Quote
doodady
What happens if you try to bridge to or from the middle of a bridge?
Please understand I am relatively new here
The same as if you try to bridge a gap of exactly 2m with a plank of wood that is exactly 2m long. The wood has nothing to rest on at each end, so it falls into the gap.
Dave
What is the result if the bridge is 2.30m and the gap is 2m (15% overlap)? would that not work the same as bridging perimeter to perimeter as it does now?
|
Re: Why no bridges for this? February 16, 2017 09:57AM |
Registered: 8 years ago Posts: 5,232 |
|
Re: Why no bridges for this? February 16, 2017 11:26AM |
Registered: 7 years ago Posts: 6 |
Quote
o_lampe
Does 15% overlap mean, the track is 15% longer than it should or is it 15% of the nozzle width or perimeter width? Fact is, I tried to print the part and it failed almost the same way as without the bump. ( I printed two pieces and flipped on upside down )
What settings did you slice it with and can you see in the preview if it made the bridge? I made the bump .2mm because I use .2mm layers.
I would assume the 15% overlap is on nozzle size, so if you have a .3 nozzle you will get a 0.045 overlap on both sides and ends of the line. If the "track" (guessing you mean line) is 15% longer, then that would mutate any part you printed to be very odd looking. ;-)
Edited 1 time(s). Last edit at 02/16/2017 12:32PM by GhremHatesSlic3r.
|
Re: Why no bridges for this? February 17, 2017 06:58AM |
Registered: 10 years ago Posts: 2,472 |
Quote
doodady
Quote
dmould
Quote
doodady
What happens if you try to bridge to or from the middle of a bridge?
Please understand I am relatively new here
The same as if you try to bridge a gap of exactly 2m with a plank of wood that is exactly 2m long. The wood has nothing to rest on at each end, so it falls into the gap.
Dave
What is the result if the bridge is 2.30m and the gap is 2m (15% overlap)? would that not work the same as bridging perimeter to perimeter as it does now?
If you are bridging between two bridges, there is no overlap - the gap is exactly the same length as the bridge. It needs something *underneath* the bridge at both ends. If the bridge is at the same level as the sides, there is nothing underneath. You will get some adhesion at the end on the extrusion, but that will be extremely weak, so unlikely to work consistently. The overlap is just as likely to break the existing bridge (by melting through the extrusion) as it is to adhere.
Dave
Sorry, only registered users may post in this forum.
