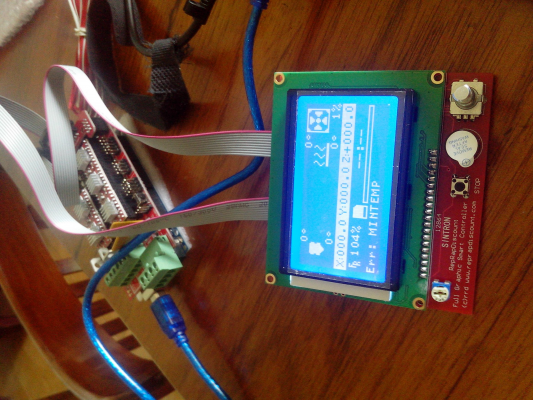
REPRAP_DISCOUNT_FULL_GRAPHIC_SMART_CONTROLLER no funciona 
Posted by AleCun
Re: REPRAP_DISCOUNT_FULL_GRAPHIC_SMART_CONTROLLER no funciona  December 26, 2014 11:02AM |
Registered: 9 years ago Posts: 25 |
Gracias Ale, voy a subirlo a la siesta, me voy a quedar solo con el marlin de la wiki y subire de ese, ya que si lo sigo cambiado nunca voy a saber porque no anda, pero, ya te digo, al principio me daba miedo al ser novato en esto borrarle las //, me tomaba el laburo comparaba 1 con otro, y los veia igual, pensaba sera algo mas, algo en otra solapa? Librerias.. asi que directamente cambiaba de marlin, hasta que anoche me agoto y decidi postearlo.
Mas tarde subo y vemos solo vi un chino, en un video de 30 minutos que le hace lo mismo, pro lo desconecta, lo presiona mas al ramps contra el ardu y le anda.. yo lo hice y nada...
Ya veremos gracias!
Danale
Mas tarde subo y vemos solo vi un chino, en un video de 30 minutos que le hace lo mismo, pro lo desconecta, lo presiona mas al ramps contra el ardu y le anda.. yo lo hice y nada...
Ya veremos gracias!
Danale
Re: REPRAP_DISCOUNT_FULL_GRAPHIC_SMART_CONTROLLER no funciona  December 26, 2014 05:49PM |
Registered: 9 years ago Posts: 25 |
buenas, estuvimos con cortes de luz asi que imposible pasarme para dejar una copia de como esta configurado
//LCD and SD support
//#define ULTRA_LCD //general LCD support, also 16x2
//#define DOGLCD // Support for SPI LCD 128x64 (Controller ST7565R graphic Display Family)
#define SDSUPPORT // Enable SD Card Support in Hardware Console
//#define SDSLOW // Use slower SD transfer mode (not normally needed - uncomment if you're getting volume init error)
//#define SD_CHECK_AND_RETRY // Use CRC checks and retries on the SD communication
//#define ENCODER_PULSES_PER_STEP 1 // Increase if you have a high resolution encoder
//#define ENCODER_STEPS_PER_MENU_ITEM 5 // Set according to ENCODER_PULSES_PER_STEP or your liking
//#define ULTIMAKERCONTROLLER //as available from the Ultimaker online store.
//#define ULTIPANEL //the UltiPanel as on Thingiverse
//#define LCD_FEEDBACK_FREQUENCY_HZ 1000 // this is the tone frequency the buzzer plays when on UI feedback. ie Screen Click
//#define LCD_FEEDBACK_FREQUENCY_DURATION_MS 100 // the duration the buzzer plays the UI feedback sound. ie Screen Click
// The MaKr3d Makr-Panel with graphic controller and SD support
// [reprap.org]
//#define MAKRPANEL
// The RepRapDiscount Smart Controller (white PC
// [reprap.org]
#define REPRAP_DISCOUNT_SMART_CONTROLLER
// The GADGETS3D G3D LCD/SD Controller (blue PC
// [reprap.org]
//#define G3D_PANEL
// The RepRapDiscount FULL GRAPHIC Smart Controller (quadratic white PC
// [reprap.org]
//
// ==> REMEMBER TO INSTALL U8glib to your ARDUINO library folder: [code.google.com]
//#define REPRAP_DISCOUNT_FULL_GRAPHIC_SMART_CONTROLLER
// The RepRapWorld REPRAPWORLD_KEYPAD v1.1
// [reprapworld.com]
//#define REPRAPWORLD_KEYPAD
//#define REPRAPWORLD_KEYPAD_MOVE_STEP 10.0 // how much should be moved when a key is pressed, eg 10.0 means 10mm per click
// The Elefu RA Board Control Panel
// [www.elefu.com]
// REMEMBER TO INSTALL LiquidCrystal_I2C.h in your ARUDINO library folder: [github.com]
//#define RA_CONTROL_PANEL
//automatic expansion
#if defined (MAKRPANEL)
#define DOGLCD
#define SDSUPPORT
#define ULTIPANEL
#define NEWPANEL
#define DEFAULT_LCD_CONTRAST 17
#endif
#if defined (REPRAP_DISCOUNT_FULL_GRAPHIC_SMART_CONTROLLER)
#define DOGLCD
#define U8GLIB_ST7920
#define REPRAP_DISCOUNT_SMART_CONTROLLER
#endif
#if defined(ULTIMAKERCONTROLLER) || defined(REPRAP_DISCOUNT_SMART_CONTROLLER) || defined(G3D_PANEL)
#define ULTIPANEL
#define NEWPANEL
#endif
#if defined(REPRAPWORLD_KEYPAD)
#define NEWPANEL
#define ULTIPANEL
#endif
#if defined(RA_CONTROL_PANEL)
#define ULTIPANEL
#define NEWPANEL
#define LCD_I2C_TYPE_PCA8574
#define LCD_I2C_ADDRESS 0x27 // I2C Address of the port expander
#endif
//I2C PANELS
//#define LCD_I2C_SAINSMART_YWROBOT
#ifdef LCD_I2C_SAINSMART_YWROBOT
// This uses the LiquidCrystal_I2C library ( [bitbucket.org] )
// Make sure it is placed in the Arduino libraries directory.
#define LCD_I2C_TYPE_PCF8575
#define LCD_I2C_ADDRESS 0x27 // I2C Address of the port expander
#define NEWPANEL
#define ULTIPANEL
#endif
// PANELOLU2 LCD with status LEDs, separate encoder and click inputs
//#define LCD_I2C_PANELOLU2
#ifdef LCD_I2C_PANELOLU2
// This uses the LiquidTWI2 library v1.2.3 or later ( [github.com] )
// Make sure the LiquidTWI2 directory is placed in the Arduino or Sketchbook libraries subdirectory.
// (v1.2.3 no longer requires you to define PANELOLU in the LiquidTWI2.h library header file)
// Note: The PANELOLU2 encoder click input can either be directly connected to a pin
// (if BTN_ENC defined to != -1) or read through I2C (when BTN_ENC == -1).
#define LCD_I2C_TYPE_MCP23017
#define LCD_I2C_ADDRESS 0x20 // I2C Address of the port expander
#define LCD_USE_I2C_BUZZER //comment out to disable buzzer on LCD
#define NEWPANEL
#define ULTIPANEL
#ifndef ENCODER_PULSES_PER_STEP
#define ENCODER_PULSES_PER_STEP 4
#endif
#ifndef ENCODER_STEPS_PER_MENU_ITEM
#define ENCODER_STEPS_PER_MENU_ITEM 1
#endif
#ifdef LCD_USE_I2C_BUZZER
#define LCD_FEEDBACK_FREQUENCY_HZ 1000
#define LCD_FEEDBACK_FREQUENCY_DURATION_MS 100
#endif
#endif
// Panucatt VIKI LCD with status LEDs, integrated click & L/R/U/P buttons, separate encoder inputs
//#define LCD_I2C_VIKI
#ifdef LCD_I2C_VIKI
// This uses the LiquidTWI2 library v1.2.3 or later ( [github.com] )
// Make sure the LiquidTWI2 directory is placed in the Arduino or Sketchbook libraries subdirectory.
// Note: The pause/stop/resume LCD button pin should be connected to the Arduino
// BTN_ENC pin (or set BTN_ENC to -1 if not used)
#define LCD_I2C_TYPE_MCP23017
#define LCD_I2C_ADDRESS 0x20 // I2C Address of the port expander
#define LCD_USE_I2C_BUZZER //comment out to disable buzzer on LCD (requires LiquidTWI2 v1.2.3 or later)
#define NEWPANEL
#define ULTIPANEL
#endif
// Shift register panels
// ---------------------
// 2 wire Non-latching LCD SR from:
// [bitbucket.org]
//#define SR_LCD
#ifdef SR_LCD
#define SR_LCD_2W_NL // Non latching 2 wire shift register
//#define NEWPANEL
#endif
#ifdef ULTIPANEL
// #define NEWPANEL //enable this if you have a click-encoder panel
#define SDSUPPORT
#define ULTRA_LCD
#ifdef DOGLCD // Change number of lines to match the DOG graphic display
#define LCD_WIDTH 20
#define LCD_HEIGHT 5
#else
#define LCD_WIDTH 20
#define LCD_HEIGHT 4
#endif
#else //no panel but just LCD
#ifdef ULTRA_LCD
#ifdef DOGLCD // Change number of lines to match the 128x64 graphics display
#define LCD_WIDTH 20
#define LCD_HEIGHT 5
#else
#define LCD_WIDTH 16
#define LCD_HEIGHT 2
#endif
#endif
#endif
// default LCD contrast for dogm-like LCD displays
#ifdef DOGLCD
# ifndef DEFAULT_LCD_CONTRAST
# define DEFAULT_LCD_CONTRAST 32
# endif
#endif
// Increase the FAN pwm frequency. Removes the PWM noise but increases heating in the FET/Arduino
//#define FAST_PWM_FAN
// Temperature status LEDs that display the hotend and bet temperature.
// If all hotends and bed temperature and temperature setpoint are < 54C then the BLUE led is on.
// Otherwise the RED led is on. There is 1C hysteresis.
//#define TEMP_STAT_LEDS
// Use software PWM to drive the fan, as for the heaters. This uses a very low frequency
// which is not ass annoying as with the hardware PWM. On the other hand, if this frequency
// is too low, you should also increment SOFT_PWM_SCALE.
//#define FAN_SOFT_PWM
// Incrementing this by 1 will double the software PWM frequency,
// affecting heaters, and the fan if FAN_SOFT_PWM is enabled.
// However, control resolution will be halved for each increment;
// at zero value, there are 128 effective control positions.
#define SOFT_PWM_SCALE 0
// M240 Triggers a camera by emulating a Canon RC-1 Remote
// Data from: [www.doc-diy.net]
// #define PHOTOGRAPH_PIN 23
// SF send wrong arc g-codes when using Arc Point as fillet procedure
//#define SF_ARC_FIX
// Support for the BariCUDA Paste Extruder.
//#define BARICUDA
//define BlinkM/CyzRgb Support
//#define BLINKM
bueno por lo que entiendo deberia llegar hasta ahi, ya que lo que sigue es la configuracion de servo.
se los resalte en negrita aca, para que vean lo que indica que hay que hacer en algunos videos para que funcione, sin llevar librerias ni nada raro.
hoy Jorge y un amigo Santiago me estuvieron ayudando, pero no levantaba y la luz que se cortaba no ayudaba, pero de todos modos no funciono.
destildamos la primera opcion, la volvimos a dejar tildada, probe una a una las conviniciones y ayer probe de poner todas las otras y con la primera opcion activada y desactivada.
ya la unica que me queda es que alguien que la tenga me comparta su config o algo porque yo ya no se que hacerle.
exitos!
Danale
//LCD and SD support
//#define ULTRA_LCD //general LCD support, also 16x2
//#define DOGLCD // Support for SPI LCD 128x64 (Controller ST7565R graphic Display Family)
#define SDSUPPORT // Enable SD Card Support in Hardware Console
//#define SDSLOW // Use slower SD transfer mode (not normally needed - uncomment if you're getting volume init error)
//#define SD_CHECK_AND_RETRY // Use CRC checks and retries on the SD communication
//#define ENCODER_PULSES_PER_STEP 1 // Increase if you have a high resolution encoder
//#define ENCODER_STEPS_PER_MENU_ITEM 5 // Set according to ENCODER_PULSES_PER_STEP or your liking
//#define ULTIMAKERCONTROLLER //as available from the Ultimaker online store.
//#define ULTIPANEL //the UltiPanel as on Thingiverse
//#define LCD_FEEDBACK_FREQUENCY_HZ 1000 // this is the tone frequency the buzzer plays when on UI feedback. ie Screen Click
//#define LCD_FEEDBACK_FREQUENCY_DURATION_MS 100 // the duration the buzzer plays the UI feedback sound. ie Screen Click
// The MaKr3d Makr-Panel with graphic controller and SD support
// [reprap.org]
//#define MAKRPANEL
// The RepRapDiscount Smart Controller (white PC

// [reprap.org]
#define REPRAP_DISCOUNT_SMART_CONTROLLER
// The GADGETS3D G3D LCD/SD Controller (blue PC

// [reprap.org]
//#define G3D_PANEL
// The RepRapDiscount FULL GRAPHIC Smart Controller (quadratic white PC

// [reprap.org]
//
// ==> REMEMBER TO INSTALL U8glib to your ARDUINO library folder: [code.google.com]
//#define REPRAP_DISCOUNT_FULL_GRAPHIC_SMART_CONTROLLER
// The RepRapWorld REPRAPWORLD_KEYPAD v1.1
// [reprapworld.com]
//#define REPRAPWORLD_KEYPAD
//#define REPRAPWORLD_KEYPAD_MOVE_STEP 10.0 // how much should be moved when a key is pressed, eg 10.0 means 10mm per click
// The Elefu RA Board Control Panel
// [www.elefu.com]
// REMEMBER TO INSTALL LiquidCrystal_I2C.h in your ARUDINO library folder: [github.com]
//#define RA_CONTROL_PANEL
//automatic expansion
#if defined (MAKRPANEL)
#define DOGLCD
#define SDSUPPORT
#define ULTIPANEL
#define NEWPANEL
#define DEFAULT_LCD_CONTRAST 17
#endif
#if defined (REPRAP_DISCOUNT_FULL_GRAPHIC_SMART_CONTROLLER)
#define DOGLCD
#define U8GLIB_ST7920
#define REPRAP_DISCOUNT_SMART_CONTROLLER
#endif
#if defined(ULTIMAKERCONTROLLER) || defined(REPRAP_DISCOUNT_SMART_CONTROLLER) || defined(G3D_PANEL)
#define ULTIPANEL
#define NEWPANEL
#endif
#if defined(REPRAPWORLD_KEYPAD)
#define NEWPANEL
#define ULTIPANEL
#endif
#if defined(RA_CONTROL_PANEL)
#define ULTIPANEL
#define NEWPANEL
#define LCD_I2C_TYPE_PCA8574
#define LCD_I2C_ADDRESS 0x27 // I2C Address of the port expander
#endif
//I2C PANELS
//#define LCD_I2C_SAINSMART_YWROBOT
#ifdef LCD_I2C_SAINSMART_YWROBOT
// This uses the LiquidCrystal_I2C library ( [bitbucket.org] )
// Make sure it is placed in the Arduino libraries directory.
#define LCD_I2C_TYPE_PCF8575
#define LCD_I2C_ADDRESS 0x27 // I2C Address of the port expander
#define NEWPANEL
#define ULTIPANEL
#endif
// PANELOLU2 LCD with status LEDs, separate encoder and click inputs
//#define LCD_I2C_PANELOLU2
#ifdef LCD_I2C_PANELOLU2
// This uses the LiquidTWI2 library v1.2.3 or later ( [github.com] )
// Make sure the LiquidTWI2 directory is placed in the Arduino or Sketchbook libraries subdirectory.
// (v1.2.3 no longer requires you to define PANELOLU in the LiquidTWI2.h library header file)
// Note: The PANELOLU2 encoder click input can either be directly connected to a pin
// (if BTN_ENC defined to != -1) or read through I2C (when BTN_ENC == -1).
#define LCD_I2C_TYPE_MCP23017
#define LCD_I2C_ADDRESS 0x20 // I2C Address of the port expander
#define LCD_USE_I2C_BUZZER //comment out to disable buzzer on LCD
#define NEWPANEL
#define ULTIPANEL
#ifndef ENCODER_PULSES_PER_STEP
#define ENCODER_PULSES_PER_STEP 4
#endif
#ifndef ENCODER_STEPS_PER_MENU_ITEM
#define ENCODER_STEPS_PER_MENU_ITEM 1
#endif
#ifdef LCD_USE_I2C_BUZZER
#define LCD_FEEDBACK_FREQUENCY_HZ 1000
#define LCD_FEEDBACK_FREQUENCY_DURATION_MS 100
#endif
#endif
// Panucatt VIKI LCD with status LEDs, integrated click & L/R/U/P buttons, separate encoder inputs
//#define LCD_I2C_VIKI
#ifdef LCD_I2C_VIKI
// This uses the LiquidTWI2 library v1.2.3 or later ( [github.com] )
// Make sure the LiquidTWI2 directory is placed in the Arduino or Sketchbook libraries subdirectory.
// Note: The pause/stop/resume LCD button pin should be connected to the Arduino
// BTN_ENC pin (or set BTN_ENC to -1 if not used)
#define LCD_I2C_TYPE_MCP23017
#define LCD_I2C_ADDRESS 0x20 // I2C Address of the port expander
#define LCD_USE_I2C_BUZZER //comment out to disable buzzer on LCD (requires LiquidTWI2 v1.2.3 or later)
#define NEWPANEL
#define ULTIPANEL
#endif
// Shift register panels
// ---------------------
// 2 wire Non-latching LCD SR from:
// [bitbucket.org]
//#define SR_LCD
#ifdef SR_LCD
#define SR_LCD_2W_NL // Non latching 2 wire shift register
//#define NEWPANEL
#endif
#ifdef ULTIPANEL
// #define NEWPANEL //enable this if you have a click-encoder panel
#define SDSUPPORT
#define ULTRA_LCD
#ifdef DOGLCD // Change number of lines to match the DOG graphic display
#define LCD_WIDTH 20
#define LCD_HEIGHT 5
#else
#define LCD_WIDTH 20
#define LCD_HEIGHT 4
#endif
#else //no panel but just LCD
#ifdef ULTRA_LCD
#ifdef DOGLCD // Change number of lines to match the 128x64 graphics display
#define LCD_WIDTH 20
#define LCD_HEIGHT 5
#else
#define LCD_WIDTH 16
#define LCD_HEIGHT 2
#endif
#endif
#endif
// default LCD contrast for dogm-like LCD displays
#ifdef DOGLCD
# ifndef DEFAULT_LCD_CONTRAST
# define DEFAULT_LCD_CONTRAST 32
# endif
#endif
// Increase the FAN pwm frequency. Removes the PWM noise but increases heating in the FET/Arduino
//#define FAST_PWM_FAN
// Temperature status LEDs that display the hotend and bet temperature.
// If all hotends and bed temperature and temperature setpoint are < 54C then the BLUE led is on.
// Otherwise the RED led is on. There is 1C hysteresis.
//#define TEMP_STAT_LEDS
// Use software PWM to drive the fan, as for the heaters. This uses a very low frequency
// which is not ass annoying as with the hardware PWM. On the other hand, if this frequency
// is too low, you should also increment SOFT_PWM_SCALE.
//#define FAN_SOFT_PWM
// Incrementing this by 1 will double the software PWM frequency,
// affecting heaters, and the fan if FAN_SOFT_PWM is enabled.
// However, control resolution will be halved for each increment;
// at zero value, there are 128 effective control positions.
#define SOFT_PWM_SCALE 0
// M240 Triggers a camera by emulating a Canon RC-1 Remote
// Data from: [www.doc-diy.net]
// #define PHOTOGRAPH_PIN 23
// SF send wrong arc g-codes when using Arc Point as fillet procedure
//#define SF_ARC_FIX
// Support for the BariCUDA Paste Extruder.
//#define BARICUDA
//define BlinkM/CyzRgb Support
//#define BLINKM
bueno por lo que entiendo deberia llegar hasta ahi, ya que lo que sigue es la configuracion de servo.
se los resalte en negrita aca, para que vean lo que indica que hay que hacer en algunos videos para que funcione, sin llevar librerias ni nada raro.
hoy Jorge y un amigo Santiago me estuvieron ayudando, pero no levantaba y la luz que se cortaba no ayudaba, pero de todos modos no funciono.
destildamos la primera opcion, la volvimos a dejar tildada, probe una a una las conviniciones y ayer probe de poner todas las otras y con la primera opcion activada y desactivada.
ya la unica que me queda es que alguien que la tenga me comparta su config o algo porque yo ya no se que hacerle.
exitos!
Danale
Re: REPRAP_DISCOUNT_FULL_GRAPHIC_SMART_CONTROLLER no funciona  December 26, 2014 07:47PM |
Registered: 9 years ago Posts: 47 |
Danale!... a ver si con esto sirve:
En LCD and SD support
Descomenta esta linea:
//#define SDSUPPORT // Enable SD Card Support in Hardware Console
Ya que no es necesaria dado que en la expansion automatica si ya seleccionaste
#define REPRAP_DISCOUNT_SMART_CONTROLLER
te va a seleccionar cualquiera de los LCD que figuran a continuacion:
#if defined(ULTIMAKERCONTROLLER) || defined(REPRAP_DISCOUNT_SMART_CONTROLLER) (en este caso es el tuyo) || defined(G3D_PANEL)
#define ULTIPANEL (como veras, el condicional anterior define esta linea)
#define NEWPANEL
#endif
... y al definirse alguna de estos tres LCD te va a definir automaticamente (#define ULTIPANEL)
y al ya estar definido ULTIPANEL, ya te habilito la tarjeta SD...
#ifdef ULTIPANEL // (Como lo podes ver acá)
// #define NEWPANEL //enable this if you have a click-encoder panel
#define SDSUPPORT // Automaticamente te define SDSUPPORT
#define ULTRA_LCD
#ifdef DOGLCD // Change number of lines to match the DOG graphic display
#define LCD_WIDTH 20
#define LCD_HEIGHT 5
#else
#define LCD_WIDTH 20
#define LCD_HEIGHT 4
#endif....................................
Si con descomentar solamete //#define SDSUPPORT no funciona, puede que alguna otra linea este jodiendo...
(Hay que ver cual)
Puede que tengas una Ramps anterior a la Version 1.4
Si es así: anda a Marlin ping.h (Ctrl +Alt + Flechita para el costado) (esta masomenos entre las lineas 312 y 320 según la versión del firm que estes usando)
...y comenta la Ramps que corresponda.. O sea si es de las viejas
// #define RAMPS_V_1_3 (descomenta o comenta según corresponda)
// #define RAMPS_V_1_0
Si tenes una Ramps 1.4
Deja descometadas estas lineas o cerciorate que estén descomentadas, y volvamos a analizar el asunto...
Saludo y conta como te fué
AleCun
PD : Desconecta la pantalla de LCD cuando cargues el firmware así no entra a chillar el buzzer que tiene
-----------------------------------------
Quote
danale17
buenas, estuvimos con cortes de luz asi que imposible pasarme para dejar una copia de como esta configurado
//LCD and SD support
//#define ULTRA_LCD //general LCD support, also 16x2
//#define DOGLCD // Support for SPI LCD 128x64 (Controller ST7565R graphic Display Family)
#define SDSUPPORT // Enable SD Card Support in Hardware Console
//#define SDSLOW // Use slower SD transfer mode (not normally needed - uncomment if you're getting volume init error)
//#define SD_CHECK_AND_RETRY // Use CRC checks and retries on the SD communication
//#define ENCODER_PULSES_PER_STEP 1 // Increase if you have a high resolution encoder
//#define ENCODER_STEPS_PER_MENU_ITEM 5 // Set according to ENCODER_PULSES_PER_STEP or your liking
//#define ULTIMAKERCONTROLLER //as available from the Ultimaker online store.
//#define ULTIPANEL //the UltiPanel as on Thingiverse
//#define LCD_FEEDBACK_FREQUENCY_HZ 1000 // this is the tone frequency the buzzer plays when on UI feedback. ie Screen Click
//#define LCD_FEEDBACK_FREQUENCY_DURATION_MS 100 // the duration the buzzer plays the UI feedback sound. ie Screen Click
// The MaKr3d Makr-Panel with graphic controller and SD support
// [reprap.org]
//#define MAKRPANEL
// The RepRapDiscount Smart Controller (white PC
// [reprap.org]
#define REPRAP_DISCOUNT_SMART_CONTROLLER
// The GADGETS3D G3D LCD/SD Controller (blue PC
// [reprap.org]
//#define G3D_PANEL
// The RepRapDiscount FULL GRAPHIC Smart Controller (quadratic white PC
// [reprap.org]
//
// ==> REMEMBER TO INSTALL U8glib to your ARDUINO library folder: [code.google.com]
//#define REPRAP_DISCOUNT_FULL_GRAPHIC_SMART_CONTROLLER
// The RepRapWorld REPRAPWORLD_KEYPAD v1.1
// [reprapworld.com]
//#define REPRAPWORLD_KEYPAD
//#define REPRAPWORLD_KEYPAD_MOVE_STEP 10.0 // how much should be moved when a key is pressed, eg 10.0 means 10mm per click
// The Elefu RA Board Control Panel
// [www.elefu.com]
// REMEMBER TO INSTALL LiquidCrystal_I2C.h in your ARUDINO library folder: [github.com]
//#define RA_CONTROL_PANEL
//automatic expansion
#if defined (MAKRPANEL)
#define DOGLCD
#define SDSUPPORT
#define ULTIPANEL
#define NEWPANEL
#define DEFAULT_LCD_CONTRAST 17
#endif
#if defined (REPRAP_DISCOUNT_FULL_GRAPHIC_SMART_CONTROLLER)
#define DOGLCD
#define U8GLIB_ST7920
#define REPRAP_DISCOUNT_SMART_CONTROLLER
#endif
#if defined(ULTIMAKERCONTROLLER) || defined(REPRAP_DISCOUNT_SMART_CONTROLLER) || defined(G3D_PANEL)
#define ULTIPANEL
#define NEWPANEL
#endif
#if defined(REPRAPWORLD_KEYPAD)
#define NEWPANEL
#define ULTIPANEL
#endif
#if defined(RA_CONTROL_PANEL)
#define ULTIPANEL
#define NEWPANEL
#define LCD_I2C_TYPE_PCA8574
#define LCD_I2C_ADDRESS 0x27 // I2C Address of the port expander
#endif
//I2C PANELS
//#define LCD_I2C_SAINSMART_YWROBOT
#ifdef LCD_I2C_SAINSMART_YWROBOT
// This uses the LiquidCrystal_I2C library ( [bitbucket.org] )
// Make sure it is placed in the Arduino libraries directory.
#define LCD_I2C_TYPE_PCF8575
#define LCD_I2C_ADDRESS 0x27 // I2C Address of the port expander
#define NEWPANEL
#define ULTIPANEL
#endif
// PANELOLU2 LCD with status LEDs, separate encoder and click inputs
//#define LCD_I2C_PANELOLU2
#ifdef LCD_I2C_PANELOLU2
// This uses the LiquidTWI2 library v1.2.3 or later ( [github.com] )
// Make sure the LiquidTWI2 directory is placed in the Arduino or Sketchbook libraries subdirectory.
// (v1.2.3 no longer requires you to define PANELOLU in the LiquidTWI2.h library header file)
// Note: The PANELOLU2 encoder click input can either be directly connected to a pin
// (if BTN_ENC defined to != -1) or read through I2C (when BTN_ENC == -1).
#define LCD_I2C_TYPE_MCP23017
#define LCD_I2C_ADDRESS 0x20 // I2C Address of the port expander
#define LCD_USE_I2C_BUZZER //comment out to disable buzzer on LCD
#define NEWPANEL
#define ULTIPANEL
#ifndef ENCODER_PULSES_PER_STEP
#define ENCODER_PULSES_PER_STEP 4
#endif
#ifndef ENCODER_STEPS_PER_MENU_ITEM
#define ENCODER_STEPS_PER_MENU_ITEM 1
#endif
#ifdef LCD_USE_I2C_BUZZER
#define LCD_FEEDBACK_FREQUENCY_HZ 1000
#define LCD_FEEDBACK_FREQUENCY_DURATION_MS 100
#endif
#endif
// Panucatt VIKI LCD with status LEDs, integrated click & L/R/U/P buttons, separate encoder inputs
//#define LCD_I2C_VIKI
#ifdef LCD_I2C_VIKI
// This uses the LiquidTWI2 library v1.2.3 or later ( [github.com] )
// Make sure the LiquidTWI2 directory is placed in the Arduino or Sketchbook libraries subdirectory.
// Note: The pause/stop/resume LCD button pin should be connected to the Arduino
// BTN_ENC pin (or set BTN_ENC to -1 if not used)
#define LCD_I2C_TYPE_MCP23017
#define LCD_I2C_ADDRESS 0x20 // I2C Address of the port expander
#define LCD_USE_I2C_BUZZER //comment out to disable buzzer on LCD (requires LiquidTWI2 v1.2.3 or later)
#define NEWPANEL
#define ULTIPANEL
#endif
// Shift register panels
// ---------------------
// 2 wire Non-latching LCD SR from:
// [bitbucket.org]
//#define SR_LCD
#ifdef SR_LCD
#define SR_LCD_2W_NL // Non latching 2 wire shift register
//#define NEWPANEL
#endif
#ifdef ULTIPANEL
// #define NEWPANEL //enable this if you have a click-encoder panel
#define SDSUPPORT
#define ULTRA_LCD
#ifdef DOGLCD // Change number of lines to match the DOG graphic display
#define LCD_WIDTH 20
#define LCD_HEIGHT 5
#else
#define LCD_WIDTH 20
#define LCD_HEIGHT 4
#endif
#else //no panel but just LCD
#ifdef ULTRA_LCD
#ifdef DOGLCD // Change number of lines to match the 128x64 graphics display
#define LCD_WIDTH 20
#define LCD_HEIGHT 5
#else
#define LCD_WIDTH 16
#define LCD_HEIGHT 2
#endif
#endif
#endif
// default LCD contrast for dogm-like LCD displays
#ifdef DOGLCD
# ifndef DEFAULT_LCD_CONTRAST
# define DEFAULT_LCD_CONTRAST 32
# endif
#endif
// Increase the FAN pwm frequency. Removes the PWM noise but increases heating in the FET/Arduino
//#define FAST_PWM_FAN
// Temperature status LEDs that display the hotend and bet temperature.
// If all hotends and bed temperature and temperature setpoint are < 54C then the BLUE led is on.
// Otherwise the RED led is on. There is 1C hysteresis.
//#define TEMP_STAT_LEDS
// Use software PWM to drive the fan, as for the heaters. This uses a very low frequency
// which is not ass annoying as with the hardware PWM. On the other hand, if this frequency
// is too low, you should also increment SOFT_PWM_SCALE.
//#define FAN_SOFT_PWM
// Incrementing this by 1 will double the software PWM frequency,
// affecting heaters, and the fan if FAN_SOFT_PWM is enabled.
// However, control resolution will be halved for each increment;
// at zero value, there are 128 effective control positions.
#define SOFT_PWM_SCALE 0
// M240 Triggers a camera by emulating a Canon RC-1 Remote
// Data from: [www.doc-diy.net]
// #define PHOTOGRAPH_PIN 23
// SF send wrong arc g-codes when using Arc Point as fillet procedure
//#define SF_ARC_FIX
// Support for the BariCUDA Paste Extruder.
//#define BARICUDA
//define BlinkM/CyzRgb Support
//#define BLINKM
bueno por lo que entiendo deberia llegar hasta ahi, ya que lo que sigue es la configuracion de servo.
se los resalte en negrita aca, para que vean lo que indica que hay que hacer en algunos videos para que funcione, sin llevar librerias ni nada raro.
hoy Jorge y un amigo Santiago me estuvieron ayudando, pero no levantaba y la luz que se cortaba no ayudaba, pero de todos modos no funciono.
destildamos la primera opcion, la volvimos a dejar tildada, probe una a una las conviniciones y ayer probe de poner todas las otras y con la primera opcion activada y desactivada.
ya la unica que me queda es que alguien que la tenga me comparta su config o algo porque yo ya no se que hacerle.
exitos!
Danale
Re: REPRAP_DISCOUNT_FULL_GRAPHIC_SMART_CONTROLLER no funciona  December 26, 2014 10:54PM |
Registered: 9 years ago Posts: 25 |
bueno acabo de leer tu mensaje y volvi a probar, pero el lcd sigue sin funcionar bien, el buzzer jamas sono, desde que lo tengo nunca hizo nada.. es una mala señal que ni conectado suene?
si es asi ya me rindo.. jajaja porque se como termina, me hace perder tiempo, me saca de las casillas y se come un pisoton, ya probare en la 3d de un amigo a ver si muestra caracteres, si los muestra el error es mio o de la config o del ramps que esta jodiendo, he visto varias con el mismo problema, que solo muestran cuadros y simbolos raros y es problemas de comunicacion por pines mal soldados o mal contacto.
al buscar el ping.h con ctrl+alt+flecha, el arduino rota la pantalla completa a 90 grados cualquiera...
asi que por hoy la dejo porque termina mal la pantallita.
gracias por tu tiempo!
Danale
Re: REPRAP_DISCOUNT_FULL_GRAPHIC_SMART_CONTROLLER no funciona  December 27, 2014 09:35AM |
Registered: 9 years ago Posts: 792 |
Si me paso algo similar cuando estaba haciendo otro proyecto con arduino y una pantalla de 20x2 lo conectaba como se suponía y siempre me terminaba tirando caracteres en japonés. No pude solucionar el tema. Termine comprando un display nuevo.
Mis sospecha rondan por el chip que controla el display capas el pin out es distindistinto o tiene algún otro parametro. Para tocar. Fijaste si podes ver el modelo del chip y comprarlo con otro display
Mis sospecha rondan por el chip que controla el display capas el pin out es distindistinto o tiene algún otro parametro. Para tocar. Fijaste si podes ver el modelo del chip y comprarlo con otro display
Quote
danale17
bueno acabo de leer tu mensaje y volvi a probar, pero el lcd sigue sin funcionar bien, el buzzer jamas sono, desde que lo tengo nunca hizo nada.. es una mala señal que ni conectado suene?
si es asi ya me rindo.. jajaja porque se como termina, me hace perder tiempo, me saca de las casillas y se come un pisoton, ya probare en la 3d de un amigo a ver si muestra caracteres, si los muestra el error es mio o de la config o del ramps que esta jodiendo, he visto varias con el mismo problema, que solo muestran cuadros y simbolos raros y es problemas de comunicacion por pines mal soldados o mal contacto.
al buscar el ping.h con ctrl+alt+flecha, el arduino rota la pantalla completa a 90 grados cualquiera...
asi que por hoy la dejo porque termina mal la pantallita.
gracias por tu tiempo!
Danale
Re: REPRAP_DISCOUNT_FULL_GRAPHIC_SMART_CONTROLLER no funciona  December 27, 2014 09:47AM |
Registered: 9 years ago Posts: 25 |
Re: REPRAP_DISCOUNT_FULL_GRAPHIC_SMART_CONTROLLER no funciona  December 27, 2014 10:47AM |
Registered: 9 years ago Posts: 17 |
Re: REPRAP_DISCOUNT_FULL_GRAPHIC_SMART_CONTROLLER no funciona  December 27, 2014 11:29AM |
Registered: 9 years ago Posts: 792 |
Bueno les comento mi experiencia. y mini tutorial.
1 - Instalar el software de arduino (http://arduino.cc/en/main/software)
2 - Instalar el driver de la arduino mega 2560 (http://www.nextdayreprap.co.uk/arduino-driver-installation-reprap-prusa-mendel-build-manual-mega-2560/)
3 - Instalar la biblioteca- [code.google.com]
Obviamente hay que configurar el soft de arduino para que lea la placa ir a "tools" --> "Board" Seleccionar Arduino mega 2560
Después seleccionar el puerto en el cual esta conectado el "com" Si no sabes cual es el puerto ir a panel de control administración de dispositivos. ir a Puertos (com & LTP) y fijarse cual es el puerto en el cual esta conectado el arduino.
Configuration.h (descomentar las siguientes lineas)
#define SDSUPPORT // Enable SD Card Support in Hardware Console
#define REPRAP_DISCOUNT_FULL_GRAPHIC_SMART_CONTROLLER
No hay que olvidarse obviamente de seleccionar la placa (RAMPS y version de la cual queres configurar ejemplo)
Las otras versiones de placas o configuraciones podes sacar desde Boards.h
[/code]
Edited 4 time(s). Last edit at 12/27/2014 08:33PM by tatubias.
1 - Instalar el software de arduino (http://arduino.cc/en/main/software)
2 - Instalar el driver de la arduino mega 2560 (http://www.nextdayreprap.co.uk/arduino-driver-installation-reprap-prusa-mendel-build-manual-mega-2560/)
3 - Instalar la biblioteca- [code.google.com]
•Arduino (Installation with IDE)
1.arrancar Arduino IDE
2.en el soft Arduino IDE, ir a importar libreria desde "Add Library" Menu.
3. Buscar el zip que se descargo y automaticamente lo agrega (u8glib_arduino_v1.17.zip)

•Arduino (Manual Installation)
1.Unzip u8glib_arduino...X.XX.zip into the "libraries" folder of the Arduino IDE
2.Start Arduino IDE
Obviamente hay que configurar el soft de arduino para que lea la placa ir a "tools" --> "Board" Seleccionar Arduino mega 2560
Después seleccionar el puerto en el cual esta conectado el "com" Si no sabes cual es el puerto ir a panel de control administración de dispositivos. ir a Puertos (com & LTP) y fijarse cual es el puerto en el cual esta conectado el arduino.
Configuration.h (descomentar las siguientes lineas)
#define SDSUPPORT // Enable SD Card Support in Hardware Console
#define REPRAP_DISCOUNT_FULL_GRAPHIC_SMART_CONTROLLER
No hay que olvidarse obviamente de seleccionar la placa (RAMPS y version de la cual queres configurar ejemplo)
// The following define selects which electronics board you have.
// Please choose the name from boards.h that matches your setup
#ifndef MOTHERBOARD
  #define MOTHERBOARD 33
#endif
Las otras versiones de placas o configuraciones podes sacar desde Boards.h
#ifndef BOARDS_H #define BOARDS_H #define BOARD_UNKNOWN -1 #define BOARD_GEN7_CUSTOM 10 // Gen7 custom (Alfons3 Version) "https://github.com/Alfons3/Generation_7_Electronics" #define BOARD_GEN7_12 11 // Gen7 v1.1, v1.2 #define BOARD_GEN7_13 12 // Gen7 v1.3 #define BOARD_GEN7_14 13 // Gen7 v1.4 #define BOARD_CHEAPTRONIC 2 // Cheaptronic v1.0 #define BOARD_SETHI 20 // Sethi 3D_1 #define BOARD_RAMPS_OLD 3 // MEGA/RAMPS up to 1.2 #define BOARD_RAMPS_13_EFB 33 // RAMPS 1.3 / 1.4 (Power outputs: Extruder, Fan, Bed) #define BOARD_RAMPS_13_EEB 34 // RAMPS 1.3 / 1.4 (Power outputs: Extruder0, Extruder1, Bed) #define BOARD_RAMPS_13_EFF 35 // RAMPS 1.3 / 1.4 (Power outputs: Extruder, Fan, Fan) #define BOARD_RAMPS_13_EEF 36 // RAMPS 1.3 / 1.4 (Power outputs: Extruder0, Extruder1, Fan) #define BOARD_DUEMILANOVE_328P 4 // Duemilanove w/ ATMega328P pin assignment #define BOARD_GEN6 5 // Gen6 #define BOARD_GEN6_DELUXE 51 // Gen6 deluxe #define BOARD_SANGUINOLOLU_11 6 // Sanguinololu < 1.2 #define BOARD_SANGUINOLOLU_12 62 // Sanguinololu 1.2 and above #define BOARD_MELZI 63 // Melzi #define BOARD_STB_11 64 // STB V1.1 #define BOARD_AZTEEG_X1 65 // Azteeg X1 #define BOARD_MELZI_1284 66 // Melzi with ATmega1284 (MaKr3d version) #define BOARD_AZTEEG_X3 67 // Azteeg X3 #define BOARD_AZTEEG_X3_PRO 68 // Azteeg X3 Pro #define BOARD_ULTIMAKER 7 // Ultimaker #define BOARD_ULTIMAKER_OLD 71 // Ultimaker (Older electronics. Pre 1.5.4. This is rare) #define BOARD_ULTIMAIN_2 72 // Ultimainboard 2.x (Uses TEMP_SENSOR 20) #define BOARD_3DRAG 77 // 3Drag Controller #define BOARD_TEENSYLU 8 // Teensylu #define BOARD_RUMBA 80 // Rumba #define BOARD_PRINTRBOARD 81 // Printrboard (AT90USB1286) #define BOARD_BRAINWAVE 82 // Brainwave (AT90USB646) #define BOARD_SAV_MKI 83 // SAV Mk-I (AT90USB1286) #define BOARD_TEENSY2 84 // Teensy++2.0 (AT90USB1286) - CLI compile: DEFINES=AT90USBxx_TEENSYPP_ASSIGNMENTS HARDWARE_MOTHERBOARD=84 make #define BOARD_GEN3_PLUS 9 // Gen3+ #define BOARD_GEN3_MONOLITHIC 22 // Gen3 Monolithic Electronics #define BOARD_MEGATRONICS 70 // Megatronics #define BOARD_MEGATRONICS_2 701 // Megatronics v2.0 #define BOARD_MEGATRONICS_1 702 // Minitronics v1.0 #define BOARD_OMCA_A 90 // Alpha OMCA board #define BOARD_OMCA 91 // Final OMCA board #define BOARD_RAMBO 301 // Rambo #define BOARD_ELEFU_3 21 // Elefu Ra Board (v3) #define BOARD_5DPRINT 88 // 5DPrint D8 Driver Board #define BOARD_LEAPFROG 999 // Leapfrog #define BOARD_99 99 // This is in pins.h but...? #define MB(board) (MOTHERBOARD==BOARD_##board) #define IS_RAMPS (MB(RAMPS_OLD) || MB(RAMPS_13_EF|| MB(RAMPS_13_EE
|| MB(RAMPS_13_EFF) || MB(RAMPS_13_EEF)) #endif //__BOARDS_H
[/code]
Edited 4 time(s). Last edit at 12/27/2014 08:33PM by tatubias.
Re: REPRAP_DISCOUNT_FULL_GRAPHIC_SMART_CONTROLLER no funciona  December 27, 2014 12:09PM |
Registered: 9 years ago Posts: 792 |
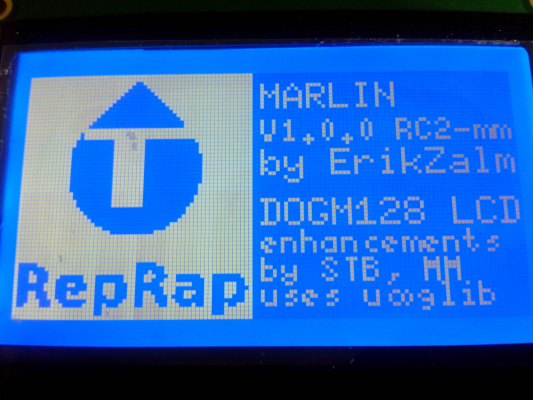
Estuve veindo para modificar la interface de la pantalla. simplemente hay que editar el archivo DOGMbitmaps.h y ahi estan todos los objetos para ser modificados.
Ejemplo si modificas esta sección, modificas el logo de booteo ahi le puse una "T"
Les adjunto una aplicación que te deja editar modificar y exportar los codigos en HEX para poder modificar cualquier parte de la interfaz
[ati-soft.biz]
Videos:
[ati-soft.biz]
[ati-soft.biz]
Edited 1 time(s). Last edit at 12/27/2014 12:10PM by tatubias.
Ejemplo si modificas esta sección, modificas el logo de booteo ahi le puse una "T"
const unsigned char start_bmp[574] PROGMEM = { //AVR-GCC, WinAVR
0xFF,0xFF,0xFF,0xFF,0xFF,0xFF,0xFF,0xF0,
0xFF,0xFF,0xFF,0xFF,0xFF,0xFF,0xFF,0xF0,
0xFF,0xFF,0xFF,0xF9,0xFF,0xFF,0xFF,0xF0,
0xFF,0xFF,0xFF,0xF0,0xFF,0xFF,0xFF,0xF0,
0xFF,0xFF,0xFF,0xE0,0x7F,0xFF,0xFF,0xF0,
0xFF,0xFF,0xFF,0xC0,0x3F,0xFF,0xFF,0xF0,
0xFF,0xFF,0xFF,0x80,0x1F,0xFF,0xFF,0xF0,
0xFF,0xFF,0xFF,0x00,0x0F,0xFF,0xFF,0xF0,
0xFF,0xFF,0xFE,0x00,0x07,0xFF,0xFF,0xF0,
0xFF,0xFF,0xFC,0x00,0x03,0xFF,0xFF,0xF0,
0xFF,0xFF,0xF8,0x00,0x01,0xFF,0xFF,0xF0,
0xFF,0xFF,0xF0,0x00,0x00,0xFF,0xFF,0xF0,
0xFF,0xFF,0xE0,0x00,0x00,0x7F,0xFF,0xF0,
0xFF,0xFF,0xC0,0x00,0x00,0x3F,0xFF,0xF0,
0xFF,0xFF,0x80,0x00,0x00,0x3F,0xFF,0xF0,
0xFF,0xFF,0xFF,0xFF,0xFF,0xFF,0xFF,0xF0,
0xFF,0xFE,0xFF,0xFF,0xFF,0xFF,0xFF,0xF0,
0xFF,0xFE,0xFF,0xFF,0xFF,0xFF,0xFF,0xF0,
0xFF,0xFC,0x00,0xFF,0x00,0x07,0xFF,0xF0,
0xFF,0xFC,0x00,0xFF,0x00,0x03,0xFF,0xF0,
0xFF,0xF8,0x00,0xFF,0x00,0x03,0xFF,0xF0,
0xFF,0xF8,0x00,0xFF,0x00,0x03,0xFF,0xF0,
0xFF,0xF8,0x00,0xFF,0x00,0x01,0xFF,0xF0,
0xFF,0xF8,0x00,0xFF,0x00,0x01,0xFF,0xF0,
0xFF,0xF8,0x00,0xFF,0x00,0x01,0xFF,0xF0,
0xFF,0xF8,0x00,0xFF,0x00,0x01,0xFF,0xF0,
0xFF,0xF8,0x00,0xFF,0x00,0x01,0xFF,0xF0,
0xFF,0xF8,0x00,0xFF,0x00,0x01,0xFF,0xF0,
0xFF,0xF8,0x00,0xFF,0x00,0x01,0xFF,0xF0,
0xFF,0xF8,0x00,0xFF,0x00,0x01,0xFF,0xF0,
0xFF,0xF8,0x00,0xFF,0x00,0x03,0xFF,0xF0,
0xFF,0xF8,0x00,0xFF,0x00,0x03,0xFF,0xF0,
0xFF,0xFC,0x00,0xFF,0x00,0x03,0xFF,0xF0,
0xFF,0xFC,0x00,0xFF,0x00,0x07,0xFF,0xF0,
0xFF,0xFE,0x00,0xFF,0x00,0x07,0xFF,0xF0,
0xFF,0xFE,0x00,0xFF,0x00,0x0F,0xFF,0xF0,
0xFF,0xFF,0x00,0x00,0x00,0x1F,0xFF,0xF0,
0xFF,0xFF,0x80,0x00,0x00,0x1F,0xFF,0xF0,
0xFF,0xFF,0xC0,0x00,0x00,0x3F,0xFF,0xF0,
0xFF,0xFF,0xE0,0x00,0x00,0x7F,0xFF,0xF0,
0xFF,0xFF,0xF0,0x00,0x01,0xFF,0xFF,0xF0,
0xFF,0xFF,0xFC,0x00,0x03,0xFF,0xFF,0xF0,
0xFF,0xFF,0xFF,0x00,0x1F,0xFF,0xFF,0xF0,
0xFF,0xFF,0xFF,0xFF,0xFF,0xFF,0xFF,0xF0,
0xFF,0xFF,0xFF,0xFF,0xFF,0xFF,0xFF,0xF0,
0xFF,0xFF,0xFF,0xFF,0xFF,0xFF,0xFF,0xF0,
0xFF,0xFF,0xFF,0xFF,0xFF,0xFF,0xFF,0xF0,
0xFF,0xFF,0xFF,0xFF,0xFF,0xFF,0xFF,0xF0,
0xFF,0xFF,0xFF,0xFF,0xFF,0xFF,0xFF,0xF0,
0xFF,0xFF,0xFF,0xFF,0xFF,0xFF,0xFF,0xF0,
0x83,0xFF,0xFF,0xFE,0x0F,0xFF,0xFF,0xF0,
0x80,0xFF,0xFF,0xFE,0x03,0xFF,0xFF,0xF0,
0x88,0x7F,0xFF,0xFE,0x23,0xFF,0xFF,0xF0,
0x8C,0x70,0x38,0x0E,0x71,0x81,0xC0,0x70,
0x8C,0x60,0x38,0x0E,0x63,0x80,0xC0,0x30,
0x80,0xE3,0x19,0xC6,0x07,0xF8,0xC7,0x30,
0x80,0xE0,0x19,0xC6,0x03,0x80,0xC7,0x10,
0x8C,0x62,0x79,0xC6,0x63,0x9C,0xC7,0x30,
0x8C,0x63,0xF8,0xC6,0x71,0x18,0xC6,0x30,
0x8E,0x30,0x18,0x0E,0x71,0x80,0xC0,0x30,
0x9E,0x38,0x39,0x1E,0x79,0xC4,0xC4,0xF0,
0xFF,0xFF,0xF9,0xFF,0xFF,0xFF,0xC7,0xF0,
0xFF,0xFF,0xF9,0xFF,0xFF,0xFF,0xC7,0xF0,
0xFF,0xFF,0xFF,0xFF,0xFF,0xFF,0xFF,0xF0
};
Les adjunto una aplicación que te deja editar modificar y exportar los codigos en HEX para poder modificar cualquier parte de la interfaz
[ati-soft.biz]
Videos:
[ati-soft.biz]
[ati-soft.biz]
Edited 1 time(s). Last edit at 12/27/2014 12:10PM by tatubias.
Re: REPRAP_DISCOUNT_FULL_GRAPHIC_SMART_CONTROLLER no funciona  December 27, 2014 02:16PM |
Registered: 9 years ago Posts: 792 |
Mira, cuando lo puse por primera vez la pantalla me aparecía en las primera fotos. Después descomente lo del lcd y la sd. Y también seguia en blanco. Después me había olvidado de configurar la placa y lo configure, como debajo y me prendio
Esto debe ser lo que te faltaba elegir que placa esta usando. No te olvides de cargar los termistores y es as cosa s
Edited 1 time(s). Last edit at 12/27/2014 02:16PM by tatubias.
// The following define selects which electronics board you have.
// Please choose the name from boards.h that matches your setup
#ifndef MOTHERBOARD
  #define MOTHERBOARD 33
Esto debe ser lo que te faltaba elegir que placa esta usando. No te olvides de cargar los termistores y es as cosa s
Edited 1 time(s). Last edit at 12/27/2014 02:16PM by tatubias.
Re: REPRAP_DISCOUNT_FULL_GRAPHIC_SMART_CONTROLLER no funciona  December 27, 2014 07:54PM |
Registered: 9 years ago Posts: 792 |
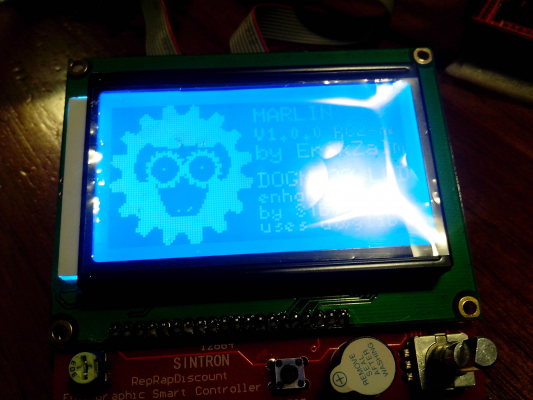
Ahi le chorie el logo a workclocksheep para testear y anduvo ok.
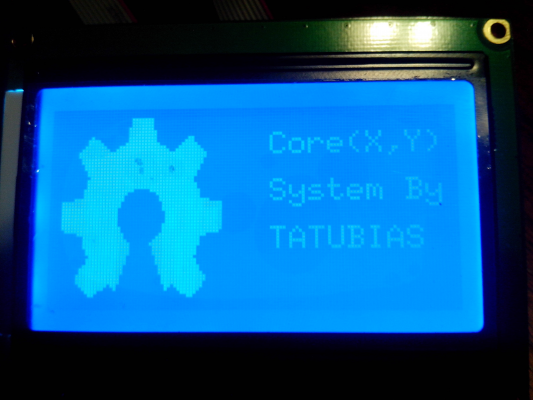
Bueno mejor saco el logo choreado a poinless asi no se me ofende cambio nomas por el de open hardware.
Edited 1 time(s). Last edit at 12/27/2014 10:38PM by tatubias.
Bueno mejor saco el logo choreado a poinless asi no se me ofende
 cambio nomas por el de open hardware.
Edited 1 time(s). Last edit at 12/27/2014 10:38PM by tatubias.
Re: REPRAP_DISCOUNT_FULL_GRAPHIC_SMART_CONTROLLER no funciona  December 27, 2014 09:01PM |
Registered: 9 years ago Posts: 47 |
Re: REPRAP_DISCOUNT_FULL_GRAPHIC_SMART_CONTROLLER no funciona  December 27, 2014 10:34PM |
Registered: 9 years ago Posts: 792 |
En mi caso nunca había tocado este arduino con ramps ni hablar ningun firmware. le habia pegado una mirada al marlin por arriba nomas al configuration.h hace unas semanas.
me puse a leer un poco y habia que habilitar nomas las coas como decia el mismo firmware y ponerle la libreria. despues arranca solo.
ahi estoy comenzando con el proyecto, casi esta definido hacer una corexy
Edited 1 time(s). Last edit at 12/27/2014 10:37PM by tatubias.
me puse a leer un poco y habia que habilitar nomas las coas como decia el mismo firmware y ponerle la libreria. despues arranca solo.
ahi estoy comenzando con el proyecto, casi esta definido hacer una corexy
Quote
AleCun
Excelente tutorial @tatubias!... y que groso!...., ...y te salio andando de una!....
Salu2
AleCun
Edited 1 time(s). Last edit at 12/27/2014 10:37PM by tatubias.
Re: REPRAP_DISCOUNT_FULL_GRAPHIC_SMART_CONTROLLER no funciona  December 28, 2014 08:29AM |
Registered: 10 years ago Posts: 721 |
Re: REPRAP_DISCOUNT_FULL_GRAPHIC_SMART_CONTROLLER no funciona  December 28, 2014 05:20PM |
Registered: 11 years ago Posts: 392 |
Choree tranquilo! es un halago que lo usen para algo... mientras no me hagan cagadas 

Quote
tatubias
Ahi le chorie el logo a workclocksheep para testear y anduvo ok.
Bueno mejor saco el logo choreado a poinless asi no se me ofendecambio nomas por el de open hardware.
Re: REPRAP_DISCOUNT_FULL_GRAPHIC_SMART_CONTROLLER no funciona  December 29, 2014 10:28AM |
Registered: 9 years ago Posts: 792 |
Voy a hacer un tutorial de como cambiar el logo de booteo y el Texto.
Para editar el texto simplemente hay que editar el archivo dogm_lcd_implementation.h
Ir hasta la seccion static void lcd_implementation_init() un poco mas abajo encontraremos las siguientes lineas
Podes cambiar cualquiera de los textos que están en negrita. obviamente no eliminar las Comillas " ". podes agregar o quitar lineas sin ningún tipo de problemas
Los siguientes comandos realizan las siguientes operaciones
u8g.setFont -> setea el tipo y tamaño de font que vas a utilizar ejemplo: u8g.setFont(u8g_font_6x10_marlin)
u8g.drawStr -> Escribe el texto en la pantalla. Ejemplo: u8g.drawStr(62,10,"MARLIN"); Los números 62,10 son el eje (pixels) x e y en la pantalla donde posicionar el texto. ejemplo si el 62 lo cambiar a 80 se te va a correr el texto a la derecha. y el 10 lo pasas a 30 baja casi a la mitad de la pantalla.
Voy a agregar un ejemplo editado:
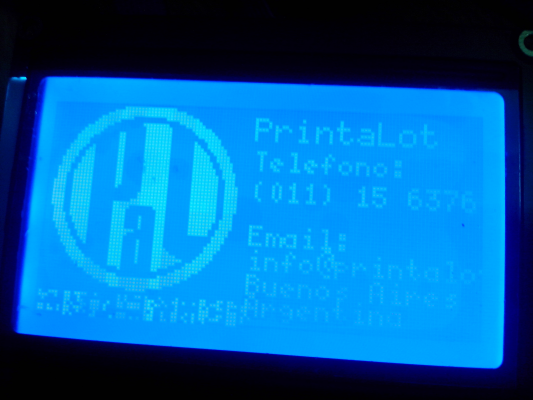
Pasemos a poner una imagen en el booteo. Simplemente hay que buscar una imagen para ponerle. En este ejemplo choreamos el isologo de print a lot.
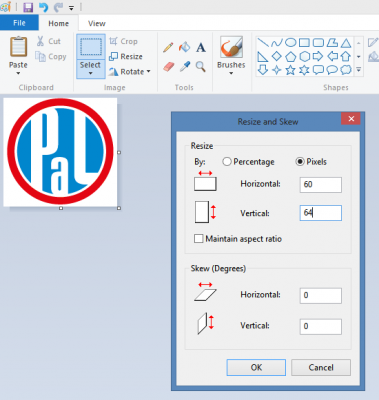
Lo abris con paint y lo escalas 60x40 pixels
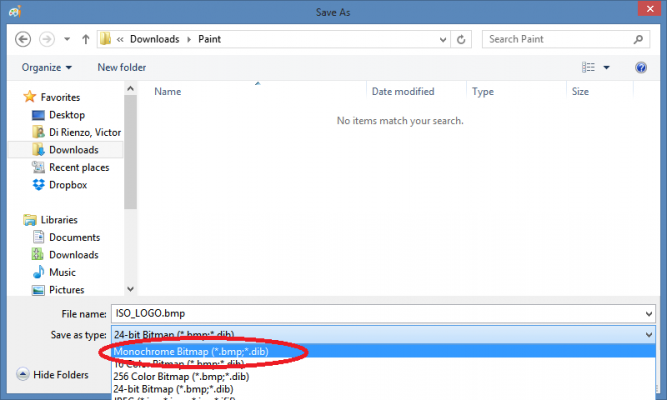
Luego grabar el archivo como BMP de 1 bit osea MONOCROMO
El logo queda asi despues de achicarlo y convertilo en bmp de 1 bit.
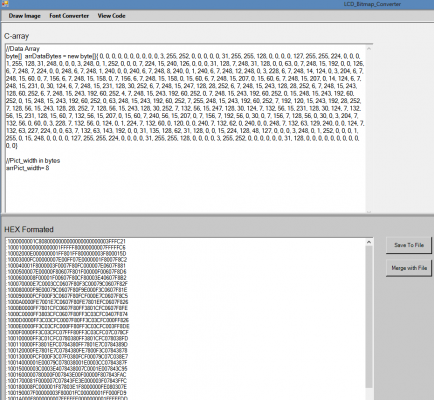
Descargar e instalar la aplicacion LCD_Bitmap_Converter link: [ati-soft.biz]
En la web hay videos de como utilizar la aplicación. Cuando terminas de instalar la aplicación te deja un icono en el escritorio.
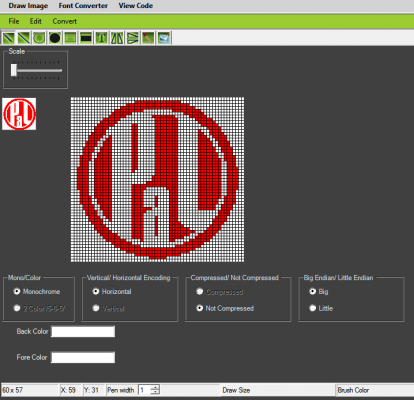
Con LCD_Bitmap_Converter abierto ir a File -> Open y elegir el bitmap de 1 bit que hicieron en nuestro caso el de Print a lot.
*Seleccionar las opciones.
*Monochrome
*Horizontal
*Not Compressed
*Big
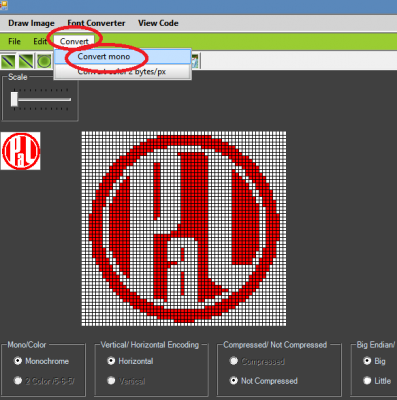
Luego hacer click en el menú en Convert -> Monochorme
Nos aparece el array de la imagen convertida.
del C-Array copiar los números que estan entre {}
Ahora tenemos que editar nuestro archivo del firmware marling para poder cambiar el logo. Abir DOGMbitmaps.h
En la primer sección encontraremos el logo que queremos modificar.
Eliminar todo lo que esta entre {} y pegarle los números del array que copiamos antes. (anda ya sea con números en decimal o hexadecimal)
Nota: si lo dejas todo en una linea anda lo mismo o lo podes ir cortando cada 8 16 numeros no importa. es mas comodo nomas.
Guardar y salir. si quieren modificar objetos como los hot end. los modifican de la misma manera en este archivo.
Bueno ya tienen todo modificado y después van a tener que ir modificando lugares de los objetos tamaños de letras etc. Ahora lo que tienen que hacer es flashear el arduino y listo
Les dejo el ejemplo así nomas como para que tengan una idea como quedo sin modificar nada.
Como ven tiene un montón de detalles pero no importa la idea es que se vea que es fácil y rápido poder modificar el boot logo de su impresora.
NOTA: se supone que el logo lo podes hacer de cualquier tamaño al igual que el texto ubicarlo donde quieras. siempre respetando el tamaño de la pantala 128x64 (creo que era). asique si solo queres poner un logo grande podes al igual que solo texto o simplemente nada.
Edited 4 time(s). Last edit at 12/29/2014 12:23PM by tatubias.
Para editar el texto simplemente hay que editar el archivo dogm_lcd_implementation.h
Ir hasta la seccion static void lcd_implementation_init() un poco mas abajo encontraremos las siguientes lineas
	u8g.firstPage();
	do {
			// RepRap init bmp
			u8g.drawBitmapP(0,0,START_BMPBYTEWIDTH,START_BMPHEIGHT,start_bmp);
			// Welcome message
			u8g.setFont(u8g_font_6x10_marlin);
			u8g.drawStr(62,10,"MARLIN");
			u8g.setFont(u8g_font_5x8);
			u8g.drawStr(62,19,"V1.0.0 RC2-mm");
			u8g.setFont(u8g_font_6x10_marlin);
			u8g.drawStr(62,28,"by ErikZalm");
			u8g.drawStr(62,41,"DOGM128 LCD");
			u8g.setFont(u8g_font_5x8);
			u8g.drawStr(62,48,"enhancements");
			u8g.setFont(u8g_font_5x8);
			u8g.drawStr(62,55,"by STB, MM");
			u8g.drawStr(62,61,"uses u");
			u8g.drawStr90(92,57,"8");
			u8g.drawStr(100,61,"glib");
	   } while( u8g.nextPage() );
Podes cambiar cualquiera de los textos que están en negrita. obviamente no eliminar las Comillas " ". podes agregar o quitar lineas sin ningún tipo de problemas
Los siguientes comandos realizan las siguientes operaciones
u8g.setFont -> setea el tipo y tamaño de font que vas a utilizar ejemplo: u8g.setFont(u8g_font_6x10_marlin)
u8g.drawStr -> Escribe el texto en la pantalla. Ejemplo: u8g.drawStr(62,10,"MARLIN"); Los números 62,10 son el eje (pixels) x e y en la pantalla donde posicionar el texto. ejemplo si el 62 lo cambiar a 80 se te va a correr el texto a la derecha. y el 10 lo pasas a 30 baja casi a la mitad de la pantalla.
Voy a agregar un ejemplo editado:
	u8g.firstPage();
	do {
			// RepRap init bmp
			u8g.drawBitmapP(0,0,START_BMPBYTEWIDTH,START_BMPHEIGHT,start_bmp);
			// Welcome message
			u8g.setFont(u8g_font_6x10_marlin);
			u8g.drawStr(62,10,"PrintaLot");
			u8g.setFont(u8g_font_5x8);
			u8g.drawStr(62,19,"Telefono:");
			u8g.setFont(u8g_font_5x8);
			u8g.drawStr(62,28,"(011) 15 6376 9733");
			u8g.drawStr(62,41,"Email:");
			u8g.setFont(u8g_font_5x8);
			u8g.drawStr(62,48,"[email protected]");
			u8g.setFont(u8g_font_5x8);
			u8g.drawStr(62,55,"Buenos Aires");
			u8g.drawStr(62,61,"Argentina");
	   } while( u8g.nextPage() );
Pasemos a poner una imagen en el booteo. Simplemente hay que buscar una imagen para ponerle. En este ejemplo choreamos el isologo de print a lot.
Lo abris con paint y lo escalas 60x40 pixels
Luego grabar el archivo como BMP de 1 bit osea MONOCROMO
El logo queda asi despues de achicarlo y convertilo en bmp de 1 bit.
Descargar e instalar la aplicacion LCD_Bitmap_Converter link: [ati-soft.biz]
En la web hay videos de como utilizar la aplicación. Cuando terminas de instalar la aplicación te deja un icono en el escritorio.
Con LCD_Bitmap_Converter abierto ir a File -> Open y elegir el bitmap de 1 bit que hicieron en nuestro caso el de Print a lot.
*Seleccionar las opciones.
*Monochrome
*Horizontal
*Not Compressed
*Big
Luego hacer click en el menú en Convert -> Monochorme
Nos aparece el array de la imagen convertida.
del C-Array copiar los números que estan entre {}
//Data Array
byte[]  arrDataBytes = new byte[]{  0, 0, 0, 0, 0, 0, 0, 0, 0, 0, 3, 255, 252, 0, 0, 0, 0, 0, 31, 255, 255, 128, 0, 0, 0, 0, 127, 255, 255, 224, 0, 0, 0, 1, 255, 128, 31, 248, 0, 0, 0, 3, 248, 0, 1, 252, 0, 0, 0, 7, 224, 15, 240, 126, 0, 0, 0, 31, 128, 7, 248, 31, 128, 0, 0, 63, 0, 7, 248, 15, 192, 0, 0, 126, 6, 7, 248, 7, 224, 0, 0, 248, 6, 7, 248, 1, 240, 0, 0, 240, 6, 7, 248, 8, 240, 0, 1, 240, 6, 7, 248, 12, 248, 0, 3, 228, 6, 7, 248, 14, 124, 0, 3, 204, 6, 7, 248, 15, 60, 0, 7, 156, 6, 7, 248, 15, 158, 0, 7, 156, 6, 7, 248, 15, 158, 0, 15, 60, 6, 7, 248, 15, 207, 0, 15, 60, 6, 7, 248, 15, 207, 0, 14, 124, 6, 7, 248, 15, 231, 0, 30, 124, 6, 7, 248, 15, 231, 128, 30, 252, 6, 7, 248, 15, 247, 128, 28, 252, 6, 7, 248, 15, 243, 128, 28, 252, 6, 7, 248, 15, 243, 128, 60, 252, 6, 7, 248, 15, 243, 192, 60, 252, 4, 7, 248, 15, 243, 192, 60, 252, 0, 7, 248, 15, 243, 192, 60, 252, 0, 15, 248, 15, 243, 192, 60, 252, 0, 15, 248, 15, 243, 192, 60, 252, 0, 63, 248, 15, 243, 192, 60, 252, 7, 255, 248, 15, 243, 192, 60, 252, 7, 192, 120, 15, 243, 192, 28, 252, 7, 128, 56, 15, 243, 128, 28, 252, 7, 128, 56, 15, 243, 128, 30, 252, 7, 132, 56, 15, 247, 128, 30, 124, 7, 132, 56, 15, 231, 128, 30, 124, 7, 132, 56, 15, 231, 128, 15, 60, 7, 132, 56, 15, 207, 0, 15, 60, 7, 240, 56, 15, 207, 0, 7, 156, 7, 192, 56, 0, 30, 0, 7, 156, 7, 128, 56, 0, 30, 0, 3, 204, 7, 132, 56, 0, 60, 0, 3, 228, 7, 132, 56, 0, 124, 0, 1, 224, 7, 132, 60, 0, 120, 0, 0, 240, 7, 132, 62, 0, 240, 0, 0, 248, 7, 132, 63, 129, 240, 0, 0, 124, 7, 132, 63, 227, 224, 0, 0, 63, 7, 132, 63, 143, 192, 0, 0, 31, 135, 128, 62, 31, 128, 0, 0, 15, 224, 128, 48, 127, 0, 0, 0, 3, 248, 0, 1, 252, 0, 0, 0, 1, 255, 0, 15, 248, 0, 0, 0, 0, 127, 255, 255, 224, 0, 0, 0, 0, 31, 255, 255, 128, 0, 0, 0, 0, 3, 255, 252, 0, 0, 0, 0, 0, 0, 31, 128, 0, 0, 0, 0, 0, 0, 0, 0, 0, 0, 0}


//Pict_width in bytes
arrPict_width= 8
Ahora tenemos que editar nuestro archivo del firmware marling para poder cambiar el logo. Abir DOGMbitmaps.h
En la primer sección encontraremos el logo que queremos modificar.
#define START_BMPWIDTH 	60	//Width in pixels
#define START_BMPHEIGHT 	64	//Height in pixels
#define START_BMPBYTEWIDTH 	8	//Width in bytes
const unsigned char start_bmp[574] PROGMEM = { //AVR-GCC, WinAVR
0xFF,0xFF,0xFF,0xFF,0xFF,0xFF,0xFF,0xF0,
0xFF,0xFF,0xFF,0xFF,0xFF,0xFF,0xFF,0xF0,
0xFF,0xFF,0xFF,0xF9,0xFF,0xFF,0xFF,0xF0,
0xFF,0xFF,0xFF,0xF0,0xFF,0xFF,0xFF,0xF0,
0xFF,0xFF,0xFF,0xE0,0x7F,0xFF,0xFF,0xF0,
0xFF,0xFF,0xFF,0xC0,0x3F,0xFF,0xFF,0xF0,
0xFF,0xFF,0xFF,0x80,0x1F,0xFF,0xFF,0xF0,
0xFF,0xFF,0xFF,0x00,0x0F,0xFF,0xFF,0xF0,
0xFF,0xFF,0xFE,0x00,0x07,0xFF,0xFF,0xF0,
0xFF,0xFF,0xFC,0x00,0x03,0xFF,0xFF,0xF0,
0xFF,0xFF,0xF8,0x00,0x01,0xFF,0xFF,0xF0,
0xFF,0xFF,0xF0,0x00,0x00,0xFF,0xFF,0xF0,
0xFF,0xFF,0xE0,0x00,0x00,0x7F,0xFF,0xF0,
0xFF,0xFF,0xC0,0x00,0x00,0x3F,0xFF,0xF0,
0xFF,0xFF,0x80,0x00,0x00,0x3F,0xFF,0xF0,
0xFF,0xFF,0x00,0x00,0x00,0x1F,0xFF,0xF0,
0xFF,0xFE,0x00,0x00,0x00,0x0F,0xFF,0xF0,
0xFF,0xFE,0x00,0x00,0x00,0x07,0xFF,0xF0,
0xFF,0xFC,0x00,0x00,0x00,0x07,0xFF,0xF0,
0xFF,0xFC,0x00,0x00,0x00,0x03,0xFF,0xF0,
0xFF,0xF8,0x00,0x00,0x00,0x03,0xFF,0xF0,
0xFF,0xF8,0x00,0x00,0x00,0x03,0xFF,0xF0,
0xFF,0xF8,0x00,0x00,0x00,0x01,0xFF,0xF0,
0xFF,0xF8,0x00,0x00,0x00,0x01,0xFF,0xF0,
0xFF,0xF8,0x00,0x00,0x00,0x01,0xFF,0xF0,
0xFF,0xF8,0x00,0x00,0x00,0x01,0xFF,0xF0,
0xFF,0xF8,0x00,0x00,0x00,0x01,0xFF,0xF0,
0xFF,0xF8,0x00,0x00,0x00,0x01,0xFF,0xF0,
0xFF,0xF8,0x00,0x00,0x00,0x01,0xFF,0xF0,
0xFF,0xF8,0x00,0x00,0x00,0x01,0xFF,0xF0,
0xFF,0xF8,0x00,0x00,0x00,0x03,0xFF,0xF0,
0xFF,0xF8,0x00,0x00,0x00,0x03,0xFF,0xF0,
0xFF,0xFC,0x00,0x00,0x00,0x03,0xFF,0xF0,
0xFF,0xFC,0x00,0x00,0x00,0x07,0xFF,0xF0,
0xFF,0xFE,0x00,0x00,0x00,0x07,0xFF,0xF0,
0xFF,0xFE,0x00,0x00,0x00,0x0F,0xFF,0xF0,
0xFF,0xFF,0x00,0x00,0x00,0x1F,0xFF,0xF0,
0xFF,0xFF,0x80,0x00,0x00,0x1F,0xFF,0xF0,
0xFF,0xFF,0xC0,0x00,0x00,0x3F,0xFF,0xF0,
0xFF,0xFF,0xE0,0x00,0x00,0x7F,0xFF,0xF0,
0xFF,0xFF,0xF0,0x00,0x01,0xFF,0xFF,0xF0,
0xFF,0xFF,0xFC,0x00,0x03,0xFF,0xFF,0xF0,
0xFF,0xFF,0xFF,0x00,0x1F,0xFF,0xFF,0xF0,
0xFF,0xFF,0xFF,0xFF,0xFF,0xFF,0xFF,0xF0,
0xFF,0xFF,0xFF,0xFF,0xFF,0xFF,0xFF,0xF0,
0xFF,0xFF,0xFF,0xFF,0xFF,0xFF,0xFF,0xF0,
0xFF,0xFF,0xFF,0xFF,0xFF,0xFF,0xFF,0xF0,
0xFF,0xFF,0xFF,0xFF,0xFF,0xFF,0xFF,0xF0,
0xFF,0xFF,0xFF,0xFF,0xFF,0xFF,0xFF,0xF0,
0xFF,0xFF,0xFF,0xFF,0xFF,0xFF,0xFF,0xF0,
0x83,0xFF,0xFF,0xFE,0x0F,0xFF,0xFF,0xF0,
0x80,0xFF,0xFF,0xFE,0x03,0xFF,0xFF,0xF0,
0x88,0x7F,0xFF,0xFE,0x23,0xFF,0xFF,0xF0,
0x8C,0x70,0x38,0x0E,0x71,0x81,0xC0,0x70,
0x8C,0x60,0x38,0x0E,0x63,0x80,0xC0,0x30,
0x80,0xE3,0x19,0xC6,0x07,0xF8,0xC7,0x30,
0x80,0xE0,0x19,0xC6,0x03,0x80,0xC7,0x10,
0x8C,0x62,0x79,0xC6,0x63,0x9C,0xC7,0x30,
0x8C,0x63,0xF8,0xC6,0x71,0x18,0xC6,0x30,
0x8E,0x30,0x18,0x0E,0x71,0x80,0xC0,0x30,
0x9E,0x38,0x39,0x1E,0x79,0xC4,0xC4,0xF0,
0xFF,0xFF,0xF9,0xFF,0xFF,0xFF,0xC7,0xF0,
0xFF,0xFF,0xF9,0xFF,0xFF,0xFF,0xC7,0xF0,
0xFF,0xFF,0xFF,0xFF,0xFF,0xFF,0xFF,0xF0
};
Eliminar todo lo que esta entre {} y pegarle los números del array que copiamos antes. (anda ya sea con números en decimal o hexadecimal)
#define START_BMPWIDTH 	60	//Width in pixels
#define START_BMPHEIGHT 	64	//Height in pixels
#define START_BMPBYTEWIDTH 	8	//Width in bytes
const unsigned char start_bmp[] PROGMEM = { //AVR-GCC, WinAVR
 0, 0, 0, 0, 0, 0, 0, 0, 0, 0, 3, 255, 252, 0, 0, 0, 0, 0, 31, 255, 255, 128, 0, 0, 0, 0, 127, 255, 255, 224, 0, 0, 0, 1, 255, 128, 31, 248, 0, 0, 0, 3, 248, 0, 1, 252, 0, 0, 0, 7, 224, 15, 240, 126, 0, 0, 0, 31, 128, 7, 248, 31, 128, 0, 0, 63, 0, 7, 248, 15, 192, 0, 0, 126, 6, 7, 248, 7, 224, 0, 0, 248, 6, 7, 248, 1, 240, 0, 0, 240, 6, 7, 248, 8, 240, 0, 1, 240, 6, 7, 248, 12, 248, 0, 3, 228, 6, 7, 248, 14, 124, 0, 3, 204, 6, 7, 248, 15, 60, 0, 7, 156, 6, 7, 248, 15, 158, 0, 7, 156, 6, 7, 248, 15, 158, 0, 15, 60, 6, 7, 248, 15, 207, 0, 15, 60, 6, 7, 248, 15, 207, 0, 14, 124, 6, 7, 248, 15, 231, 0, 30, 124, 6, 7, 248, 15, 231, 128, 30, 252, 6, 7, 248, 15, 247, 128, 28, 252, 6, 7, 248, 15, 243, 128, 28, 252, 6, 7, 248, 15, 243, 128, 60, 252, 6, 7, 248, 15, 243, 192, 60, 252, 4, 7, 248, 15, 243, 192, 60, 252, 0, 7, 248, 15, 243, 192, 60, 252, 0, 15, 248, 15, 243, 192, 60, 252, 0, 15, 248, 15, 243, 192, 60, 252, 0, 63, 248, 15, 243, 192, 60, 252, 7, 255, 248, 15, 243, 192, 60, 252, 7, 192, 120, 15, 243, 192, 28, 252, 7, 128, 56, 15, 243, 128, 28, 252, 7, 128, 56, 15, 243, 128, 30, 252, 7, 132, 56, 15, 247, 128, 30, 124, 7, 132, 56, 15, 231, 128, 30, 124, 7, 132, 56, 15, 231, 128, 15, 60, 7, 132, 56, 15, 207, 0, 15, 60, 7, 240, 56, 15, 207, 0, 7, 156, 7, 192, 56, 0, 30, 0, 7, 156, 7, 128, 56, 0, 30, 0, 3, 204, 7, 132, 56, 0, 60, 0, 3, 228, 7, 132, 56, 0, 124, 0, 1, 224, 7, 132, 60, 0, 120, 0, 0, 240, 7, 132, 62, 0, 240, 0, 0, 248, 7, 132, 63, 129, 240, 0, 0, 124, 7, 132, 63, 227, 224, 0, 0, 63, 7, 132, 63, 143, 192, 0, 0, 31, 135, 128, 62, 31, 128, 0, 0, 15, 224, 128, 48, 127, 0, 0, 0, 3, 248, 0, 1, 252, 0, 0, 0, 1, 255, 0, 15, 248, 0, 0, 0, 0, 127, 255, 255, 224, 0, 0, 0, 0, 31, 255, 255, 128, 0, 0, 0, 0, 3, 255, 252, 0, 0, 0, 0, 0, 0, 31, 128, 0, 0, 0, 0, 0, 0, 0, 0, 0, 0, 0};
Nota: si lo dejas todo en una linea anda lo mismo o lo podes ir cortando cada 8 16 numeros no importa. es mas comodo nomas.
Guardar y salir. si quieren modificar objetos como los hot end. los modifican de la misma manera en este archivo.
Bueno ya tienen todo modificado y después van a tener que ir modificando lugares de los objetos tamaños de letras etc. Ahora lo que tienen que hacer es flashear el arduino y listo
Les dejo el ejemplo así nomas como para que tengan una idea como quedo sin modificar nada.
Como ven tiene un montón de detalles pero no importa la idea es que se vea que es fácil y rápido poder modificar el boot logo de su impresora.
NOTA: se supone que el logo lo podes hacer de cualquier tamaño al igual que el texto ubicarlo donde quieras. siempre respetando el tamaño de la pantala 128x64 (creo que era). asique si solo queres poner un logo grande podes al igual que solo texto o simplemente nada.
Edited 4 time(s). Last edit at 12/29/2014 12:23PM by tatubias.
Re: REPRAP_DISCOUNT_FULL_GRAPHIC_SMART_CONTROLLER no funciona  December 29, 2014 01:23PM |
Registered: 10 years ago Posts: 246 |
Re: REPRAP_DISCOUNT_FULL_GRAPHIC_SMART_CONTROLLER no funciona  December 29, 2014 01:40PM |
Registered: 9 years ago Posts: 792 |
Dentro de la pagina,
[code.google.com]
podes encotrar todos los comandos y cosas que se pueden hacer con la libreria, hay de todo como para divertirse. <-- si puse divertirse (GET A LIFE)
[code.google.com]
podes encotrar todos los comandos y cosas que se pueden hacer con la libreria, hay de todo como para divertirse. <-- si puse divertirse (GET A LIFE)
Re: REPRAP_DISCOUNT_FULL_GRAPHIC_SMART_CONTROLLER no funciona  January 02, 2015 01:07AM |
Registered: 9 years ago Posts: 25 |
muy bueno lo del logo!
por otro lado vengo a contarles a todos aquellos que me dieron una ayuda y se tomaron su tiempo para dar pie con bola, les cuento que la pantalla no anda, asi como estaba, me fui ni bien llegue de un amigo, la enchufamos con mi zocalo, mis cables y claro esta, mi pantalla y esta no hacia nada.
letras o simbolos raros era todo...
empezamos a descartar, sacamos mi pantalla y pusimos derecho la de el, y listo, la pantalla funciono.
con eso descarte zocalo, descarte cables, es simplemente mi pantalla que no hace nada.
la de el, funciona "bien" se ven las letras, es legible, muestra temperatura, podes desplazarte por el menu y hasta pita! el buzer te deja loco.
la mia esta muda, con geroglificos y no va, jorge22 ya me va a dar una mano para el cambio, asi que tendre novedades mas adelante.
gracias a todos por su tiempo!
Danale
Re: REPRAP_DISCOUNT_FULL_GRAPHIC_SMART_CONTROLLER no funciona  January 02, 2015 07:18AM |
Registered: 9 years ago Posts: 792 |
Quote
danale17
muy bueno lo del logo!
por otro lado vengo a contarles a todos aquellos que me dieron una ayuda y se tomaron su tiempo para dar pie con bola, les cuento que la pantalla no anda, asi como estaba, me fui ni bien llegue de un amigo, la enchufamos con mi zocalo, mis cables y claro esta, mi pantalla y esta no hacia nada.
letras o simbolos raros era todo...
empezamos a descartar, sacamos mi pantalla y pusimos derecho la de el, y listo, la pantalla funciono.
con eso descarte zocalo, descarte cables, es simplemente mi pantalla que no hace nada.
la de el, funciona "bien" se ven las letras, es legible, muestra temperatura, podes desplazarte por el menu y hasta pita! el buzer te deja loco.
la mia esta muda, con geroglificos y no va, jorge22 ya me va a dar una mano para el cambio, asi que tendre novedades mas adelante.
gracias a todos por su tiempo!
Danale
Se te tuvo que haber movido el lcd de donde apoya contra el pcb entonces hace mal contacto o se cruzan los pines. una macana
Sorry, only registered users may post in this forum.
