Eric's Tantillus build
Posted by Eric Young
|
Eric's Tantillus build August 20, 2012 03:29AM |
Registered: 11 years ago Posts: 149 |
After a few days of building and Star Trek NG marathoning things were going pretty smoothly. BIG thanks to everyone contributing to the forum threads because it's been a great help for me(especially the software threads). I snapped a picture of the Tantillus sitting on my desk a few hours ago and I gotta say looks like one bamf 
Just now I successfully connected the printer to Pronterface and was about to start trying to move the motors when I realized I had not yet plugged in the power adapter. So I did, and five seconds later there's a faint crackling sound as smoke and a small fire engulf one of the Pololu boards . My paranoid dog somehow determines that her existence is jeopardized by the 1 inch flame, and in a desperate attempt to save herself she jumps on my bed as I reach for the power plug.
So attached is a pic of the aftermath. I'm 110% sure the burnt Pololu needs replacing, but I'm a noob with this electronics/software stuff and not really sure what else to do now. If anyone has any suggestions on what to spend my time on right now I'd love to hear them. I did a quick search for Pololu fires and it seems this has happened plenty of times before. It sounds like the fires occur as a result of either faulty Pololu board construction or a short circuit. I'm almost certain I shorted something since it all happened so quickly, but have no idea what/where the short is or how to figure those things out. Planning to keep reading random forum threads for now and see where it gets me.
I did re-wire the power connector with my own wire because I'd broken the supplied cable by flexing it too many times. Attached is a pic of my re-worked cable. All the other cables look okay to me and after double checking all connector locations/orientations everything else seems to have been in the right place when the fire started.
Edited 2 time(s). Last edit at 08/21/2012 02:46AM by Eric Young.

Just now I successfully connected the printer to Pronterface and was about to start trying to move the motors when I realized I had not yet plugged in the power adapter. So I did, and five seconds later there's a faint crackling sound as smoke and a small fire engulf one of the Pololu boards
. My paranoid dog somehow determines that her existence is jeopardized by the 1 inch flame, and in a desperate attempt to save herself she jumps on my bed as I reach for the power plug.So attached is a pic of the aftermath. I'm 110% sure the burnt Pololu needs replacing, but I'm a noob with this electronics/software stuff and not really sure what else to do now. If anyone has any suggestions on what to spend my time on right now I'd love to hear them. I did a quick search for Pololu fires and it seems this has happened plenty of times before. It sounds like the fires occur as a result of either faulty Pololu board construction or a short circuit. I'm almost certain I shorted something since it all happened so quickly, but have no idea what/where the short is or how to figure those things out. Planning to keep reading random forum threads for now and see where it gets me.

I did re-wire the power connector with my own wire because I'd broken the supplied cable by flexing it too many times. Attached is a pic of my re-worked cable. All the other cables look okay to me and after double checking all connector locations/orientations everything else seems to have been in the right place when the fire started.

Edited 2 time(s). Last edit at 08/21/2012 02:46AM by Eric Young.
|
Re: Fire 1, Pololu 0 (Eric's Tantillus build) August 20, 2012 03:33AM |
Registered: 13 years ago Posts: 2,947 |
Do not worry I will replace the driver and if we find all of them are bad I will replace everyone's. No one need worry, I am here to make sure everyone gets a 100% working machine the way it is supposed to be.
Edited 1 time(s). Last edit at 08/20/2012 03:41AM by Sublime.
Edited 1 time(s). Last edit at 08/20/2012 03:41AM by Sublime.
| FFF Settings Calculator | Gcode post processors | Geometric Object Deposition Tool Blog |
| Tantillus.org | Mini Printable Lathe | How NOT to install a Pololu driver |
|
Re: Fire 1, Pololu 0 (Eric's Tantillus build) August 20, 2012 04:04AM |
Registered: 11 years ago Posts: 95 |
|
Re: Fire 1, Pololu 0 (Eric's Tantillus build) August 20, 2012 04:05AM |
Registered: 11 years ago Posts: 149 |
Sublime Wrote:
-------------------------------------------------------
> Do not worry I will replace the driver and if we
> find all of them are bad I will replace
> everyone's. No one need worry, I am here to make
> sure everyone gets a 100% working machine the way
> it is supposed to be.
Thanks Sublime, you've been super accommodating and it's much appreciated I didn't mean to imply that you should replace the driver - I'd bet I shorted something and if that's the case I'm happy to order a new one. I'm mostly wondering how to go about figuring out what the problem is/was, as I'm not really sure how to go about diagnosing the issue.
-------------------------------------------------------
> Do not worry I will replace the driver and if we
> find all of them are bad I will replace
> everyone's. No one need worry, I am here to make
> sure everyone gets a 100% working machine the way
> it is supposed to be.
Thanks Sublime, you've been super accommodating and it's much appreciated
I didn't mean to imply that you should replace the driver - I'd bet I shorted something and if that's the case I'm happy to order a new one. I'm mostly wondering how to go about figuring out what the problem is/was, as I'm not really sure how to go about diagnosing the issue.
|
Re: Fire 1, Pololu 0 (Eric's Tantillus build) August 20, 2012 04:18AM |
Registered: 13 years ago Posts: 2,947 |
Eric Young Wrote:
-------------------------------------------------------
> Thanks Sublime, you've been super accommodating
> and it's much appreciated I didn't mean to
> imply that you should replace the driver - I'd bet
> I shorted something and if that's the case I'm
> happy to order a new one. I'm mostly wondering how
> to go about figuring out what the problem is/was,
> as I'm not really sure how to go about diagnosing
> the issue.
There is really know way to tell at this point other than to put it under a microscope and see which trace burnt and then we could tell which part of the circuit caused the fire and trace it back. I do not know how you could have shorted it because I prewired everything and all you had to do was plug it in. The only thing that may have happened is touching the wrong place with a metal screwdriver while trying to adjust the current or installing the driver backwards.
Edited 1 time(s). Last edit at 08/20/2012 04:29AM by Sublime.
-------------------------------------------------------
> Thanks Sublime, you've been super accommodating
> and it's much appreciated
I didn't mean to> imply that you should replace the driver - I'd bet
> I shorted something and if that's the case I'm
> happy to order a new one. I'm mostly wondering how
> to go about figuring out what the problem is/was,
> as I'm not really sure how to go about diagnosing
> the issue.
There is really know way to tell at this point other than to put it under a microscope and see which trace burnt and then we could tell which part of the circuit caused the fire and trace it back. I do not know how you could have shorted it because I prewired everything and all you had to do was plug it in. The only thing that may have happened is touching the wrong place with a metal screwdriver while trying to adjust the current or installing the driver backwards.
Edited 1 time(s). Last edit at 08/20/2012 04:29AM by Sublime.
| FFF Settings Calculator | Gcode post processors | Geometric Object Deposition Tool Blog |
| Tantillus.org | Mini Printable Lathe | How NOT to install a Pololu driver |
|
Re: Fire 1, Pololu 0 (Eric's Tantillus build) August 20, 2012 04:27AM |
Registered: 11 years ago Posts: 149 |
ernchesto Wrote:
-------------------------------------------------------
> Ikes! I'm with the canine..
>
> I'm curious - I have my fans turned the opposite
> direction. I've yet to make them run, so I'm not
> sure which way they're going to blow. I'm guessing
> you're in no position to test this One of us has
> it backwards, and I'm sure you're dog is hoping
> it's me.
Haha nice. I may have ended up on the bed myself if I hadn't seen a couple electrical fires before. Not sure about the fans, but yeah I'm not going to be plugging anything in again for a while
-------------------------------------------------------
> Ikes! I'm with the canine..
>
> I'm curious - I have my fans turned the opposite
> direction. I've yet to make them run, so I'm not
> sure which way they're going to blow. I'm guessing
> you're in no position to test this
One of us has> it backwards, and I'm sure you're dog is hoping
> it's me.
Haha nice. I may have ended up on the bed myself if I hadn't seen a couple electrical fires before. Not sure about the fans, but yeah I'm not going to be plugging anything in again for a while
|
Re: Fire 1, Pololu 0 (Eric's Tantillus build) August 20, 2012 04:43AM |
Registered: 11 years ago Posts: 149 |
Sublime Wrote:
-------------------------------------------------------
> There is really know way to tell at this point
> other than to put it under a microscope and see
> which trace burnt and then we could tell which
> part of the circuit caused the fire and trace it
> back. I do not know how you could have shorted it
> because I prewired everything and all you had to
> do was plug it in. The only thing that may have
> happened is touching the wrong place with a metal
> screwdriver while trying to adjust the current or
> installing the drier backwards.
I've screwed up simpler things than cable orientation so don't put it past me It wasn't a screwdriver because I never adjusted the current. That picture I attached shows all the driver orientations and I can take more pics if it helps.
After another look it appears one of the fan cables was loose and could potentially have flopped enough to cause a short around the D8/D9 terminals. Do you think that could be the problem?
Edited 1 time(s). Last edit at 08/20/2012 05:12AM by Eric Young.
-------------------------------------------------------
> There is really know way to tell at this point
> other than to put it under a microscope and see
> which trace burnt and then we could tell which
> part of the circuit caused the fire and trace it
> back. I do not know how you could have shorted it
> because I prewired everything and all you had to
> do was plug it in. The only thing that may have
> happened is touching the wrong place with a metal
> screwdriver while trying to adjust the current or
> installing the drier backwards.
I've screwed up simpler things than cable orientation so don't put it past me
It wasn't a screwdriver because I never adjusted the current. That picture I attached shows all the driver orientations and I can take more pics if it helps.After another look it appears one of the fan cables was loose and could potentially have flopped enough to cause a short around the D8/D9 terminals. Do you think that could be the problem?
Edited 1 time(s). Last edit at 08/20/2012 05:12AM by Eric Young.
|
Re: Fire 1, Pololu 0 (Eric's Tantillus build) August 20, 2012 11:00AM |
Registered: 12 years ago Posts: 195 |
I also spent part of my printing & build so-far watching ST:TNG on Netflix too. Seems to go well with building your own replicator (lower case intended).
Both the fans and the connectors at D8-D9 are 12V PWM channels with ground being switched. There shouldn't be any problem with a short there other than burning up a FET or trace if the
I doubt it's your fault if you only blew out one Pololu and didn't disconnect the motor cable at the time.
Both the fans and the connectors at D8-D9 are 12V PWM channels with ground being switched. There shouldn't be any problem with a short there other than burning up a FET or trace if the
I doubt it's your fault if you only blew out one Pololu and didn't disconnect the motor cable at the time.
|
Re: Fire 1, Pololu 0 (Eric's Tantillus build) August 20, 2012 01:18PM |
Registered: 11 years ago Posts: 149 |
pokey9000 Wrote:
-------------------------------------------------------
> I also spent part of my printing & build so-far
> watching ST:TNG on Netflix too. Seems to go well
> with building your own replicator (lower case
> intended).
Nice! Nothing like a little Jean-Luc to keep me motivated and on track
> Both the fans and the connectors at D8-D9 are 12V
> PWM channels with ground being switched. There
> shouldn't be any problem with a short there other
> than burning up a FET or trace if the
Very good to know, thanks! I have a digital multimeter that I barely remember how to use, do you think I should check anything in particular? There's a good chance that the cable could have shorted from D8 to D9 fyi - would this still not cause the Pololu problem?
> I doubt it's your fault if you only blew out one
> Pololu and didn't disconnect the motor cable at
> the time.
Hmm I figured that since the other 3 Pololu's are fine that it was unlikely to be a problem with the Pololu itself. Guess my logic is no good.
|
Re: Fire 1, Pololu 0 (Eric's Tantillus build) August 20, 2012 01:47PM |
Registered: 12 years ago Posts: 195 |
Eric Young Wrote:
-------------------------------------------------------
> pokey9000 Wrote:
> --------------------------------------------------
> -----
>
> > Both the fans and the connectors at D8-D9 are
> 12V
> > PWM channels with ground being switched. There
> > shouldn't be any problem with a short there
> other
> > than burning up a FET or trace if the
>
> Very good to know, thanks! I have a digital
> multimeter that I barely remember how to use, do
> you think I should check anything in particular?
> There's a good chance that the cable could have
> shorted from D8 to D9 fyi - would this still not
> cause the Pololu problem?
I would pull the RAMPS off the Arduino and see if it shows up in Pronterface with only USB hooked up. If the Arduino is still happy, then you might want to pull off the smoked driver and the motor connector and check for resistance between any of the output pins (the motor header for that axis) and from each one to ground and 12V. You should see an open circuit for all of these. If there's any resistance between any then there's something else wrong...
All of the D8/D9 pins are either connected straight to 12V or are connected to a FET that switches a connection to ground on and off. The fan should be driven by an identical circuit. If any one pin among all of those is shorted to any other, the worst that would happen is you would blow one of the fuses and/or smoke one of the FETs. It's when you get a stray wire carrying 12V shorted to any of the logic signals or the 5V rail. The last one is the usual cause of everything on the board exploding at once.
> Hmm I figured that since the other 3 Pololu's are
> fine that it was unlikely to be a problem with the
> Pololu itself. Guess my logic is no good.
I've dealt with manufacturing test and postmortem analysis enough to no longer make that assumption... Some percentage of components are going to leave the factory broken or on the fast path to failure regardless of how thoroughly tested the manufacturer claims they are.
|
Re: Fire 1, Pololu 0 (Eric's Tantillus build) August 20, 2012 02:03PM |
Registered: 11 years ago Posts: 149 |
|
Re: Fire 1, Pololu 0 (Eric's Tantillus build) August 20, 2012 07:40PM |
Registered: 11 years ago Posts: 116 |
|
Re: Fire 1, Pololu 0 (Eric's Tantillus build) August 20, 2012 09:16PM |
Registered: 13 years ago Posts: 2,947 |
Here is an example of a real genuine Pololu driver that caught fire in the exact same spot. [forums.reprap.org]
| FFF Settings Calculator | Gcode post processors | Geometric Object Deposition Tool Blog |
| Tantillus.org | Mini Printable Lathe | How NOT to install a Pololu driver |
|
Re: Fire 1, Pololu 0 (Eric's Tantillus build) August 20, 2012 10:25PM |
Registered: 12 years ago Posts: 195 |
In that last picture you can see the sense resistors are 0 ohms each. That means that the intrinsic resistance of the PCB and wiring to ground provide a sense resistance far lower than 0.05 ohms the Pololu-made Pololus ship with. The end result is that the A4988 computes a current limit much higher than you would expect based on the pot setting. And I see that the pot wasn't on the low end of the range to start with...
|
Re: Fire 1, Pololu 0 (Eric's Tantillus build) August 20, 2012 10:47PM |
Registered: 13 years ago Posts: 2,947 |
pokey9000 Wrote:
-------------------------------------------------------
> In that last picture you can see the sense
> resistors are 0 ohms each. That means that the
> intrinsic resistance of the PCB and wiring to
> ground provide a sense resistance far lower than
> 0.05 ohms the Pololu-made Pololus ship with. The
> end result is that the A4988 computes a current
> limit much higher than you would expect based on
> the pot setting. And I see that the pot wasn't on
> the low end of the range to start with...
This is unlikely as the chip itself has thermal protection and if you turn up the current too high it just goes into thermal protection mode.
| FFF Settings Calculator | Gcode post processors | Geometric Object Deposition Tool Blog |
| Tantillus.org | Mini Printable Lathe | How NOT to install a Pololu driver |
|
Re: Fire 1, Pololu 0 (Eric's Tantillus build) August 21, 2012 02:12AM |
Registered: 11 years ago Posts: 149 |
Well the Arduino connects just fine with Pronterface. Can't find the multimeter for the life of me, but once located I'll check resistances between output pins, ground and 12V.
Would it be worth hooking everything back up (except the burnt driver and complimentary motor cable) with only the USB cable to see what happens? Everything was doing fine before when only the USB was attached, so I'm thinking that it's probably safe to plug in the RAMPS/Drivers again as long as the wall adapter isn't used. Is this a safe assumption and would it be worthwhile?
Does anyone happen know of any diagnostic software to run on the Arduino and RAMPS boards?
Edited 1 time(s). Last edit at 08/21/2012 03:33AM by Eric Young.
|
Eric's Tantillus build August 21, 2012 03:56AM |
Registered: 11 years ago Posts: 149 |
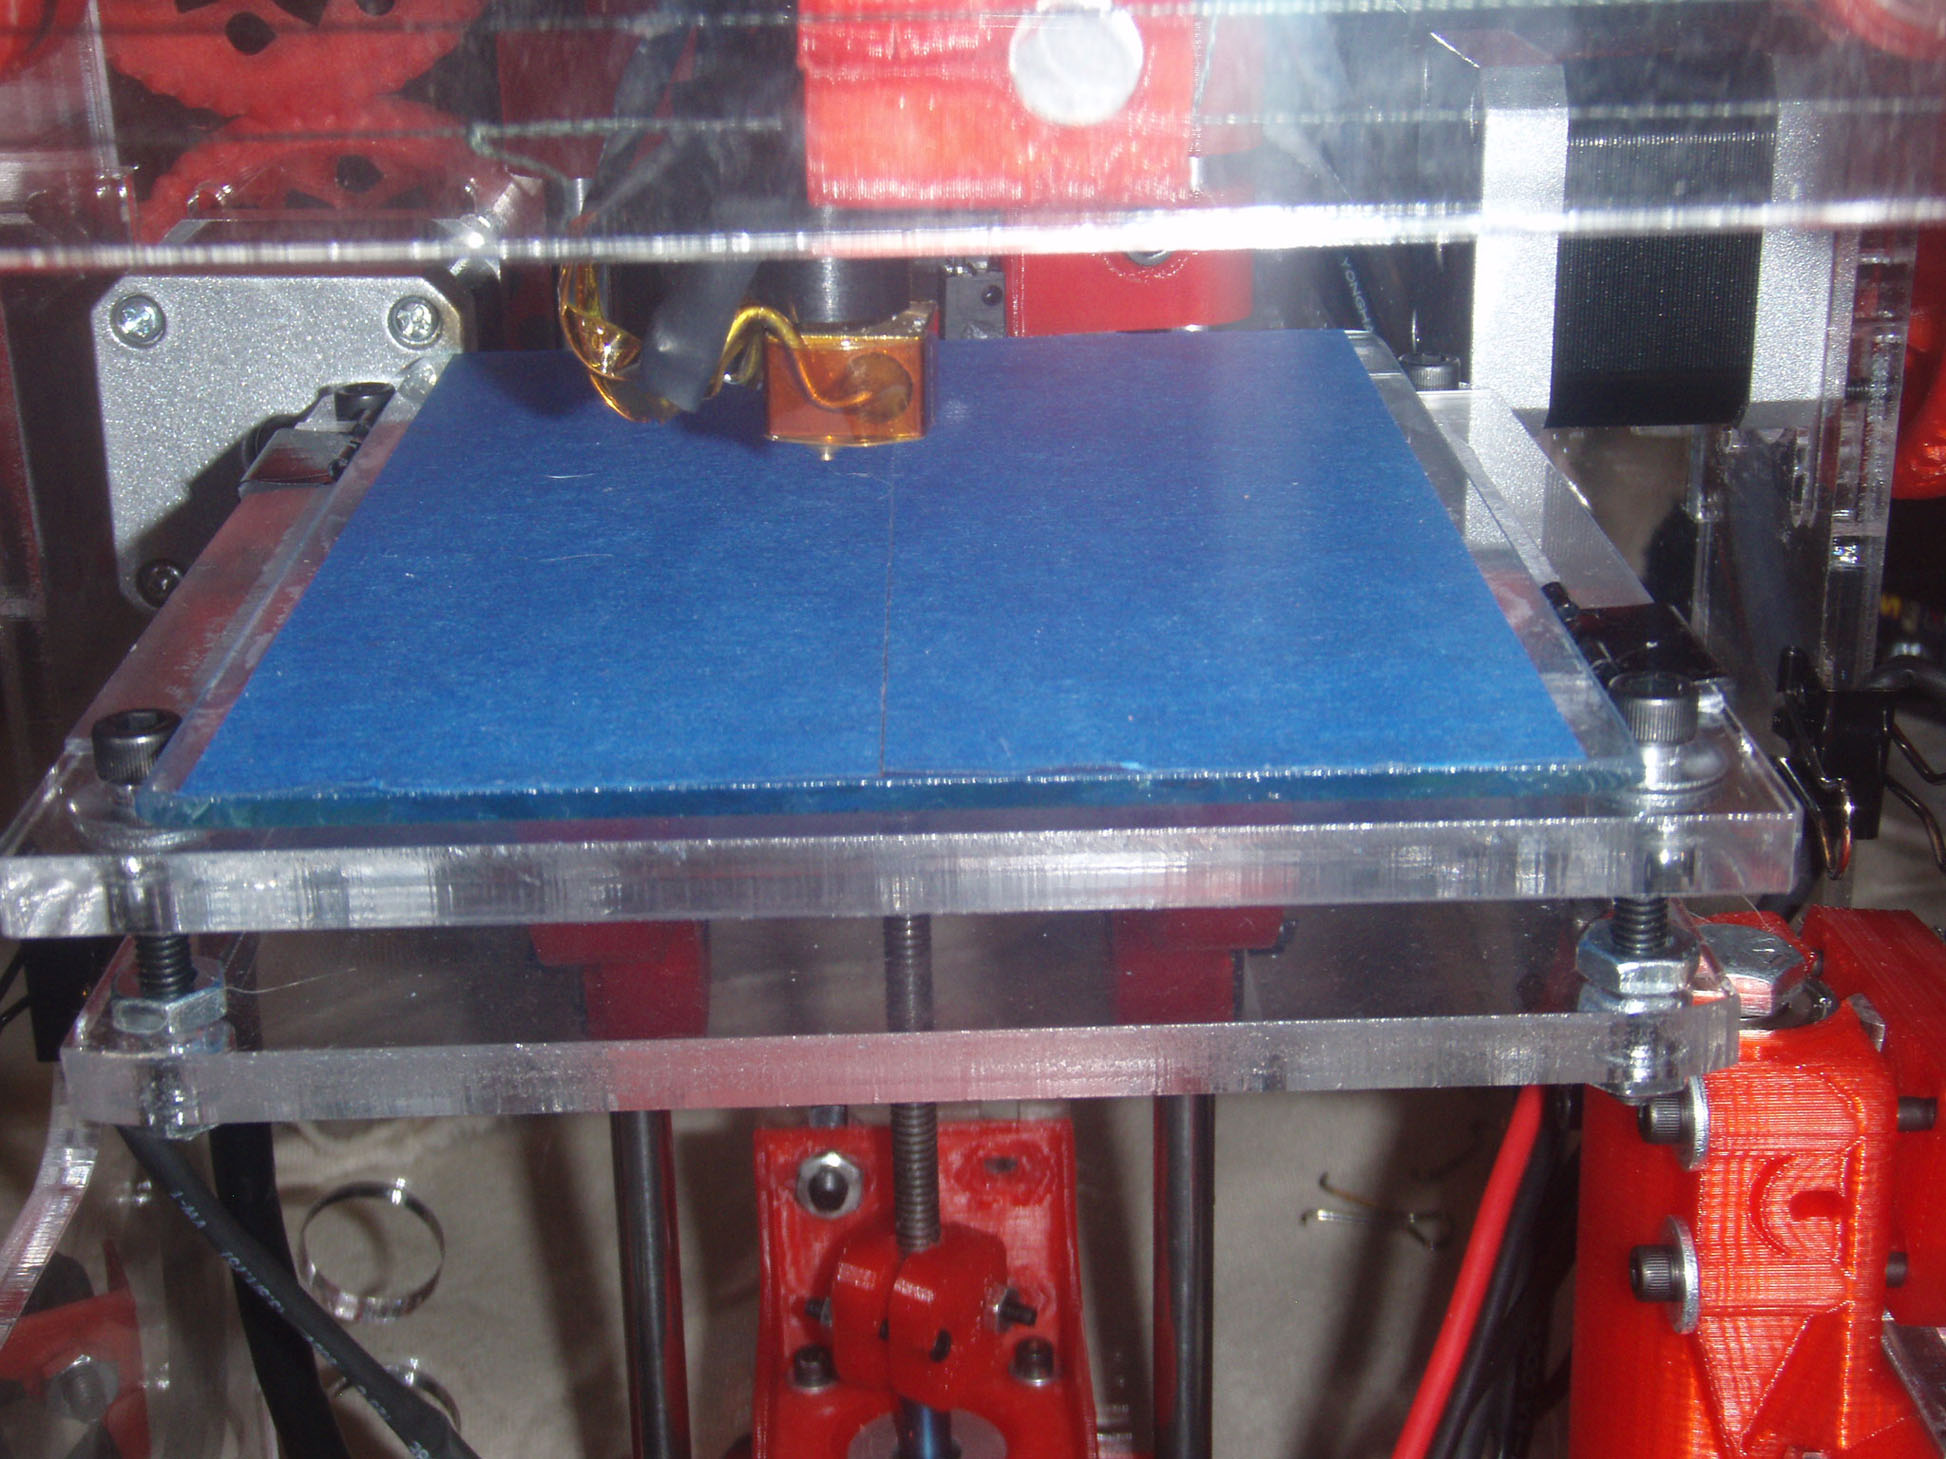
I was having an issue with the back of the glass build plate not pressing flat against the acrylic when the bulldog clips were attached, so I decided to to do a little mod and post it to get input.
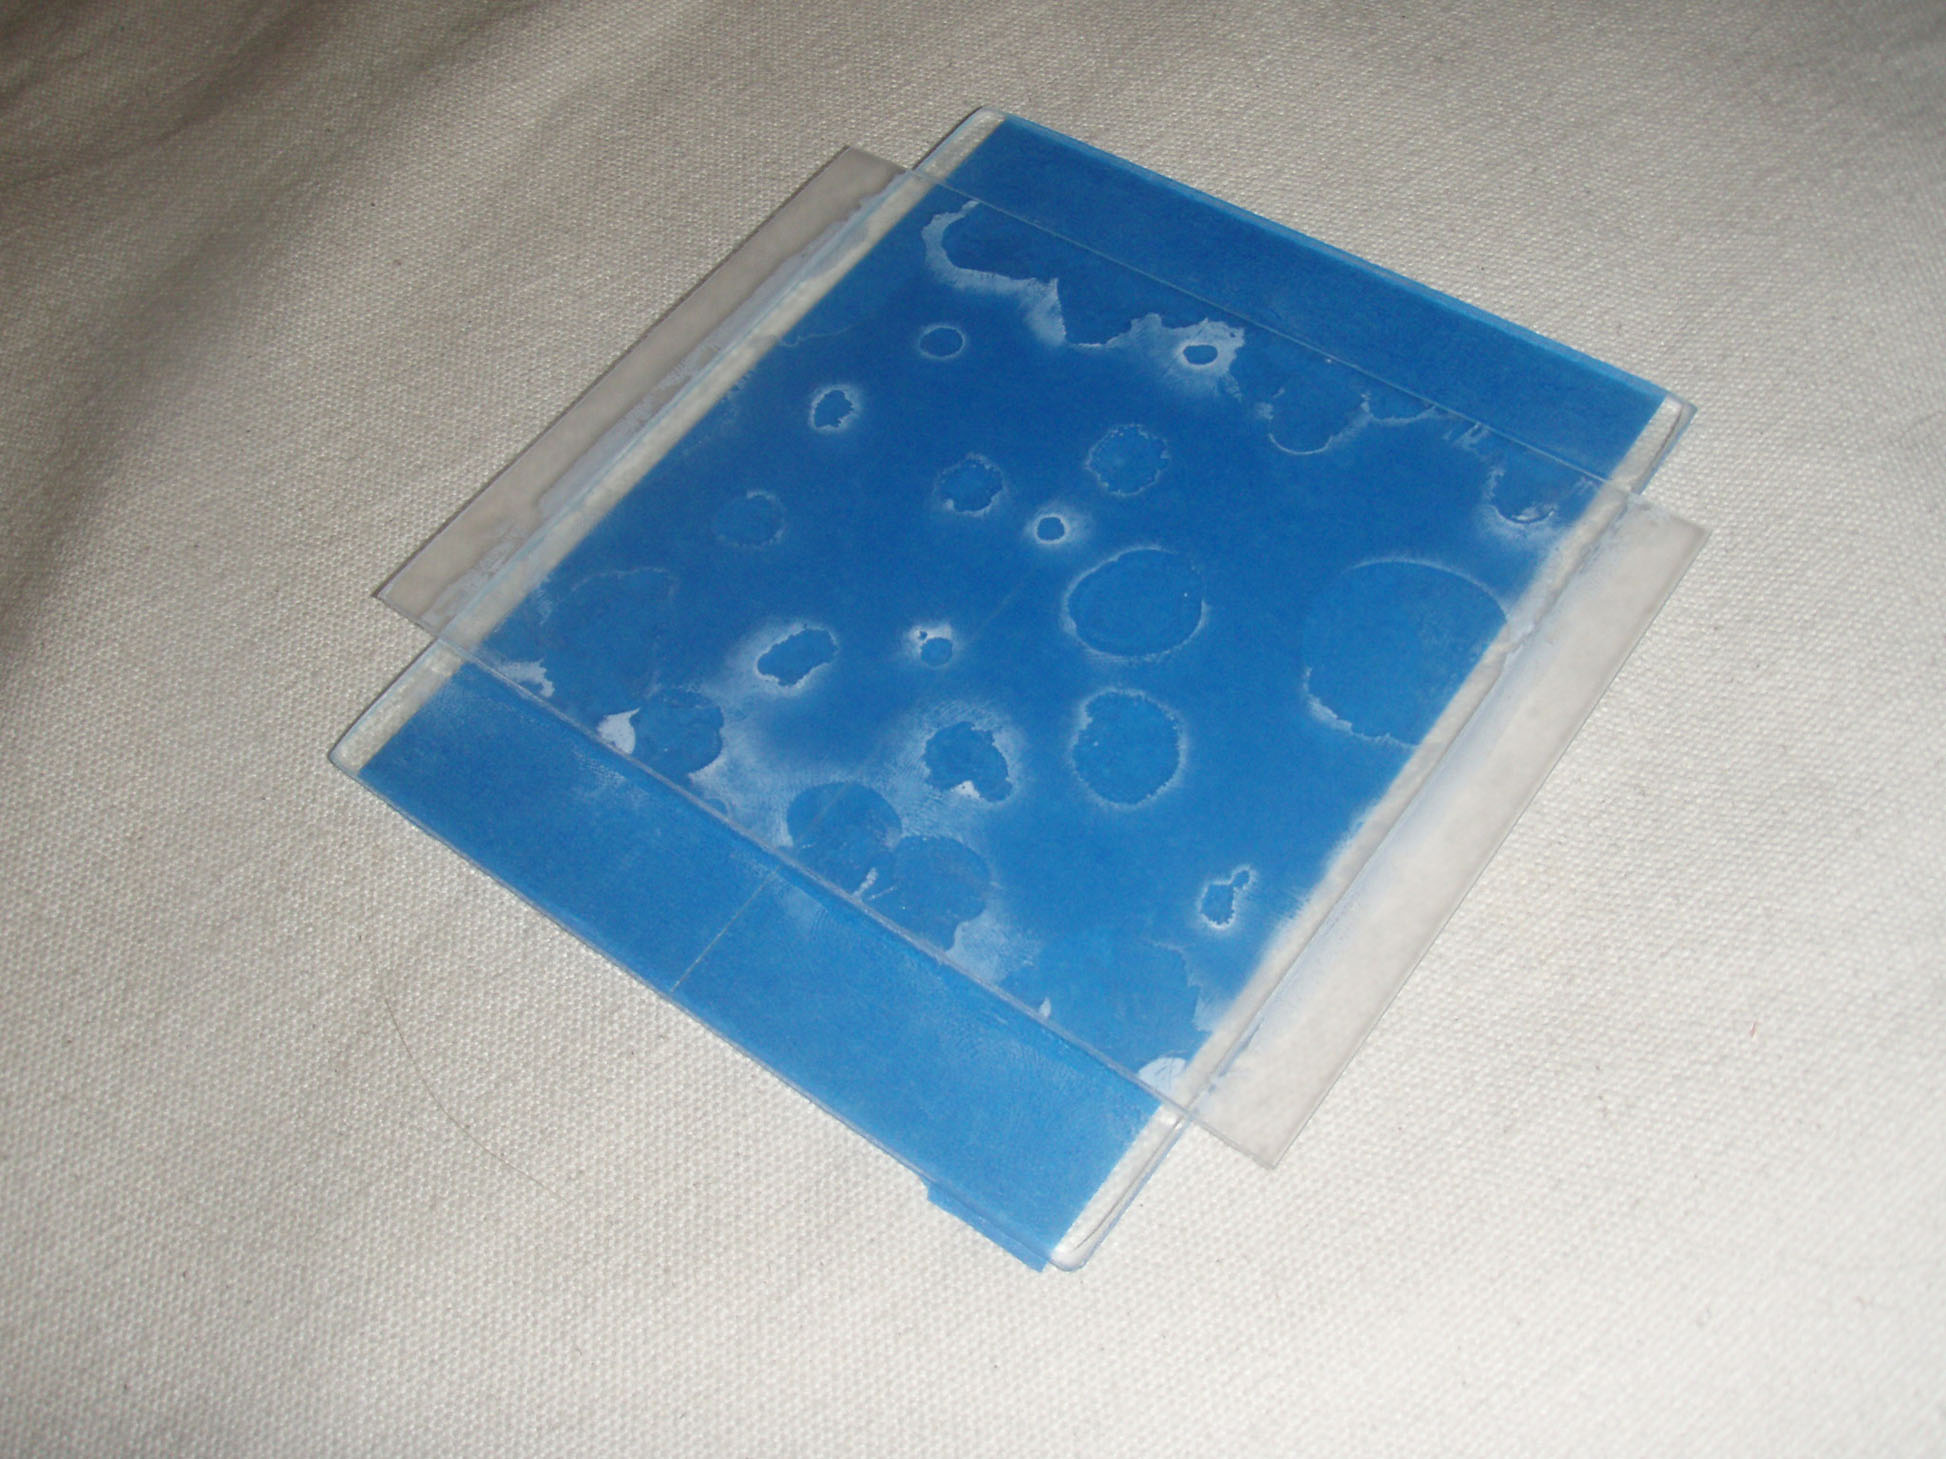
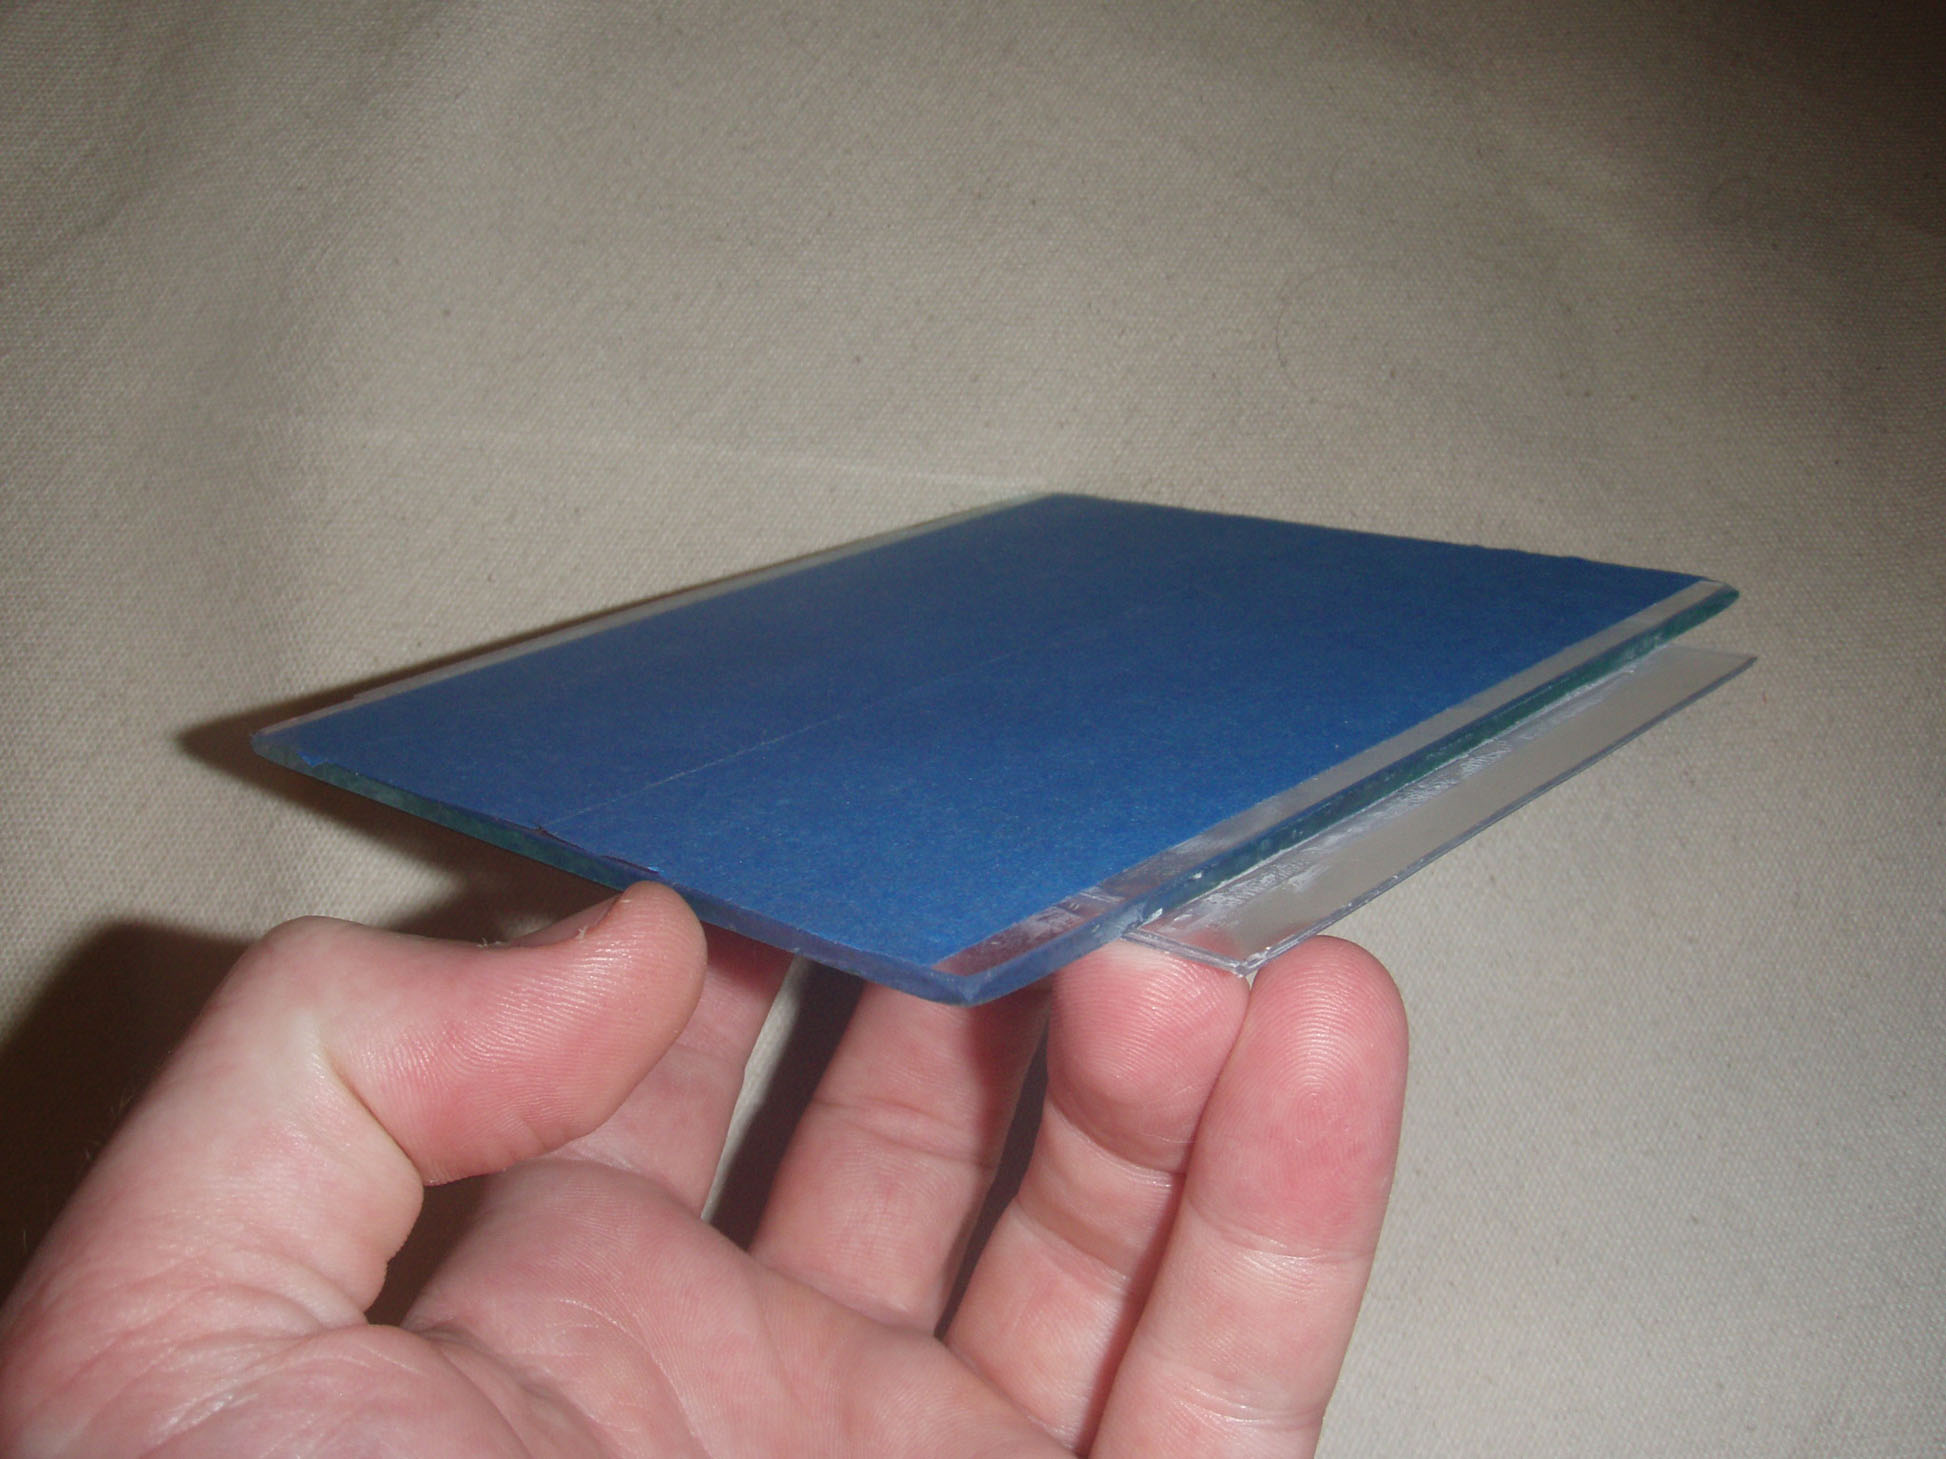
Attached are a few images of the mod - just glued a thin sheet of plastic to the bottom of the glass so that I could apply the bulldog clips from the sides and at a diagonal orientation as shown in the first image. I may or may not have used waaaay to much glue. The dimensions of the plastic sheet are 93mm wide x 129mm long x 1.2mm thick and it fits nicely in between the screw heads.
Anyone have thoughts on this? It definitely solves the problem of the glass raising off the acrylic in the back. Since the glass is more secure it should also prevent the glass plate from moving in the XY plane due to drag from the extruder tip - something that was mentioned as being a potential issue in Robot's thread about the wavey tall/skinny parts. This mod does reduces the possible build height by 1.2mm, which is something I'm fine with but may be an issue for others. I guess this is stating the obvious, but one could use a thinner sheet instead. A 1/2mm or so thick sheet of metal would probably be a good way to go.
Edited 2 time(s). Last edit at 08/21/2012 04:15AM by Eric Young.
|
Re: Eric's Tantillus build August 21, 2012 10:09PM |
Registered: 11 years ago Posts: 149 |
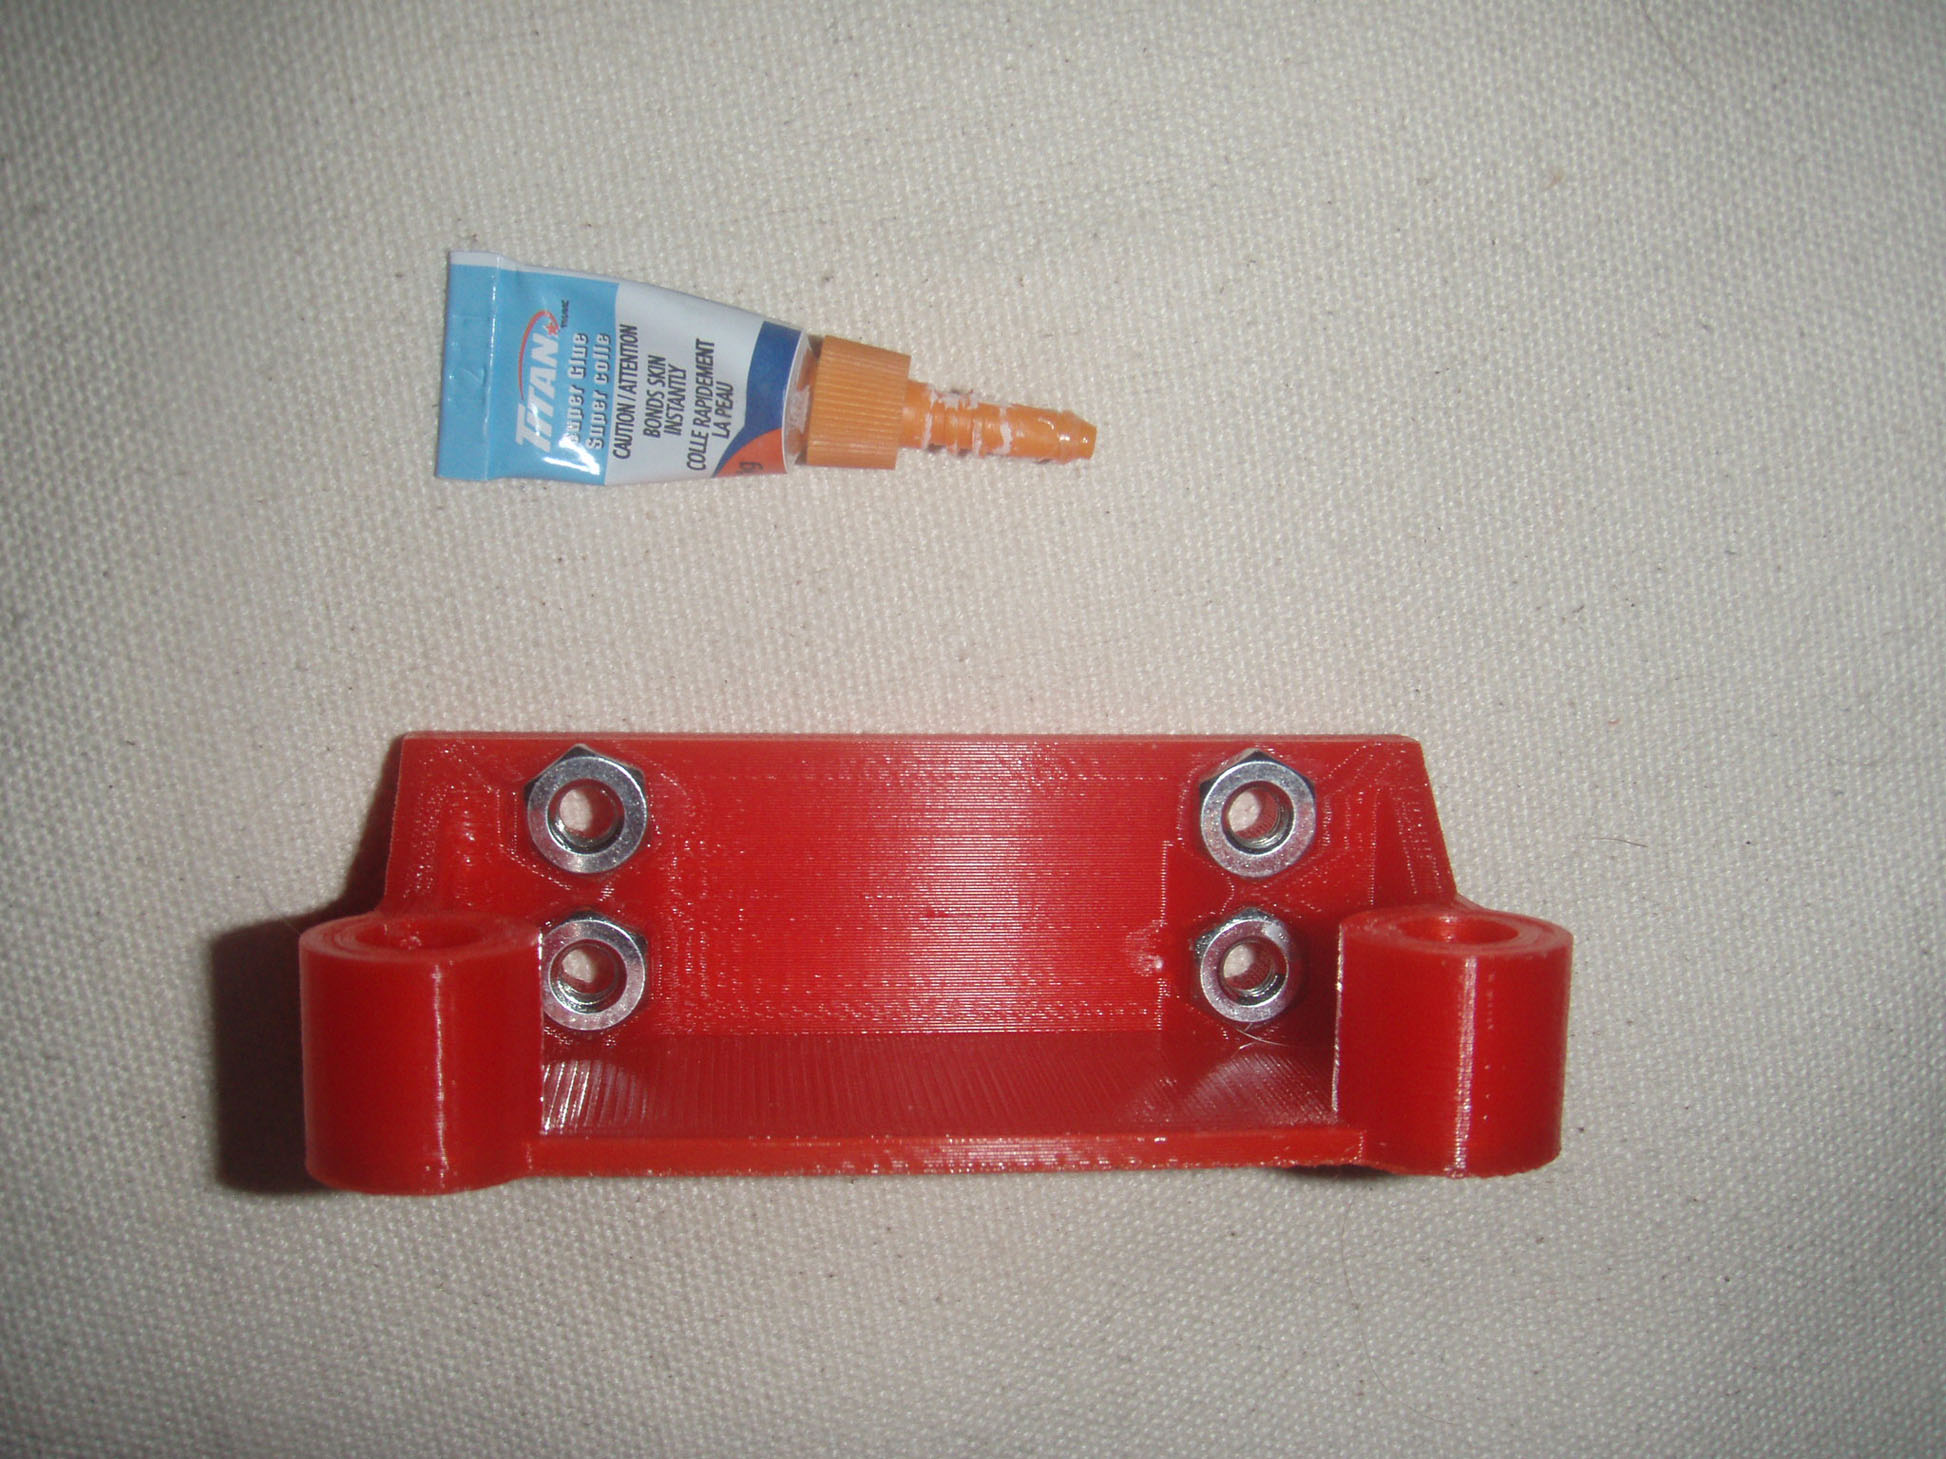
One little assembly tip I thought worth mentioning:
For the Z-axis parts that require nuts/bolts through the back panel, I've been gluing the nuts into their 'homes' in the plastic parts, making it a little easier to install/uninstall since you don't have to hold the nuts this way. A pic of one of the parts is attached to show what I mean. Just a couple drops of the glue seems to work nicely.
Edit: Before you apply the glue, use a screw to tighten each nut into it's 'home' so that the plastic is able to conform a bit to the shape of the nut and thus provide a better fit.
Edited 2 time(s). Last edit at 08/21/2012 10:17PM by Eric Young.
|
Re: Fire 1, Pololu 0 (Eric's Tantillus build) August 21, 2012 11:56PM |
Registered: 13 years ago Posts: 2,947 |
I think the lifting is because you have the washers under the head of the bolts and they should be under the acrylic.
| FFF Settings Calculator | Gcode post processors | Geometric Object Deposition Tool Blog |
| Tantillus.org | Mini Printable Lathe | How NOT to install a Pololu driver |
|
Re: Eric's Tantillus build August 22, 2012 12:47AM |
Registered: 11 years ago Posts: 149 |
Sublime Wrote:
-------------------------------------------------------
> I think the lifting is because you have the
> washers under the head of the bolts and they
> should be under the acrylic.
That's funny because I did have the washers under the bolt heads at first, but figured that one out and so they were in the correct location when the lifting occurred. It's not very pronounced, maybe 0.1 - 0.2 mm or so, and it only happens once the clips are applied to the front end. I think the top acrylic bed and glass aren't perfectly flat relative to one another, so compressing them near a single edge (front) causes the lifting at the other end (back).
I did not try turning the plate around 180deg or flipping it over, but probably should have.
|
Re: Eric's Tantillus build August 22, 2012 12:55AM |
Registered: 13 years ago Posts: 2,947 |
I did have a problem with the back edge lifting on my wooden machine because the wood squished along the edge a little. Maybe I should design a lip or something that the back edge of the glass pushes under.
Edited 2 time(s). Last edit at 08/22/2012 02:01AM by Sublime.
Edited 2 time(s). Last edit at 08/22/2012 02:01AM by Sublime.
| FFF Settings Calculator | Gcode post processors | Geometric Object Deposition Tool Blog |
| Tantillus.org | Mini Printable Lathe | How NOT to install a Pololu driver |
|
Re: Eric's Tantillus build August 22, 2012 01:42AM |
Registered: 11 years ago Posts: 149 |
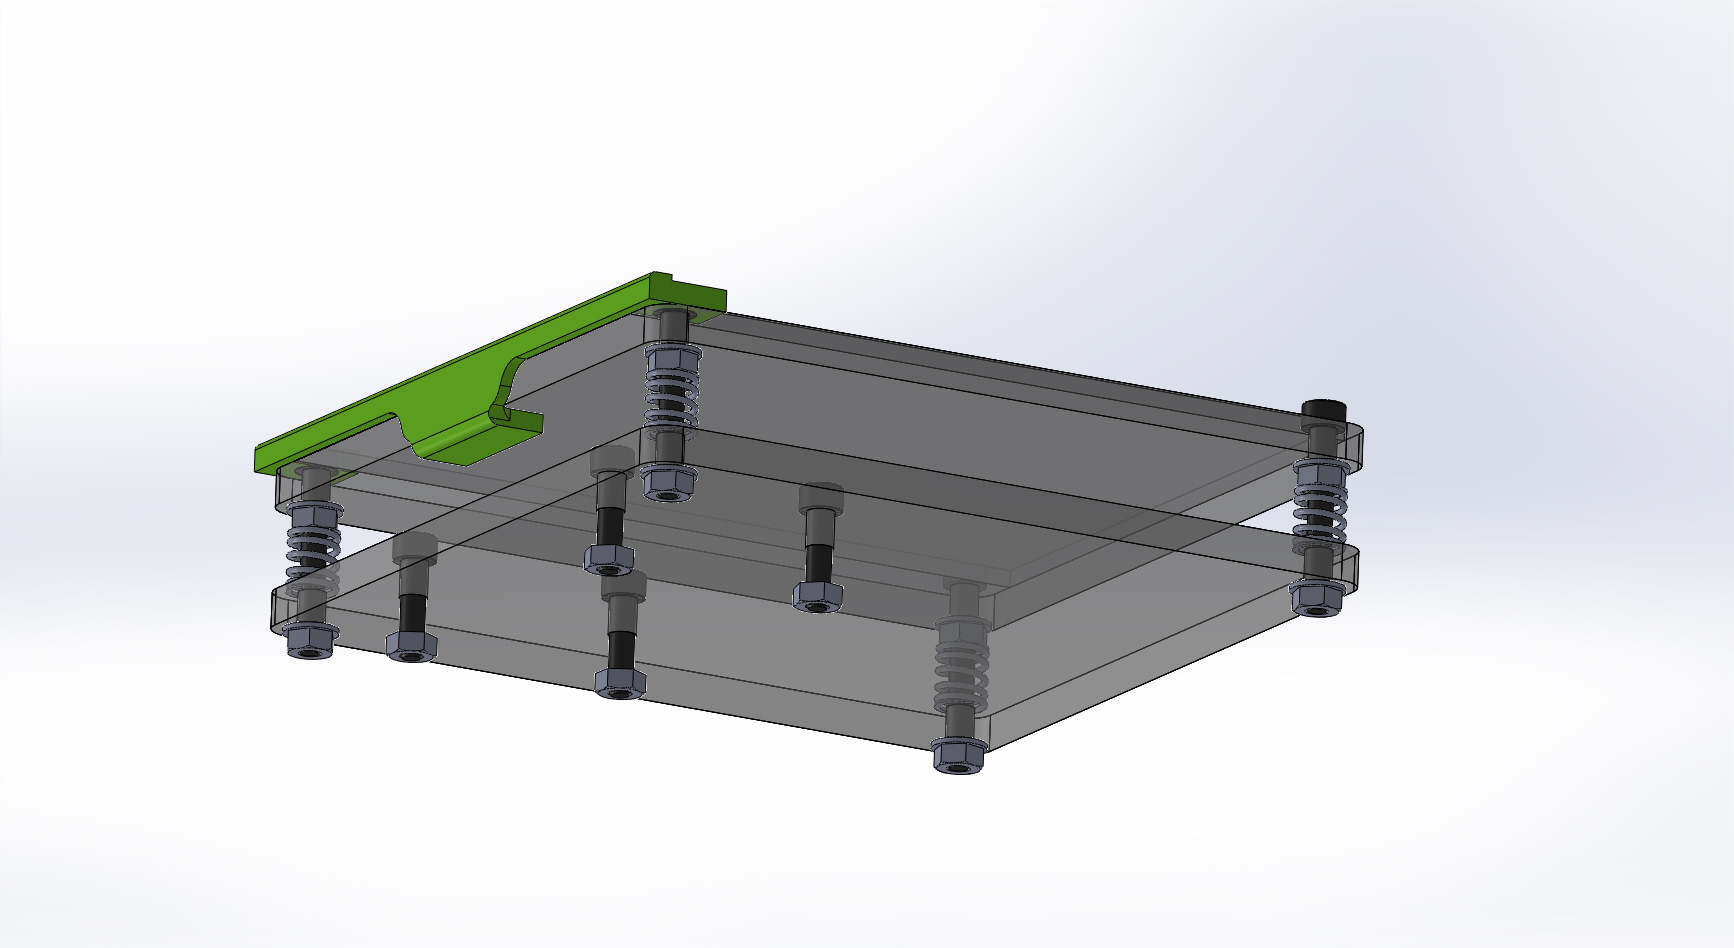
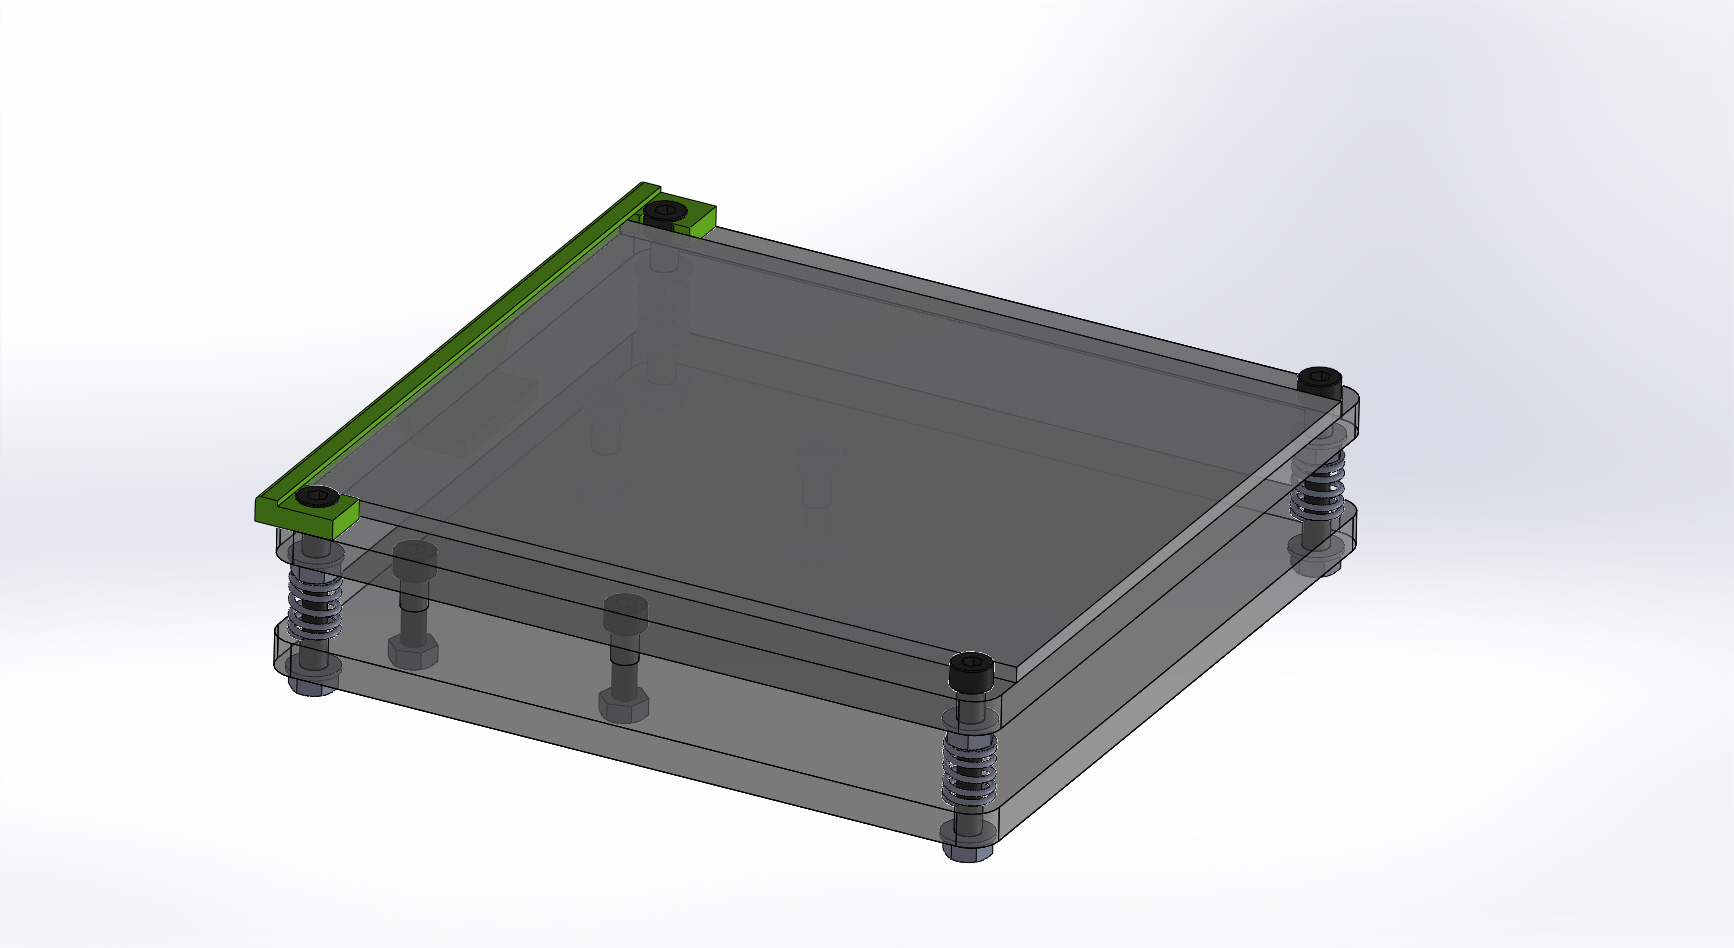
That would take care of it - probably something with an angle on the surface that touches the top back edge of the glass, so that it provides a downward force when the glass is pushed back against it. You could probably use the existing back screws to constrain the lip-piece too. I'll throw together a rough model of what I'm thinking because it's hard to describe in words.
Seems like I'm the only one having this issue because I think others would notice it during the bed-leveling stage of the build.
Seems like I'm the only one having this issue because I think others would notice it during the bed-leveling stage of the build.
|
Re: Eric's Tantillus build August 22, 2012 02:30AM |
Registered: 11 years ago Posts: 149 |
|
Re: Eric's Tantillus build August 22, 2012 02:41AM |
Registered: 13 years ago Posts: 2,947 |
A few thought.
1) The round edge at the back is nice but can cause an issue printing it because that back edge has to face down on the bed.
2) I do not know if it can go all the way across because it could hit the Z-arms if you lower the bed.
1) The round edge at the back is nice but can cause an issue printing it because that back edge has to face down on the bed.
2) I do not know if it can go all the way across because it could hit the Z-arms if you lower the bed.
| FFF Settings Calculator | Gcode post processors | Geometric Object Deposition Tool Blog |
| Tantillus.org | Mini Printable Lathe | How NOT to install a Pololu driver |
|
Re: Eric's Tantillus build August 22, 2012 02:57AM |
Registered: 11 years ago Posts: 149 |
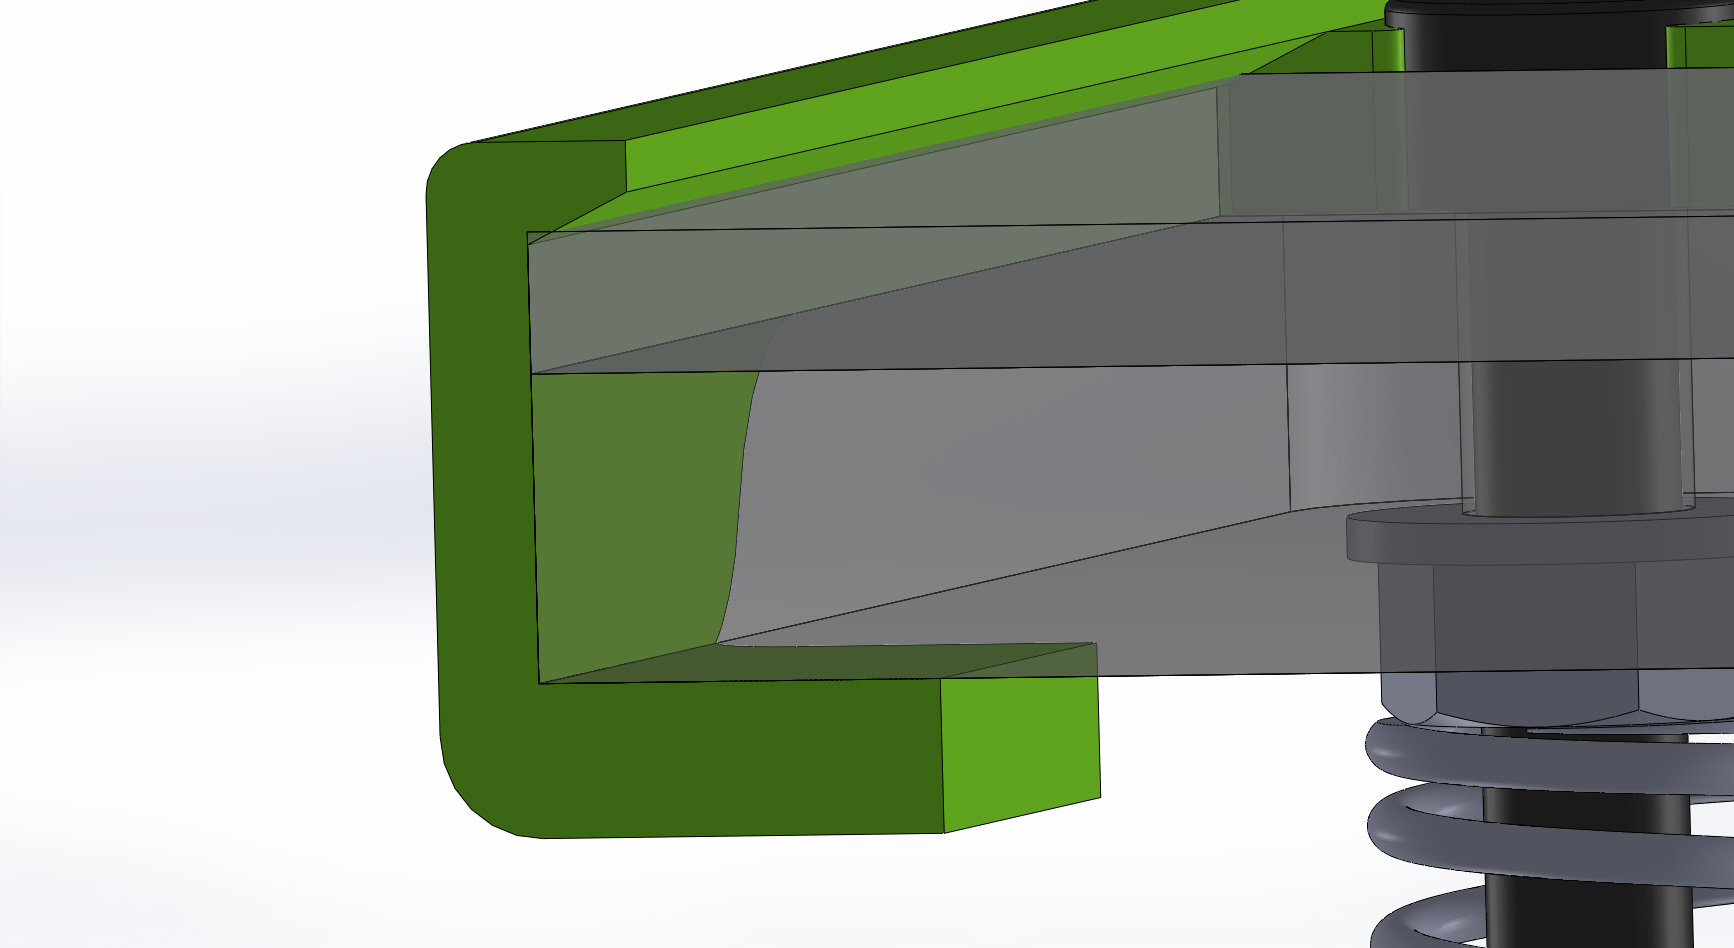
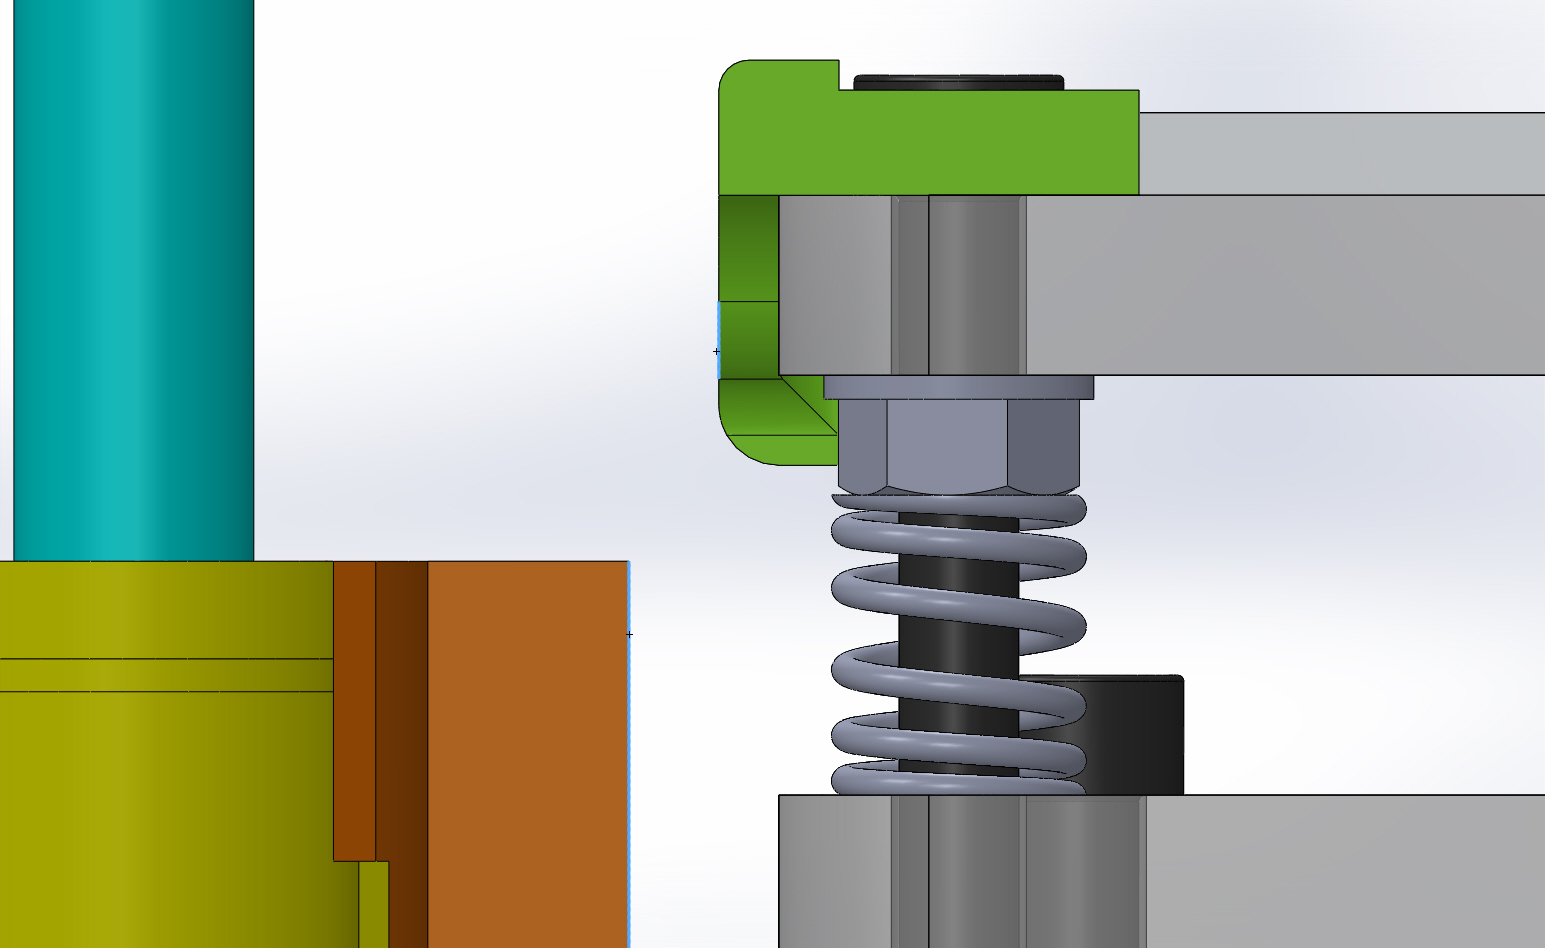
Yeah it doesn't need that fillet on the edge, I'm so used to designing for injection molding and will need to get used to this printer mindset now
Looks like there is still 3mm clearance for the Z-arms if that backside wall thickness is 2mm- see attached.
Looks like there is still 3mm clearance for the Z-arms if that backside wall thickness is 2mm- see attached.
|
Re: Eric's Tantillus build August 22, 2012 03:04AM |
Registered: 13 years ago Posts: 2,947 |
I assume you are using wiilworkforplastics solidworks model and I think he may have increased some of the clearances or maybe made the bed a little smaller.
| FFF Settings Calculator | Gcode post processors | Geometric Object Deposition Tool Blog |
| Tantillus.org | Mini Printable Lathe | How NOT to install a Pololu driver |
|
Re: Eric's Tantillus build August 22, 2012 03:48AM |
Registered: 11 years ago Posts: 149 |
|
Re: Eric's Tantillus build August 22, 2012 07:12PM |
Registered: 11 years ago Posts: 149 |
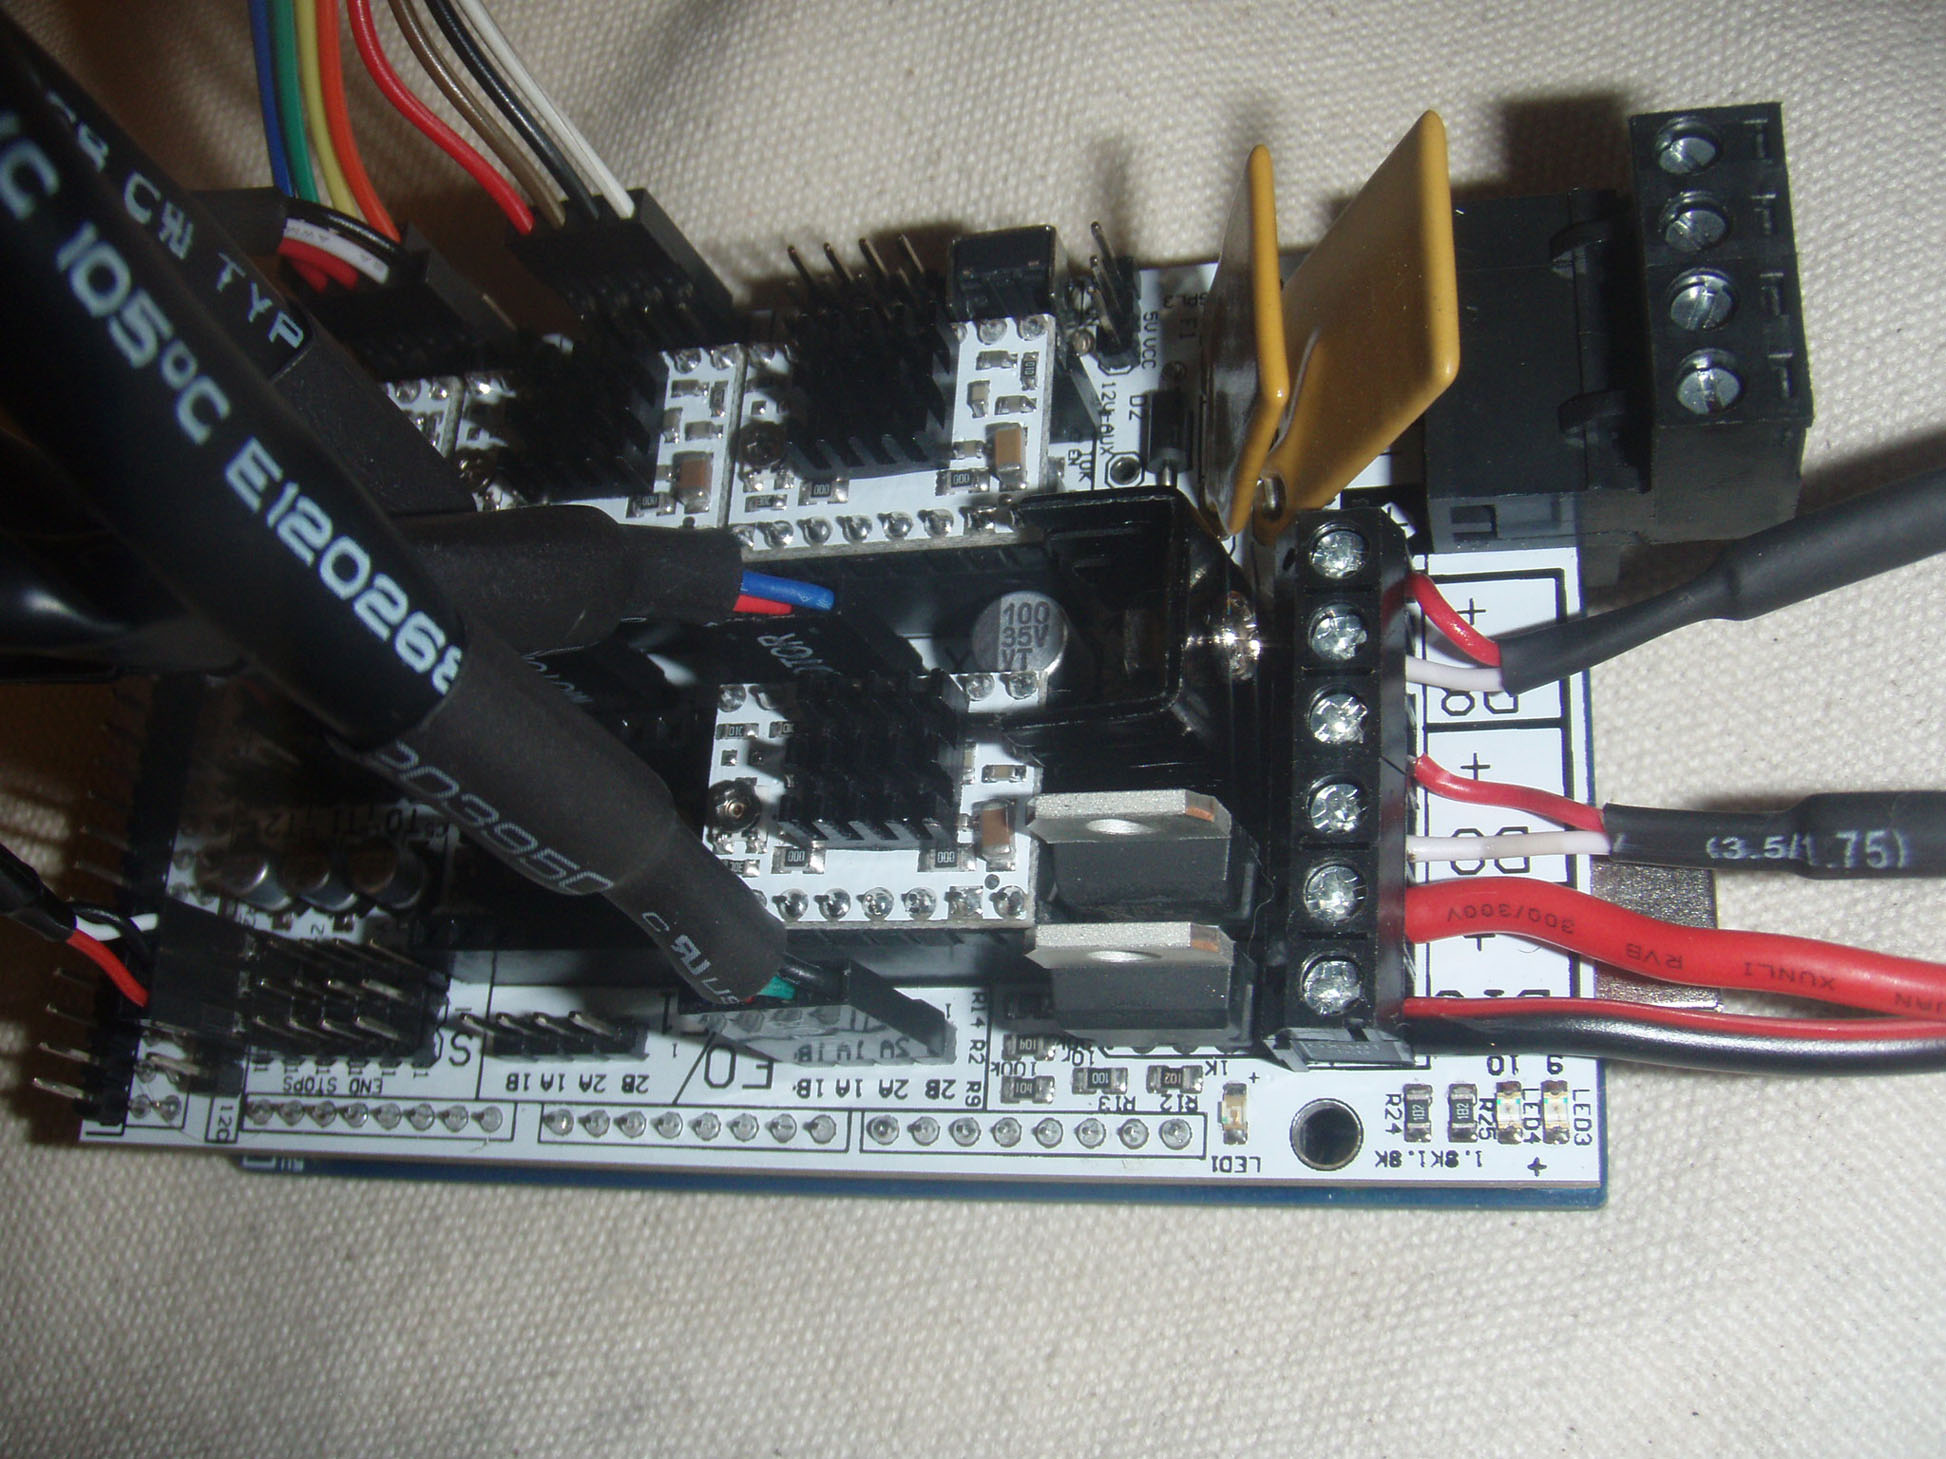
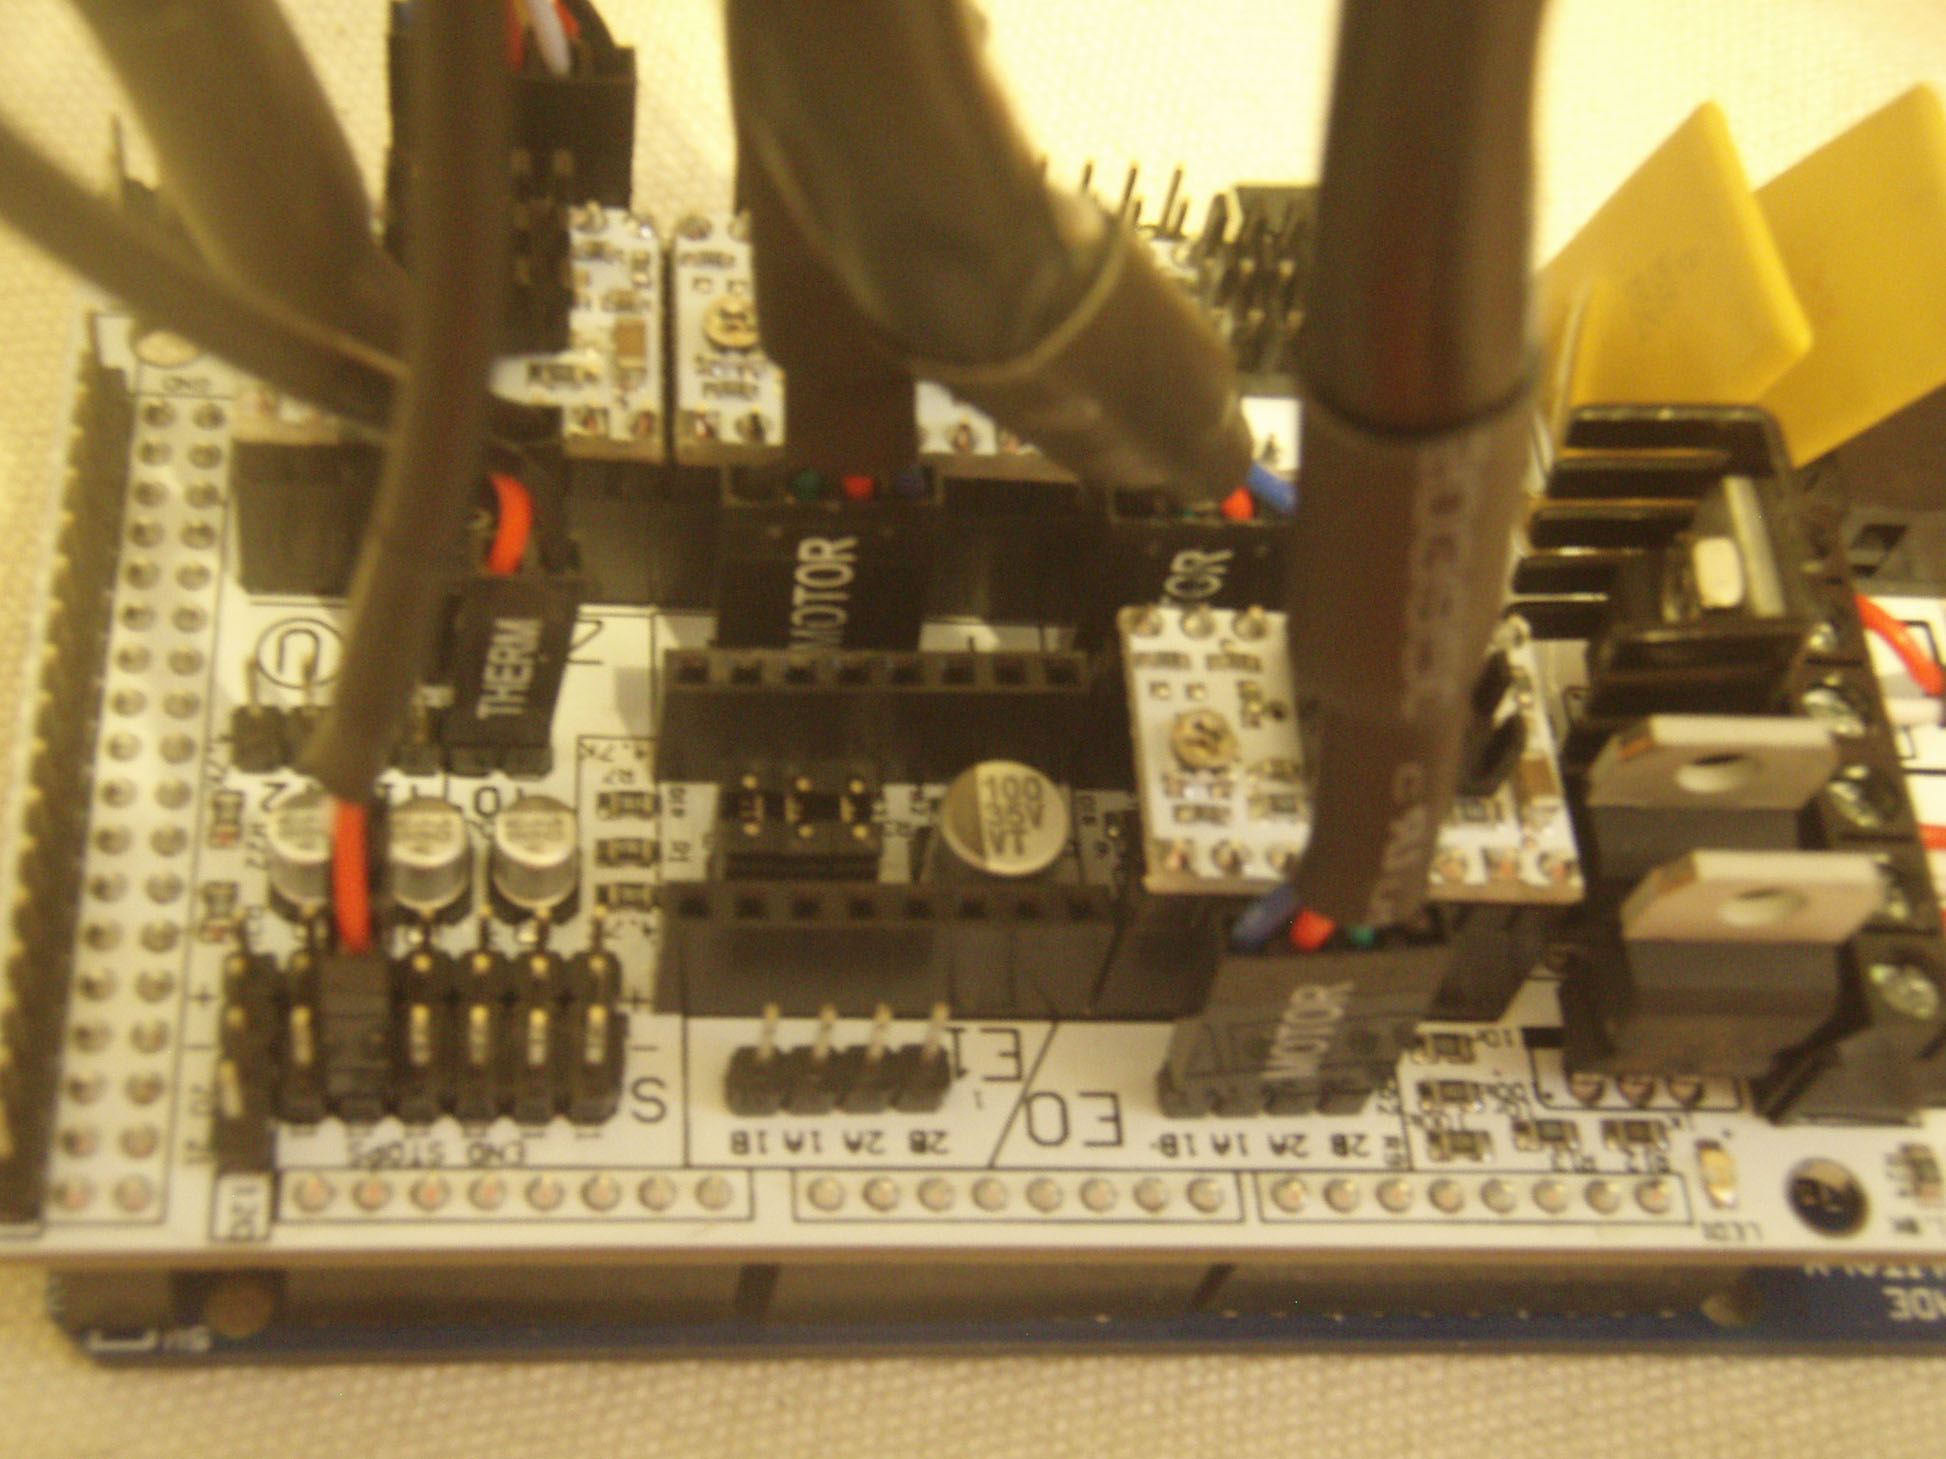
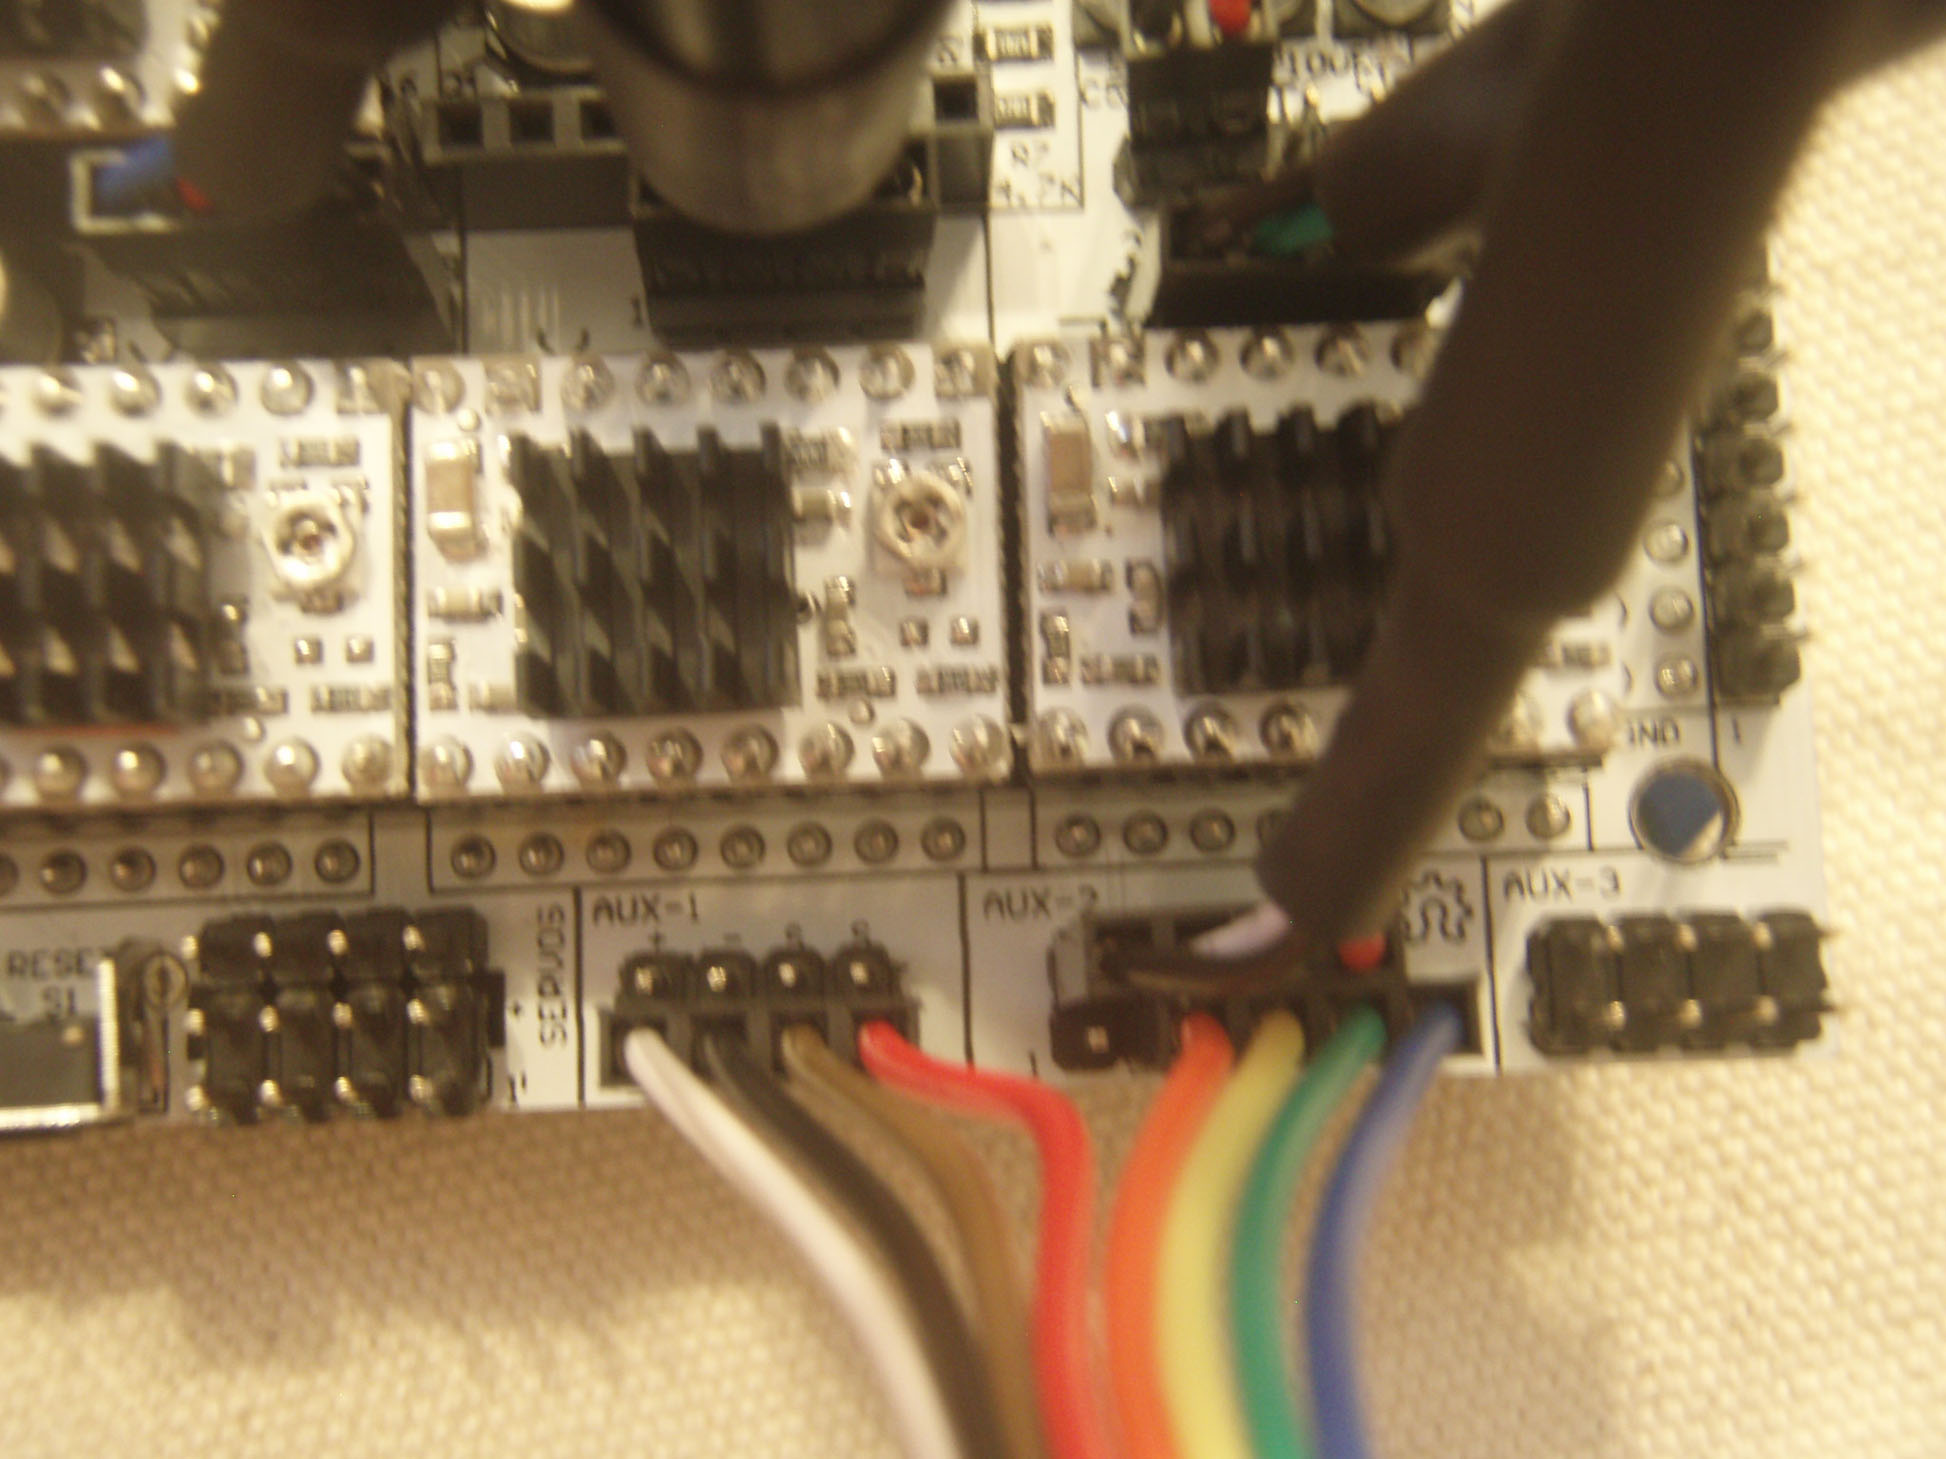
Got the electronics all hooked up again and figured this time I'd post some pictures of all the connectors before plugging in to wall power. Sublime - would you mind confirming that my connector locations/orientation look good?
Orientation of the Thermistor connector does not matter, correct?
Also, when I installed the heatsinks on the Pololu's it looked as though the bottoms of the heat sinks were coming mighty close to the surface mount components and may even be touching. Is this okay, or should I stick some Kapton tape between the bottom of the heat sink and the surface mount components? I did make sure not to let the heatsinks short any of the pins, as Sublime pointed out to me.
Edited 1 time(s). Last edit at 08/22/2012 07:19PM by Eric Young.
|
Re: Eric's Tantillus build August 22, 2012 07:31PM |
Registered: 11 years ago Posts: 95 |
|
Re: Eric's Tantillus build August 22, 2012 07:34PM |
Registered: 13 years ago Posts: 2,947 |
The only issue I see is both fans need to go to D9. The other set of terminals (D8) are for a heated bed if anyone wants to add one (would need a second power supply rated to 15A).
The heatsinks coming close to the components is normal and should not touch, but if you feel they may actually touch adding kapton would eliminate the issue.
Edited 1 time(s). Last edit at 08/22/2012 07:44PM by Sublime.
The heatsinks coming close to the components is normal and should not touch, but if you feel they may actually touch adding kapton would eliminate the issue.
Edited 1 time(s). Last edit at 08/22/2012 07:44PM by Sublime.
| FFF Settings Calculator | Gcode post processors | Geometric Object Deposition Tool Blog |
| Tantillus.org | Mini Printable Lathe | How NOT to install a Pololu driver |

Sorry, only registered users may post in this forum.