Let's talk about swapping hotends
Posted by Yonderboy
|
Let's talk about swapping hotends September 04, 2012 03:27AM |
Registered: 11 years ago Posts: 51 |
Hey all... so, I was inclined to start a discussion about the best approaches to levelling, calibrating and tuning a working Tantillus. My Tantillus has been functioning for about a week now, but the one thing I've observed is that it seems to slip out of whack pretty easily, especially right after transporting it somewhere. But before going down that rabbit-hole, I need some other advice because....
*insert dramatic pause*
My Tantillus is dead right now. But, she went down valiantly, I must say.
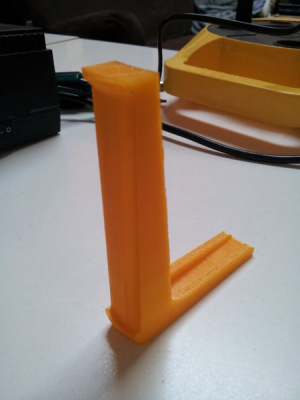
I had to work the day on Saturday, so I brought my printer in to the office with me and was calibrating and levelling for a long while, and then proceeded to reprint the Repraper.com filament spool holder - my first attempt had printed in the default orientation, which caused it to print vertically like below. This made it weak and easily snapped along the length under stress, so I reprinted it reoriented so that the filaments ran the length.
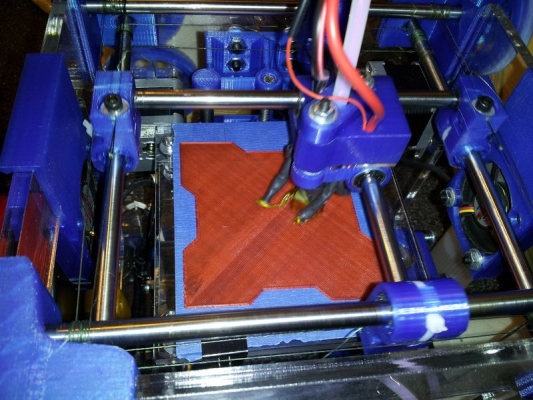
Later, I headed home with the printer again. I had in mind an ambitious print, and once again I found I couldn't get my first layer to stick (perhaps it was once again thrown out of calibration by being moved). I spent a while tweaking and tuning and after two more re-levelling attempts, re-applying my blue tape a few times, and lots of screwing with the Z-axis offset, it finally seemed to be dialed in correctly again. So off it went. This time, I had scaled up the faithful Companion Cube (What can I say? I'm a bit Portal fan.) up to the full 100x100x100mm capacity of the build platform. I'd planned to print it at 0.10 mm layer height, with a 15% infill every 3 layers, printing straight from the SD card. There was every indication that it was gonna take forever (like about 24 hours) but it would be amazing! ;-) It looked like this at the start:
It continued printing for about 10 straight hours as far as I knew... I was in the other room but could hear the printer moving all the while. After about 4 hours it had made some great progress and was looking good. Then I didn't look again until 6 hours later.
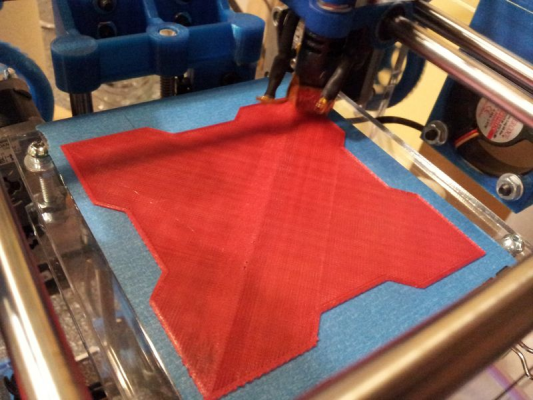
At that point something visibly weird had happened. The printer was still moving as though it was dutifully printing, and the LCD said that it was at 50%, but it looks like it hadn't printed any new layers in a very long time. There was about a 1-inch gap between where the head was currently moving and the last layer printed... like so:
Looking at the LCD, the current temperature read at 25 / 190, and the extruder wasn't still moving even though the carriage was. The deduction I made from all of this was that something caused the heating resistor in the hotend to stop functioning, and as soon as the temperature dropped below the safe extrusion level, it stopped extruding... yet the head kept moving.
It was apparent that the print had failed, so I stopped the print and let the machine sit for a bit. (Incidentally I was pretty disappointed, but it crossed my mind to ask whether there's any way to resume an interrupted print...perhaps after a power outage or something like that... I'm assuming no.) Then I went and started it up again, and tried to dial up the head temperature... nothing happened. The readout just stayed at 25 regardless of target temperature. Not sure how to troubleshoot this, I started sniffing around. Since I had ordered two hotends, I had the 0.35mm one and its heating resistor on hand. I whipped out my multimeter, and tested that resistor and it was reading 5.6 ohms. I pulled the wires leading to my installed heating resistor from the RAMPS board and tested them. Nothing. It stayed flat at 1, so obviously there is a problem with that resistor. Since I have the spare hotend and resistor, I figured that it was time for me to test-drive the other hotend while I get a replacement for this dead resistor.
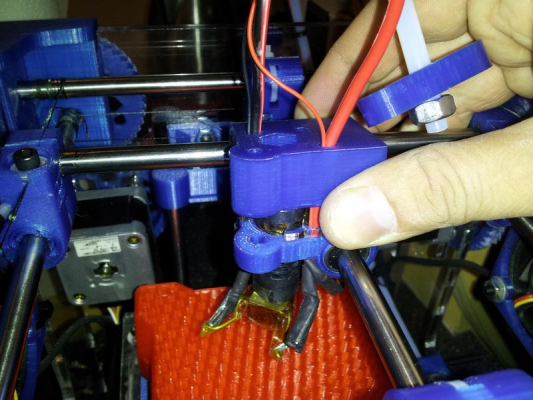
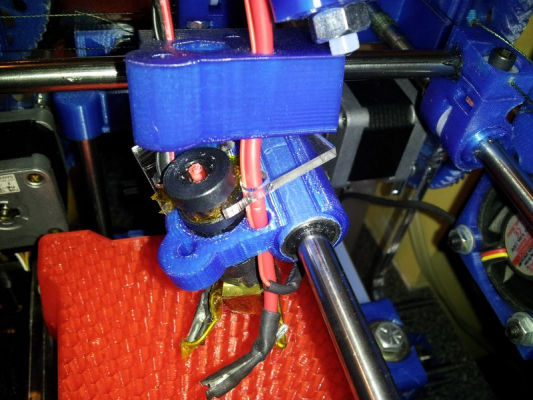
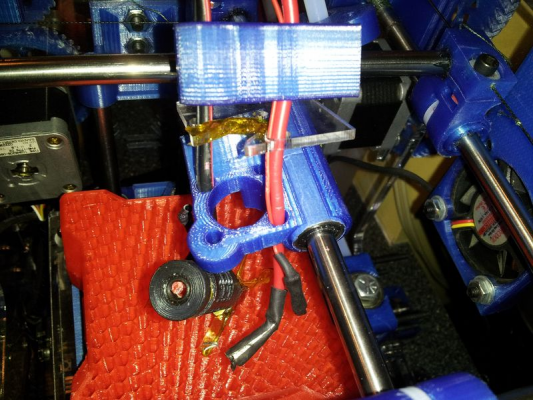
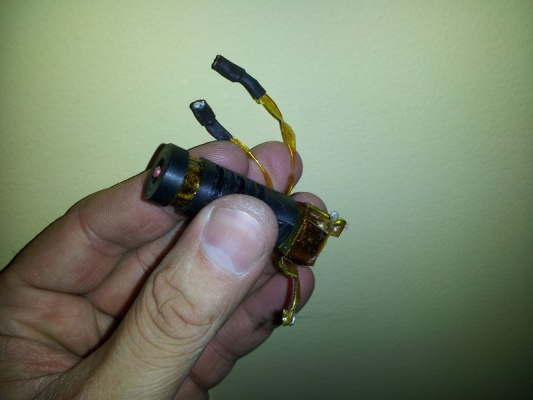
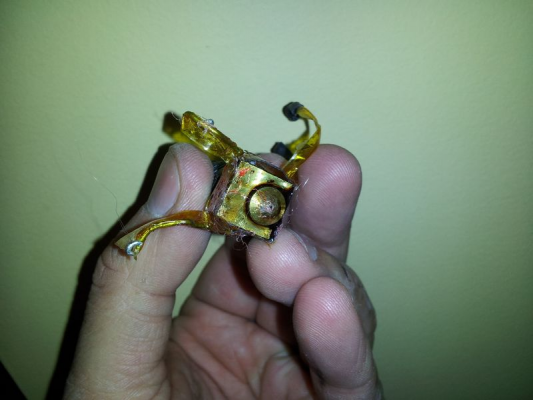
Now, I had planned on trying out the other hotend at some point anyway, so this isn't all bad... but now I needed to figure out how best to swap it out. I was fortunate that when I picked up my hardware and acrylic parts kits from Sublime, he went over with me how you might physically approach swapping the heads. There's a bit of finesse to rocking the two halves of the carriage apart from each other while they remain connected to the linear bearings, and due to the thickness of the heater and thermistor wires, they held the acrylic piece that sits in the hotend's groove firmly in place. Ultimately I got it apart, but it was a pain, and I had to cut the wires through the insulator-free butt connectors to separate the head free.
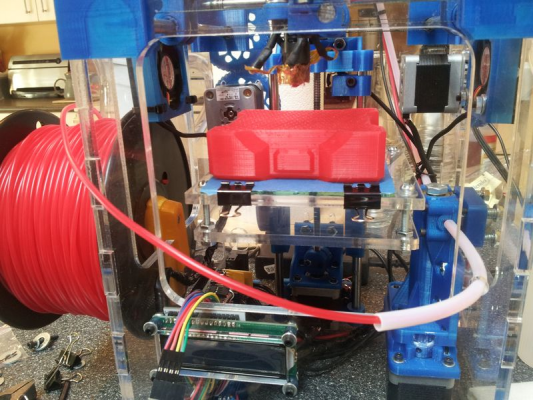
Here are some shots as I pulled it out:
First thing I wanted to ask was, has this happened to anyone else before? Either on a Tantillus or another printer that uses J-Heads?
The other question was... what can we do about making it easier to swap heads? As you had told me, Sublime, having to cut the wires every time you remove the head will lead them to being shorter and shorter over time, and is a big pain. I wanted to add some sort of quick connect, but I'd assume that it would need to be able to withstand some heat, and more importantly, it'll need to be able to feed through the diameter of the holes in the carriage. Plus, I'll need two fit two of them through the hole, one for each connector of the resistor and the thermistor, right?
I also did buy one of those hotend heaters from Eugene, but I haven't tried it out yet. I'm not sure how successful your testing of that part has been, Sublime, running at a full 15v. In the case of using that part, I assume we'd just wire it permanently, and then insert it and insert the thermistor into the hotend when we go to attach it? Therefore it would still be a fair bit of work fitting it in place each time you swap heads, correct?
I don't have any Kapton tape right now, so Gerald is lending me his, but I should be able to swap in the other head and resistor tomorrow. Meanwhile, I thought I'd poll everyone on their thoughts around approaching head swapping... are there some other brilliant ideas that I've yet to think of?
Cheers,
Yonder
|
Re: Let's talk about swapping hotends September 04, 2012 04:10AM |
Registered: 13 years ago Posts: 2,947 |
Yonderboy Wrote:
-------------------------------------------------------
> My Tantillus is dead right now. But, she went
> down valiantly, I must say.
>
> I had to work the day on Saturday, so I brought my
> printer in to the office with me and was
> calibrating and levelling for a long while, and
> then proceeded to reprint the Repraper.com
> filament spool holder - my first attempt had
> printed in the default orientation, which caused
> it to print vertically like below. This made it
> weak and easily snapped along the length under
> stress, so I reprinted it reoriented so that the
> filaments ran the length.
This is most likely a result of printing at too low of temperature or possibly too low of flow rate. Both can cause poor layer adhesion. I have few of these printed and one has been hit so hard that it pulled the bolt through the back of the holder but never broke the holder itself.
> Later, I headed home with the printer again. I
> had in mind an ambitious print, and once again I
> found I couldn't get my first layer to stick
> (perhaps it was once again thrown out of
> calibration by being moved). I spent a while
> tweaking and tuning and after two more
> re-levelling attempts, re-applying my blue tape a
> few times, and lots of screwing with the Z-axis
> offset, it finally seemed to be dialed in
> correctly again. So off it went.
I wonder if this is because of thermal expansion changing the length of the hotend. I have travelled with my machines a few times and never have I re calibrated them after.
> Now, I had planned on trying out the other hotend
> at some point anyway, so this isn't all bad... but
> now I needed to figure out how best to swap it
> out. I was fortunate that when I picked up my
> hardware and acrylic parts kits from Sublime, he
> went over with me how you might physically
> approach swapping the heads. There's a bit of
> finesse to rocking the two halves of the carriage
> apart from each other while they remain connected
> to the linear bearings, and due to the thickness
> of the heater and thermistor wires, they held the
> acrylic piece that sits in the hotend's groove
> firmly in place. Ultimately I got it apart, but
> it was a pain, and I had to cut the wires through
> the insulator-free butt connectors to separate the
> head free.
Once you have the carriage apart you can push the hotend up enough that you can slide the acrylic plate off without cutting the wires if need be.
> First thing I wanted to ask was, has this happened
> to anyone else before? Either on a Tantillus or
> another printer that uses J-Heads?
I have burnt out one resistor in my two years of Printing. It is possible that the resistor was too lose and not conducting enough heat. This causes the resistor to o way above the required temperature to transfer enough heat. This would also explain why your machine seems to take a long time to heat up.
>
> The other question was... what can we do about
> making it easier to swap heads? As you had told
> me, Sublime, having to cut the wires every time
> you remove the head will lead them to being
> shorter and shorter over time, and is a big pain.
> I wanted to add some sort of quick connect, but
> I'd assume that it would need to be able to
> withstand some heat, and more importantly, it'll
> need to be able to feed through the diameter of
> the holes in the carriage. Plus, I'll need two
> fit two of them through the hole, one for each
> connector of the resistor and the thermistor,
> right?
I cut the wires above the carriage where I leave the excess material. This way you can pull the wires through the carriage before taking apart the carriage. I then solder them back together so the wires do not get shorter and shorter. But for a simple solution you could use a terminal strip with screw terminals mounted to the top of the carriage. This way the wires still fit through the carriage with ease.
>
> I also did buy one of those hotend heaters from
> Eugene, but I haven't tried it out yet. I'm not
> sure how successful your testing of that part has
> been, Sublime, running at a full 15v. In the
> case of using that part, I assume we'd just wire
> it permanently, and then insert it and insert the
> thermistor into the hotend when we go to attach
> it? Therefore it would still be a fair bit of
> work fitting it in place each time you swap heads,
> correct?
Yes this is why I want to test it but have not swapped it out yet. Feel free to test yours, the worst thing that will happen is it will burn out.
>
> I don't have any Kapton tape right now, so Gerald
> is lending me his, but I should be able to swap in
> the other head and resistor tomorrow. Meanwhile,
> I thought I'd poll everyone on their thoughts
> around approaching head swapping... are there
> some other brilliant ideas that I've yet to think
> of?
If you do come up with a better way I would love to know about it.
>
> Cheers,
> Yonder
| FFF Settings Calculator | Gcode post processors | Geometric Object Deposition Tool Blog |
| Tantillus.org | Mini Printable Lathe | How NOT to install a Pololu driver |
|
Re: Let's talk about swapping hotends September 04, 2012 05:04AM |
Registered: 11 years ago Posts: 51 |
> This is most likely a result of printing at too
> low of temperature or possibly too low of flow
> rate. Both can cause poor layer adhesion. I have
> few of these printed and one has been hit so hard
> that it pulled the bolt through the back of the
> holder but never broke the holder itself.
That's probably true. Since I didn't already have one, the spool holder was the third print ever that I did. I definitely hadn't tuned my flow rate yet at the time, but I've since improved it and gotten way more reliable layer adhesion. I'm sure my new one will last forever. ;-)
> I wonder if this is because of thermal expansion
> changing the length of the hotend. I have
> travelled with my machines a few times and never
> have I re calibrated them after.
Perhaps... that's an interesting theory. I'd be curious to hear whether anyone else has to keep retuning.
> Once you have the carriage apart you can push the
> hotend up enough that you can slide the acrylic
> plate off without cutting the wires if need be.
I ultimately pulled off something like that. My 14g zip wire for my heating resistor had a pretty thick plastic insulator and did a pretty good job of filling the holes and creating a lot of friction... but I ultimately got it free.
> I have burnt out one resistor in my two years of
> Printing. It is possible that the resistor was too
> lose and not conducting enough heat. This causes
> the resistor to o way above the required
> temperature to transfer enough heat. This would
> also explain why your machine seems to take a long
> time to heat up.
Hmm... that could have been. I didn't think it was too loose as I built it, but I have nothing to compare to. It definitely looks pretty fried now that I pulled it out of the hotend, so you're probably right, it was needing to go too hot to have to do its job. Refresh my memory... your recommendation was to wrap with a layer or two of aluminum foil if the resistor fits too loosely, correct?
> I cut the wires above the carriage where I leave
> the excess material. This way you can pull the
> wires through the carriage before taking apart the
> carriage. I then solder them back together so the
> wires do not get shorter and shorter. But for a
> simple solution you could use a terminal strip
> with screw terminals mounted to the top of the
> carriage. This way the wires still fit through the
> carriage with ease.
Hmm... I really like the idea of a terminal strip with screw terminals. I'll have to give that a go.
> Yes this is why I want to test it but have not
> swapped it out yet. Feel free to test yours, the
> worst thing that will happen is it will burn out.
Why not... I'll try it out. ;-)
> If you do come up with a better way I would love
> to know about it.
We'll see where my experimentation takes me. Perhaps something clever will come up... ;-)
|
Re: Let's talk about swapping hotends September 04, 2012 11:20AM |
Registered: 12 years ago Posts: 195 |
Yonderboy Wrote:
-------------------------------------------------------
> > I have burnt out one resistor in my two years
> of
> > Printing. It is possible that the resistor was
> too
> > lose and not conducting enough heat. This
> causes
> > the resistor to o way above the required
> > temperature to transfer enough heat. This would
> > also explain why your machine seems to take a
> long
> > time to heat up.
>
> Hmm... that could have been. I didn't think it
> was too loose as I built it, but I have nothing to
> compare to. It definitely looks pretty fried now
> that I pulled it out of the hotend, so you're
> probably right, it was needing to go too hot to
> have to do its job. Refresh my memory... your
> recommendation was to wrap with a layer or two of
> aluminum foil if the resistor fits too loosely,
> correct?
That's per the J-Head wiki, when used with the tight fitting 5.6 ohm resistors. When tho aren't available, Brian ships a 6.8 ohm resistor that's maybe 1mm smaller in diameter than the bore. In that case he recommends using muffler putty or cement. I have the latter in my Prusa, and my 1st resistor burned out after about a month of use and the 2nd has been going strong for nearly half a year.
>
> Hmm... I really like the idea of a terminal strip
> with screw terminals. I'll have to give that a
> go.
>
> > If you do come up with a better way I would
> love
> > to know about it.
>
> We'll see where my experimentation takes me.
> Perhaps something clever will come up... ;-)
I haven't installed my Bowden cable yet, but my plan is to put a terminal strip inside the case to go between the hotend and controller. Then I'll use double-sided Velcro cable straps to hold the wiring to the Bowden. That way I can remove the wires from the controller and hotend easily and thread them through the carriage if I need to take the hotend out. I am also using 22ga stranded wire for both the hotend and thermistor as it's easier to run and is supposed to be good to 7A in free air (5.6 ohms at 15V is 2.7A) and so it's fairly easy to thread through the carriage.
|
Re: Let's talk about swapping hotends September 04, 2012 02:27PM |
Registered: 13 years ago Posts: 2,947 |
Yonderboy Wrote:
-------------------------------------------------------
> Hmm... that could have been. I didn't think it
> was too loose as I built it, but I have nothing to
> compare to. It definitely looks pretty fried now
> that I pulled it out of the hotend, so you're
> probably right, it was needing to go too hot to
> have to do its job. Refresh my memory... your
> recommendation was to wrap with a layer or two of
> aluminum foil if the resistor fits too loosely,
> correct?
If it is tight you have to be careful it does not scrape off the outer ceramic coating on the resistor. If it just slides in then it is most likely a little loose. Yes the tinfoil is the standard way to make sure it has good contact with the hotend, but as Pokey says you can use thermal cement which works really well (hard to find in some places).
> Hmm... I really like the idea of a terminal strip
> with screw terminals. I'll have to give that a
> go.
You could also use something as simple as wire nuts.
| FFF Settings Calculator | Gcode post processors | Geometric Object Deposition Tool Blog |
| Tantillus.org | Mini Printable Lathe | How NOT to install a Pololu driver |
|
Re: Let's talk about swapping hotends October 03, 2012 10:19PM |
Registered: 11 years ago Posts: 16 |
Sublime Wrote:
-------------------------------------------------------
>
> If it is tight you have to be careful it does not
> scrape off the outer ceramic coating on the
> resistor.
What are the consequences if the coating gets scraped off? Mine was a REALLY tight fit and did end up scraping a bit.
-------------------------------------------------------
>
> If it is tight you have to be careful it does not
> scrape off the outer ceramic coating on the
> resistor.
What are the consequences if the coating gets scraped off? Mine was a REALLY tight fit and did end up scraping a bit.
|
Re: Let's talk about swapping hotends October 03, 2012 10:46PM |
Registered: 13 years ago Posts: 2,947 |
PxT Wrote:
-------------------------------------------------------
> Sublime Wrote:
> --------------------------------------------------
> -----
>
> >
> > If it is tight you have to be careful it does
> not
> > scrape off the outer ceramic coating on the
> > resistor.
>
>
>
> What are the consequences if the coating gets
> scraped off? Mine was a REALLY tight fit and did
> end up scraping a bit.
The resistor is basically a coil of nichrome wire embedded in a shell of ceramic. If you scrape off too much ceramic you can expose the nichrome wire which can then contact the brass block and cause a short. If you would like to test you can measure for continuity between the brass block and the heater wires.
| FFF Settings Calculator | Gcode post processors | Geometric Object Deposition Tool Blog |
| Tantillus.org | Mini Printable Lathe | How NOT to install a Pololu driver |
|
Re: Let's talk about swapping hotends October 03, 2012 11:56PM |
Registered: 12 years ago Posts: 195 |
PxT Wrote:
-------------------------------------------------------
> What are the consequences if the coating gets
> scraped off? Mine was a REALLY tight fit and did
> end up scraping a bit.
If it measures the same as before you put it in, you're fine. Unfortunately the resistor manufacturers don't coat them to the tolerances we'd like.
Back on the topic of swapping hotends: I had to do this a couple of times when I expected I was having thermistor trouble. The aforementioned terminal strip came in handy, but it was still a minor PITA to thread the wire through the carriage. Other than that the hotend comes out easily once the screws are removed and midplate is slid out. One possible solution is to use a connector between the hotend and the wires going up through the carriage. I have a similar setup on my Prusa using a spare 4-pin Molex KK set and it makes servicing the hotend painless. The only thing preventing this are the closed holes in the midplate. I was thinking that slots running to the end of the midpiece for the two wire holes would let you slide it out without having to first remove the wire. But it also looks like that would make the edges of the slot for the hotend more fragile. Any thoughts on this?
|
Re: Let's talk about swapping hotends October 04, 2012 12:19AM |
Registered: 13 years ago Posts: 2,947 |
pokey9000 Wrote:
-------------------------------------------------------
> PxT Wrote:
> --------------------------------------------------
> -----
> > What are the consequences if the coating gets
> > scraped off? Mine was a REALLY tight fit and
> did
> > end up scraping a bit.
>
> If it measures the same as before you put it in,
> you're fine. Unfortunately the resistor
> manufacturers don't coat them to the tolerances
> we'd like.
>
> Back on the topic of swapping hotends: I had to do
> this a couple of times when I expected I was
> having thermistor trouble. The aforementioned
> terminal strip came in handy, but it was still a
> minor PITA to thread the wire through the
> carriage. Other than that the hotend comes out
> easily once the screws are removed and midplate is
> slid out. One possible solution is to use a
> connector between the hotend and the wires going
> up through the carriage. I have a similar setup
> on my Prusa using a spare 4-pin Molex KK set and
> it makes servicing the hotend painless. The only
> thing preventing this are the closed holes in the
> midplate. I was thinking that slots running to
> the end of the midpiece for the two wire holes
> would let you slide it out without having to first
> remove the wire. But it also looks like that
> would make the edges of the slot for the hotend
> more fragile. Any thoughts on this?
If you made the plate out of 1/8" or 3mm aluminium it should be strong enough to have the slots. Otherwise I see no other way of running the wires. The very first carriage had them on the outside and they would get in the way when the carriage was in the front left corner.
The best method is to use a heater cartridge instead of the resistor. The cartridge heater has both wires coming out the same side which means you can remove it form the heater block without disconnecting the wires at all. You can also remove the thermistor without removing the wires. To remove the hotend with the wires through the carriage is not that hard once you figure it out and have enough slack in the wires.
| FFF Settings Calculator | Gcode post processors | Geometric Object Deposition Tool Blog |
| Tantillus.org | Mini Printable Lathe | How NOT to install a Pololu driver |
|
Re: Let's talk about swapping hotends May 15, 2013 10:01AM |
Registered: 11 years ago Posts: 203 |
|
Re: Let's talk about swapping hotends May 15, 2013 11:45AM |
Registered: 13 years ago Posts: 2,947 |
Yes, and possibly no.
The mount will work but in my mind I think these all could possibly be an issue. I do not know for sure they are all just guesses.
1) The cooling fins may contact the carriage and require some small modifications.
2) The length looks to be longer then the J-head MK-V that is recommended so it may reduce your overall build height.
3) If it weighs more it could reduce the max acceleration and/or jerk which is one of the things that keeps corners of the prints so sharp.
4) Its larger diameter could potentially hit the X/Y ends and reduce the build area a little.
5) It will require the fan mount to ensure the plastic mounting parts do not get soft. The fan mount could also exaggerate the problem in 4.
| FFF Settings Calculator | Gcode post processors | Geometric Object Deposition Tool Blog |
| Tantillus.org | Mini Printable Lathe | How NOT to install a Pololu driver |
|
Re: Let's talk about swapping hotends May 15, 2013 12:27PM |
Registered: 11 years ago Posts: 203 |
|
Re: Let's talk about swapping hotends May 16, 2013 12:43PM |
Registered: 11 years ago Posts: 5 |
Sorry, only registered users may post in this forum.
