Tantillus Upgrades and Add ons Thread
Posted by tjhj2
|
Tantillus Upgrades and Add ons Thread October 01, 2012 01:11PM |
Registered: 11 years ago Posts: 79 |
Hello All,
I figured it would be nice to have a central thread of all the add-ons, upgrades and little things people have done to make their Tantillus better or more Tantillus like.
Please include alignment suggestions, or tweaks that made assembly easier.
Sublime - Thanks for the great printer.
Thanks everyone for helping make it better.
|
Re: Tantillus Upgrades and Add ons Thread October 01, 2012 01:14PM |
Registered: 11 years ago Posts: 79 |
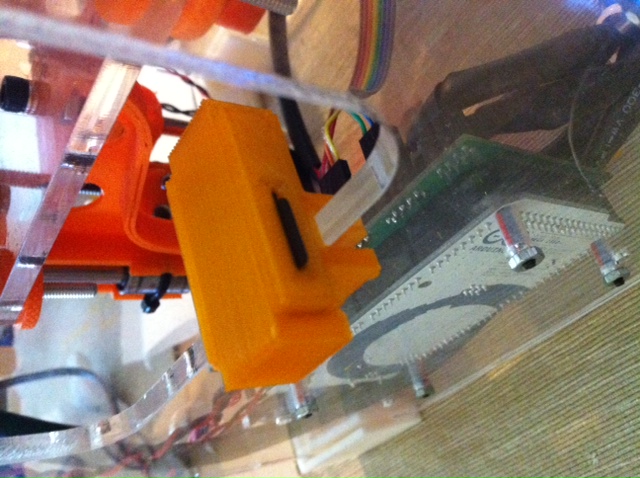
To start it off.
A clip for the SD Ramps to mount it on the side of the case and get rid of it flopping about.
[www.thingiverse.com]
A clip for the SD Ramps to mount it on the side of the case and get rid of it flopping about.
[www.thingiverse.com]
|
Re: Tantillus Upgrades and Add ons Thread October 01, 2012 02:57PM |
Registered: 12 years ago Posts: 195 |
Assembly tweaks I don't think Sublime has in his docs:
-Pack the top or bottom right Z axis rod holder with something with some give (cut up rubber band, small fabric pieces, etc) to take up slack. Unless the Z rod fits exactly in the Z holders height-wise, the slack will allow the Z endstop to travel up and down, screwing up your Z homing.
-Put a flat in your X,Y, and extruder motor shafts. Tantillus kits ship with this, but most motors don't have them by default. At least do this to your extruder to avoid inevitable future frustration. Also watch that you calibrate the motor driver current per Sublime's docs to keep the motor from overheating and warping of the gear body. Some Loctite on the grub screws couldn't hurt either.
-Don't let the end of the loops on the XY make their way into the XY ends. The washer needs to hold the loose end tightly, and this can't happen if the loop goes beyond it. If you've already strung it up and this is happening: loosen both ends on that axis, hold the carriage still, and with your other hand turn the gear slowly until the loops clear the ends on both sides. Then tighten both and retension.
|
Re: Tantillus Upgrades and Add ons Thread October 01, 2012 03:10PM |
Registered: 13 years ago Posts: 2,947 |
@tjhj Nice SDramps holder.
@Pokey I have some of what you said added to the instructions but have not pushed it out yet. I will also try and add some of it to the troubleshooting page.
I should add a page to the site with links to user created accessories and add-ons.
@Pokey I have some of what you said added to the instructions but have not pushed it out yet. I will also try and add some of it to the troubleshooting page.
I should add a page to the site with links to user created accessories and add-ons.
| FFF Settings Calculator | Gcode post processors | Geometric Object Deposition Tool Blog |
| Tantillus.org | Mini Printable Lathe | How NOT to install a Pololu driver |
|
Re: Tantillus Upgrades and Add ons Thread October 02, 2012 12:46AM |
Registered: 11 years ago Posts: 116 |
Your tantillus kit must be different from mine. I've got the one where the SD port is attached to the board (I have to reach inside) and there is no cable. Is there a cable available somewhere that I could use to get easier access to the SD port and also get the port out of the path of the print bed?
Nice design work.
tjhj2 Wrote:
-------------------------------------------------------
> To start it off.
>
> A clip for the SD Ramps to mount it on the side of
> the case and get rid of it flopping about.
>
> [www.thingiverse.com]
Edited 1 time(s). Last edit at 10/02/2012 09:31PM by Lisa M.
Nice design work.
tjhj2 Wrote:
-------------------------------------------------------
> To start it off.
>
> A clip for the SD Ramps to mount it on the side of
> the case and get rid of it flopping about.
>
> [www.thingiverse.com]
Edited 1 time(s). Last edit at 10/02/2012 09:31PM by Lisa M.
|
Re: Tantillus Upgrades and Add ons Thread October 03, 2012 05:07AM |
Registered: 11 years ago Posts: 111 |
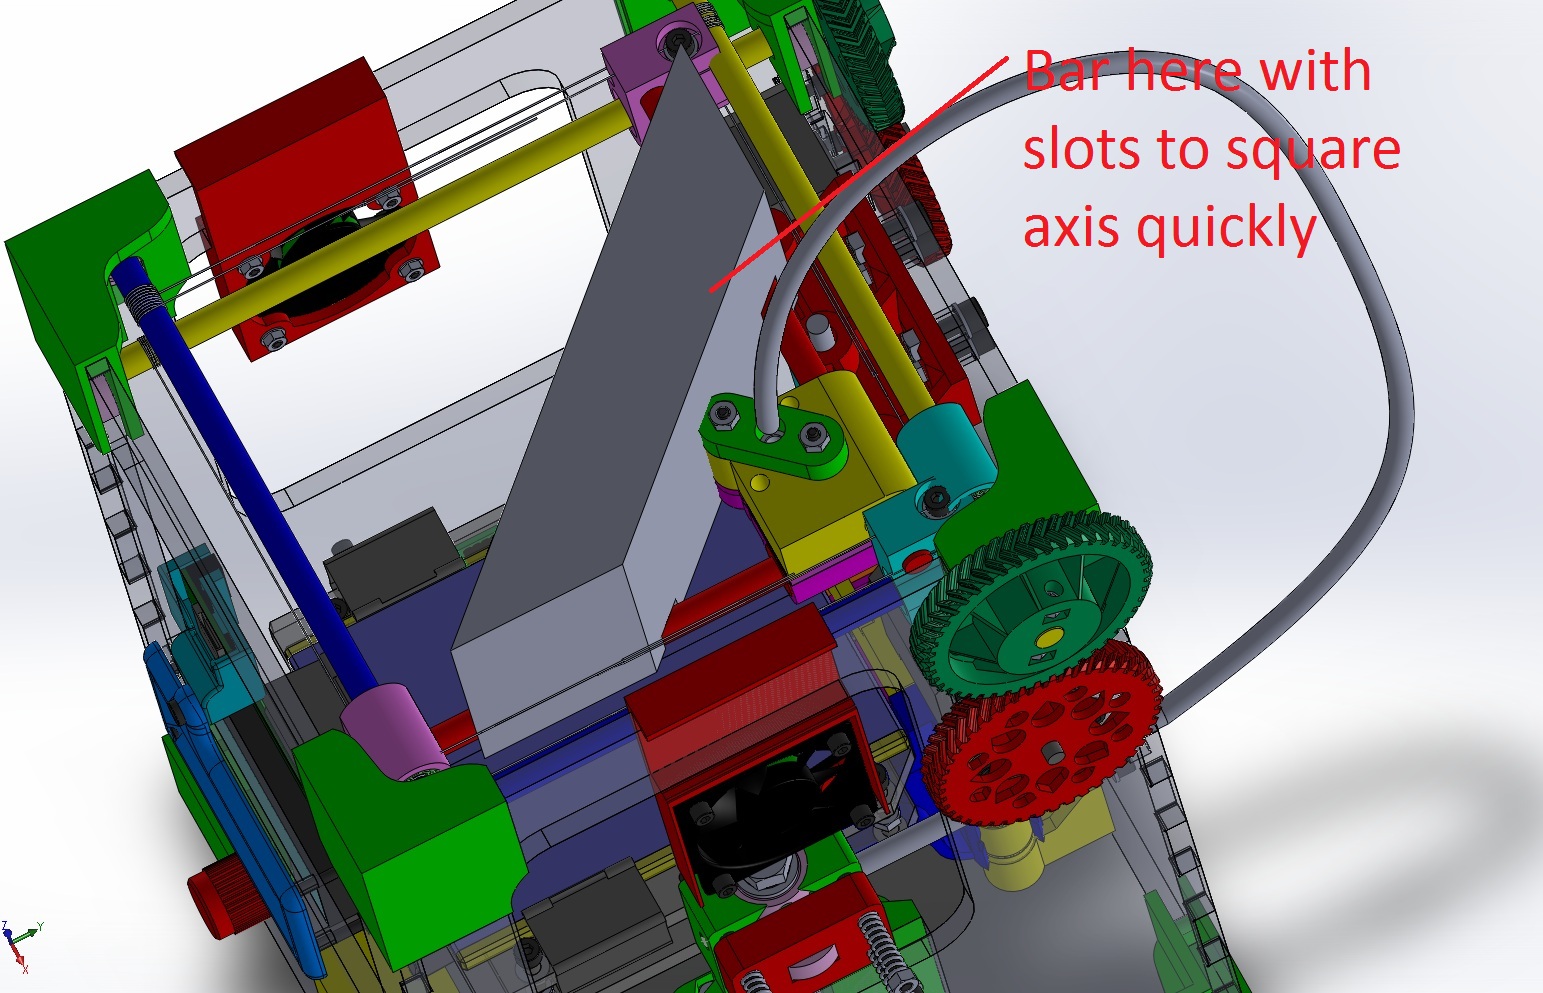
Oh classic I just adjusted Eric's SD holder to be clip on as well. Was going to push with next release of metric laser cut model. Just tried it today, seems to work.
Another thing I was thinking about was making a squaring bar to square the axis's up quickly and easily.
See attached.
Another thing I was thinking about was making a squaring bar to square the axis's up quickly and easily.
See attached.
|
Re: Tantillus Upgrades and Add ons Thread October 03, 2012 05:17AM |
Registered: 13 years ago Posts: 2,947 |
The squaring jig is a little much. For a simpler jig all you need to do is make a spacer between the cross bar and the rotating bar. If the space is the same you are square. But I do not feel any jig is needed. All you do is put the carriage in one corner and turn one of the gears until the carriage is in the opposite corner and then back again. If the carriage moves away from the XYend as it travels from one side to the other it is out of square. Then you move the carriage to where it moved away from the XYend and adjust it until it touches and that direction is now square and you do it in the other direction.
Edited 1 time(s). Last edit at 10/03/2012 06:43AM by Sublime.
Edited 1 time(s). Last edit at 10/03/2012 06:43AM by Sublime.
| FFF Settings Calculator | Gcode post processors | Geometric Object Deposition Tool Blog |
| Tantillus.org | Mini Printable Lathe | How NOT to install a Pololu driver |
|
Re: Tantillus Upgrades and Add ons Thread October 03, 2012 05:32AM |
Registered: 11 years ago Posts: 111 |
Sublime Wrote:
-------------------------------------------------------
> The squaring jug is a little much.
Duh, I see now, good call. Scratch what I said. I'm so use to clocking things, and using jigs that I miss the simple things now days. I'll take note to add that one into the drawings I do as a small annotation.
|
Re: Tantillus Upgrades and Add ons Thread October 04, 2012 12:22PM |
Registered: 11 years ago Posts: 79 |
@Lisa
Lisa there are a few different ways to make an extension cable. Since it plugs into the board I am assuming that you have one male header on one (Either the ramps or sdreader), and a female header on the other. You might be able to find these parts at a local electronics or hobby store, but radio shack doesn't sell them...
Option 1
Take 4 of 0.1" Crimp Connector Housings 2x4. [www.pololu.com]
Buy some pre made pre crimped Wires with Pre-crimped Terminals 50-Piece Rainbow Assortment M-F 3" [www.pololu.com] (or any length you want, these are three inches each which works with my mount but may not get you to a front mount)
Take the wires and put all the male pins into one set and in the same order put all the females into the other. And tada you have an easy to make extension cable.
Option 2
Buy or find the 0.1" Crimp Connector Housings 2x4. [www.pololu.com] you can also use 2 sets of 1x4 plugs.
Use some of the female crimp connector pins you might have around already similar to [www.pololu.com]
Make the cables Female-Female and install a 0.100" (2.54 mm) Breakaway Male Header: 1x40-Pin, Straight, Double-Sided into the part with with the female socket to act as an adapter.
Option 3
Get two 2x4 (8 Pin Female IDC Connectors) [www.surplusgizmos.com]
Get some 8 strand ribbon cable [www.surplusgizmos.com] (This is 9 strand so you can just peel one off to make it 8 strand)
Wire it in a cross over pattern, (If you go this route I will upload pictures to explain, otherwise it doesn't act as an extension)
Use a 0.100" (2.54 mm) Breakaway Male Header: 1x40-Pin, Straight, Double-Sided into the part with with the female socket to act as an adapter.
Option 4 (The easiest way)
Ask sublime to sell you a connector. Pay him. Be Happy.
I hope this helps
Quote
Lisa M.
Your tantillus kit must be different from mine. I've got the one where the SD port is attached to the board (I have to reach inside) and there is no cable. Is there a cable available somewhere that I could use to get easier access to the SD port and also get the port out of the path of the print bed?
Lisa there are a few different ways to make an extension cable. Since it plugs into the board I am assuming that you have one male header on one (Either the ramps or sdreader), and a female header on the other. You might be able to find these parts at a local electronics or hobby store, but radio shack doesn't sell them...
Option 1
Take 4 of 0.1" Crimp Connector Housings 2x4. [www.pololu.com]
Buy some pre made pre crimped Wires with Pre-crimped Terminals 50-Piece Rainbow Assortment M-F 3" [www.pololu.com] (or any length you want, these are three inches each which works with my mount but may not get you to a front mount)
Take the wires and put all the male pins into one set and in the same order put all the females into the other. And tada you have an easy to make extension cable.
Option 2
Buy or find the 0.1" Crimp Connector Housings 2x4. [www.pololu.com] you can also use 2 sets of 1x4 plugs.
Use some of the female crimp connector pins you might have around already similar to [www.pololu.com]
Make the cables Female-Female and install a 0.100" (2.54 mm) Breakaway Male Header: 1x40-Pin, Straight, Double-Sided into the part with with the female socket to act as an adapter.
Option 3
Get two 2x4 (8 Pin Female IDC Connectors) [www.surplusgizmos.com]
Get some 8 strand ribbon cable [www.surplusgizmos.com] (This is 9 strand so you can just peel one off to make it 8 strand)
Wire it in a cross over pattern, (If you go this route I will upload pictures to explain, otherwise it doesn't act as an extension)
Use a 0.100" (2.54 mm) Breakaway Male Header: 1x40-Pin, Straight, Double-Sided into the part with with the female socket to act as an adapter.
Option 4 (The easiest way)
Ask sublime to sell you a connector. Pay him. Be Happy.
I hope this helps
|
Re: Tantillus Upgrades and Add ons Thread October 04, 2012 05:26PM |
Registered: 13 years ago Posts: 2,947 |
I actually have the cables on order for everyone that ordered complete kits from me but they have not shown up yet. For now I would not worry about it as it only restricts the max build height by a few mm that most people do not even use.
| FFF Settings Calculator | Gcode post processors | Geometric Object Deposition Tool Blog |
| Tantillus.org | Mini Printable Lathe | How NOT to install a Pololu driver |
|
Re: Tantillus Upgrades and Add ons Thread October 08, 2012 10:19PM |
Registered: 11 years ago Posts: 149 |
Great thread tjhj2.
I created the attached PCB covers today because I've dropped my binder clips a couple times now and one came waaaay too close to shorting some of the leads on the RAMPS board. There are lots of Arduino/RAMPS covers on Thingiverse and the difference is that these are designed to be easily removable for access to the boards without taking the mounting screws off. Also attached in an image of how they mount on the Tantillus. I've only printed the first one so far and it fits nicely, so the second piece should also be just fine.
I created the attached PCB covers today because I've dropped my binder clips a couple times now and one came waaaay too close to shorting some of the leads on the RAMPS board. There are lots of Arduino/RAMPS covers on Thingiverse and the difference is that these are designed to be easily removable for access to the boards without taking the mounting screws off. Also attached in an image of how they mount on the Tantillus. I've only printed the first one so far and it fits nicely, so the second piece should also be just fine.
|
Re: Tantillus Upgrades and Add ons Thread October 12, 2012 03:45PM |
Registered: 11 years ago Posts: 149 |
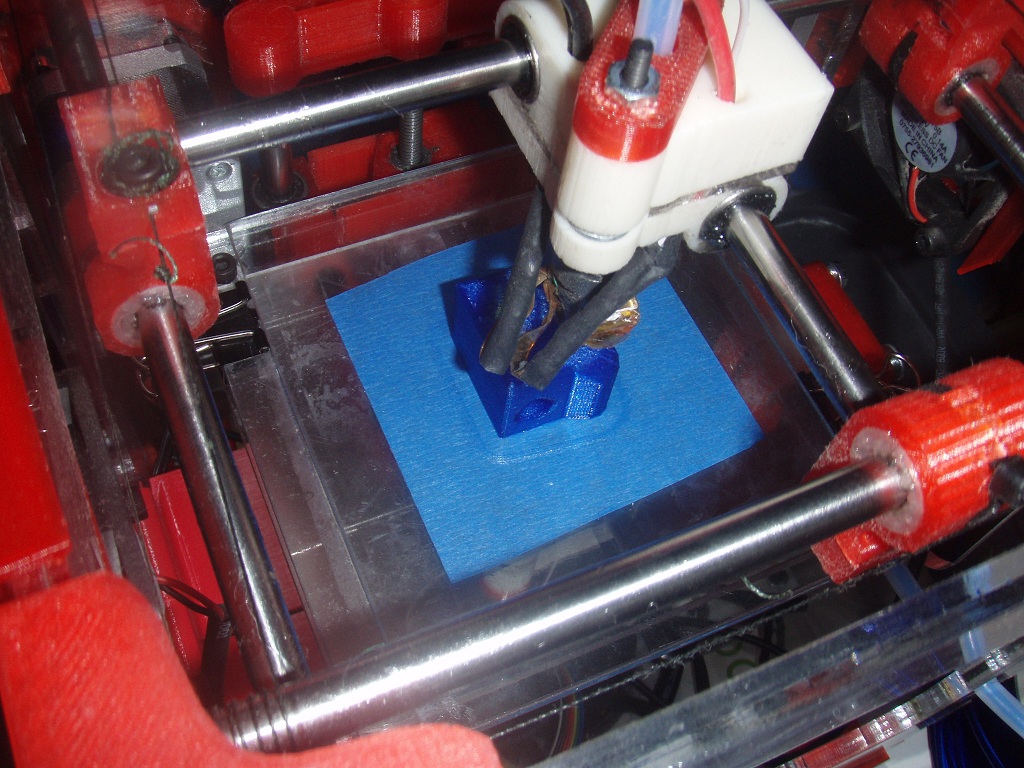
Not sure if this is the best thread for this, or even if it's news to anyone, but there is a 3 inch wide version of the 3M blue tape available and since I found out about it I've been using it for the majority of my prints since they almost always lie within the 3" width. Attached a pic to show what it looks like on the build plate during a print.
|
Re: Tantillus Upgrades and Add ons Thread October 15, 2012 03:30AM |
Registered: 11 years ago Posts: 116 |
I made a rest for the extruder motor mount. I had my motor mount break and I'm still not sure why it happened. So I thought this might help ...or not. Anyway, here it is on thingiverse.
|
Re: Tantillus Upgrades and Add ons Thread October 16, 2012 01:00AM |
Registered: 11 years ago Posts: 116 |
|
Re: Tantillus Upgrades and Add ons Thread October 16, 2012 01:27AM |
Registered: 13 years ago Posts: 2,947 |
Lisa M Wrote:
-------------------------------------------------------
> >
> > Option 4 (The easiest way)
> > Ask sublime to sell you a connector. Pay him.
> Be
> > Happy.
> >
>
> Okay. Sublime will you make a connector available
> to me?
When they arrive I have one for you. They seem to be hard to get. The first place I was having them made never came through. I now have them on order with someone else.
| FFF Settings Calculator | Gcode post processors | Geometric Object Deposition Tool Blog |
| Tantillus.org | Mini Printable Lathe | How NOT to install a Pololu driver |
Sorry, only registered users may post in this forum.